- How to share albums in Photos on your iPhone, iPad, and Mac
- Before you begin
- Turn on Shared Albums
- Use Shared Albums on your iPhone, iPad, and iPod touch
- Create a new shared album
- Delete a shared album
- Invite more people
- Remove a subscriber
- Add photos and videos
- Delete from a Shared Album
- Save photos and videos from a shared album
- Use Shared Albums on your Mac
- Create a new Shared Album
- Delete a shared album
- Invite more people
- Remove a subscriber
- Add photos and videos
- Delete from a shared album
- Save photos and videos from a shared album
- File types that you can use in Shared Albums
- Shared Album storage limits
- PhotoShare Frame 4+
- Control your PhotoShare Frame
- Switchmate Inc.
- Designed for iPhone
- iPhone Screenshots
- Description
- What’s New
- Ratings and Reviews
- Great idea, app works, could be more user friendly
- Rough.
- Great frame, terrible app
- App Privacy
- Data Linked to You
- Data Not Linked to You
How to share albums in Photos on your iPhone, iPad, and Mac
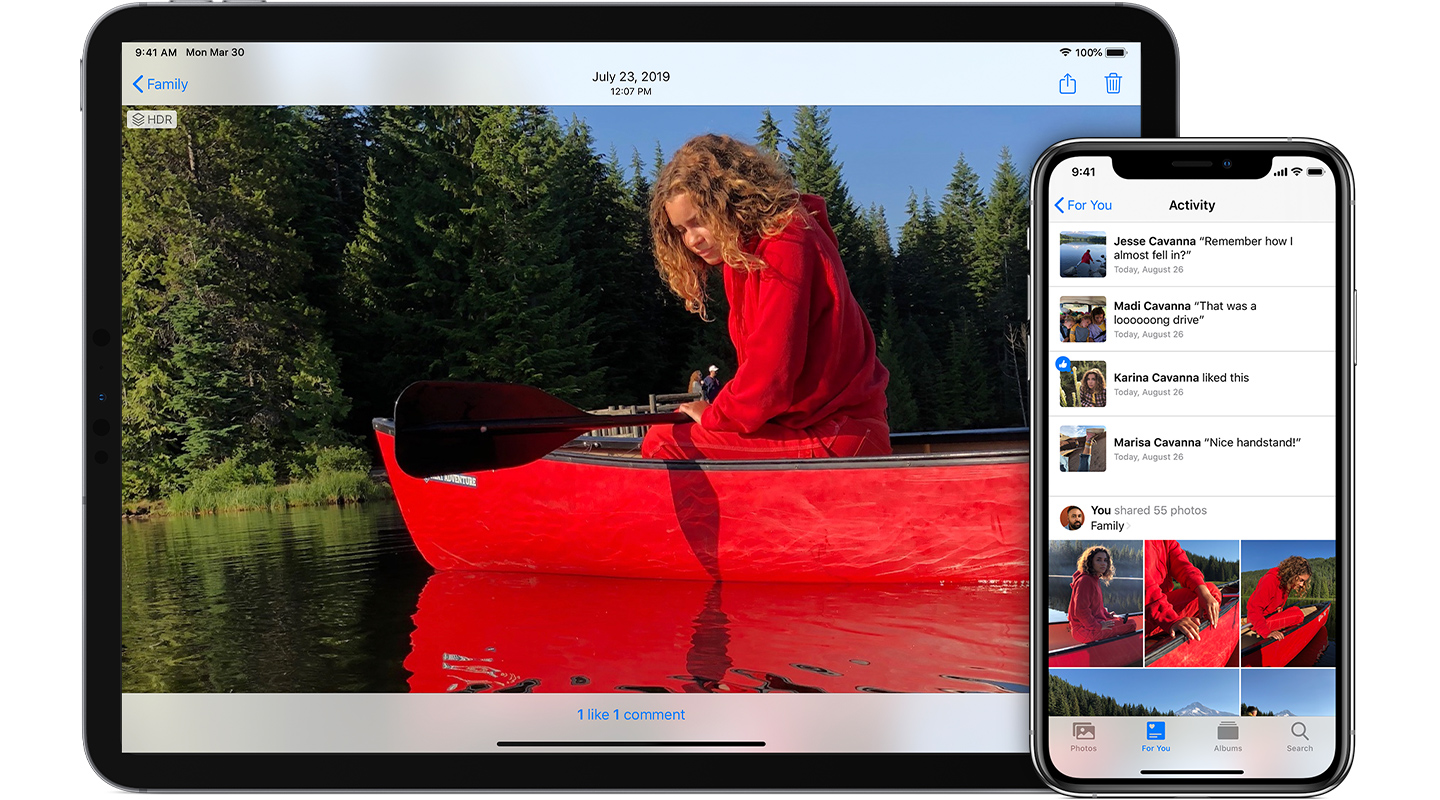
Shared Albums let you share photos and videos with just the people you choose — and they can add their own photos, videos, and comments.
Use Shared Albums on your iOS or iPadOS device
Use Shared Albums on your Mac
Before you begin
- Update your iPhone, iPad, or iPod touch to the latest iOS or iPadOS, your Mac to the latest macOS, and your Apple TV 4K or Apple TV HD to the latest tvOS. If you have a Windows PC, update to Windows 7 or later and download iCloud for Windows.
- Set up iCloud on all of your devices.
- Make sure that you’re signed in to iCloud with the same Apple ID on all of your devices that you want to use with Shared Albums.
Turn on Shared Albums
- On your iPhone, iPad, or iPod touch, go to Settings > [your name] > iCloud > Photos, then turn on Shared Albums.
- On your Mac, open the Photos app. From the menu bar at the top of the screen, choose Photos > Preferences. Click the iCloud tab, then select Shared Albums.
- On your Apple TV, go to Settings > Users and Accounts > iCloud and turn on Shared Albums.
- On your Windows PC, open iCloud for Windows and select Photos. Click the Options button to verify that Shared Albums is on, then click Apply. Learn more about sharing albums with iCloud for Windows.
If you’re using earlier versions of iOS, iCloud for Windows, iPhoto, or Aperture, you can still create and see Shared Albums. In earlier versions of iOS, macOS, tvOS, and iCloud for Windows, Shared Albums was called iCloud Photo Sharing.

Use Shared Albums on your iPhone, iPad, and iPod touch
Create a new shared album
- Go to the Albums tab and tap the Add button .
- Tap New Shared Album.
- Give the shared album a name, then tap Next.
- Choose people to invite from your contacts, or type an email address or iMessage phone number.
- Tap Create.
Delete a shared album
- Open the shared album.
- Go to the People tab.
- Tap Delete Shared Album.
If you’re looking at your list of shared albums, you can also tap Edit, then tap the Delete button to delete a shared album.
When you delete a shared album, it’s automatically removed from all of your devices and the devices of your subscribers. If Public Website was enabled, the shared album is removed from the web too. Deleting a shared ablum permanently deletes all of its photos. Before continuing, make sure that you save any photos that you want to keep.
Invite more people
- In Albums, select a shared album that you created.
- Go to the People tab.
- Tap Invite People.
- Enter the names of people that you want to share this album with.
- Tap Add.
You can even share albums with friends and family who don’t use iCloud. Just open a shared album that you created, go to the People tab, and turn on Public Website. Your photos publish to a website that anyone can see in an up-to-date web browser.
Remove a subscriber
- Open the shared album.
- Go to the People tab.
- Select the subscriber that you want to remove.
- Tap Remove Subscriber at the bottom of the screen.
As the creator of a shared album, you control who can access it. You can remove subscribers or delete the album at any time.
Add photos and videos
- In the Photos tab or from within an album, tap Select and then select the photos and videos that you want to share.
- Tap the Share button , then tap Add to Shared Album .
- Choose the album where you want to share your photos. Then tap Post.
If you have a shared album open, you can also tap the Add button to select photos and videos to add.
When you add new photos, the people that you share the album with are notified automatically. Make sure that Subscribers Can Post is turned on so that they can add photos and videos too. Just go to the shared album’s People tab.
Delete from a Shared Album
- Open the shared album.
- Tap the photo or video.
- Tap the Trash button .
- Tap Delete Photo.
If you’re the owner of a shared album, you can delete any photos, videos, or comments from anyone. Subscribers can delete anything that they personally added. Anything you delete is automatically deleted from the album on all your devices and the devices of subscribers.
Any photos that you saved or downloaded from a shared album to your Photos library stay in your library even if the shared album is deleted or the person who created it stops sharing it.
Save photos and videos from a shared album
When you share photos and videos with someone, they can save shared items to their own library.
- Tap the photo or video.
- Tap the Share button .
- Tap Save Image or Save Video.
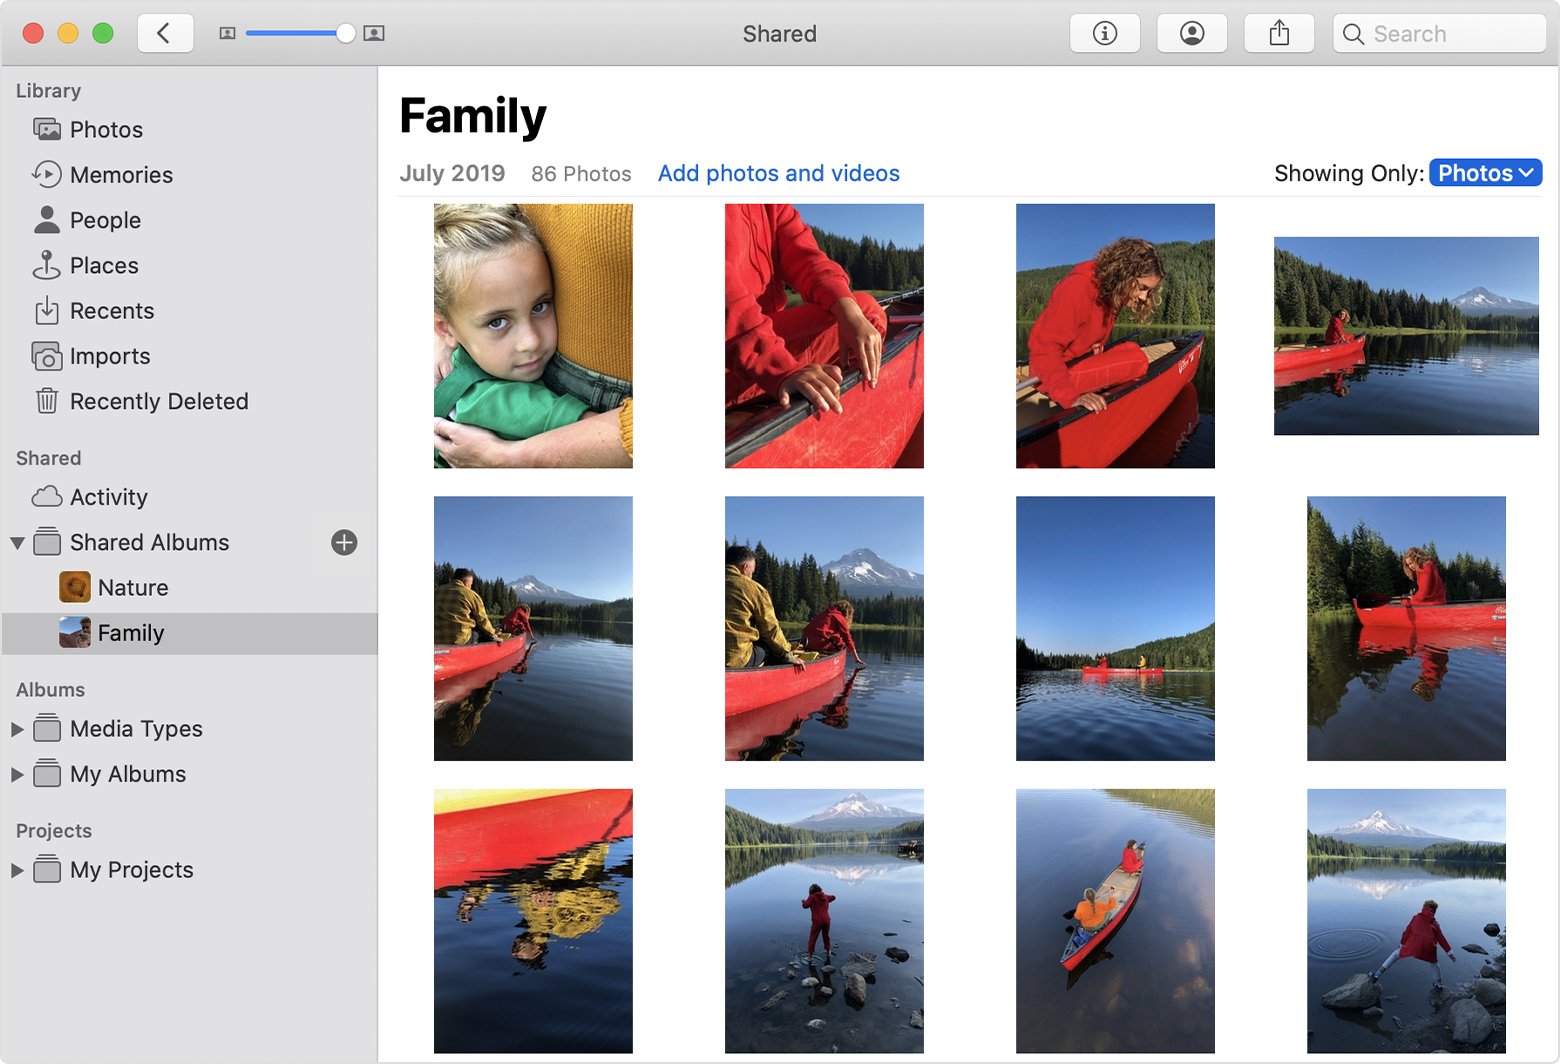
Use Shared Albums on your Mac
Create a new Shared Album
- In the sidebar, click the Add button next to Shared Albums.
- Type the email addresses of people you want to share the album with. Click the Add button to select contacts from iCloud.
- Click Create.
Delete a shared album
- Open the shared album.
- Click the People button in the toolbar.
- Click Delete Shared Album.
When you delete a shared album, it’s automatically removed from all of your devices and the devices of your subscribers. If Public Website was enabled, the shared album is removed from the web too. Deleting a shared ablum permanently deletes all of its photos. Before continuing, make sure that you save any photos that you want to keep.
Invite more people
- Select a shared album that you created under Shared in the sidebar.
- Click the People button in the toolbar.
- In the Invite People field, type the email addresses of people that you want to share this album with. Click the Add button to choose people to invite from your contacts.
You can even share albums with friends and family who don’t use iCloud. Just open a shared album that you created, click the People button in the toolbar, and turn on Public Website. Your photos publish to a website that anyone can see in an up-to-date web browser.
Remove a subscriber
- Open the shared album.
- Click the People button in the toolbar.
- Select the subscriber that you want to remove.
- Click Remove Subscriber.
As the creator of a shared album, you control who can access it. You can remove subscribers or delete the album at any time.
Add photos and videos
- Select the photos and videos that you want to share.
- Click the Share button in the toolbar, then select Shared Albums.
- Choose the album where you want to share your photos.
If you have a shared album open, you can also click “Add photos and videos” to select photos and videos to add. You can also simply drag photos from your library directly into the shared album in the sidebar.
When you add new photos, the people that you share the album with are notified automatically. Open the shared album, click the People button in the toolbar, and make sure that Subscribers Can Post is turned on so that they can add photos and videos too.
Delete from a shared album
- Open the shared album.
- Select the photo or video.
- Control-click, then click Delete Photo. Click Delete.
If you have a shared album open, you can also select a photo and press the Delete key to delete it from the shared album.
If you’re the owner of a shared album, you can delete any photos, videos, or comments from anyone. Subscribers can delete anything that they personally added. Anything you delete is automatically deleted from the album on all your devices and the devices of subscribers.
Any photos that you saved or downloaded from a shared album to your Photos library stay in your library even if the shared album is deleted or the person who created it stops sharing it.
Save photos and videos from a shared album
When you share photos and videos with someone, they can save the shared items to their own library.
- Select the photo and video that you want to save.
- Control-click, then click Import.
File types that you can use in Shared Albums
Shared Albums support these image formats:
Shared Albums also support special formats that you capture with your iPhone, like slo-mo, time-lapse, Live Photos, and Memory videos. When shared, photos are reduced to 2048 pixels on the long edge, except panoramic photos, which can be up to 5400 pixels wide. You can share GIFs that are 100MB or smaller.
Shared Albums support these video file types and formats:
Videos can be up to fifteen minutes in length and are delivered at up to 720p resolution.
* You can’t upload RAW photos to Shared Albums on your Windows PC.
Shared Albums upload a copy of your data. Downloaded content may not contain the same information as the original.
Shared Album storage limits
A shared album can hold up to 5000 photos and videos. If you reach your Shared Album limit, you need to delete some photos or videos before adding new ones. The photos and videos you share (and the comments or likes associated with those photos) stay in iCloud until you or the contributor delete them manually, or until you delete the shared album completely.
The photos and videos in your Shared Albums are kept in iCloud, but they don’t count against your iCloud storage limit.
Information about products not manufactured by Apple, or independent websites not controlled or tested by Apple, is provided without recommendation or endorsement. Apple assumes no responsibility with regard to the selection, performance, or use of third-party websites or products. Apple makes no representations regarding third-party website accuracy or reliability. Contact the vendor for additional information.
Источник
PhotoShare Frame 4+
Control your PhotoShare Frame
Switchmate Inc.
Designed for iPhone
iPhone Screenshots
![]()
![]()
![]()
![]()
![]()
Description
Companion App for the PhotoShare Friends and Family Cloud Frame. Simply select your favorite photos, select one or more PhotoShare Frames as the destination and press “Send Photos.” Your photos will appear in moments on the PhotoShare Frame, ready to be enjoyed by family and friends. Use the PhotoShare Frame App to send multiple photos and messages to up to 10 PhotoShare Frames at once.
What’s New
— Minor Optimizations & Fixes
— iCloud Picture Handling Improvements
Ratings and Reviews
Great idea, app works, could be more user friendly
I haven’t had any issues with the app as far as bugs or not doing what it’s supposed to. We love the frame and love how easy it is to send pictures to grandparents! I also love how all of us can set up different accounts, but send photos to the same frame. I thought we’d have to share an account at first, but we didn’t have to!
A couple things that would make it an even easier process and would definitely make it a 5-star app for me:
1) I wish you could choose an album to select a picture from rather than have to go through every photo in my phone.
2) It would also be nice if I could see a larger preview of the photo when you clicked on it so I can make sure I’m sending the right photo (y’know, for when you have to find the one photo that someone didn’t close their eyes in).
3) And last, I wish I could remove photos previously sent to the frame. I love that the person with the frame doesn’t have to do anything to receive the photos on their end, but I know I’m going to have to go to grandma’s house and remove some of the photos myself once it’s too full to send new ones because she won’t know how to.
Overall, great concept and easy to setup and use! It was the best Mother’s Day gift for grandma!
Rough.
The idea of this app is great. We bought the frame as a gift and the recipient loves the physical frame itself. But the app is really terrible and frustrating.
For starters, if you don’t upload all your pictures to the app before sharing them to the frame, there won’t be any record that they were sent. You can select pictures from your Apple photos app and share them to the PhotoShare frame app, and that will open the PhotoShare frame app and allow you to select the frame to send to and everything, but it won’t store the photo or provide any record that you shared it so you have to just remember what photos you already sent to the frame. Same thing if you try to use this with Google photos.
Also, even if you do upload all your photos to the app in advance to have a record, if you are sharing to more than one frame, the app doesn’t differentiate if a photo has been shared to one frame or the other or both. If it has been shared at all, there will be a check mark on it and that’s the only indicator you get.
There is also no way for the owner of the frame to sort their photos. They will appear on the frame in whatever order they were received, so I feel bad sending more than 2 photos of any given event because I don’t want them seeing 8 pictures of the same birthday party in a row when, for example, the frame owner has other kids and grandkids. If the pictures could be shuffled I’d be happy to send far more.
It’s a good idea but the app needs a lot of improvement.
Great frame, terrible app
My dad got me this frame as a gift and I love it! I think it’s a great way to share photos with family who are far away, and I like that pictures are cycled through so there’s always something different.
That being said, I absolutely hate the app (this app). The UI is terrible, forcing me to only pick from tiny thumbnails of my most recent pictures. I can’t go into albums and pick the photos I’ve already marked aside, which is extremely frustrating as practically every other app that requests access to photos allows this feature. I haven’t gotten the email sharing to work either, so getting new pictures onto my frame is a headache. Additionally, the UI looks and feels just plain bad. It feels like it was developed in 2013 by someone taking an amateur coding class at their local library. The website is no better, but at least there I can easily pick out the photos I want from a folder on my desktop. Considering this app is specifically for wireless photo sharing, you would think they’d make the experience of actually sharing photos easier.
I normally don’t feel strongly enough to write app reviews, but I really do love this frame and want to be able to use it without the frustration. Hopefully, I’ll be able to sometime down the line.
App Privacy
The developer, Switchmate Inc. , indicated that the app’s privacy practices may include handling of data as described below. For more information, see the developer’s privacy policy.
Data Linked to You
The following data may be collected and linked to your identity:
Data Not Linked to You
The following data may be collected but it is not linked to your identity:
Privacy practices may vary, for example, based on the features you use or your age. Learn More
Источник


