- If you can’t send or receive messages on your iPhone, iPad, or iPod touch
- Try these steps first
- If you see a red exclamation point
- If you see a green message bubble
- If you receive messages on one device but not the other
- If you have issues with a group message
- How to forward SMS/MMS text messages from your iPhone to your iPad, iPod touch or Mac
- Set up text message forwarding
- How to Customize Text Message Tones on iPhone — iOS 13 Also Supported
- Part 1: How to Change Default Text Tones on iPhone?
- Part 2: How to Assign Customized Text Tones to Individual Contacts on iPhone?
- Part 3: How to Customize Text Message Ringtones for iPhone with Third-Party Program?
- Send a group text message on your iPhone, iPad, or iPod touch
- Types of group text messages
- Group iMessage
- Group MMS
- Group SMS
- Send a group text message
If you can’t send or receive messages on your iPhone, iPad, or iPod touch
If you see an alert when you send a message, or if you can’t send or receive messages, learn what to do.
Try these steps first
- Restart your device:
- iPhone
- iPad
- iPod touch
- Check your network connection. To send a message as iMessage or MMS, you need a cellular data or Wi-Fi connection. To send an SMS message, you need cellular network connection. If you turn on Wi-Fi Calling, you can send SMS messages over Wi-Fi.
- Check with your carrier to see if the type of message you’re trying to send, like MMS or SMS, is supported.
- If you’re trying to send group MMS messages on an iPhone, go to Settings > Messages and turn on MMS Messaging. If you don’t see an option to turn on MMS Messaging or Group Messaging on your iPhone, then your carrier might not support this feature.
- Make sure that your device has enough space to receive images and videos.
- Make sure that you entered the correct phone number or email address for the contact.
If you see a Waiting for Activation alert, learn what to do.
If you still need help, find your issue below to learn what to do next.
Message not delivered
You see a green message bubble
Not receiving messages on a device
Issues with group messages
![]()
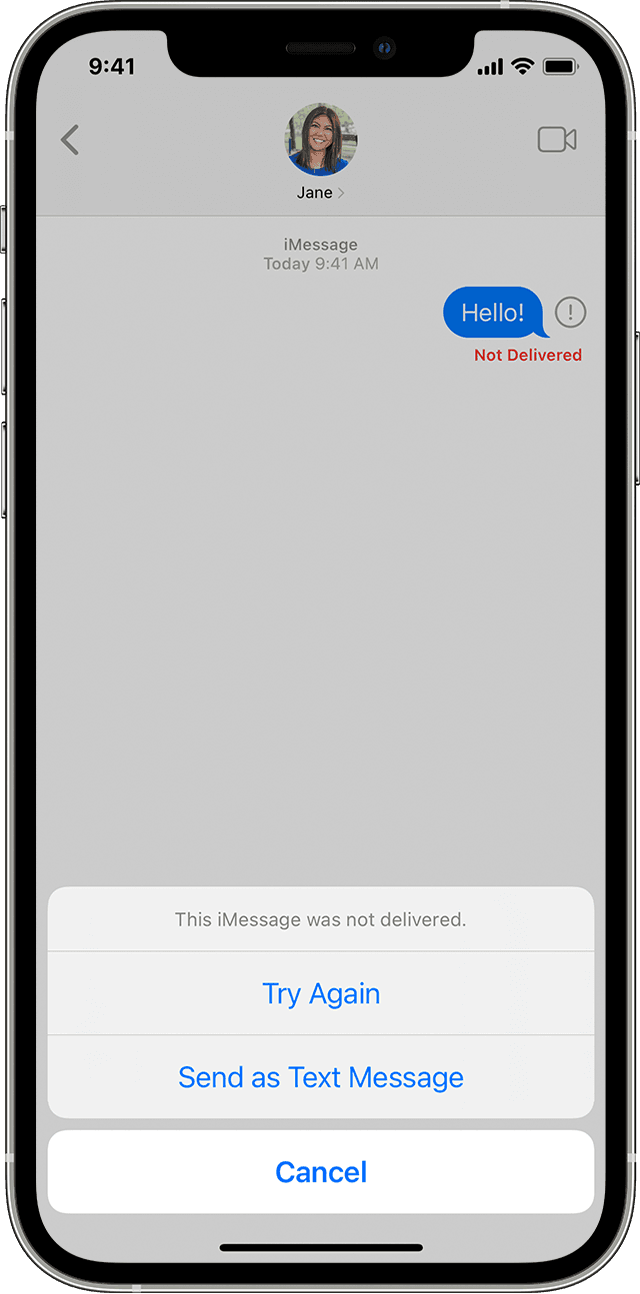
If you see a red exclamation point
If you try to send a message and you see with an alert that says Not Delivered, follow these steps:
- Check your network connection.
- Tap , then tap Try Again.
- If you still can’t send the message, tap , then tap Send as Text Message. Messaging rates may apply. Contact your carrier for more information.


If you see a green message bubble
If you see a green message bubble instead of a blue one, then that message was sent using MMS/SMS instead of iMessage. There are several reasons for this:
- The person that you sent the message to doesn’t have an Apple device.
- iMessage is turned off on your device or on your recipient’s device. To check if iMessage is turned on for your device, go to Settings > Messages > iMessage.
- iMessage is temporarily unavailable on your device or on your recipient’s device.
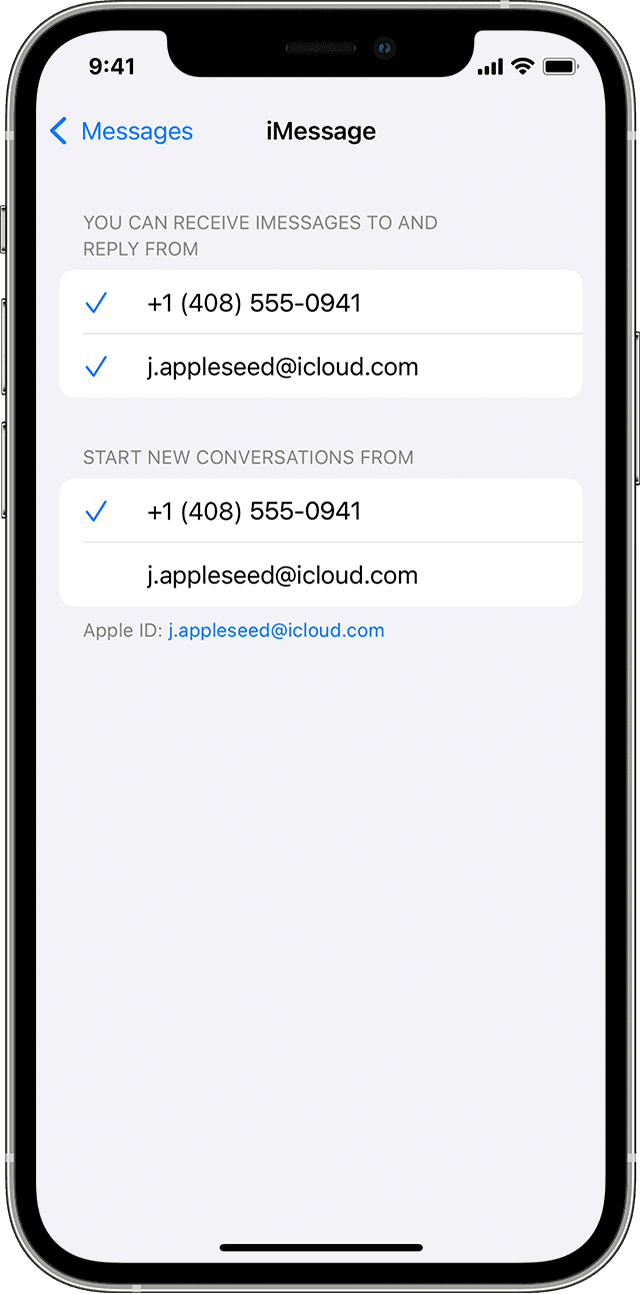
If you receive messages on one device but not the other
If you have an iPhone and another iOS or iPadOS device, like an iPad, your iMessage settings might be set to receive and start messages from your Apple ID instead of your phone number. To check if your phone number is set to send and receive messages, go to Settings > Messages, and tap Send & Receive.
If you don’t see your phone number, you can link your iPhone number to your Apple ID so you can send and receive iMessages from your phone number. You can also set up Text Message Forwarding so you can send and receive MMS and SMS messages on all of your Apple devices.
If you have issues with a group message
If you’re in a group message and stop receiving messages, check to see if you left the conversation. Open Messages and tap the group message. If you see a message that says you left the conversation, then either you left the conversation or you were removed from the group message. You can rejoin a group message only if someone in the group adds you.
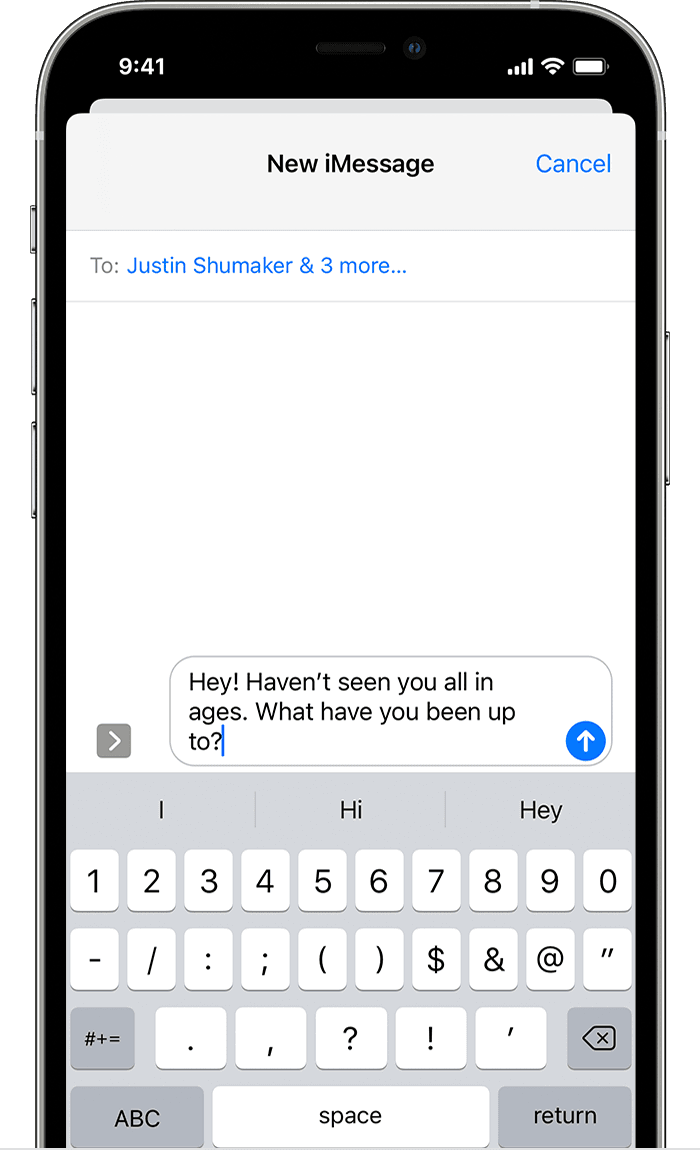
To start a new group message:
- Open Messages and tap the Compose button .
- Enter the phone numbers or email addresses of your contacts.
- Type your message, then tap the Send button .
If you have other issues with a group message, you might need to delete the conversation and start a new one. To delete a group message:
- Open Messages and find the conversation that you want to delete.
- Swipe left over the conversation.
- Tap Delete.
When you delete a message, you can’t recover it. If you want to save parts of a message, take a screenshot. To save an attachment in a message, tap the Download button . The photo or image will be saved to your Library in the Photos app.
Источник
How to forward SMS/MMS text messages from your iPhone to your iPad, iPod touch or Mac
With Text Message Forwarding, the SMS/MMS messages that you send and receive on your iPhone can appear on your Mac, iPad, and iPod touch. Then you can continue the conversation from the device you want.
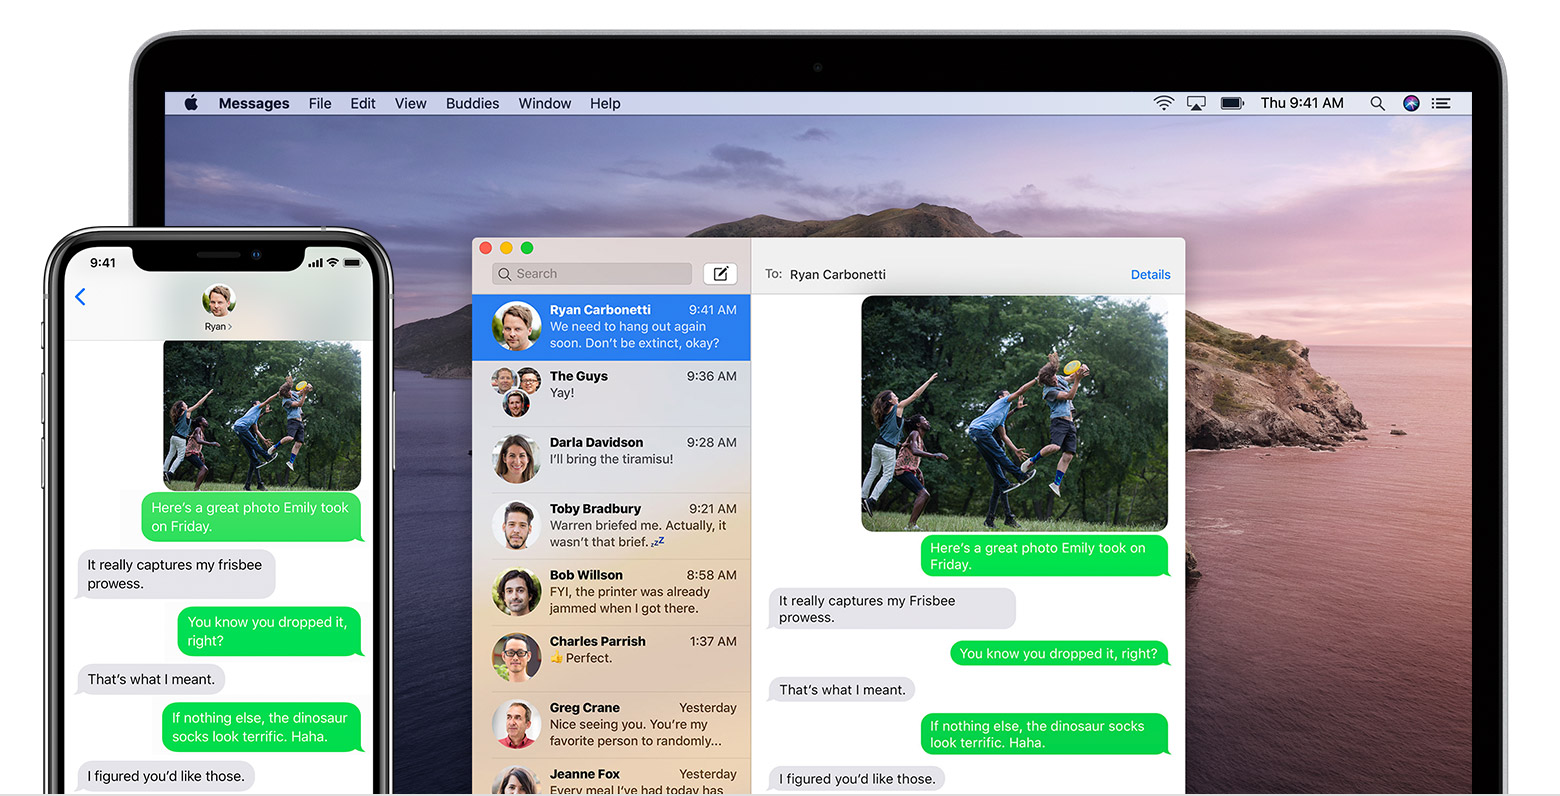
When someone sends you an SMS or MMS message on your iPhone, it appears as a green bubble. iMessages appear as blue bubbles. When you set up Text Message Forwarding, you can send and receive the SMS and MMS messages from your iPhone on any Mac, iPad, or iPod touch that meets the Continuity system requirements.
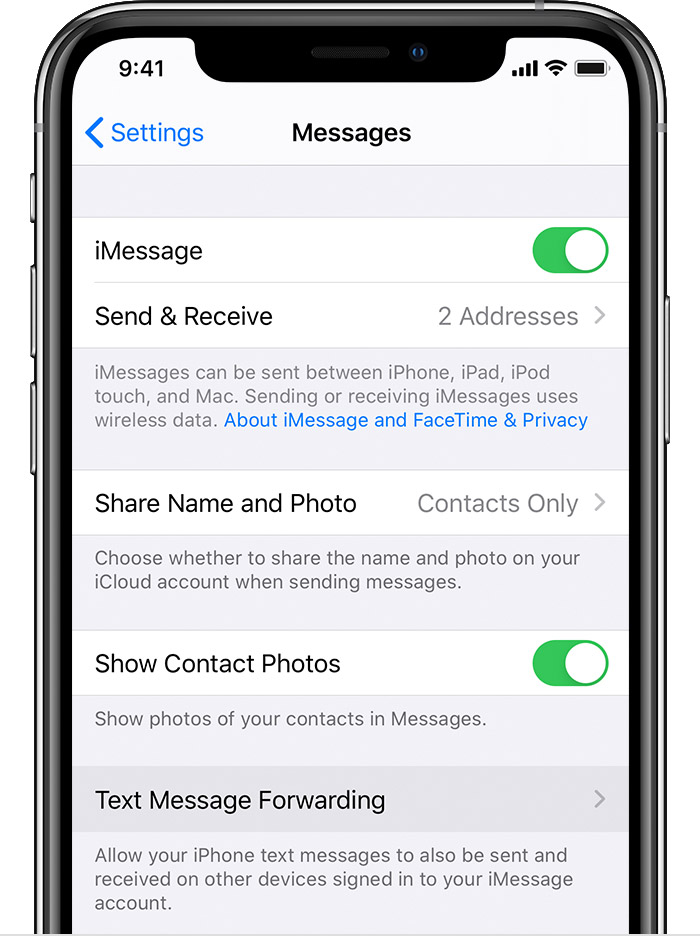
Set up text message forwarding
- On your iPhone, iPad, or iPod touch, go to Settings > Messages > Send & Receive. On your Mac, open Messages, choose Messages > Preferences, then click iMessage. Make sure that you’re signed in to iMessage with the same Apple ID on all your devices.
- On your iPhone, go to Settings > Messages > Text Message Forwarding.*

- Choose which devices can send and receive text messages from your iPhone. If you’re not using two-factor authentication for your Apple ID, a verification code appears on each of your other devices: enter that code on your iPhone.
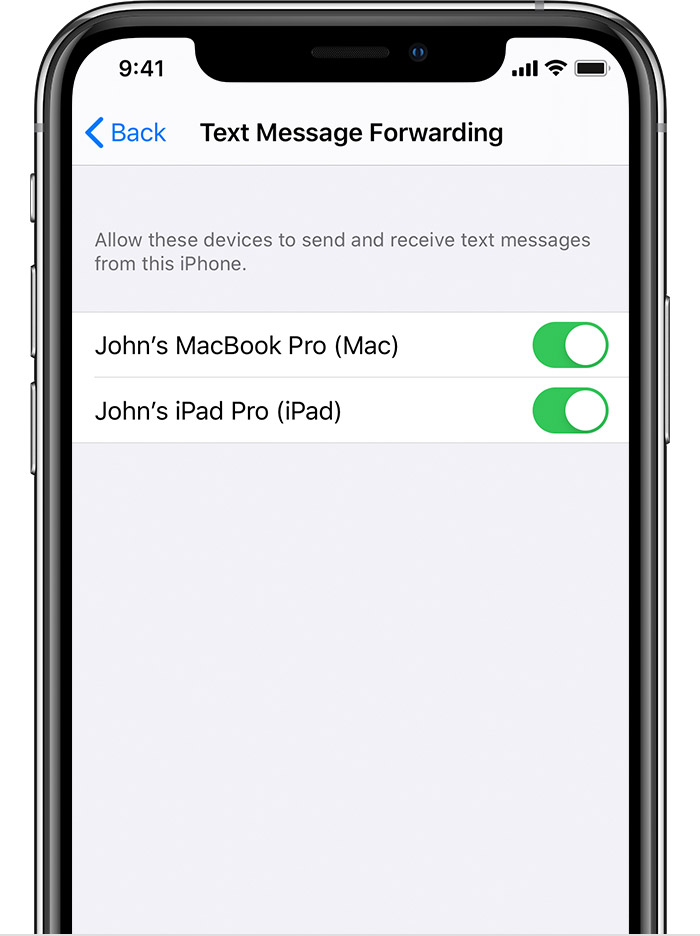
As long as your iPhone is turned on and connected to Wi-Fi or a cellular network, new SMS/MMS texts can be sent and received on the devices that you added.
iCloud now keeps your entire messages history updated and available on all your devices — even when you set up a new device. Learn how to keep all your messages in iCloud.
* Don’t see the Text Message Forwarding setting on your iPhone? Go to Settings > Messages, turn off iMessage, turn it back on, tap Send & Receive, tap Use Your Apple ID for iMessage, then sign in with the same Apple ID used on your other devices.
Источник
How to Customize Text Message Tones on iPhone — iOS 13 Also Supported
home_icon Created with Sketch.
Home > Transfer iPhone Media > How to Customize Text Message Tones on iPhone — iOS 13 Also Supported
![]()
March 27, 2018 (Updated: June 21, 2021)
Tired of default text messages tones on iPhone and want to customize text messages tones? Read below to find more.
Part 1: How to Change Default Text Tones on iPhone?
Changing the default text message ringtone on iPhone can be a huge task if you don’t know the steps to take. Even though iPhone comes with a good number of text tones, many of us are still using the default text tone because they don’t know how to change the default text tone on iPhone. Here, we shall be giving you the steps on how to change your iPhone ringtone text message alert:
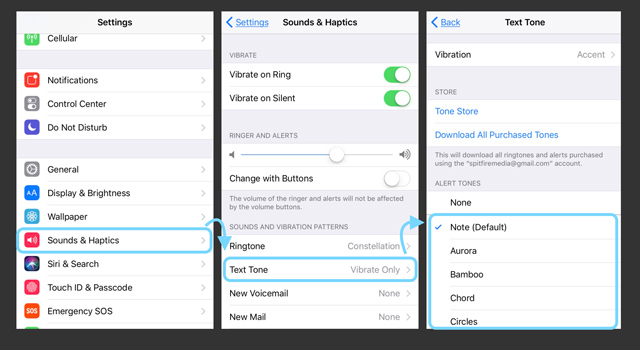
Step 1. Tap your iPhone Wake button, and launch your Setting app afterward.
Step 2. Select “Sounds & Haptics” if you’re using iPhone 7 Plus and later versions, or just “Sounds” if you’re using an older version of iPhone.
Step 3. Go to Text Tone under «SOUNDS AND VIBRATION PATTERNS» section, and swipe through the list of text message tones. You can click on any tone to preview it.
Step 4. When you find the text tone that soothes you better, then check if it has a checkmark next to it. If the checkmark is on it, that means the tone has been saved as your default text tone.
Part 2: How to Assign Customized Text Tones to Individual Contacts on iPhone?
On iPhones, text tones share a great similarity with ringtones in that you can assign different tones to individual contacts in your contact list. The benefit of this is that it gives you greater personalization and a better way to identify who is texting you at any time.
Here are the steps on how to assign customized text tones to individual contacts on iPhone:
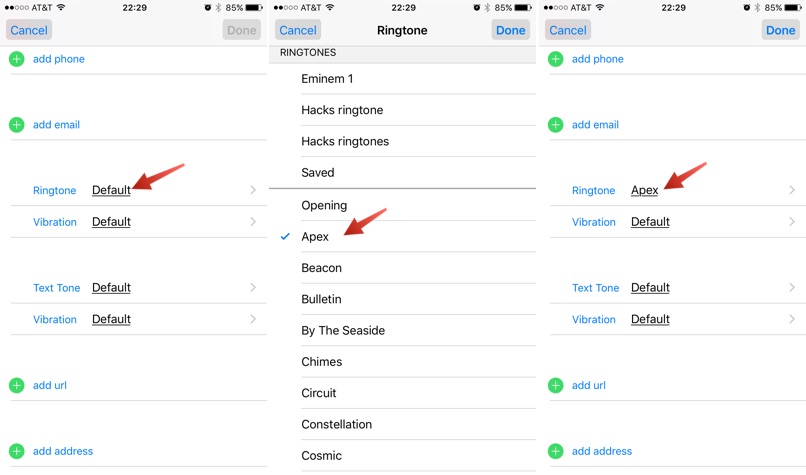
Step 1 . Launch your iPhone’s Contact Address Book app, and find the contact you want to assign a text tone to. You can find the contact by browsing or searching for it.
Step 2. Click “Edit” tab in the top right corner of the contact. Once the contact is in edit mode, then scroll down and click the “Text Tone” section.
Step 3. At this point, you can choose from the preinstalled tones on your iPhone, or choose from the custom text tones you’ve added to your iPhone. You can click on any tone to preview it.
Step 4. Once you’ve found the text tone you like, you can check if it has a checkmark next to it, then click it and click the “Done” button at the top right corner of your page (on earlier versions of iOS, this button is labeled “Save”).
Step 5. Once you’ve changed the text tone, the next window you’ll see is the contact page, and click “Done” to save the changes.
Part 3: How to Customize Text Message Ringtones for iPhone with Third-Party Program?
If you’re not satisfied with the options in part 1 & 2 above, you can make your own text message tones. Here we introduce you to a tool that can help you to customize free iPhone text message ringtones in few clicks. This Text tone maker for iOS is popularly known as iMyFone TunesMate.
iMyFone TunesMate is the best tool to make text message ringtones for iPhone. This app has a multitude of features and functionalities. It can be used to create custom ringtones and text tones, and save them directly on iPhone. It serves as an iOS file manager, and as an alternative to iTunes which help you to transfer media files to iPhone without limitations.
- TunesMate can customize text message ringtones for iPhone from any song without opening iTunes or iTunes library.
- You can use TunesMate to upload your newly customized text tone to iPhone without launching iTunes.
- You can use iMyFone TunesMate to make a two-way transfer of iPhone text message ringtones: Extract or upload ringtones from/to iPhone/PC.
- Purchased and non-purchased ringtones are permitted to be transferred with TunesMate.
- iMyFone TunesMate supports all types of iOS media files such as ringtones, text tones, music, videos, audiobooks, playlists, podcasts, photos, etc.
Steps on how to customize text message tones for iPhone via TunesMate:
Step 1 Launch iMyFone TunesMate and connect your iPhone using a USB cable.
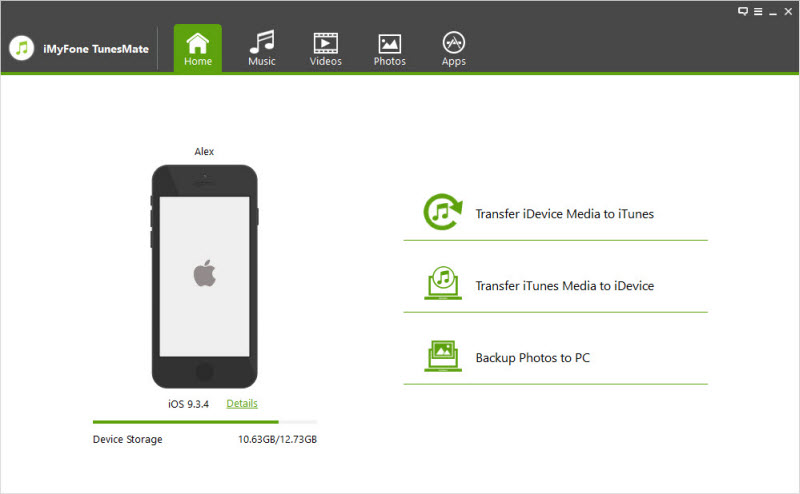
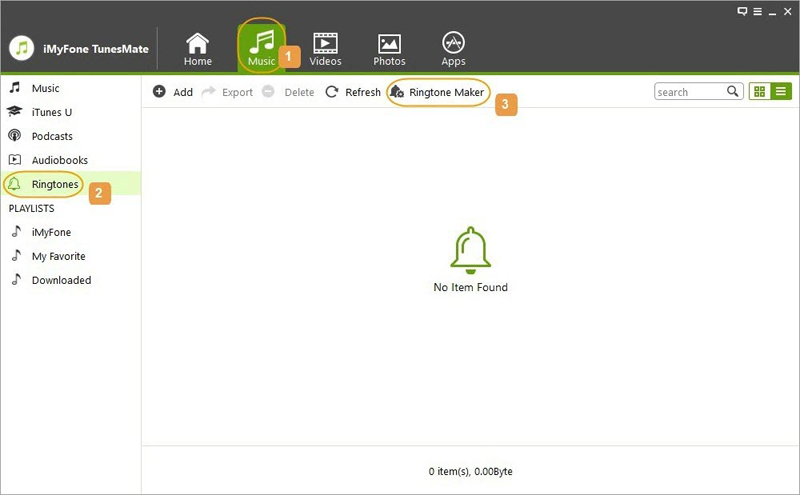
Step 2 Once the program is open, click on the «Music» tab at the top of the panel, and click on Ringtone. Then choose «Ringtone Maker».
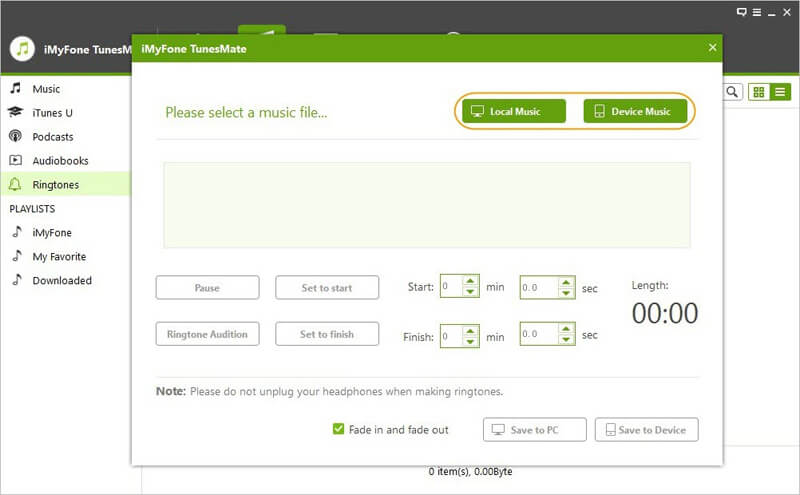
Step 3 You’ll be given the option to import a song from either your computer or your iPhone — select the relevant option and locate the song that you want to turn into a text message ringtone.
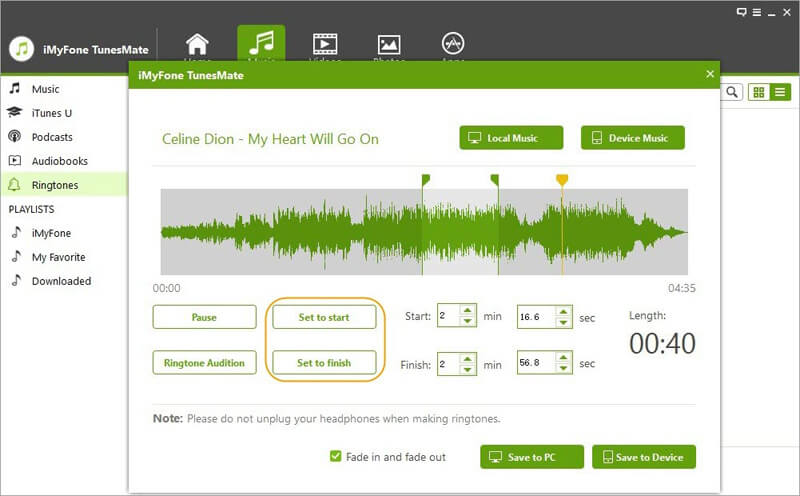
Step 4 Once you’ve got the song open in TunesMate, use the settings available on your screen to convert the chosen song into an up-to-40-second ringtone.
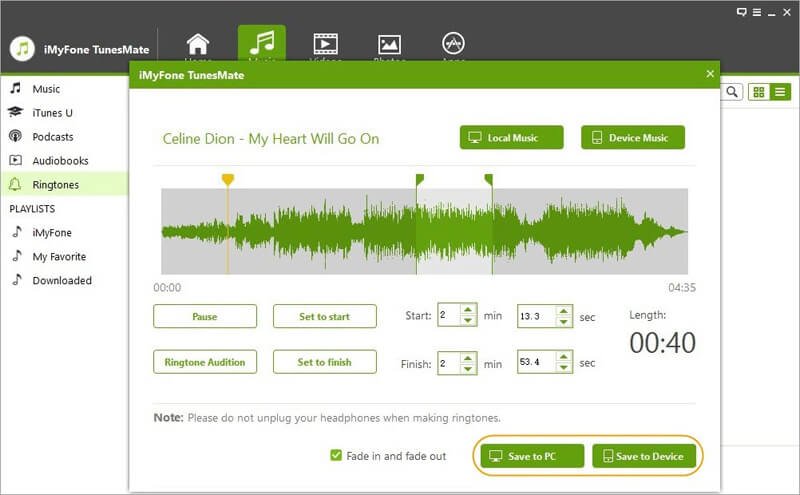
Step 5 Save the ringtone by clicking “Save to Device” and it will be available on your iPhone immediately.
Step 6 Follow the steps in “Part 1” of this article to set up your newly created text message ringtone as your iPhone text tone.
With methods mentioned above, you can enjoy iPhone text message tones to the fullest.
![]()

(Click to rate this post)
Generally rated 4.6 ( 256 participated)
You have already rated this article, please do not repeat scoring!
Источник
Send a group text message on your iPhone, iPad, or iPod touch
Stay connected to the conversations that matter the most. Learn how to start a group text message with your friends, family, and coworkers.
- Make sure that your device has the latest version of iOS or iPadOS.
- If you’re using an Apple device that’s not an iPhone, make sure that you’re signed in to iMessage with your Apple ID.
Types of group text messages
There are three types of group messages that you might see: group iMessage, group MMS, and group SMS. The Messages app automatically chooses the type of group message to send based on settings, network connection, and carrier plan. For example:
- If you and your recipients are using Apple devices and iMessage is turned on, then the group message is sent as an iMessage.
- If you send a group message to people who aren’t using iMessage, then the message is sent as an MMS or SMS message.
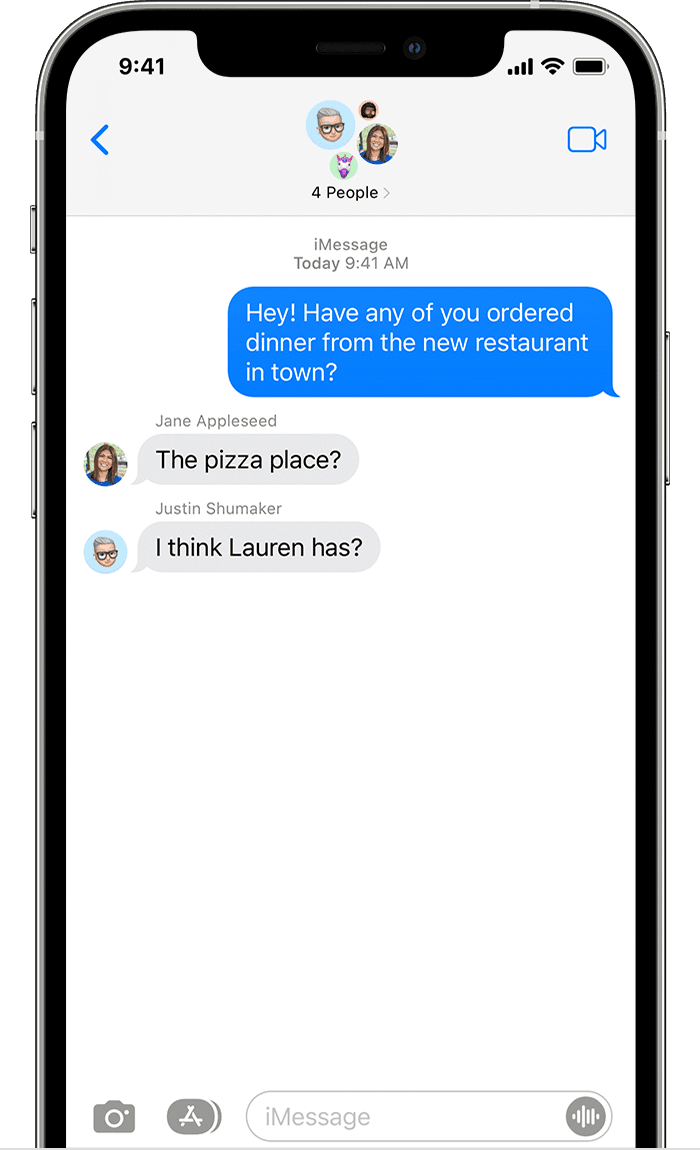
Group iMessage
These messages appear in blue text bubbles. They go through Apple instead of your carrier, and are protected by end-to-end encryption. In a group iMessage, everyone can:
- Send and receive photos, videos, and audio messages
- See all responses from the group
- Send and receive message effects, like sketches, animations, bubble effects, and more
- Share their location with the group
- Give the group a name, add or remove people from the group, mute notifications, or leave the group
![]()
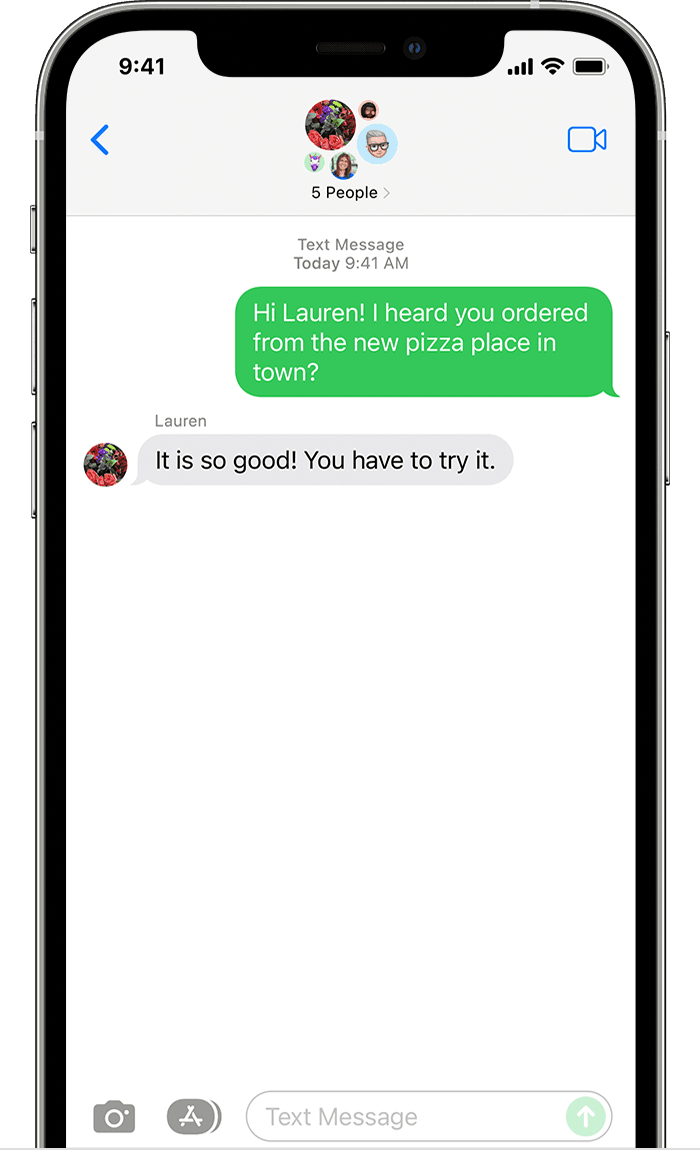
Group MMS
These messages appear in green text bubbles and go through your carrier instead of Apple. In a group MMS, everyone can:
- Send and receive photos and videos
- See all responses from the group
- Mute notifications
![]()
Group SMS
These messages also appear in green text bubbles and go through your carrier. Group SMS messages don’t support multimedia attachments, like photos or videos. All responses in a group SMS are sent as individual text messages and the recipients can’t see the other responses from the group.
Learn how to foward SMS/MMS text messages across your devices, like from an iPad to a Mac.
Send a group text message
- Open Messages and tap the Compose button .
- Enter the names or tap the Add button to add people from your contacts.
- Type your message, then tap the Send button .
 to add people from your contacts.
To send a group MMS message on an iPhone, make sure MMS Messaging is turned on. Go to Settings > Messages and turn on MMS Messaging. If you don’t see an option to turn on MMS Messaging or Group Messaging, contact your carrier to see if your plan supports Group MMS Messaging.
With iOS 15 and iPadOS 15, photos, links, and other content that are sent within the group message will appear in the Shared with You section of the corresponding content apps. If you don’t want to see the photos and other content in Shared with You, go to the group message, tap the top of the thread, then turn off Show in Shared with You.
Источник


