- If your iPhone, iPad or iPod touch is lost or stolen
- Look for your device on a map
- Mark as Lost
- Report your missing device to the police
- File a Theft and Loss claim
- Erase your device remotely
- Contact your wireless network provider
- Remove your missing device from your account
- Using Dual SIM with an eSIM
- How can you use Dual SIM?
- What you need
- Set up your cellular plan with eSIM
- Label your plans
- Set your default number
- Use two phone numbers for calls, messages, and data
- Let your iPhone remember which number to use
- Make and receive calls
- Downgrade or cancel your iCloud+ plan
- What happens when you downgrade or cancel iCloud+
- Downgrade or cancel on your iPhone, iPad, or iPod touch
- Downgrade or cancel on your Mac
- Downgrade or cancel on your Windows PC
- If you subscribe to Apple One
- If you can’t select Done
- Learn more
- About cellular data roaming options for your iPhone and iPad
- Turn off Data Roaming or prepare for a trip
- Shop roaming plans with your carrier
- Shop roaming plans with eSIM and Apple SIM
- Buy or rent local SIM cards
- Check your data usage
- Get help when you have roaming issues during international travel
If your iPhone, iPad or iPod touch is lost or stolen
If you lose your iPhone, iPad or iPod touch or think it might have been stolen, use Find My and protect your data.
Look for your device on a map
To find your device, sign in to iCloud.com/find. Or use the Find My app on another Apple device that you own.
If your iPhone, iPad or iPod touch doesn’t appear in the list of devices, Find My was not turned on. But you can still protect your account if Find My was not turned on.
Mark as Lost
When you mark your device as lost, you lock it remotely with a passcode, keeping your information secure. This also disables Apple Pay on the missing device. And you can display a custom message with your contact information on the missing device.
Report your missing device to the police
The police might request the serial number of your device.
File a Theft and Loss claim
If your missing iPhone is covered by AppleCare+ with Theft and Loss, file a claim for an iPhone replacement.
Erase your device remotely
After you erase a device, you can’t track its location, so make sure you no longer need to search for the device. If you have AppleCare+ with Theft and Loss, do not erase your iPhone until your claim has been approved.
Contact your wireless network provider
If the missing device is an iPhone or an iPad with cellular, report your missing device to your wireless network provider. Ask the network provider to disable your account to prevent calls, texts and data use. And if your device is covered under your wireless network provider plan, file a claim.
Remove your missing device from your account
If you have AppleCare+ with Theft and Loss, do not remove your lost iPhone from your account until your claim has been approved.
Go to appleid.apple.com/uk to remove the missing device from your list of trusted devices.
AppleCare+ with Theft and Loss is not available in all countries and regions.
Information about products not manufactured by Apple, or independent websites not controlled or tested by Apple, is provided without recommendation or endorsement. Apple assumes no responsibility with regard to the selection, performance or use of third-party websites or products. Apple makes no representations regarding third-party website accuracy or reliability. Contact the vendor for additional information.
Источник
Using Dual SIM with an eSIM
An eSIM is a digital SIM that allows you to activate a cellular plan from your carrier without having to use a physical nano-SIM. With iPhone 13 Pro Max, iPhone 13 Pro, iPhone 13, and iPhone 13 mini, you can use Dual SIM with either two active eSIMs or a nano-SIM and an eSIM. iPhone 12 models, iPhone 11 models, iPhone XS, iPhone XS Max, and iPhone XR, feature Dual SIM with a nano-SIM and an eSIM. 1
How can you use Dual SIM?
- Use one number for business and another number for personal calls.
- Add a local data plan when you travel outside of the country or region.
- Have separate voice and data plans.
With iOS 13 and later, both of your phone numbers can make and receive voice and FaceTime calls and send and receive messages using iMessage, SMS, and MMS. 2 Your iPhone can use one cellular data network at a time.
If you want to use 5G with Dual SIM on iPhone 12, iPhone 12 mini, iPhone 12 Pro, or iPhone 12 Pro Max, make sure that you have iOS 14.5 or later.
What you need
- An iPhone XS, iPhone XS Max, iPhone XR, or later with iOS 12.1 or later
- A wireless carrier that supports eSIM
To use two different carriers, your iPhone must be unlocked. Otherwise, both plans must be from the same carrier. If a CDMA carrier provides your first SIM, your second SIM won’t support CDMA. Contact your carrier for more information.
If you have an enterprise or corporate cellular service plan, check with your company administrator to see if they support this feature.
Set up your cellular plan with eSIM
Use two phone numbers
Learn about Dual SIM status icons
Change your cellular data number
Manage cellular settings
Erase your eSIM
Set up your cellular plan with eSIM
On iPhone 13 Pro Max, iPhone 13 Pro, iPhone 13, and iPhone 13 mini, you can use two eSIMs for two or more cellular plans—two active at the same time—or a physical nano-SIM for a cellular plan and an eSIM for one or more other cellular plans.
On iPhone 12 models, iPhone 11 models, iPhone XS, iPhone XS Max, and iPhone XR, you can use a physical nano-SIM for a cellular plan and an eSIM for one or more other cellular plans. If you don’t have a nano-SIM and your carrier supports it, an eSIM can serve as your only cellular plan. The eSIM provided by your carrier is stored digitally in your iPhone.
You can store more than one eSIM in your iPhone, but you can use only one at a time. To switch eSIMs, tap Settings, tap either Cellular or Mobile Data, and then tap the plan you want to use. Then tap Turn On This Line.
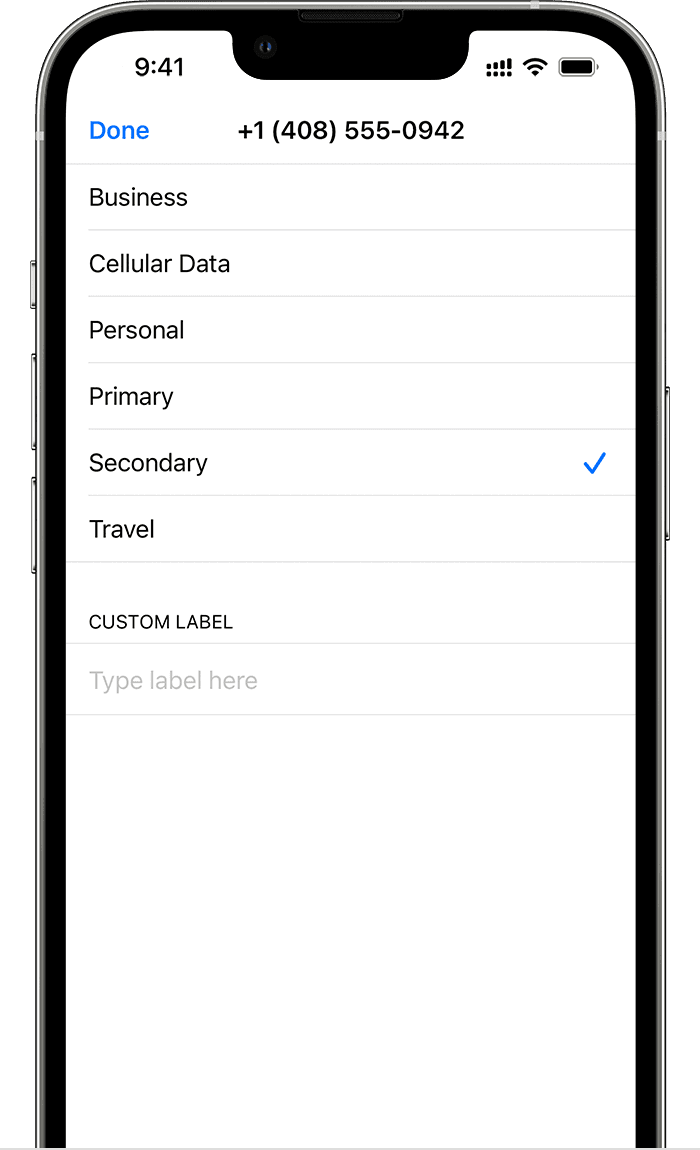
Label your plans
After your second plan is activated, label your plans. For example, you can label one plan Business and the other plan Personal.
You’ll use these labels when you choose which phone number to use for making or receiving calls and messages, to designate a number for cellular data, and to assign a number to your contacts so you know which number you will use.
If you change your mind later, you can change your labels by going to Settings, tapping either Cellular or Mobile Data, and then tapping the number whose label you want to change. Then tap Cellular Plan Label and select a new label or enter a custom label.
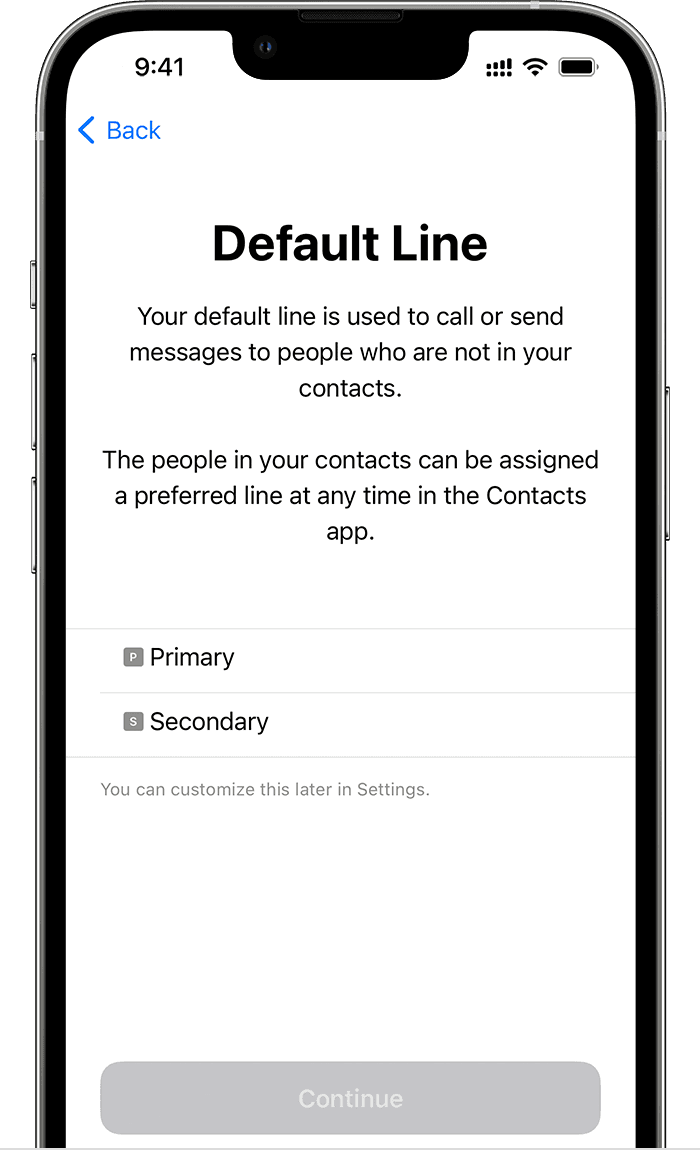
Set your default number
Choose a number to use when you call or send a message to someone who isn’t in your Contacts app. With iOS 13 and later, choose which cellular plans you want to use for iMessage and FaceTime. With iOS 13 and later, you can choose either or both numbers.
On this screen, choose a number to be your default, or you can choose which number is to be used only for cellular data. Your other number will be your default. If you want your iPhone to use cellular data from both plans, depending on coverage and availability, turn on Allow Cellular Data Switching.
Use two phone numbers for calls, messages, and data
Now that your iPhone is set up with two phone numbers, here’s how to use them.
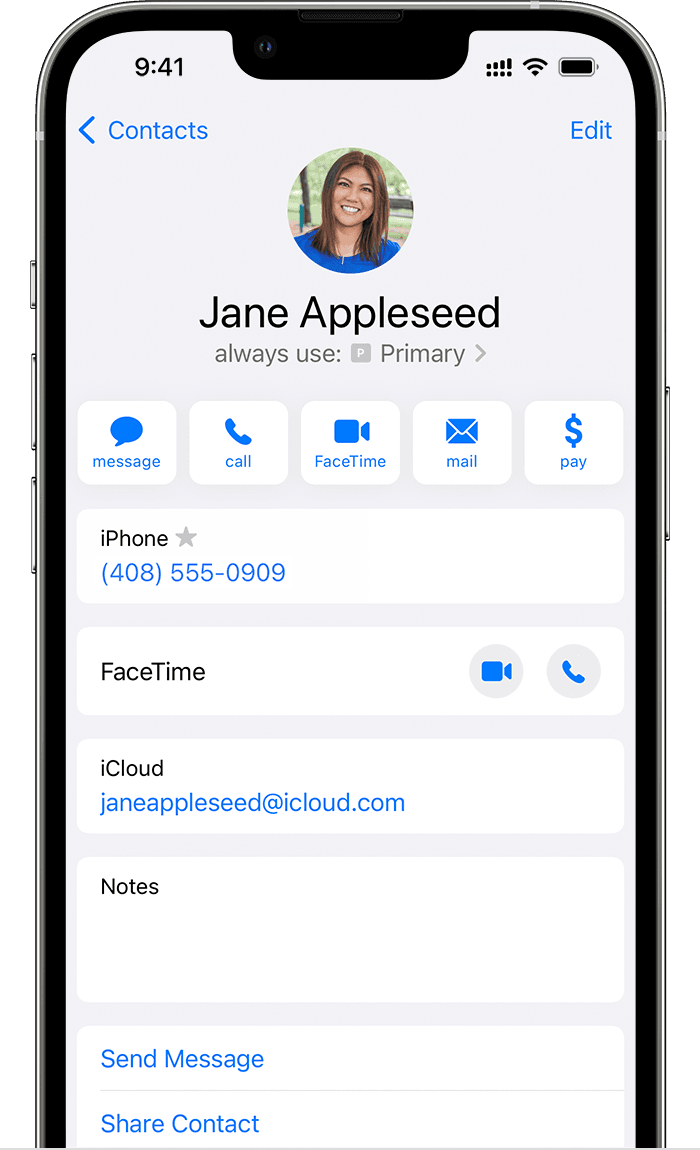
Let your iPhone remember which number to use
When you call one of your contacts, you don’t need to choose which number to use every time. By default, your iPhone uses the same number that you used the last time you called that contact. If you haven’t called that contact, your iPhone uses your default number. You can also specify which number to use for your calls with a contact. Follow these steps:
- Tap the contact.
- Tap Preferred Cellular Plan.
- Tap the number you want to use with that contact.
Make and receive calls
You can make and receive phone calls with either phone number.
With iOS 13 and later, when you’re on a call, if the carrier for your other phone number supports Wi-Fi calling, you can answer incoming calls on your other number. When you’re on a call using a line that isn’t your designated line for cellular data, you need to turn on Allow Cellular Data Switching to receive calls from your other line. If you ignore the call and you have voicemail set up with your carrier, you’ll get a missed-call notification and the call will go to voicemail. Check with your carrier for Wi-Fi calling availability and find out whether additional fees or data usage applies from your data provider.
If you’re on a call and your other line shows No Service, either your carrier doesn’t support Wi-Fi calling or you don’t have Wi-Fi calling turned on. 3 It could also mean Allow Cellular Data Switching is not turned on. When you’re on a call, an incoming call on your other phone number will go to voicemail if you set up voicemail with your carrier. 4 However, you won’t get a missed-call notification from your secondary number. Call Waiting works for incoming calls on the same phone number. To avoid missing an important call, you can turn on call forwarding and forward all calls from one number to the other. Check with your carrier for availability and to find out whether additional fees apply.
Источник
Downgrade or cancel your iCloud+ plan
If you have more space in iCloud than you need, you can downgrade or cancel your iCloud+ plan on your iPhone, iPad, iPod touch, Mac, or PC.
What happens when you downgrade or cancel iCloud+
- If your iCloud storage exceeds your new storage plan capacity, iCloud won’t sync or update your information. iCloud updates again when you increase your storage capacity or delete information to make more space.
- If you downgrade to the free iCloud plan, your storage will be reduced to 5GB and you will no longer have access to iCloud+ features like Hide My Email, Private Relay, and HomeKit Secure Video support.*
- When you downgrade or cancel your plan, the storage change takes effect after your current subscription billing period ends.**
- To make sure you don’t lose any information, learn how to copy what’s in iCloud.
* Not all features are available in all countries or regions.
** Partial refunds are available where required by law. If you recently changed your iCloud storage plan, contact Apple within 14 days for a refund. Learn how to request a refund.
![]()
Downgrade or cancel on your iPhone, iPad, or iPod touch
- Go to Settings > [your name] > iCloud > Manage Storage or iCloud Storage.
- Tap Change Storage Plan.
- Tap Downgrade Options and enter your Apple ID password.
- Choose a different plan.
- Tap Done. Can’t tap Done?
![]()
Downgrade or cancel on your Mac
- Choose Apple menu > System Preferences, then click Apple ID. If you’re using macOS Mojave or earlier, you don’t need to click Apple ID.
- Click iCloud.
- Click Manage.
- Click Change Storage Plan.
- Click Downgrade Options.
- Enter your Apple ID password, then click Manage.
- Choose a different plan.
- Click Done. Can’t click Done?
![]()
Downgrade or cancel on your Windows PC
- Open iCloud for Windows.
- Click Storage.
- Click Change Storage Plan.
- Click Downgrade Options.
- Enter your Apple ID password, then click Manage.
- Choose a different plan.
- Click Done. Can’t click Done?
![]()
If you subscribe to Apple One
Apple Music, Apple TV+, Apple Arcade, iCloud+, and more are combined into one simple plan with Apple One. If you already have an iCloud+ plan, you don’t need to cancel it when you sign up for Apple One. Learn what happens to your iCloud+ plan when you subscribe.
If you pay for both Apple One and an iCloud+ plan, you can downgrade or cancel the iCloud+ plan and just use the iCloud+ plan included in Apple One.
If you downgrade or cancel the iCloud+ plan included in Apple One, you also cancel your Apple One subscription. Learn how to see or cancel your subscriptions.
If you can’t select Done
If you can’t click Done, make sure you are signed in with the same Apple ID as your iCloud storage plan. You can also try following these steps on a different device. If you still need help, contact Apple Support.
![]()
Learn more
- iCloud+ bills to the payment method that you use with your Apple ID. You can add, remove, or change your payment method.
- Discover what iCloud backs up.
- If you want to turn off some iCloud features off or turn off iCloud completely, learn what to do.
- If you don’t have one of these devices, contact Apple Support to change your iCloud+ plan.
Information about products not manufactured by Apple, or independent websites not controlled or tested by Apple, is provided without recommendation or endorsement. Apple assumes no responsibility with regard to the selection, performance, or use of third-party websites or products. Apple makes no representations regarding third-party website accuracy or reliability. Contact the vendor for additional information.
Источник
About cellular data roaming options for your iPhone and iPad
Turn data roaming on or off, prepare for international trips, and more.
Turn off Data Roaming or prepare for a trip
Need to avoid roaming charges because you arrived at your destination without an international data plan? Turn off Cellular Data and Data Roaming. 1,2 Open Settings and tap Cellular, or Cellular Data, or Mobile Data. Turn off Cellular Data, then tap Cellular Data Options and turn off Data Roaming.
Still planning your trip? Here are three ways to prepare:
Shop roaming plans with your carrier
Before you go: To avoid fees and higher rates, call your carrier or visit online to shop international roaming plans.
After arrival: Open Settings. Tap Cellular, or Cellular Data, or Mobile Data. Then tap Cellular Data Options and turn on Data Roaming and other settings suggested by your carrier.
Shop roaming plans with eSIM and Apple SIM
Before you go: If you have an iPad with an eSIM or Apple SIM, you can browse cellular data plans from select carriers in more than 90 countries, regions, and territories.
After arrival: Go to Settings > Cellular Data and buy a roaming plan that fits your needs.
Buy or rent local SIM cards
Before you go: You can usually 3 buy or rent a SIM card for a specific country or region. Learn more from travel guides and websites related to the country or region.
After arrival: Replace your current iPhone SIM card or iPad SIM card with the new one. You’ll need the original when you return home, so put your original in a safe place.
![]()
- When you turn off Cellular Data and Data Roaming, the cellular-data icon shouldn’t appear in the status bar. Learn more about cellular data settings and usage.
- Apple Watch Series 3 (GPS + Cellular) and Apple Watch Series 4 don’t support data roaming. While using data roaming on your iPhone, Apple Watch Series 3 (GPS + Cellular) or Apple Watch Series 4 will only be able to use Wi-Fi or your iPhone cellular connection.
- To use bought or rented SIM cards, you need an iPad (Wi-Fi + Cellular), unlocked iPhone, or SIM-free iPhone.

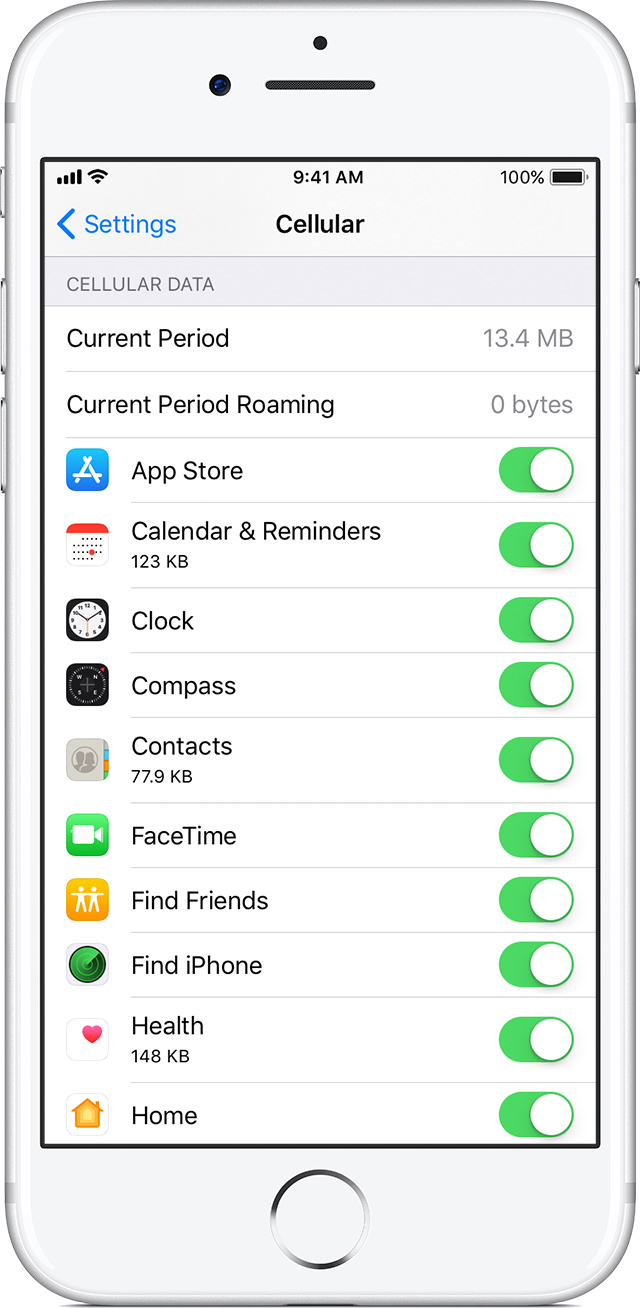
Check your data usage
If you exceed the data-usage limits of your international data plan, you might run out of data or notice slower network speeds. To check data usage, open Settings and tap Cellular, or Cellular Data, or Mobile Data. Then look under the Cellular Data heading.
Get help when you have roaming issues during international travel
- Turn on Airplane Mode for about 30 seconds. Then turn it off again and let your iPhone automatically select the best network.
- If you see No Service in the status bar of your iPhone, open Settings and tap Cellular, or Cellular Data, or Mobile Data. Tap Cellular Data Options and make sure that Data Roaming is on. Then, to check that international roaming is turned on for your account, contact your carrier.
- If the date and time are wrong after you arrive, go to Settings > General > Date & Time. Make sure that Set Automatically is turned on.
Still need help? If so, here’s what to do:
- Go to Settings > Cellular > Cellular Network and turn off Automatic. Wait until available networks appear, which might take two minutes.
- Tap the carrier that you want.
- Go back to the main Settings screen and wait for your iPhone or iPad to connect to the network.
- If you still need help, try a different SIM card or contact your carrier for more information.
Источник


