- Question: Q: iPhone Camera Aspect Ratio Option!
- What’s the Difference Between iPhone 8 Plus and iPhone X Aspect Ratio?
- Body Size vs. Screen Size
- Phone Layout
- Iphone x aspect ratio
- Device Screen Sizes and Orientations
- Auto Layout
- Layout Guides and Safe Areas
- Как изменять соотношение сторон камеры при съемке на iPhone
- Как выбирать соотношение сторон камеры на iPhone
- Как изменять соотношение сторон камеры при съемке на iPhone
- Как выбирать соотношение сторон камеры на iPhone
Question: Q: iPhone Camera Aspect Ratio Option!
I don’t know if anyone else is as mystified as me about this but here is my gripe with the interface and capture process of the iPhone’s camera. Let me say this up front; I’m fairly happy with the image quality of the camera. My beef isn’t with the image quality(although I dearly wish HDR would be much better but I digres. )
here’s the issue. I just recently returned from a cruise in the Mediterranean with my family and i took probably close to 600 photos using the iphone 6s plus. Upon returning home and wanting to print 4×6 (2:3) prints of my faves for our album only to realize that some major cropping will have to be done to 100% of my images. WHY? Because the native aspect ratio of the iphone camera is 4:3!! Seriously. NOTHING in this world is no longer 4:3 aspect ratio. Old «square» tube televisions use to be 4:3 but who uses one of those to view their iphone images? Even the iphone screen when turned horizontal to «landscape» mode is not 4:3 so why does Apple even have this as a default setting for taking photos on what they tout as a «high-end» camera?
When I compose a shot I typically use the display/viewfinder edges as my guide for what to include or exclude from the frame. I dont have time to think «wait a second, remember if you want to print this shot on a 4×6 print you have to account for the crop that will need to be done so give yourself more room etc».
How about Apple give us the ability to choose what aspect ratio we’d like to take the photo in. Similar to the useless «square» setting (hello. Instagram no longer requires square-only photos), give us an option for 4×6 INSTEAD of 3:2 which can confuse people and besides, when you go to your local film developing place the prints are called and have been called 4×6 loooooong before Apple started making iPhones. So a 4×6, 5×7, 8×10, 16:9(native aspect ratio of iphones and 98% of people’s TV’s or computer displays) and if you must 1:1(square) option. All before taking the photo and whichever choice you make that choice is the default the next time you start the camera app.
DIsclaimer: I recently purchased a camera app that offers choices for aspect ratio BEFORE taking a photo.
Источник
What’s the Difference Between iPhone 8 Plus and iPhone X Aspect Ratio?
If you’re wondering about the differences in aspect ratios between iPhone 8 Plus and iPhone X, you’re not alone. The iPhone X falls between the iPhone 8 and iPhone 8 Plus when it comes to size. The iPhone X aspect ratio is also wildly different compared to the other models.
If you’re moving to the iPhone X from the iPhone 8, the differences will probably be noticeable. But if you had a plus-size iPhone, will the iPhone X feel smaller or bigger? Let’s look at the specifics to get that answer.
Body Size vs. Screen Size
First, let’s talk about the body dimensions. The iPhone X is 5.65 inches (143.6 mm) long, 2.79 inches (70.9 mm) wide, and 0.30 inches (7.7 mm) thick. The iPhone 8 Plus is 6.24 inches (158.4 mm) long, 3.07 inches (78.1 mm) wide, and 0.30 inches (7.5 mm) thick.
However, the iPhone X has a screen size of 5.8 inches, with an aspect ratio of 19.5:9 while the iPhone 8 Plus screen is 5.5 inches and an aspect ratio of 16:9. So even though the size of the iPhone 8 Plus is bigger, the iPhone X still has a bigger screen. This is due to the thinner bezels on the iPhone X. Screen size of the iPhone X
But to many, moving from an iPhone Plus to an iPhone X feels like downgrading in screen size. I can’t speak for myself, because I don’t plan to upgrade to the iPhone X from my iPhone 7 Plus. But people on this Reddit thread share their experiences when making the switch.
The consensus among users is that the switch to iPhone X makes it feel like going to an iPhone 8. This is probably due to the fact that the iPhone X is thin and tall, while the other models feel like a more balanced ratio. Most people can adjust of course, but it leads many to wonder whether Apple will introduce an iPhone X Plus next year.
Phone Layout
This useful piece by The Verge gives insight into the models. Because the iPhone X has a narrower aspect ratio, you’re still getting more surface area on iPhone Plus models. Because of this, the iPhone X won’t display plus-sized app layouts. The “horns” on each side of the notch don’t add much in terms of usable screen. Therefore, the iPhone X uses the same app layouts as the iPhone 8. Useable screen areas that developers can use on the iPhone X
You’ll see more vertical content at once in portrait mode, but in landscape mode you’ll see less vertical space than even the iPhone 8. This is because Apple wants developers to avoid the home indicator that sits at the bottom of the iPhone X screen in lieu of a Home button. You also won’t get the iPhone Plus/iPad-style multi-panel views either.
So if you’re an iPhone Plus user looking at the iPhone X, just be aware that it will feel like going to a smaller model, despite the larger screen.
Источник
Iphone x aspect ratio
People generally want to be able to use their favorite apps on all of their devices and in any context. To meet this expectation, design an adaptable interface by configuring UI elements and layouts to automatically change shape and size on different devices, during multitasking on iPad, in split view, when the screen rotates, and more.
Device Screen Sizes and Orientations
iOS devices have a variety of screen sizes and people can use them in either portrait or landscape orientation. In edge-to-edge devices like iPhone X and iPad Pro, the display has rounded corners that closely match the device’s overall dimensions. Other devices — such as iPhone SE and iPad Air — have a rectangular display.
If your app runs on a specific device, make sure it runs on every screen size for that device. In other words, an iPhone-only app must run on every iPhone screen size and an iPad-only app must run on every iPad screen size.

| Device | Dimensions (portrait) |
|---|---|
| 12.9″ iPad Pro | 1024×1366 pt (2048×2732 px @2x) |
| 11″ iPad Pro | 834×1194 pt (1668×2388 px @2x) |
| 10.5″ iPad Pro | 834×1194 pt (1668×2388 px @2x) |
| 9.7″ iPad Pro | 768×1024 pt (1536×2048 px @2x) |
| 7.9″ iPad mini | 768×1024 pt (1536×2048 px @2x) |
| 10.5″ iPad Air | 834×1112 pt (1668×2224 px @2x) |
| 9.7″ iPad Air | 768×1024 pt (1536×2048 px @2x) |
| 10.2″ iPad | 810×1080 pt (1620×2160 px @2x) |
| 9.7″ iPad | 768×1024 pt (1536×2048 px @2x) |
| iPhone 13 Pro Max | 428×926 pt (1284×2778 px @3x) |
| iPhone 13 Pro | 390×844 pt (1170×2532 px @3x) |
| iPhone 13 | 390×844 pt (1170×2532 px @3x) |
| iPhone 13 mini | 375×812 pt (1125×2436 px @3x) |
| iPhone 12 Pro Max | 428×926 pt (1284×2778 px @3x) |
| iPhone 12 Pro | 390×844 pt (1170×2532 px @3x) |
| iPhone 12 | 390×844 pt (1170×2532 px @3x) |
| iPhone 12 mini | 375×812 pt (1125×2436 px @3x) |
| iPhone 11 Pro Max | 414×896 pt (1242×2688 px @3x) |
| iPhone 11 Pro | 375×812 pt (1125×2436 px @3x) |
| iPhone 11 | 414×896 pt (828×1792 px @2x) |
| iPhone X S Max | 414×896 pt (1242×2688 px @3x) |
| iPhone X S | 375×812 pt (1125×2436 px @3x) |
| iPhone X R | 414×896 pt (828×1792 px @2x) |
| iPhone X | 375×812 pt (1125×2436 px @3x) |
| iPhone 8 Plus | 414×736 pt (1080×1920 px @3x) |
| iPhone 8 | 375×667 pt (750×1334 px @2x) |
| iPhone 7 Plus | 414×736 pt (1080×1920 px @3x) |
| iPhone 7 | 375×667 pt (750×1334 px @2x) |
| iPhone 6s Plus | 414×736 pt (1080×1920 px @3x) |
| iPhone 6s | 375×667 pt (750×1334 px @2x) |
| iPhone 6 Plus | 414×736 pt (1080×1920 px @3x) |
| iPhone 6 | 375×667 pt (750×1334 px @2x) |
| 4.7″ iPhone SE | 375×667 pt (750×1334 px @2x) |
| 4″ iPhone SE | 320×568 pt (640×1136 px @2x) |
| iPod touch 5th generation and later | 320×568 pt (640×1136 px @2x) |
NOTE All scale factors in the table above are UIKit scale factors, which may differ from native scale factors. For developer guidance, see scale and nativeScale.
To learn how screen resolution impacts your app’s artwork, see Image Size and Resolution.
Auto Layout
Auto Layout is a development tool for constructing adaptive interfaces. Using Auto Layout, you can define rules (known as constraints) that govern the content in your app. For example, you can constrain a button so it’s always horizontally centered and positioned eight points below an image, regardless of the available screen space.

Auto Layout automatically readjusts layouts according to the constraints you specify for certain environmental variations, known as traits. You can set your app to dynamically adapt to a wide range of traits, including:
- Different device screen sizes, resolutions, and color gamuts (sRGB/P3)
- Different device orientations (portrait/landscape)
- Split view
- Multitasking modes on iPad
- Dynamic Type text-size changes
- Internationalization features that are enabled based on locale (left-to-right/right-to-left layout direction, date/time/number formatting, font variation, text length)
- System feature availability (3D Touch)
Layout Guides and Safe Areas
A layout guide defines a rectangular region that helps you position, align, and space your content on the screen. The system includes predefined layout guides that make it easy to apply standard margins around content and restrict the width of text for optimal readability. You can also define custom layout guides.
A safe area defines the area within a view that isn’t covered by a navigation bar, tab bar, toolbar, or other views a view controller might provide.
Источник
Как изменять соотношение сторон камеры при съемке на iPhone
С выходом iPhone 11 и iPhone 11 Pro интерфейс приложения «Камера» был изменен с целью высвобождения места для различных дополнительных параметров съемки, появившихся в новых флагманских моделях. Кроме основных эксклюзивных функций камеры флагманских смартфонов получили также режимы съемки с различным соотношением сторон.
На более ранних моделях iPhone, приложение «Камера» предлагает только один режим съемки с соотношением сторон 1:1, так называемый «Квадрат». Он позволяет делать снимки в формате Instagram. Это означает, что пользователи могут выбирать другие пропорции уже постфактум, в режиме редактирования приложения «Фото»,
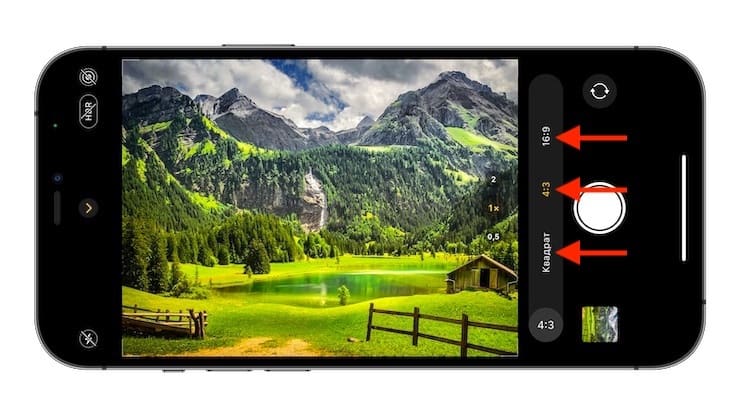
На последних моделях iPhone пользователи при съемке в приложении «Камера» могут выбирать уже между тремя параметрами соотношения сторон: Квадрат (1:1), 4:3 и 16:9.
Как выбирать соотношение сторон камеры на iPhone
Для того, чтобы перейти к различным режимам съемки, выполните следующие действия:
1. Запустите приложение «Камера», в нем коснитесь «шеврона» (кнопки со стрелкой) в верхней части видоискателя или сбоку от него при съемке в альбомной ориентации. Это позволит открыть скрытые настройки.
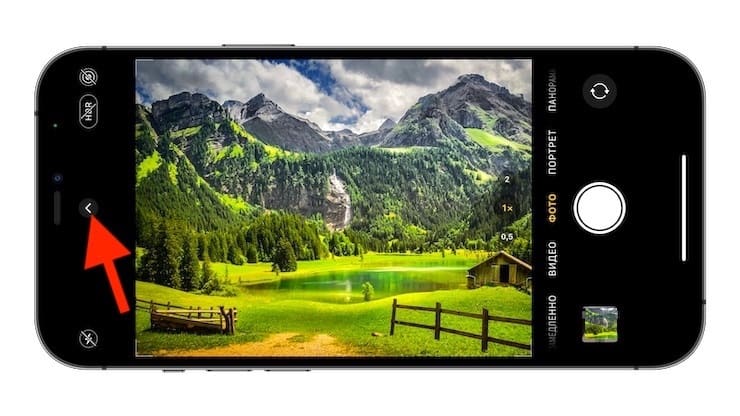
2. Непосредственно под видоискателем или сбоку от него появится кнопка 4:3, которую и надо нажать.
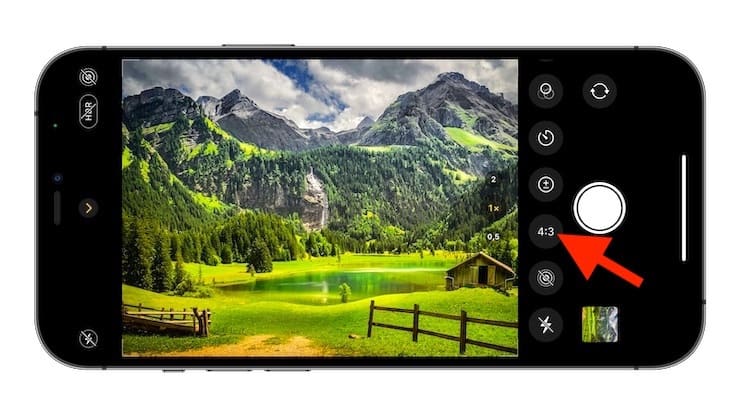
3. В появившемся после нажатия расширенном меню кнопок выберите предпочитаемое соотношение сторон.
4. Продолжите съемку с необходимым соотношением сторон.
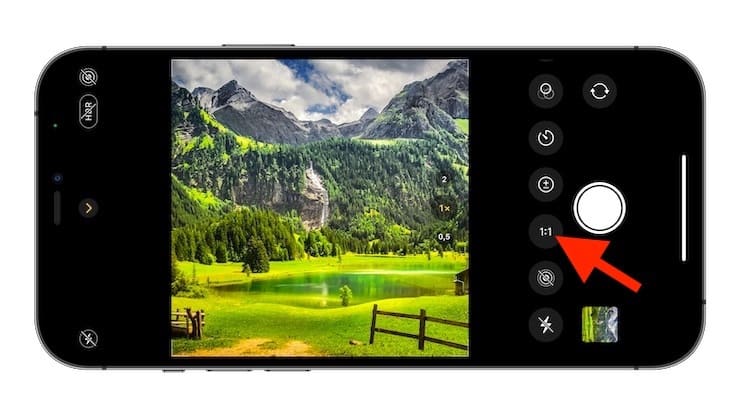
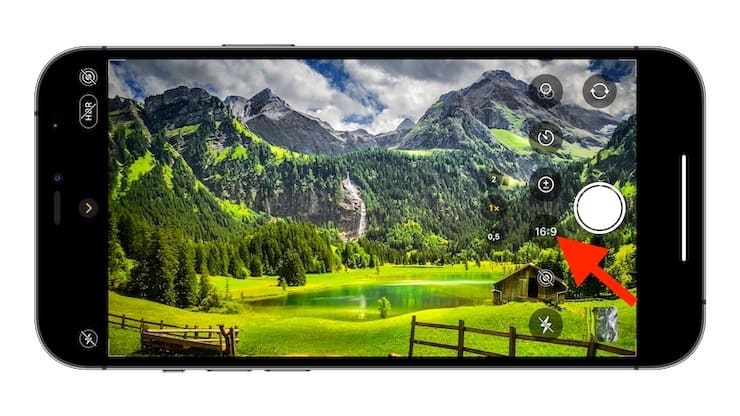
Обратите внимание, что соотношения 1:1 и 16:9 являются неразрушаемыми. Другими словами, вы можете повторно обрезать их в окне редактирования, если позже захотите вернуться к стандартному формату кадра 4:3.
Источник
Как изменять соотношение сторон камеры при съемке на iPhone
С выходом iPhone 11 и iPhone 11 Pro интерфейс приложения «Камера» был изменен с целью высвобождения места для различных дополнительных параметров съемки, появившихся в новых флагманских моделях. Кроме основных эксклюзивных функций камеры флагманских смартфонов получили также режимы съемки с различным соотношением сторон.
На более ранних моделях iPhone, приложение «Камера» предлагает только один режим съемки с соотношением сторон 1:1, так называемый «Квадрат». Он позволяет делать снимки в формате Instagram. Это означает, что пользователи могут выбирать другие пропорции уже постфактум, в режиме редактирования приложения «Фото»,
На последних моделях iPhone пользователи при съемке в приложении «Камера» могут выбирать уже между тремя параметрами соотношения сторон: Квадрат (1:1), 4:3 и 16:9.
Как выбирать соотношение сторон камеры на iPhone
Для того, чтобы перейти к различным режимам съемки, выполните следующие действия:
1. Запустите приложение «Камера», в нем коснитесь «шеврона» (кнопки со стрелкой) в верхней части видоискателя или сбоку от него при съемке в альбомной ориентации. Это позволит открыть скрытые настройки.
2. Непосредственно под видоискателем или сбоку от него появится кнопка 4:3, которую и надо нажать.
3. В появившемся после нажатия расширенном меню кнопок выберите предпочитаемое соотношение сторон.
4. Продолжите съемку с необходимым соотношением сторон.
Обратите внимание, что соотношения 1:1 и 16:9 являются неразрушаемыми. Другими словами, вы можете повторно обрезать их в окне редактирования, если позже захотите вернуться к стандартному формату кадра 4:3.
Источник


