- If your iPhone won’t turn on or is frozen
- If your screen is black or frozen
- On your iPhone 8 or later, including iPhone SE (2nd generation)
- On your iPhone 7 or iPhone 7 Plus
- On your iPhone 6s and earlier, including iPhone SE (1st generation)
- If your iPhone turns on but gets stuck during start up
- If your iPhone or iPod touch won’t charge
- Plug into power
- Wall power outlet
- Computer
- Power accessory
- If your device charges slowly or won’t charge
- If your device stopped charging at 80 percent
- If an alert says that your accessory isn’t supported or certified
- Доброе утро, день или вечер на экран блокировки iPhone: как отключить
- Yr.no 4+
- Designed for iPad
- Screenshots
- Description
- Use the Find My app to locate a missing device or item
- What features are available for your missing device or item
- iPhone, iPad, iPod touch
- Apple Watch
- AirPods Pro, AirPods Max
- AirPods, Beats products
- Third-party products
- AirTag
- iPhone Leather Wallet with MagSafe
- See it on a map
- Don’t see your device?
- Play a sound
- Mark your device as lost or turn on Lost Mode for your item
- What happens if you activate Mark As Lost for your device
If your iPhone won’t turn on or is frozen
If your iPhone has a frozen screen, doesn’t respond when you touch it, or becomes stuck when you turn it on, learn what to do.
iPhone screen is black or frozen
iPhone is stuck on the Apple logo
If your screen is black or frozen
Follow the steps for your device.
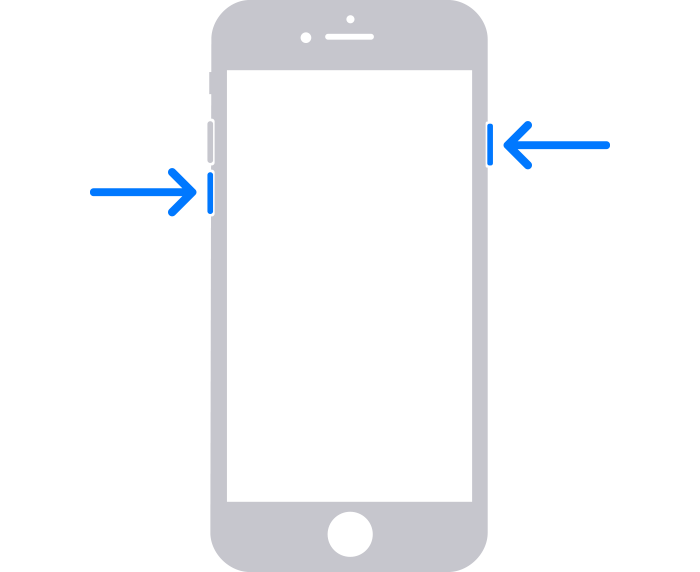
On your iPhone 8 or later, including iPhone SE (2nd generation)
- Press and quickly release the volume up button.
- Press and quickly release the volume down button.
- Press and hold the side button until you see the Apple logo.

- If your phone doesn’t turn on, follow these steps to check your hardware and charge your phone. You might need to charge for up to an hour.
- If your phone still doesn’t turn on, contact Apple Support.
On your iPhone 7 or iPhone 7 Plus
- Press and hold both the side button and the volume down button until you see the Apple logo.
- If your phone doesn’t turn on, follow these steps to check your hardware and charge your phone. You might need to charge for up to an hour.
- If your phone still doesn’t turn on, contact Apple Support.
On your iPhone 6s and earlier, including iPhone SE (1st generation)
- Press and hold both the Home button and the side button or the top button until you see the Apple logo.
- If your phone doesn’t turn on, follow these steps to check your hardware and charge your phone. You might need to charge for up to an hour.
- If your phone still doesn’t turn on, contact Apple Support.

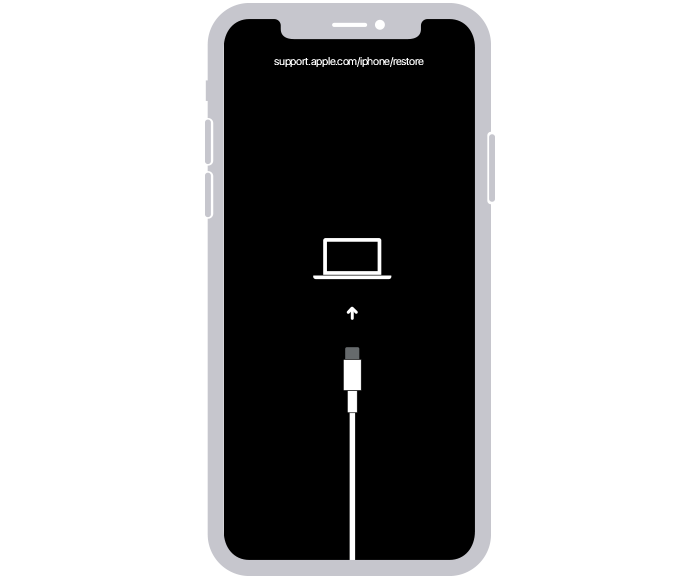
If your iPhone turns on but gets stuck during start up
If you see the Apple logo or a red or blue screen during startup, try these steps:
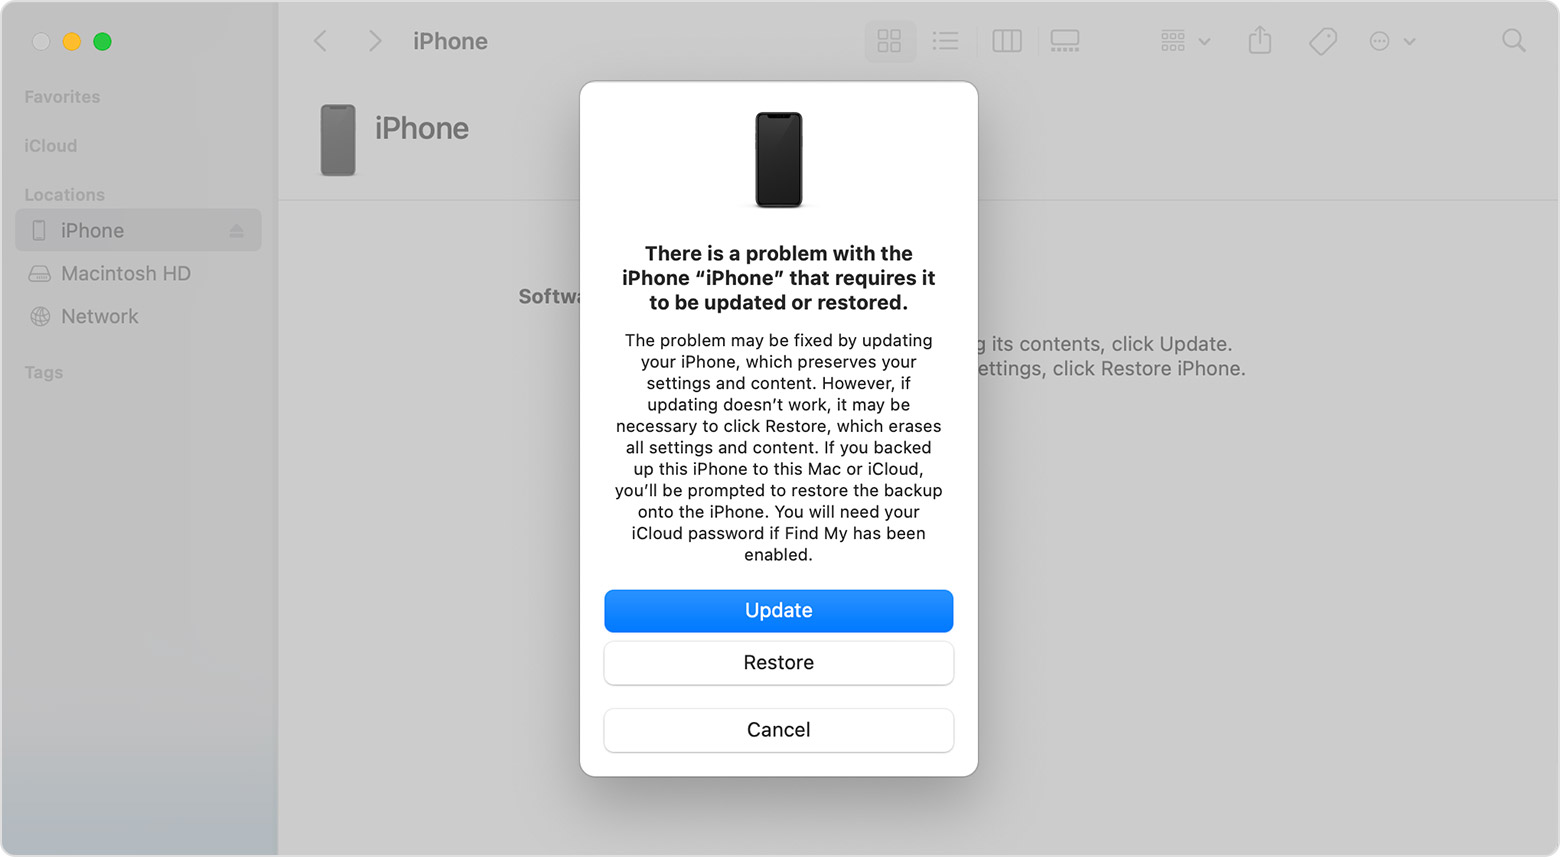
- Connect your iPhone to a computer. On a Mac with macOS Catalina, open the Finder. On a Mac with macOS Mojave or earlier, or on a PC, open iTunes. Find out which macOS your Mac is using.
- Select your iPhone on your computer.
- While your iPhone is connected, follow these steps:
- On your iPhone 8 or later, including iPhone SE (2nd generation): Press and quickly release the volume up button. Press and quickly release the volume down button. Then press and hold the side button.
Источник
If your iPhone or iPod touch won’t charge
If your battery won’t charge or charges slowly, or if you see an alert message, learn what to do.
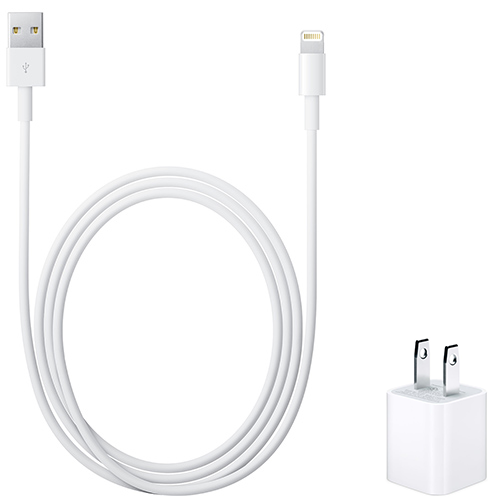
Plug into power
To charge your device, follow these steps:
- Connect your device to the USB cable that comes with it.
- Plug into one of these three power sources:
Wall power outlet
Plug your USB charging cable into a USB power adapter, then plug the adapter into the wall.
Computer
Plug your charging cable into a USB 2.0 or 3.0 port on a computer that’s on and not in sleep mode. Don’t use the USB ports on your keyboard.
Power accessory
Plug your cable into a powered USB hub, docking station, or other Apple-certified accessory.
![]()
If you’re trying to charge wirelessly with an iPhone 8 or later, first make sure that you can charge with the USB adapter and cable that came with your device. If that works, then get help with wireless charging. For a third-party accessory, check that it’s Apple certified.
As your device charges, you’ll see a lightning bolt beside the battery icon in the status bar, or a large battery icon on your Lock screen.
![]()
My device charges slowly or won’t charge
My device stopped charging at 80 percent
I see Accessory Not Supported or Certified
If your device charges slowly or won’t charge
Follow these steps and try again after each:
- Check your charging cable and USB adapter for signs of damage, like breakage or bent prongs. Don’t use damaged accessories.
- Use a wall power outlet and check for firm connections between your charging cable, USB wall adapter, and wall outlet or AC power cable, or try a different outlet.
- Remove any debris from the charging port on the bottom of your device, then firmly plug your charging cable into your device. If the charging port is damaged, your device probably needs service.
- Let your device charge for a half hour.
- If your device is still unresponsive, force restart your device:
- iPhone 8 or later and iPhone SE (2nd generation): Press and quickly release the Volume Up button. Press and quickly release the Volume Down button. Press and hold the Side button until you see the Apple logo.
- iPhone 7, iPhone 7 Plus, and iPod touch (7th generation): Press and hold both the Side (or Top) button and the Volume Down button until you see the Apple logo.
- iPhone 6s or earlier, iPhone SE (1st generation), and iPod touch (6th generation) or earlier: Press and hold both the Side (or Top) button and the Home button until you see the Apple logo.
- Let your device charge for another half hour.
- If your device still won’t power on or charge, take your device, charging cable, and charging adapter to an Apple Retail Store or Apple Authorized Service Provider for evaluation. You can also contact Apple Support.
If your device stopped charging at 80 percent
Your iPhone might get slightly warmer while it charges. To extend the lifespan of your battery, if the battery gets too warm, software might limit charging above 80 percent. Your iPhone will charge again when the temperature drops. Try moving your iPhone and charger to a cooler location.
iOS 13 and later uses Optimized Battery Charging to slow the rate of battery aging by reducing the time that your iPhone spends fully charged. Your iPhone uses on-device machine learning to understand your daily charging routine so that it can wait until you need to use your iPhone to finish charging past 80 percent.* Optimized Battery Charging is active only when your iPhone predicts that it will be connected to a charger for a long period of time.
* Information regarding your charging routine is stored only on your iPhone. The information isn’t included in backups and isn’t shared with Apple.
If an alert says that your accessory isn’t supported or certified
These alerts can appear for a few reasons: Your iOS device might have a dirty or damaged charging port, your charging accessory is defective, damaged, or non Apple-certified, or your USB charger isn’t designed to charge devices. Follow these steps:
- Remove any debris from the charging port on the bottom of your device.
- Restart your device:
- iPhone
- iPod touch
- Try a different USB cable or charger.
- Make sure that you have the latest version of iOS.
- Contact Apple Support to set up service.
Источник
Доброе утро, день или вечер на экран блокировки iPhone: как отключить
Мы тоже знаем, что если человек, в силу разных причин работавший допоздна, на следующий день просыпается не совсем с утра, то стандартное «Доброе утро» на экране iPhone очень быстро перестаёт нравиться. Если не сказать больше… Равно как и «Добрый день» или «Добрый вечер», когда они тоже невпопад.
Данная фича, то бишь приветствие «Доброе утро» вместе с виджетом погоды начало появляться на экране блокировки iPhone после выхода нынешней iOS 12. Новшество, конечно, заметное и даже понравилось (и, судя по отзывам до сих пор нравится) многим юзерам, но не всем.
Кстати, следует уточнить, что отображается оно не всегда, а только когда в iOS 12 активированы одновременно сразу два особых «сонных» режима: «Не беспокоить» и «Отход ко сну«. Только эта комбинация и служит триггером для включения приветствия утром, днем или вечером. А временем, которое в расписании указано как «Конец» работы режима «Не беспокоить», определяется то, какой именно фразой — «Доброе утро«, «Добрый день» или «Добрый вечер» будет каждый раз приветствовать вас ваш iPhone (или iPad).
Кроме того, приветствие на экране блокировки появляется только, когда iPhone вы открываете в первый раз после автоотключения режима «Не беспокоить». Чуть позже, когда вы снова заглядываете в смартфон, оно больше не отображается. И не будет отображаться до того момента, когда согласно установленному расписанию, в iPhone на следующий день снова не включатся режимы «Не беспокоить» и «Отход ко сну».

В общем, если это самое «Доброе утро» вам тоже перестало нравиться, то отключается оно просто. Правда, отдельная кнопочка в настройках для этого не предусмотрена. Потому чтобы приветствие больше не появлялось, надо всего лишь не включать одновременно указанные режимы, то есть, отключить опцию «Отход ко сну» (тапаем «Настройки» -> «Не беспокоить» -> «Отход ко сну» -> выкл).
Однако надо также учитывать, что кроме показа приветствия на экране блокировки, в режиме «Отход ко сну» iPhone еще автоматом снижает яркость экрана и пересылает уведомления в «Центр уведомлений». Потому если этот режим отключить, то данные, в целом полезные опции тоже отключатся.
Источник
Yr.no 4+
Designed for iPad
-
- #80 in Weather
-
- 5.0 • 1 Rating
-
- Free
Screenshots
![]()
![]()
![]()
![]()
![]()
![]()
Description
New Yr on iPhone and iPad is different from anything else you’ve seen in weather forecasting: Scroll through a beautiful and animated sky to see how the weather changes hourly, and get all the need-to-know details at the same time. And if there will be rainfall within the next 90 minutes we’ll let you know through our now-cast.
The weather visualization makes it a fun experience to check the weather – even when it’s raining!
Check details day by day and hour by hour in the long-term forecast, or study the details in the graph.
Under «Around you» you get an overview of air pollution, pollen spread and UV forecast, as well as the latest weather observations in your area.
Forecasts are delivered by the Norwegian Meteorological Institute.
ABOUT US: Yr is a weather service jointly produced by NRK and the Norwegian Meteorological Institute. Our primary goals are to secure life and property, while delivering useful and accurate weather forecasts to our users, preparing them for all kinds of weather. This year we are celebrating our ten-year anniversary, and with millions of users every day we are proud of being one of the most popular weather services in the world.
Источник
Use the Find My app to locate a missing device or item
Learn the different ways you can use the Find My app to help find your missing device or personal item, like how to see its location on a map or mark it as lost.
If you’ve lost or misplaced an Apple device or personal item, just use the Find My app on an iPhone, iPad, or iPod touch with the latest version of iOS or iPadOS or a Mac with the latest version of macOS signed in with the same Apple ID. You can also use the Find Devices or Find Items apps on your Apple Watch with the latest version of watchOS.
For a misplaced iPhone, iPad, iPod touch, Apple Watch, Mac, AirPods product, or supported Beats product, you can also use the Find My app on a device owned by someone in your Family Sharing group, or sign in to iCloud.com/find on a web browser.
What features are available for your missing device or item
Find My features and availability might vary by country or region.
iPhone, iPad, iPod touch
- View Location
- Play a Sound
- Mark as Lost (Lost Mode)
- Remote Erase
- Notify When Found
- Notify When Left Behind
- View Location
- Play a Sound
- Mark as Lost (Lock your Mac)
- Remote Erase
- Notify When Found
- Notify When Left Behind*
* Feature only available on MacBooks with Apple Silicon.
Apple Watch
- View Location
- Play a Sound
- Mark as Lost (Lost Mode)
- Remote Erase
- Notify When Found
AirPods Pro, AirPods Max
- View Location
- Find Nearby
- Play a Sound
- Lost Mode (Mark as Lost)
- Notify When Found
- Notify When Left Behind
AirPods, Beats products
Third-party products
- View Location
- Lost Mode
- Other features vary by product
AirTag
- View Location
- Find Nearby
- Play a Sound
- Lost Mode (Mark as Lost)
- Notify When Found
- Notify When Left Behind
iPhone Leather Wallet with MagSafe
- View Location
- Show Phone Number
- Notify When Detached
![]()
![]()
See it on a map
- Open the Find My app.
- Choose the Devices or Items tab.
- Select the device or item to see its location on the map. If you belong to a Family Sharing group, you can see the devices in your group.
- Choose Directions to open its location in Maps.
If you turn on Find My network, you can see your device or item’s location even if it’s not connected to a Wi-Fi or cellular network. The Find My network is an encrypted anonymous network of hundreds of millions of Apple devices that can help you locate your device or item.
Don’t see your device?
You might not have Find My turned on. If your device is powered off, the battery has run out, or more than 24 hours has passed since its last location was sent to Apple, you can’t see your device’s location. Learn how you can still protect your information.
![]()
Play a sound
- Open the Find My app.
- Choose the Devices tab or the Items tab.
- Select your missing device or item, then choose Play Sound. If your device is offline, it won’t play a sound until it connects to a network. If the AirTag attached to your item is out of Bluetooth range, your AirTag won’t play a sound until it’s within range.
For 24 hours after your last use, your iPhone will also notify you if you leave your AirPods or Beats products out of Bluetooth range when you’re not in a significant location like home or work. Learn more about Notify When Left Behind.
![]()
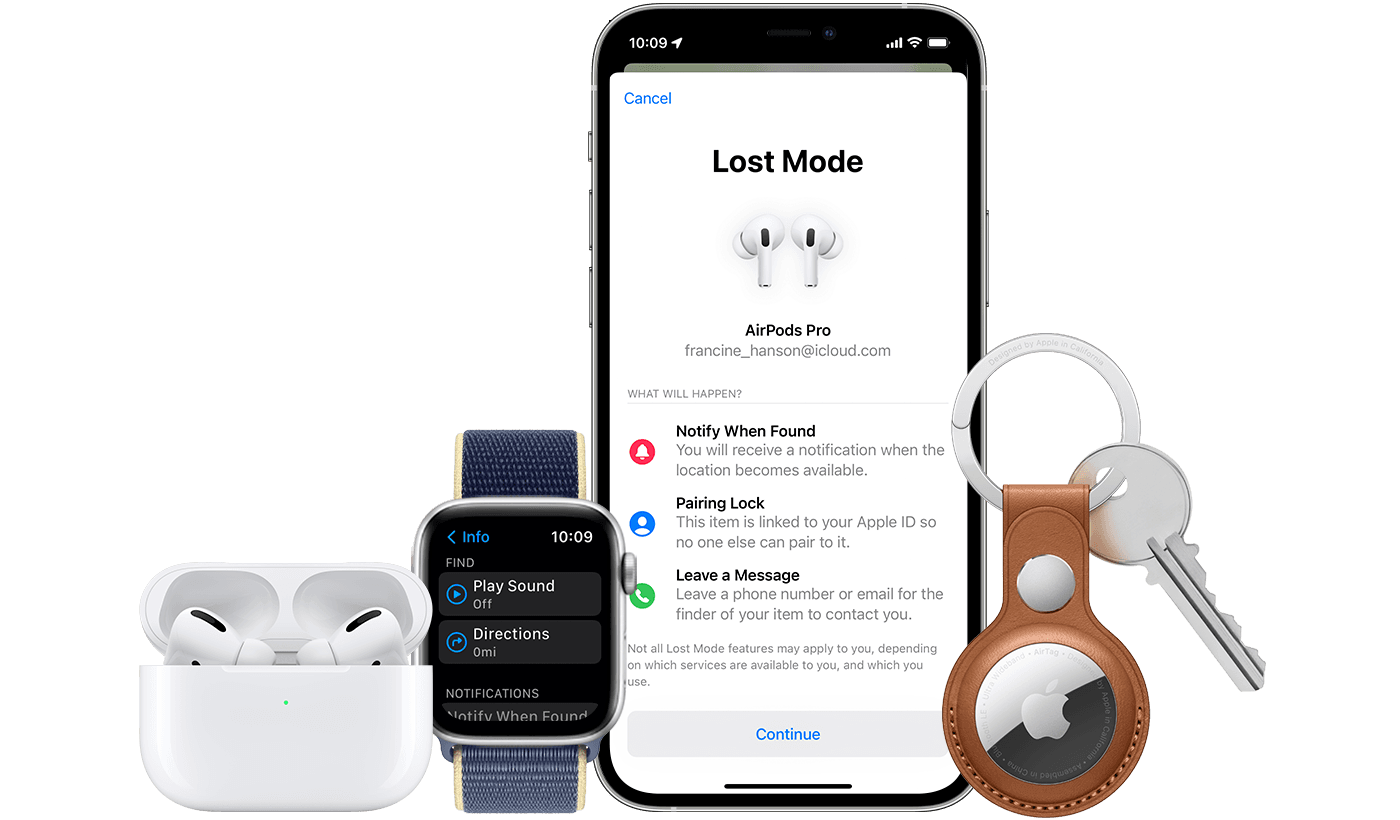
Mark your device as lost or turn on Lost Mode for your item
- Open the Find My app and choose the Devices tab or the Items tab.
- Select your missing device or item.
- Scroll down to Mark As Lost or Lost Mode and select Activate or Enable.
- Follow the onscreen steps if you want your contact information to display on your missing device or item, or if you want to enter a custom message asking the finder of your missing device to contact you.
- Select Activate.
What happens if you activate Mark As Lost for your device
Mark as Lost remotely locks your missing iPhone, iPad, iPod touch, or Mac with a passcode, keeping your information secure even if your device goes missing. You can also display a custom message with your phone number on the Lock screen, and keep track of your device’s location. Learn more about how to use Mark as Lost.
Источник


