- How to Jailbreak iOS Device on My Windows
- What Should You Prepare Before Jailbreaking?
- Step-by-Step Guide on How to Jailbreak on Windows
- Step 1. Burn the checkn1x ISO file to the USB flash drive
- Step 2. Start to Jailbreak with checkN1x
- Remove iCoud Activation Lock On iOS Device
- How to Jailbreak iOS Device on Windows
- Solution 1: Jailbreak iOS with Checkn1x
- # Burn a USB Flash Drive
- #Restart Computer and Jailbreak iOS Device
- Solution 2: Jailbreak iOS with Checkra1n
- Preparations for Jailbreaking iOS on Windows
- Detailed Steps for Jailbreaking iOS on Windows
- # Create Ubuntu USB Flash Drive
- # Boot Ubuntu on Windows
- # Jailbreak iOS Device
- FAQs: Common Errors and Problems when Jailbreaking
- Q1. What to Do when the «Start» button of Checkra1n is grey?
- Q2. What to Do when Jailbreaking Gets Stuck on «Right before trigger»?
- Q3. What to Do when the Jailbreaking Fails?
- Q4. How to Solve the -20 Error when Jailbreaking iPad on iOS 14.5 and 14.6?
How to Jailbreak iOS Device on My Windows
Before you bypass the iCloud activation lock, you need to jailbreak the iOS device. Because there is no jailbreak tool for Windows system, you can follow this tutorial to create a jailbreak environment on a Windows computer and then jailbreak your iOS device.
Note:If you have a Mac (for macOS 10.13-10.15), it’s suggested that jailbreaking your iOS device would be a better choice.
A Video Tutorial: How to Jailbreak on Windows
What Should You Prepare Before Jailbreaking?
Here is a need-to-do list before you jailbreak the iOS device on Windows.
- Make sure your computer runs Windows 7 or later, 32 or 64 bit.
- Get a USB flash drive with more than 2 GB capacity.
- Download checkn1x-1.0.6-amd64.iso.
- Download rufus-3.1.1.exe.
Step-by-Step Guide on How to Jailbreak on Windows
Step 1. Burn the checkn1x ISO file to the USB flash drive
- Insert the USB flash drive into your computer.
- After downloading the file Rufus, click Rufus to open the application.
Click the “SELECT” button to find the downloaded checkn1x ISO file. Leave the other options as defaults, and then click “START”.

Then a warning message pops up saying the data on your USB flash drive will be formatted(If necessary, please back up your USB flash drive). Then select the «Write in DD Image Mode» option, and then click OK.
It takes 2 or 3 minutes to burn checkn1x ISO file to USB flash drive.
When the burning process is completed, click the «CLOSE» button.
Note: When the checkN1x ISO file is burned, please unplug and reinsert the USB flash driver into your computer in case the system doesn’t recognize it.
Step 2. Start to Jailbreak with checkN1x
- Restart your computer. When the computer is powered on and loaded in the meanwhile, press F12 (Boot Menu).
Note:For most branded computers, the shortcut key to «Boot Menu» is F12. If F12 is invalid, refer to the following «Boot Menu» shortcuts
| Boot Menu Key | Desktop Brand | Laptop Brand | Motherboard Brand |
|---|---|---|---|
| ESC | Dell | ASUS, Sony | MAXSUN, UNIKA, SUPOX, Spark, SOYO, EPOX, UNIKA, Jetway, J&W, Colorful, ECS, SOYO, FOXCONN |
| F8 | ASUS, BenQ | ASUS, YESTON, J&W | |
| F9 | HP, BenQ | BIOSTAR, GUANMING | |
| F10 | ASL | ||
| F11 | MSI | MSI, ASRock, ONDA, Colorful,ECS, Gamen, Topstar | |
| F12 | Lenovo, HP, Acer, Hasee, eFound, THTF, Haier | Thinkpad, Dell, Lenovo, TOSHIBA, Samsung, IBM, Acer, Hasee, Haier,eFound, THTF, GIGABYTE, Gateway, eMachines | GIGABYTE, Intel, Cthim, SOYO, FOXCONN, Gamen, Topstar |
Note:If your computer is unable to enter the «Boot Menu», try entering the COMPUTER BIOS/UEFI and modify the system Boot entry Settings to enter the Linux CheckRA1n environment. For detailed guide, please check the following:
In the startup window, select the USB flash drive that just burned the checkn1x ISO file.
After you’ve launched the Checkra1n, connect your iOS device to the computer. Then select the Options from the keyboard arrow key and press Enter to set the jailbreak tool.
From the Settings screen, select Allow Untested iOS/iPadOS/tvOS versions option from the keyboard arrow key, and press Enter to select it.
After selecting «Skip A11 BPR check», press Enter to select.
Note 1: If you have an iPhone 8/8 Plus/ X with iOS 14 system, you need to tick «Skip A11 BPR check» option .
Note 2: You could not jailbreak an iPhone 8/8 Plus/ X running iOS 14(with lock screen passcode). If with lock screen passcode, please have a deep flash of the firmware firstly, and try to jailbreak again.
Then choose the Back button and press Enter to back to the main interface.
After you hit the Start button, press Enter to jailbreak your iOS device.
After the checkn1x tool is initiated, connect your iOS device to the computer, and you will see a connected reminder in the program. The select the Start option from arrow keys the on your keyboard and press the enter key.
To jailbreak your iOS device, CheckN1x requires your device be in DFU mode. Select «Next» and the program will direct you to DFU mode.
Check the «Next» option and Checkn1x will automatically put your iOS device into recovery mode first.
Select the «Start» option, and then follow the instructions on Checkn1x to put your iOS device into DFU mode.
After your device enters DFU mode successfully, Checkn1x will automatically jailbreak your device. When the jailbreaking process is completed, select «Done» and unplug the USB flash drive.
Tip #1: If the jailbreaking process gets stuck:
- Change a different USB flash drive and try to jailbreak again.
- Restart your iOS device and computer and try to jailbreak again.
Tip #2: If jailbreak failed:
Re-plug your device into the USB port on the back of your computer host and try again.
Tip #3: Notes for iPhone 8/8 Plus/ X devices with iOS 14 system:
For Phone 8/8 Plus/ X with iOS 14 system before jailbreaking, they should be in inactive and without any lock screen passcode.
Remove iCoud Activation Lock On iOS Device
After your device is jailbroken successfully, restart the computer, and your computer will automatically enter the Windows operating system. Please use Tenorshare 4MeKey to remove the activation lock of the iOS device. Here comes the Tenorshare 4MeKey Remove iCloud Activation Lock Tutorial.
Источник
How to Jailbreak iOS Device on Windows
home_icon Created with Sketch.
Home > Bypass Activation Lock > How to Jailbreak iOS Device on Windows
![]()
May 27, 2020 (Updated: November 17, 2021)
2 views , 1 min read
To bypass iCloud activation lock, you need to jailbreak your iOS device first. Since there is no jailbreak tool for the Windows system, you can follow the tested tutorial here to create a Linux Ubuntu environment on your Windows computer and then jailbreak your iOS device.
Contents of this article:
- Jailbreak Solution 1: Jailbreak iOS with Checkn1x Quickly- Recommended
- Jailbreak Solution 2: Jailbreak iOS with Checkra1n
- FAQs: Common Errors and Problems when Jailbreaking
- Q1. What to Do when the «Start» button of Checkra1n is grey?
- Q2. What to Do when Jailbreaking Gets Stuck on «Right before trigger»?
- Q3. What to Do when the Jailbreaking Fails?
- Q4. How to Solve the -20 Error ?
- Q5. How to Solve the Lockdown -21 Error?
Solution 1: Jailbreak iOS with Checkn1x
Checkn1x is a Linux-based distribution for jailbreaking iOS devices with Checkn1x.
Preparations needed for jailbreaking iOS devices on Windows:
- Windows 7 or later, 32 or 64 bit
- USB flash drive with 2 GB, or more, capacity
- Download BalenaEtcher to burn USB flash
- Download Checkn1x iso file
Refer to the video below to jailbreak iOS device on Windows in 5 minutes:
# Burn a USB Flash Drive
Step 1. First download the mirror writing tool BalenaEthcer
Step 2. Download the latest version of the jailbreak tool image, select the above Checkn1x 1.1.7 version to download.
Step 3. Open BalenaEtcher, click «Flash from file», and select the downloaded image.
Step 4. Select the connected USB flash drive. Note that this will erase all the data in your U disk. Make a backup first if necessary.
Step 5. Click «Flash» to start writing the image .iso file.
After the writing is complete, restart the computer and choose to boot from the U disk.
#Restart Computer and Jailbreak iOS Device
Step 6. Restart the computer and Press F12 when the screen goes dark and before the brand logo appears.
Use the errow keys to navigate and the Enter key to select. Select the U disk you used in the previous session to start. Usually the key is F12 and it might differ according to brands.
Step 7. Press the Alt+F2 key, select to run the Checkra1n jailbreak tool (GUI).
Step 8. Checkra1n will start with the following starting interface. Use the errow keys to navigate and the Enter key to select.
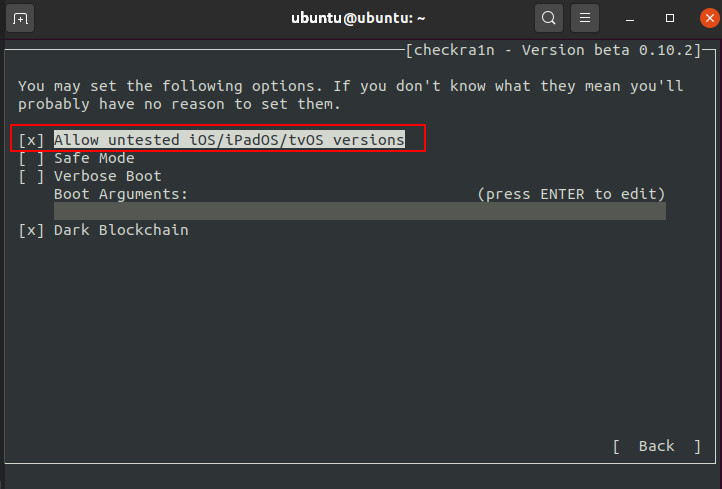
Step 9. Click «Options». For iPhone 6s, 6s plus, 7 and 7 plus, please select «Allow untested iOS/iPadOS/tv OS versions.»
Special reminder: When jailbreaking iPhone8, 8P, X, you need to check the first item «Allow untested iOS/iPadOS/tv OS versions»and «Skip A11 BPR check», and then return to start jailbreaking.
Step 10. Your device will automatically enter recovery mode. When it enter recovery mode successfully, click «Next».
After that, you need to put the device into DFU mode manually. Just follow the instructions on the Checkra1n interface. Here my device is an iPhone 8plus running iOS 14.6.
After your device enters DFU mode successfully, Checkra1n will start jailvreaking automatically and it might takes a moment.
If the «All Done» text appears on the Checkra1n interface, then the jailbreaking succeeds. You can press «Ctrl + Alt + Delete» to restart your computer and bypass the iCloud activation lock.
If the above method cannot be jailbroken, or a Lockdown -21 error is displayed, then use the following jailbreak method:
In the start interface, select the Alt + F3 key combination to enter the command line jailbreak mode. At this time, you only need to tighten and enter the DFU mode. The jailbreak tool will automatically jailbreak, and no other operations are required. Only when All done is displayed at the end, the jailbreak is successful!
Solution 2: Jailbreak iOS with Checkra1n
- Device models supported to jailbreak on iOS 14.x :full support for Apple chip A10/A10X devices — iPhone 6s6s plus77plus, iPad (2018, 6th generation)
iPad (2019, 7th generation), iPod touch (2019, 7th generation)
limited support for A11 devices on iOS 14.x (Options > Skip A11 BPR check) — iPhone 8/8 plus/X. After jailbreaking A11 devices, do not set Passcode, Touch ID, Face ID, or password for your lock screen. - If you have access to a computer running macOS 10.13 — 10.15, you are recommended to Jailbreak iOS Device on Mac first.
- According to our tests, the jailbreaking for iPhone 5S will fail using this method. If you are using iPhone 5S, please jailbreak it on a Mac.
Check the video here to learn quickly on how to jailbreak iOS on Windows with Checkra1n:
Preparations for Jailbreaking iOS on Windows
Preparations needed for jailbreaking iOS devices on Windows:
- Windows 7 or later, 32 or 64 bit
- USB flash drive with 2 GB, or more, capacity
- Download ubuntu .iso file
- Download rufus.exe to create USB drive for Ubuntu
- Download checkra1n-x86_64 file to jailbreak iOS in Ubuntu
Detailed Steps for Jailbreaking iOS on Windows
# Create Ubuntu USB Flash Drive
Step 1. Insert your USB flash drive.
Step 2. Download the executable Rufus and run it – no installation is necessary. Once downloaded, the application is ready to use.
Step 3. Click the «Select» button and find the Ubuntu image you’ve downloaded. After selecting, the «ubuntu-20.04.1-desktop-amd64.iso» file will appear in the boot selection. Keep the other options default and click «Start«.
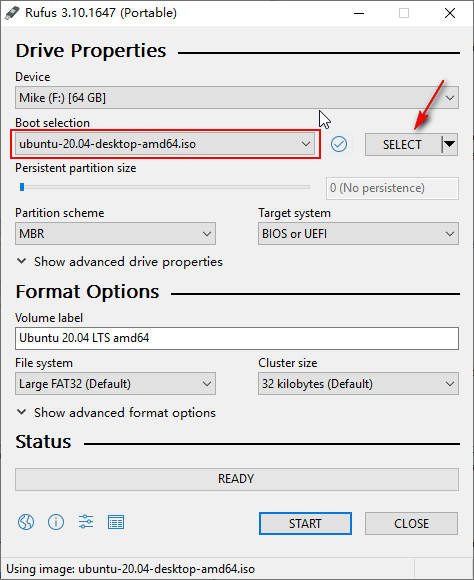
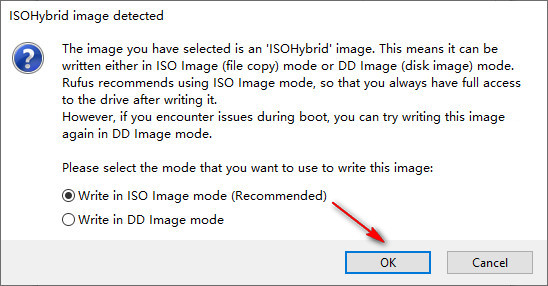
Step 4. Rufus will show a warning that all data on your live USB will be destroyed. Please backup your USB files if necessary and then click «OK«. Once an ISOHybrid image is detected, select the recommended option and click «OK«.
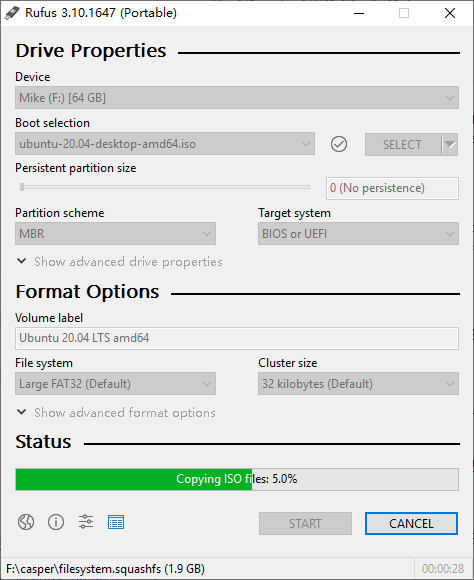
Wait for 2 to 3 minutes when Rufus is creating USB flash drive of Ubuntu.
Click «Close» when the process completes.
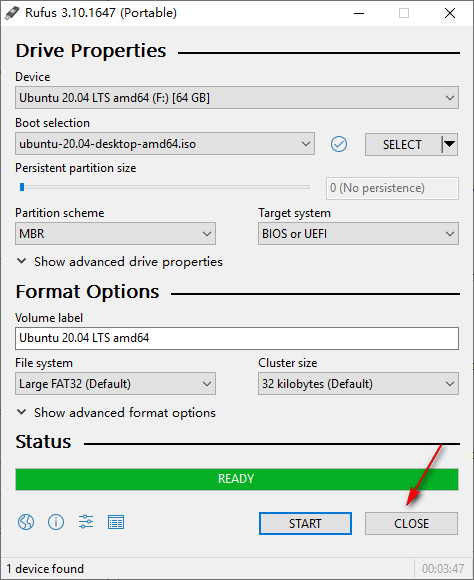
Please re-plugin the USB flash after creating Ubuntu drive in case that it becomes unrecognized.
# Boot Ubuntu on Windows
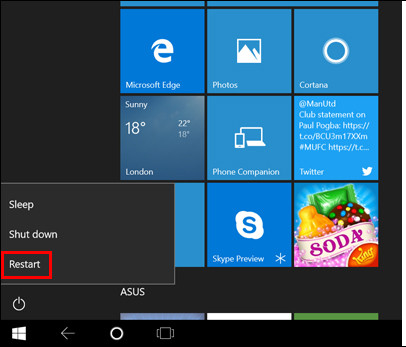
Step 5. Go to «Windows» > «Restart» to restart your compuer.
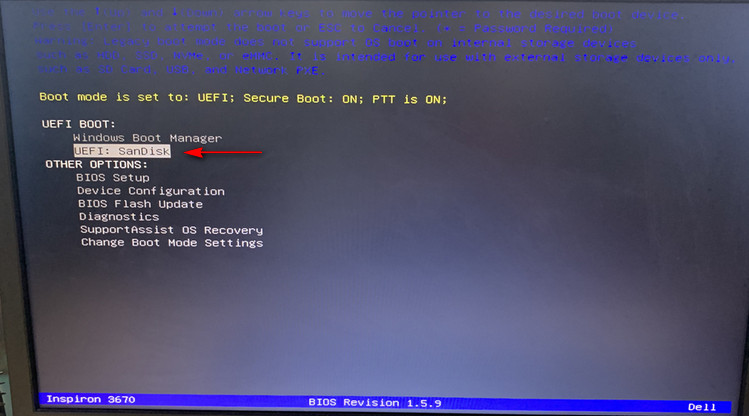
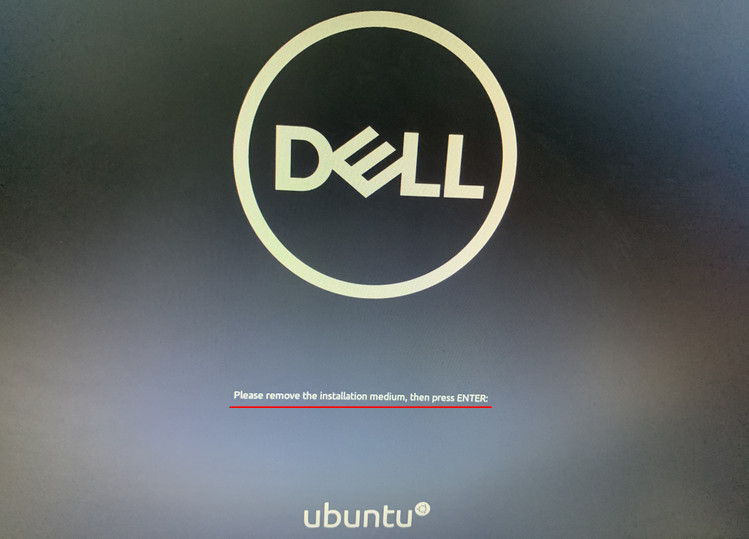
Press the F12 shortcut key when the computer is turned on and before the operating system loading. Here my computer is Dell.
For most computer brands, the keyboard shortcut for launching BIOS is F12. If F12 does not work, you need to search for the correct key that matches your brand.
The BIOS control window of your computer will appear. On the BIOS window, you need to choose the Ubuntu USB flash drive you’ve just created. Use the arrow keys on your keyboard to select the correct option, and then press «Enter«.
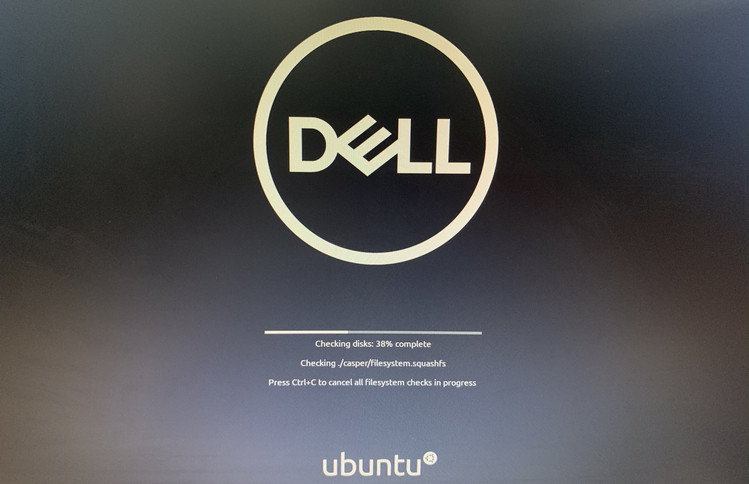
Step 6. You’ll see the Ubuntu system loading as below. All Ubuntu filesystem checks are in progress.
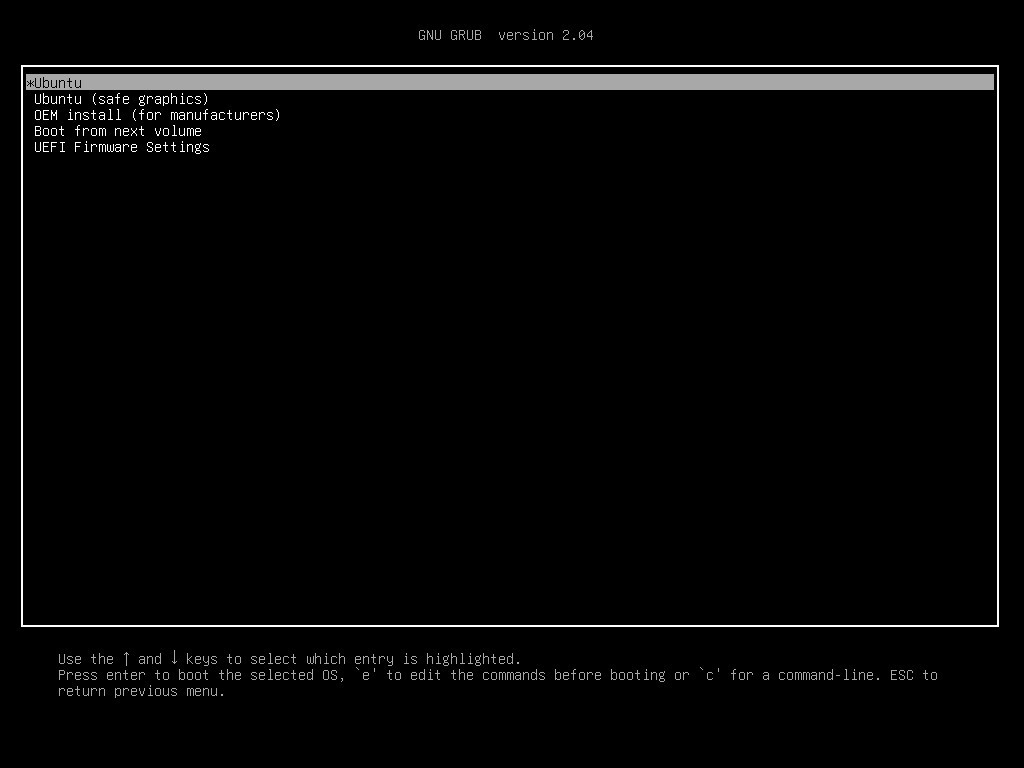
Select the first option «*Ubuntu» to boot the selected Ubuntu OS.
Step 7. When the booting ends, select «Try Ubuntu» to start Ubuntu from the flash drive.

Now you’ve entered the Ubuntu system. Keep your iPhone/iPad/iPod touch connected to the computer and you’ll see it on the desktop.
# Jailbreak iOS Device
Step 8. Find the «checkra1n-x86_64» jailbreak tool file you’ve downloaded before. If you haven’t downloaded the file before restarting the computer, you can download it now through a browser. To open Checkra1n jailbreak tool, you’ll need to use Terminal.
Open Terminal, enter codes in Terminal in succession (you can copy the codes in the quotations directly):
- enter «chmod +x » (there is a space before the plus sign and a space after the x) and drag the «checkra1n-x86_64» file to the Terminal window and press «Enter» key.
- enter «sudo » (there is a space after sudo) and drag the «checkra1n-x86_64» file to the Terminal window again, then press the «Enter» key.
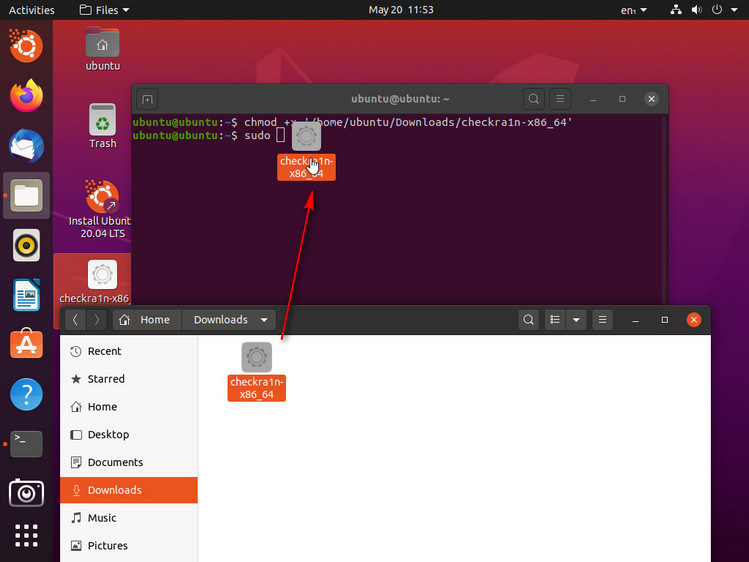
If the Checkra1n file can’t be draged to Terminal, please copy and paste it to the desktop. Right click the file and choose «Show in Files» and then drag it again.
If the codes are correctly entered in the previous step, then Checkra1n will be running with the following screen appear:
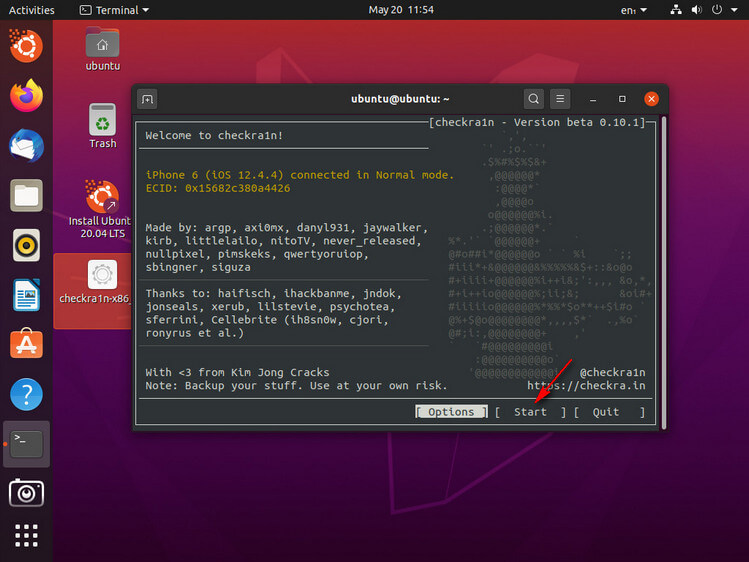
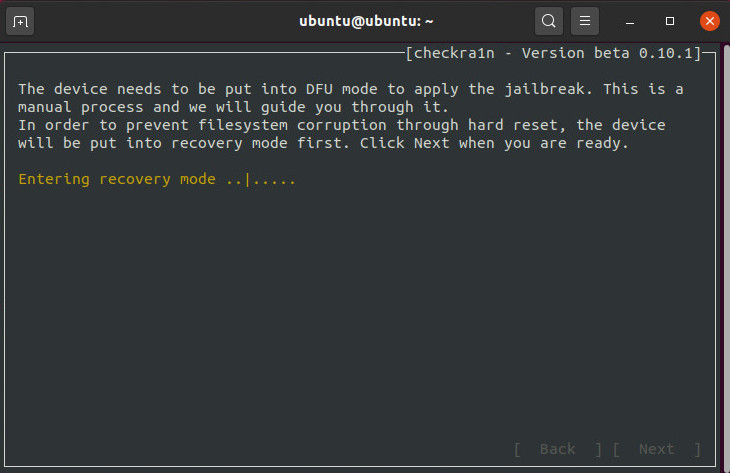
Step 9. To jailbreak your iOS device, Checkra1n requires your device to be in recovery mode.
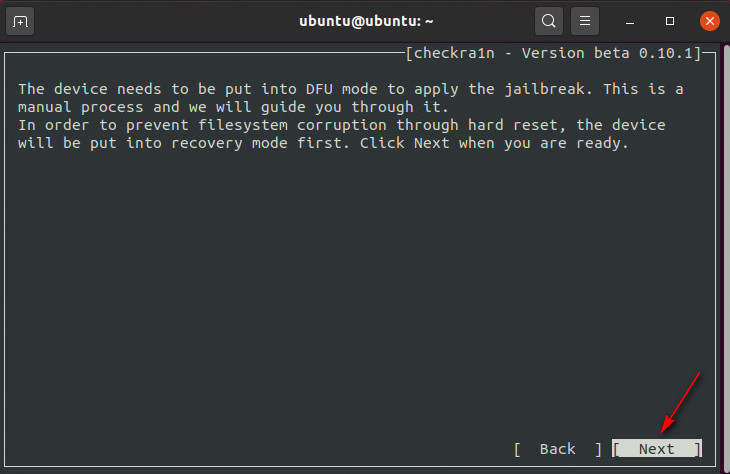
Click «Next» and Checkra1n will help your iOS device enter recovery mode automatically.
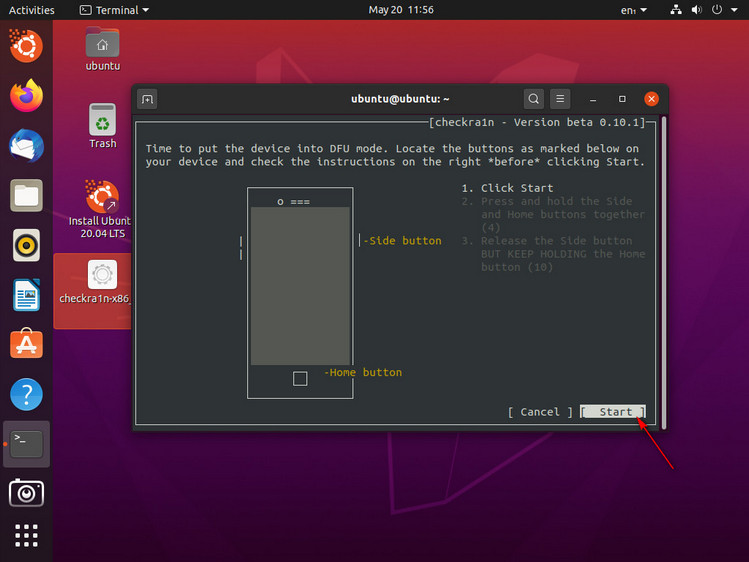
Click «Start» and follow the given instructions on Checkra1n to put your iOS device into DFU mode.
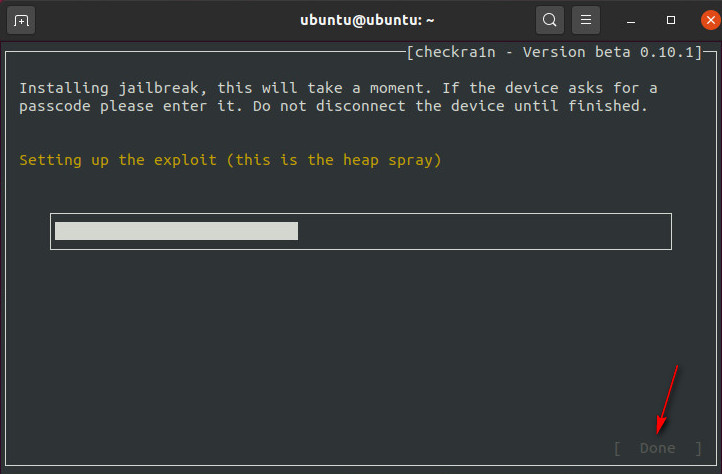
After entering DFU mode successfully, Checkra1n will immediately start installing jailbreak. Clik «Done» when the jailbreaking process completes.
Step 10. After successful jailbreaking, quit Ubuntu and restart your computer. Go to the top right corner, click «Power» > «Power Off» > «Restart«.
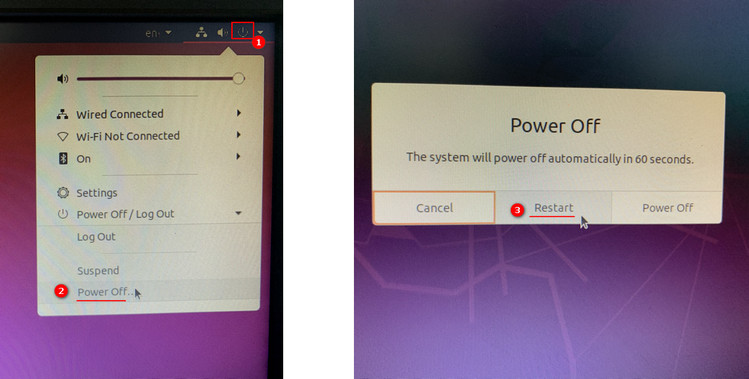
Manually unplug your USB flash from your computer’s USB port and then press «Enter«.
After restarting, your computer will automatically enter Windows operating system. Launch iBypasser Windows version, and click «Start Bypass» to finish bypassing the iCloud activation lock screen.
FAQs: Common Errors and Problems when Jailbreaking
Q1. What to Do when the «Start» button of Checkra1n is grey?
If your device is running versions that have not been tested by Checkra1n, the «Start«button on Checkra1n will be grey. You need to click «Options» and select «Allow untested iOS/iPadOS/tvOS versions» and click «Back» then the «Start» button will be usable.
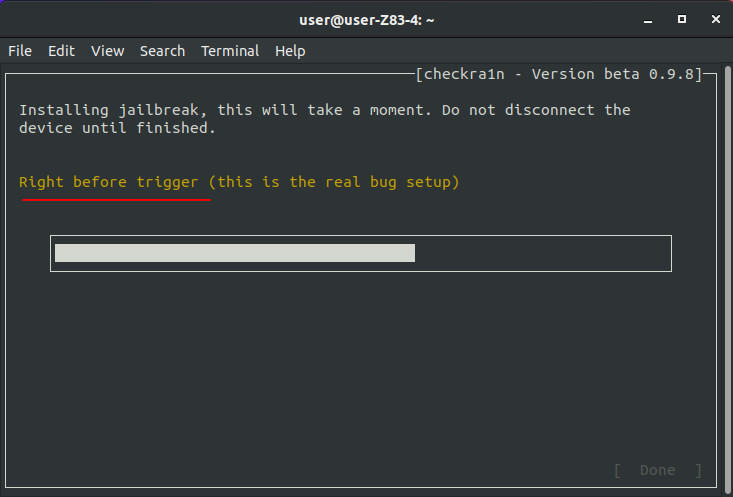
Q2. What to Do when Jailbreaking Gets Stuck on «Right before trigger»?
If Chcekra1n gets stuck on «Right before trigger (this is the real bug setup)» screen, try the following solutions to fix this:
- use another USB and repeat the tutorial steps
- flash your iOS device and restart the computer to try again
Q3. What to Do when the Jailbreaking Fails?
If the jailbreak fails, please plug your device into the USB port on the back of the computer mainframe and try the jailbreak process again. Usually the USB port on the back of the computer mainframe is 2.0 which has better compatibility then the 3.0 version in the front.
Q4. How to Solve the -20 Error when Jailbreaking iPad on iOS 14.5 and 14.6?
For the iPad Pro 12.9-inch and iPad mini4 models, when jailbreaking iOS14.5, 14.5.1, and 14.6, Error -20 will appear, which leads to the final jailbreak failure (as shown above). The reason is that some new versions such as 14.5 and the jailbreak tool checkra1n have problems with the driver kernel, resulting in the failure of the system to boot correctly in the last step. Here is a method that can successfully solve this problem.
Tools you’ll need:
Step 1. Download the tool and file given above.
Step 2. Drag Checkra1n 0.12.4 to the desktop. Right click the file and go to «Show Package Contents» to find the Checkra1n file.
Step 3. Open Terminal which you can find through Applications > Utilities, and then drag the Checkra1n file to the Terminal window.
Step 4. Enter » -k » (there is a space before and after -k ). Drag the PongoConsolidated.bin file to the Terminal window.
Step 5. Press «Enter» on your keyboard and the Checkra1n GUI will be launched. Now you can do the normal jailbreak steps to jailbreak your device. If you’ve tested other devices with the -20 error, please let me know in the comment.
After the jailbreaking is done, launch iBypasser Windows version, and click «Start Bypass» to finish bypassing the iCloud activation lock screen.
Источник


