- Creating libraries for Android applications — Tutorial
- 1. Android library projects and Java libraries
- 2. Custom Android library modules
- 2.1. Using custom library modules
- 2.2. Creating custom Android library modules
- 3. Prerequisite
- 4. Exercise: Create an Android library module
- 4.1. Create library module
- 4.2. Remove generated dependency from build.gradle of the library project
- 4.3. Create the model class
- 4.4. Create instances
- 4.5. Define dependency to the library project
- 4.6. Use library project to update detailed fragments
- 4.7. Validate implementation
- 5. Exercise: Deploy a library project
- How to Import External JAR Files in Android Studio?
- How to find the libs folder in Android Studio?
- Binding a .JAR
- Overview
- Walkthrough
- Creating the Bindings Library
- Using the Bindings Library
- Summary
Creating libraries for Android applications — Tutorial
This tutorial describes how to create and use library projects in Android.
1. Android library projects and Java libraries
Android project can use code contained in JAR files (Java libraries)
If you want to use libraries, these must only use API available in Android. For example, the java.awt and javax.swing packages are not available on Android.
In addition to JAR files, the Android uses a binary distribution format called Android ARchive(AAR). The .aar bundle is the binary distribution of an Android Library Project.
An AAR is similar to a JAR file, but it can contain resources as well as compiled byte-code. A AAR file can be included in the build process of an Android application similar to a JAR file.
It is possible to create libraries modules which can be used as dependencies in Android projects. These modules allow you to store source code and Android resources which can be shared between several other Android projects.
To use a Java library (JAR file) inside your Android project, you can simple copy the JAR file into the folder called libs in your application. *.jar files in this folder are included into the compile classpath via the default build.gradle file.
2. Custom Android library modules
2.1. Using custom library modules
An Android library module can contain Java classes, Android components and resources. Only assets are not supported.
The code and resources of the library project are compiled and packaged together with the application.
Therefore a library module can be considered to be a compile-time artifact.
2.2. Creating custom Android library modules
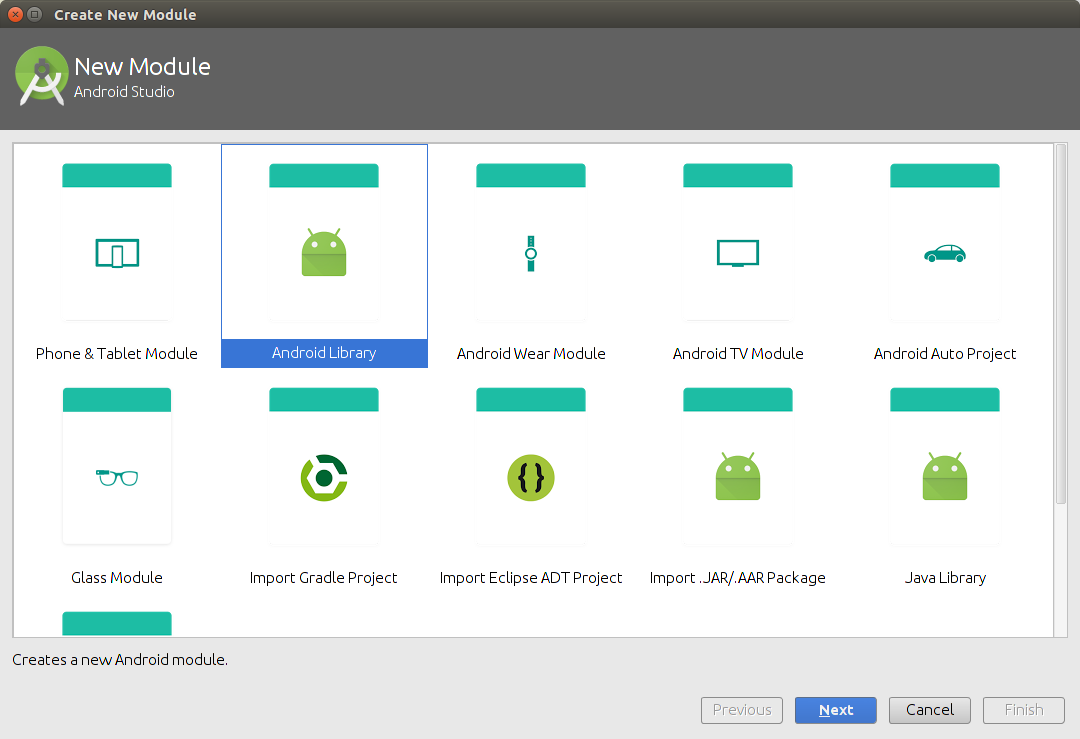
Using library projects helps you to structure your application code. To create a new library module in Android Studio, select File New Module and select Android Library .
3. Prerequisite
The following example assumes that you have created an Android project with the com.example.android.rssfeed top level package based on the following tutorial: https://www.vogella.com/tutorials/AndroidFragments/article.html#fragments_tutorial
4. Exercise: Create an Android library module
Our library project will contain the data model and a method to get the number of instances. The library provides access to (fake) RSS data. An RSS document is an XML file which can be used to publish blog entries and news.
4.1. Create library module
For Android Studio each library is a module. To create a new library module in Android Studio, select File New Module and select Android Library .
Use com.example.android.rssfeedlibrary as module name and Rssfeed Library as library name.
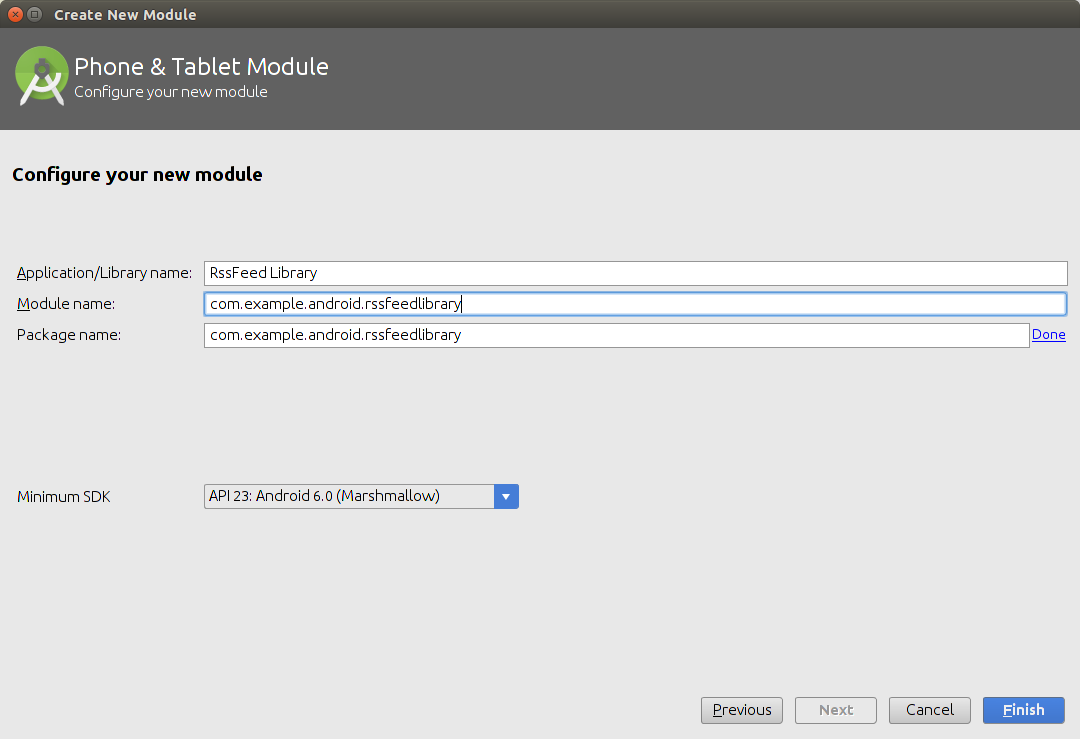
If prompted for a template select that no activity should be created. As a result Android Studio shows another module.

4.2. Remove generated dependency from build.gradle of the library project
Open the build.gradle of the library project. Delete the dependencies closure, your library does not need any dependency and the generated dependency can cause problems for the build.
Ensure you remove dependencies from the correct library project and not from your app.
4.3. Create the model class
Create an RssItem class which can store data of an RSS entry.
Generate the getters and setter, the constructor and a toString() method. The result should look like the following class:
4.4. Create instances
Create a new class called RssFeedProvider with a static method to return a list of RssItem objects. This method does currently only return test data.
4.5. Define dependency to the library project
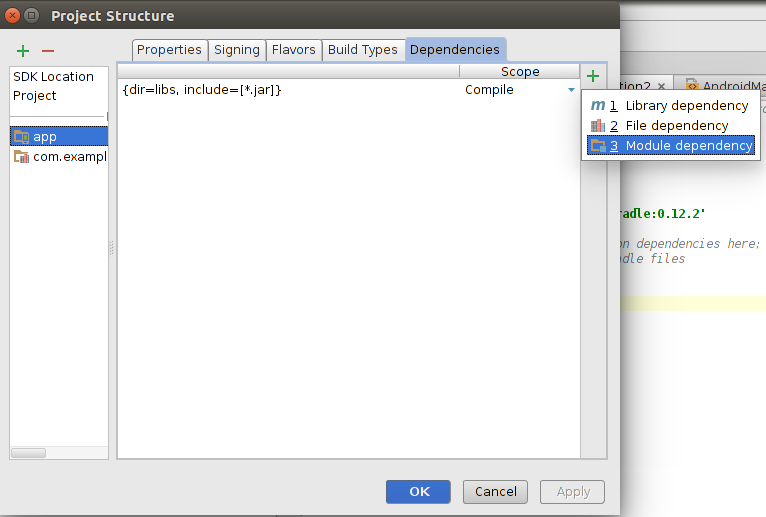
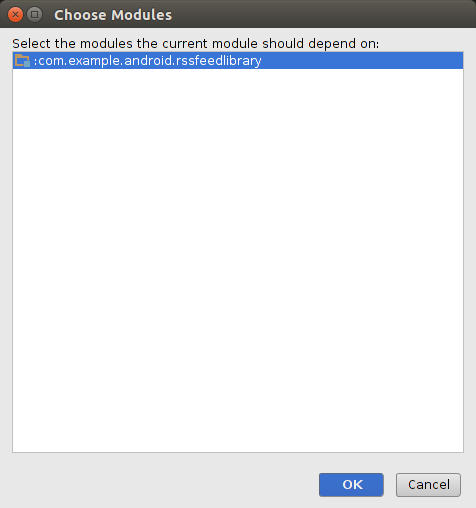
To use the library add it as a dependency in your project select File Project Structure . Select the app entry. Switch to the Dependencies tab and select Module dependencies via the + sign.

4.6. Use library project to update detailed fragments
Update the updateDetail method in your MyListFragment class to use the RssFeedProvider provider. This is only test code.
4.7. Validate implementation
Start your application and ensure that the toString value of the list of RssItems is displayed in the DetailFragment .
| The list is currently generated randomly every time you press the button. |
5. Exercise: Deploy a library project
Create a new library project called recyclerbaseadapter with the same top level package. Add the following to its build.gradle file.
Create or move a MyBaseAdapter class in this library.
Deploy it by running the gradle uploadArchives task.
You can now define a dependency to this library, by adding mavenLocal() and using:
Источник
How to Import External JAR Files in Android Studio?
A JAR (Java Archive) is a package file format typically used to aggregate many Java class files and associated metadata and resources (text, images, etc.) into one file to distribute application software or libraries on the Java platform. In simple words, a JAR file is a file that contains a compressed version of .class files, audio files, image files , or directories. We can imagine .jar files as a zipped file(.zip) that is created by using WinZip software. Even, WinZip software can be used to extract the contents of a .jar. So you can use them for tasks such as lossless data compression, archiving, decompression, and archive unpacking. Let us see how to create a .jar file:
To create a .jar file, use the jar cf command in the following way:
jar cf jarfilename inputfiles
Here, cf represents to create the file. For example, assuming our package pack is available in C:\directory, to convert it into a jar file into the pack.jar, we can give the command as:
Now, the pack.jar file is created. Let’s see the steps involved in importing or adding a JAR file in Android Studio:
Step 1: Download any jar file as your requirement. For example, download the following three mail dependency JAR files for Android Studio. Please refer to this link to download those JAR files. Download all the three JAR files somewhere in the system.
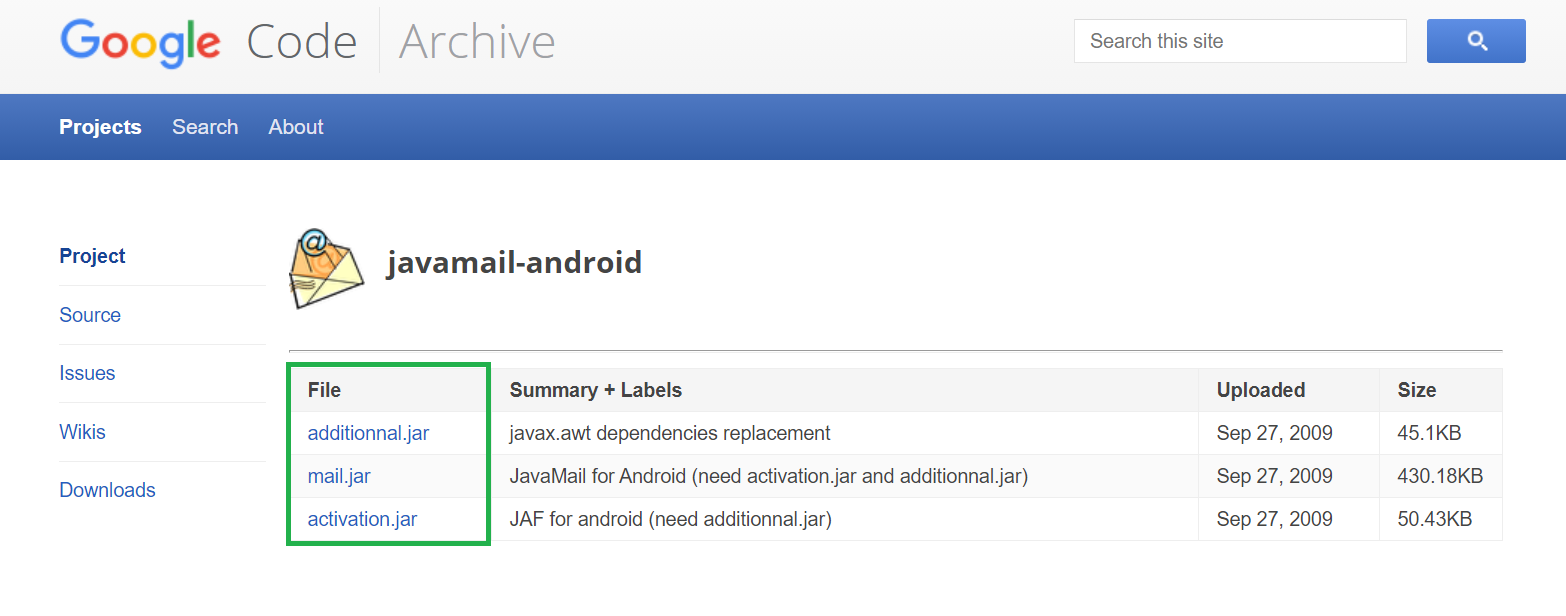
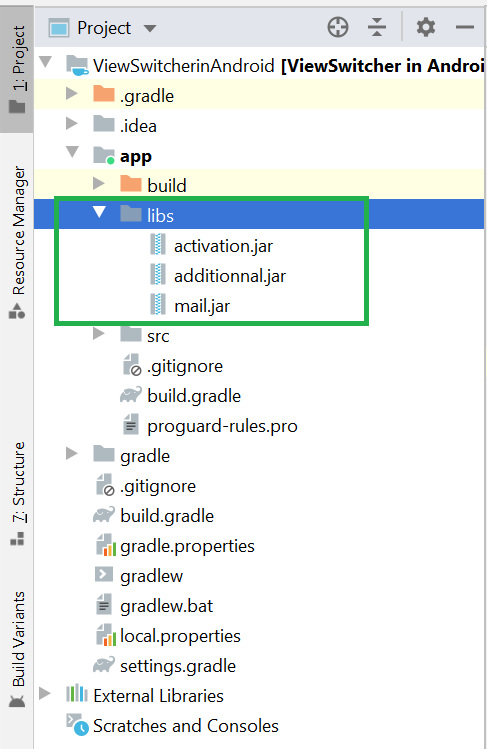
Step 2: Copy these three files and paste it into the libs folder as shown in the below image.
How to find the libs folder in Android Studio?
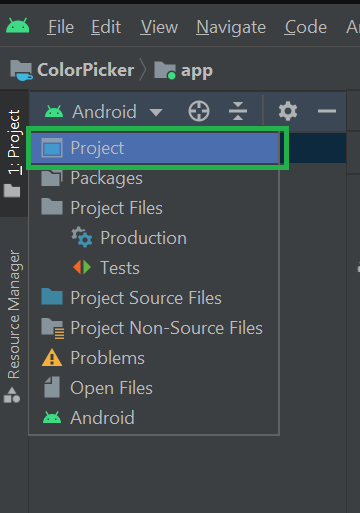
If you are unable to find the libs folder in Android studio then open your android project in “Project” mode If the project is already opened in the “Android” mode.
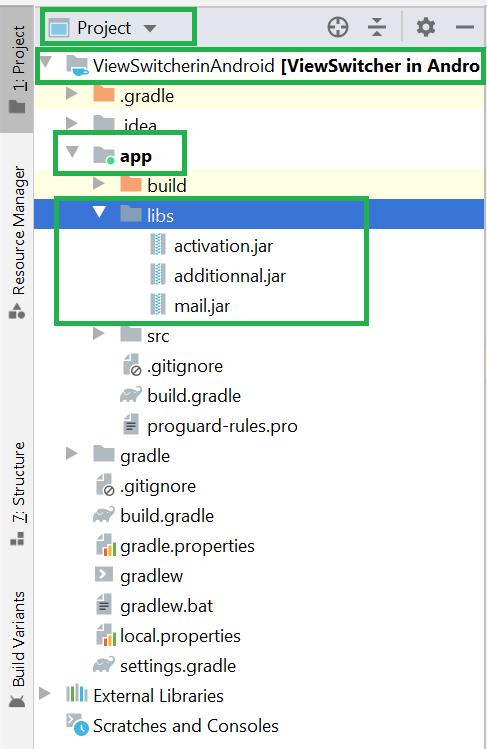
Then go to Your Project Name > app > libs and right-click on it and paste the downloaded JAR files. You may also refer to the below image.
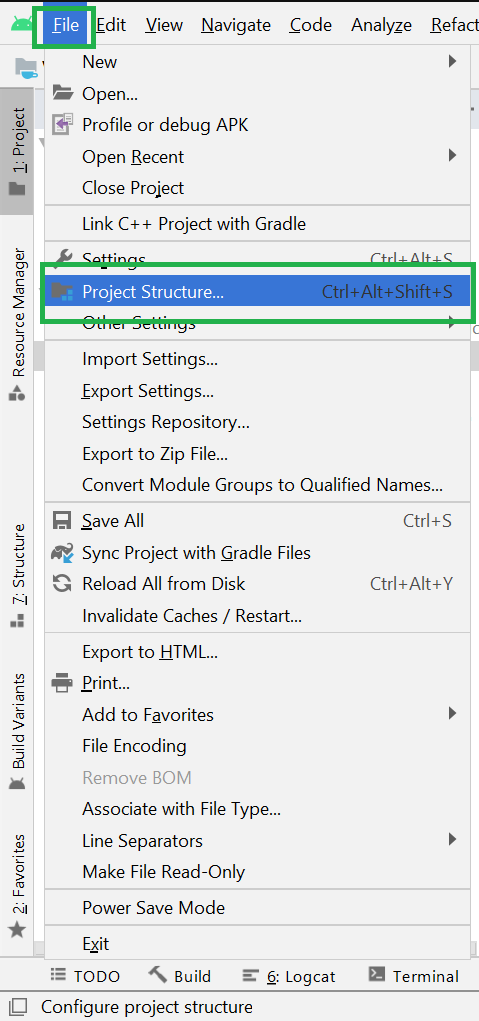
Step 3: Once the JAR files are successfully copied to the libs folder we will add them as dependency files. To do so first go to File > Project Structure as shown in the below image.
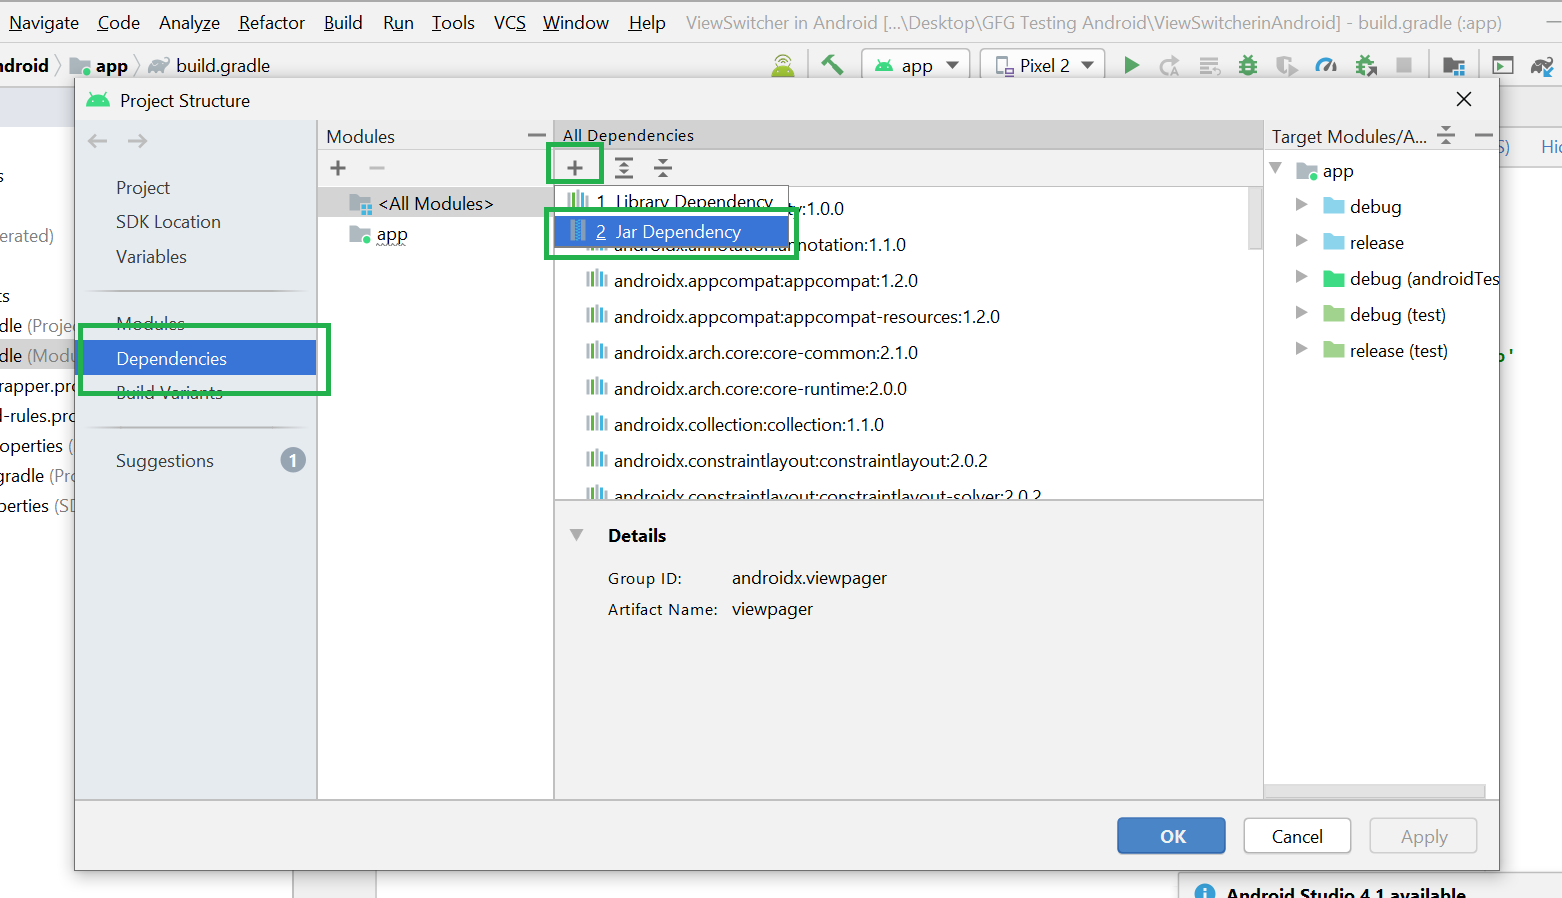
Step 4: A pop-up screen will arise like in the following image. Now click on the Dependencies then click on the ‘+‘ icon and select Jar Dependency as shown in the below image.
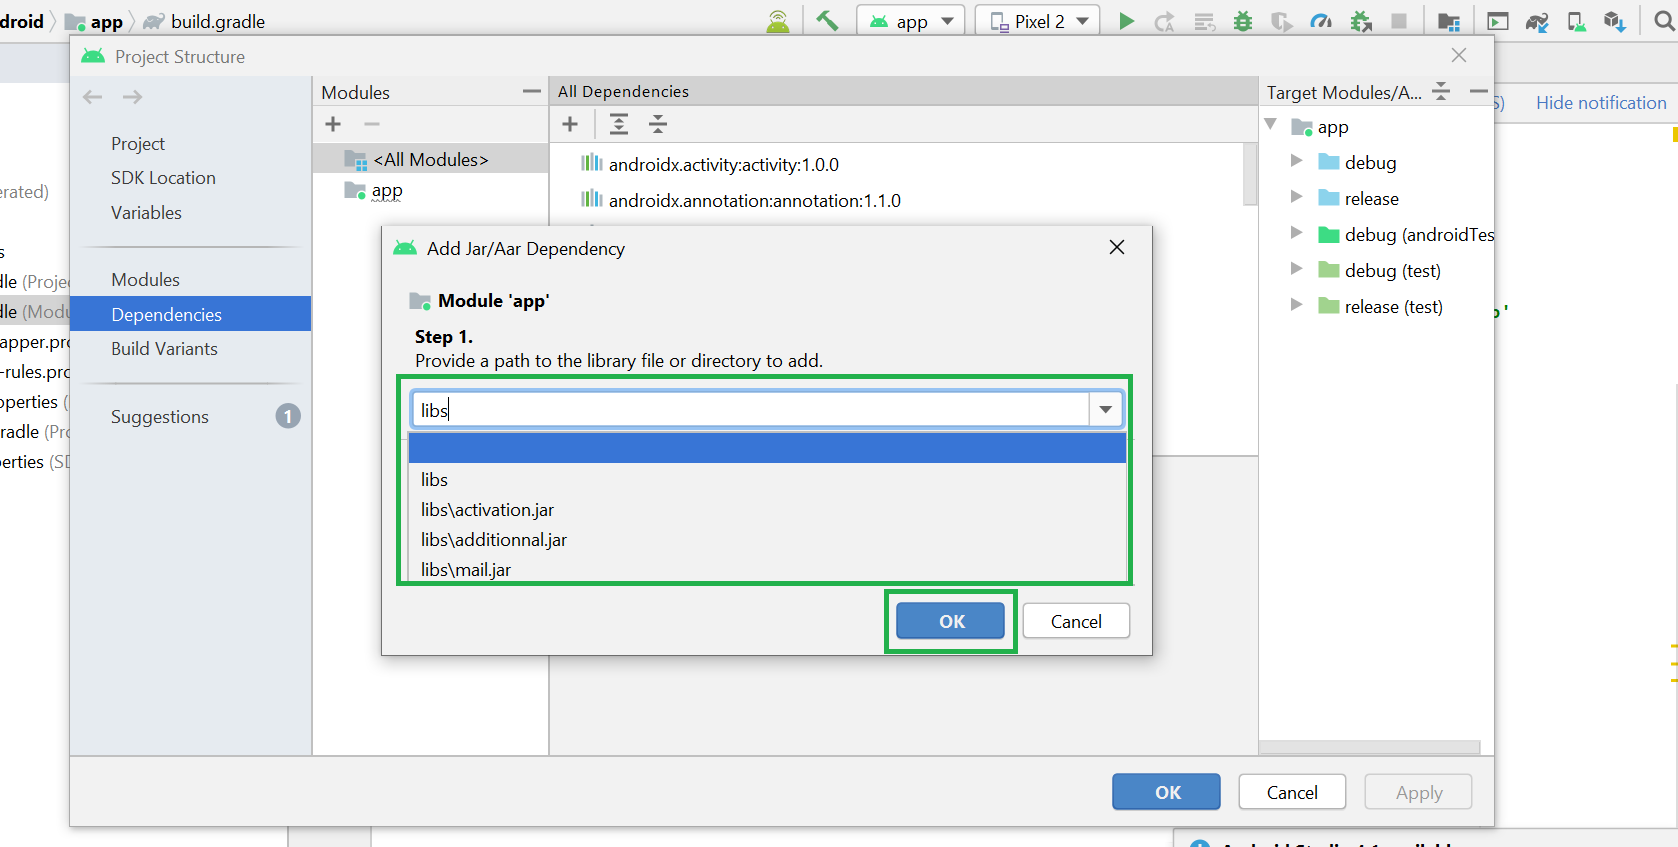
Step 5: After clicking on the Jar Dependency another small pop-up screen will arise like the following image and select the JAR file one by one and click on OK.
Step 6: Now select all jar files and click on the OK button and the Gradle will Start building.
Источник
Binding a .JAR
We’re currently investigating custom binding usage on the Xamarin platform. Please take this survey to inform future development efforts.
This walkthrough provides step-by-step instructions for creating a Xamarin.Android Java Bindings Library from an Android .JAR file.
Overview
The Android community offers many Java libraries that you may want to use in your app. These Java libraries are often packaged in .JAR (Java Archive) format, but you can package a .JAR it in a Java Bindings Library so that its functionality is available to Xamarin.Android apps. The purpose of the Java Bindings library is to make the APIs in the .JAR file available to C# code through automatically-generated code wrappers.
Xamarin tooling can generate a Bindings Library from one or more input .JAR files. The Bindings Library (.DLL assembly) contains the following:
The contents of the original .JAR file(s).
Managed Callable Wrappers (MCW), which are C# types that wrap corresponding Java types within the .JAR file(s).
The generated MCW code uses JNI (Java Native Interface) to forward your API calls to the underlying .JAR file. You can create bindings libraries for any .JAR file that was originally targeted to be used with Android (note that Xamarin tooling does not currently support the binding of non-Android Java libraries). You can also elect to build the Bindings Library without including the contents of the .JAR file so that the DLL has a dependency on the .JAR at runtime.
In this guide, we’ll step through the basics of creating a Bindings Library for a single .JAR file. We’ll illustrate with an example where everything goes right – that is, where no customization or debugging of bindings is required. Creating Bindings Using Metadata offers an example of a more advanced scenario where the binding process is not entirely automatic and some amount of manual intervention is required. For an overview of Java library binding in general (with a basic code example), see Binding a Java Library.
Walkthrough
In the following walkthrough, we’ll create a Bindings Library for Picasso, a popular Android .JAR that provides image loading and caching functionality. We will use the following steps to bind picasso-2.x.x.jar to create a new .NET assembly that we can use in a Xamarin.Android project:
Create a new Java Bindings Library project.
Add the .JAR file to the project.
Set the appropriate build action for the .JAR file.
Choose a target framework that the .JAR supports.
Build the Bindings Library.
Once we’ve created the Bindings Library, we’ll develop a small Android app that demonstrates our ability to call APIs in the Bindings Library. In this example, we want to access methods of picasso-2.x.x.jar:
After we generate a Bindings Library for picasso-2.x.x.jar, we can call these methods from C#. For example:
Creating the Bindings Library
Before commencing with the steps below, please download picasso-2.x.x.jar.
First, create a new Bindings Library project. In Visual Studio for Mac or Visual Studio, create a new Solution and select the Android Bindings Library template. (The screenshots in this walkthrough use Visual Studio, but Visual Studio for Mac is very similar.) Name the Solution JarBinding:

The template includes a Jars folder where you add your .JAR(s) to the Bindings Library project. Right-click the Jars folder and select Add > Existing Item:

Navigate to the picasso-2.x.x.jar file downloaded earlier, select it and click Add:

Verify that the picasso-2.x.x.jar file was successfully added to the project:

When you create a Java Bindings library project, you must specify whether the .JAR is to be embedded in the Bindings Library or packaged separately. To do that, you specify one of the following build actions:
EmbeddedJar – the .JAR will be embedded in the Bindings Library.
InputJar – the .JAR will be kept separate from the Bindings Library.
Typically, you use the EmbeddedJar build action so that the .JAR is automatically packaged into the bindings library. This is the simplest option – Java bytecode in the .JAR is converted into Dex bytecode and is embedded (along with the Managed Callable Wrappers) into your APK. If you want to keep the .JAR separate from the bindings library, you can use the InputJar option; however, you must ensure that the .JAR file is available on the device that runs your app.
Set the build action to EmbeddedJar:

Next, open the project Properties to configure the Target Framework. If the .JAR uses any Android APIs, set the Target Framework to the API level that the .JAR expects. Typically, the developer of the .JAR file will indicate which API level (or levels) that the .JAR is compatible with. (For more information about the Target Framework setting and Android API levels in general, see Understanding Android API Levels.)
Set the target API level for your Bindings Library (in this example, we are using API level 19):

Finally, build the Bindings Library. Although some warning messages may be displayed, the Bindings Library project should build successfully and produce an output .DLL at the following location: JarBinding/bin/Debug/JarBinding.dll
Using the Bindings Library
To consume this .DLL in your Xamarin.Android app, do the following:
Add a reference to the Bindings Library.
Make calls into the .JAR through the Managed Callable Wrappers.
In the following steps, we’ll create a minimal app that uses the Bindings Library to download and display an image in an ImageView ; the «heavy lifting» is done by the code that resides in the .JAR file.
First, create a new Xamarin.Android app that consumes the Bindings Library. Right-click the Solution and select Add New Project; name the new project BindingTest. We’re creating this app in the same Solution as the Bindings Library in order to simplify this walkthrough; however, the app that consumes the Bindings Library could, instead, reside in a different Solution:

Right-click the References node of the BindingTest project and select Add Reference. :

Check the JarBinding project created earlier and click OK:

Open the References node of the BindingTest project and verify that the JarBinding reference is present:

Modify the BindingTest layout (Main.axml) so that it has a single ImageView :
Add the following using statement to MainActivity.cs – this makes it possible to easily access the methods of the Java-based Picasso class that resides in the Bindings Library:
Modify the OnCreate method so that it uses the Picasso class to load an image from a URL and display it in the ImageView :
Compile and run the BindingTest project. The app will startup, and after a short delay (depending on network conditions), it should download and display an image similar to the following screenshot:

Congratulations! You’ve successfully bound a Java library .JAR and used it in your Xamarin.Android app.
Summary
In this walkthrough, we created a Bindings Library for a third-party .JAR file, added the Bindings Library to a minimal test app, and then ran the app to verify that our C# code can call Java code residing in the .JAR file.
Источник


