- Инструкция по установке Java Development Kit (JDK)
- Java jdk для андроид
- Java jdk для андроид
- ORACLE JAVA FOR MOBILE AND EMBEDDED DEVICES — DOWNLOADS
- JAVA ME SDK 8.2
- REFERENCE IMPLEMENTATIONS
- Install Android Development Tools
- Before You Begin
- Background
- What Do You Need?
- Install and Set Up Android Studio
- Install an Android SDK Platform Package
- Create and Start an Android Virtual Device
- Install the Java SE Development Kit 8
- Create Environment Variables
Инструкция по установке Java Development Kit (JDK)

Думаю для вас не будет секретом, что разработка большинства приложений для мобильной платформы Android ведется преимущественно на языке Java. Для создания приложений на языке Java обязательно специальное программное обеспечение. Последние версии этого программного обеспечения всегда можно загрузить с сайта разработчика, oracle.com . К этому программному обеспечению относятся такие инструменты как JDK (Java Development Kit) и JRE (Java Runtime Environment).
JRE (Java Runtime Environment) — это инструмент представляющий собой среду выполнения — минимальную реализацию виртуальной машины, в которой запускается и выполняется программный код на Java. JDK (Java Development Kit) – это инструмент представляющий целый набор инструментов, комплект разработчика приложений на языке Java. На самом деле, JRE входит в состав JDK, равно так же как и другие различные стандартные библиотеки классов Java, компилятор javac, документация, примеры кода и разнообразные служебные утилиты. Весь этот набор распространяется бесплатно и имеет версии для разных операционных систем, поэтому каждый у кого есть желание может скачать его и использовать.
В JDK не входит интегрированная среда разработки, предполагается, что её разработчик будет устанавливать отдельно. Существует великое множество IDE для Java-разработки, например: IntelliJ IDEA, Borland JBuilder, NetBeans и др. Для разработки приложений под Андроид мы выбираем Eclipse IDE.
Как установить JDK. Для установки JDK, необходимо зайти на сайт oracle.com выбрать вкладку Downloads, потом JAVA for developers.
Далее выбираем JDK как на рисунке, вам нужно найти версию JDK, которая установится на ваш компьютер – выберите операционную систему и разрядность:
После того как вы скачали нужную вам JDK, запускаем скачанный файл и после некоторого ожидания вы увидите стартовый экран для установки. Жмем “Next”.
На следующем экране вам предложат директорию для установки. Нажимаем «Next» для установки в директорию по умолчанию или же нажимаем на кнопку “Change…” и выбираем свою директорию. Запомните путь до директории в которую вы установили JDK, на рисунке он выделен красным:
Когда установка Java Development Kit (JDK) почти закончится, появится форма в которой вам предложат установить JRE (Java Runtime Environment), устанавливаем. Здесь нет необходимости менять директорию установки – жмем “Next”.
Некоторое время перед вами будет экран, на котором будет такая надпись (3 миллиарда устройств используют Java):
Затем вы увидите, что установка закончилась:
На этом установка Java Development Kit практически завершена. Но остается сделать еще один шаг-прописать путь до файлов JDK в путях операционной системы. Это позволит нам запускать основные файлы из командной строки. И также мы установим переменную JAVA_HOME. На операционной системе Windows 7 это делается следующим образом: В меню “Пуск” найдите пункт “Компьютер” и кликните на нем правой кнопкой мыши. Появится меню выберите в нем пункт “Свойства”. Появится окно:
Выбираем пункт “Дополнительные параметры системы”. Появится окно, в котором выбираем пункт “Переменные среды”.
В появившемся окне вам нужно создать переменную – “JAVA_HOME”. И отредактировать переменную “Path”. Для этого нажмите кнопку “Создать”.
Вариант установки переменной “JAVA_HOME” показан на рисунке. Вот тут-то и пригодится та строка, которую я предлагал вам запомнить при установке JDK.
Установка переменной “Path” скорее всего ее создавать не надо – она уже обычно есть. Если нет, то в списке системных переменных ищем переменную «Path» кликаем по ней, вписываем туда дополнительный путь C:\Program Files\Java\jdk1.7.0_07\bin и нажимаем «Ок» (будьте очень внимательны — здесь надо вводить строку предварительно поставив “;” в конце списка всех путей и еще надо добавить строку “\bin” после.
Источник
Java jdk для андроид
Краткое описание:
Работа с java
##О приложении
Этот проект создан для изучения и создания Java приложений на Android.
Вы можете создать и запустить Ява-приложение с JDK 1.7.
(НЕт оффициальной поддержки) Создайте apk-файл (поддержка только armeabi-v7a, x86, x86_64)
## Туториалы(Советы по использованию)
1. Настройте систему https://youtu.be/FZtSbgq8ZN0
2. Создайте файл при помощи библиотеки https://youtu.be/fUFqR8ZlChg
3. Создайте Android приложение https://youtu.be/euZilR8-EhA
##Внимание
Это бета версия,которая будет часто обновляться.
## Todo(. Оставлено по английски,иначе будет утрачен смысл.
1. Java compiler JDK 1.7 ✔
2. Java editor ✔
3. Java auto complete code ✔ (But not working perfect)
4. Java debugger (jdb).
5. Run java file, class file ✔
6. Build java library ✔
7. Support VCS
8. Decompile class, jar
9. Java code formatter (Google Java code formatter) ✔
10. Build Android app. ✔
11. XML auto complete
12. Layout builder for Android
## Что содержит проект?
1. Javac — Java compiler
2. Aapt — Android asset package tool
3. Dx — Dex for dalvik vm
4. Zip Signer
5. Apk сборщик
Это приложение бесплатно, потому что я хочу помочь людям изучать Java. Я работаю для людей. Если вы хотите поддержать проект нажмите на кнопку Донат в приложении.
## Overview
This project is develop to help the community learn java on android.
You can build and run Java file with JDK 1.7.
(No official support) Build apk file (only support armeabi-v7a, x86, x86_64)
##Attention
Because this is beta version so I will update very often.
## Todo
1. Java compiler JDK 1.7 ✔
2. Java editor ✔
3. Java auto complete code ✔ (But not working perfect)
4. Java debugger (jdb).
5. Run java file, class file ✔
6. Build java library ✔
7. Support VCS
8. Decompile class, jar
9. Java code formatter (Google Java code formatter) ✔
10. Build Android app. ✔
11. XML auto complete
12. Layout builder for Android
## What does tools the project include?
1. Javac — Java compiler
2. Aapt — Android asset package tool
3. Dx — Dex for dalvik vm
4. Zip Signer
5. Apk builder
## Contribute
I would absolutely love every possible kind of contributions. If you
have a questions, ideas, need help or want to propose a change just open
an issue. Pull request are greatly appreciated.
This app is free for everyone to learn Java. I work for the community. If you want to donate to the project, you can click donate button in the application.
Источник
Java jdk для андроид
Your search did not match any results.
We suggest you try the following to help find what you’re looking for:
- Check the spelling of your keyword search.
- Use synonyms for the keyword you typed, for example, try “application” instead of “software.”
- Try one of the popular searches shown below.
- Start a new search.
ORACLE JAVA FOR MOBILE AND EMBEDDED DEVICES — DOWNLOADS
Java for Mobile Devices is a set of technologies that let developers deliver applications and services to all types of mobile handsets, ranging from price efficient feature-phones to the latest smartphones.
JAVA ME SDK 8.2
Oracle Java ME SDK 8.2 is now available to support Oracle Java ME Embedded 8.2 and 8.1 platforms and includes plugins for NetBeans.
REFERENCE IMPLEMENTATIONS
Mobile Information Device Profile (MIDP) 2.0
MIDP, combined with the Connected Limited Device Configuration (CLDC), is the Java runtime environment for today’s mobile information devices (MIDs) such as mobile phones and entry level PDAs.
Connected Limited Device Configuration (CLDC) 1.1
CLDC is a Java Community Process effort that has standardized a portable, minimum-footprint Java building block for small, resource-constrained devices. CLDC runs on top of Sun’s K Virtual Machine (KVM) that is provided as part of this release.
Источник
 Install Android Development Tools
 Install Android Development Tools
Before You Begin
 Before You Begin
This 15-minute tutorial shows you how to install Android Studio, which includes the Android SDK, and create an Android Virtual Device (AVD) on which you install an Oracle JavaScript Extension Toolkit (Oracle JET) hybrid mobile application during a later tutorial. The time to complete doesn’t include processing time as a result of your activities.
Background
The Oracle JET command-line interface invokes the Android SDK that you install with Android Studio to build an Android application package (APK) file from the source files of your hybrid mobile application. This APK file is installed on an AVD to enable you to test the hybrid mobile application.
What Do You Need?
- A computer that meets the system requirements to install Android Studio. See System requirements at https://developer.android.com/studio/
Install and Set Up Android Studio
 Install and Set Up Android Studio
Depending on the operating system of your computer, the Android Studio installation wizard prompts you with dialogs where you choose between standard or custom install types. Choose the options recommended by the Android Studio installation wizard as these options include the components that you require to create and install a hybrid mobile application on an AVD. They also include an Android emulator and an emulator accelerator appropriate for your computer, be that Windows, Mac, or Linux.
- Go to the Download page for Android Studio on the Android Developer’s website at https://developer.android.com/studio/ and click DOWNLOAD ANDROID STUDIO.
- Review and accept the terms and conditions in the Download Android Studio dialog that appears and click DOWNLOAD ANDROID STUDIO FOR PLATFORM where PLATFORM refers to the operating system of your machine, such as Windows, Mac, or Linux.
- Go to the Install Android Studio guide at https://developer.android.com/studio/install and follow the instructions for your operating system to install and start Android Studio.
- If you run Android Studio behind a firewall or secure network, an Android Studio First Run dialog appears which displays a button (Setup Proxy) that you click to enter the proxy server settings for your environment. This allows Android Studio to complete the download of the components for a standard install.
- In the Welcome to Android Studio dialog, select Start a new Android Studio project, and then, in the Create New Project wizard, accept the default options to progress to the final screen in the wizard and click Finish.
This enables the Android Studio toolbar with the options that you need to create an AVD. It also downloads and configures the Gradle build tool that the Android SDK invokes to build the APK file when you complete the creation of your Oracle JET hybrid mobile application.
If you run Android Studio behind a firewall or secure network, a Proxy Settings dialog appears that enables you to configure proxy settings for the Gradle build tool that Android Studio downloads and configures. Provide the proxy settings for your environment to ensure that the Gradle build tool functions correctly.
Install an Android SDK Platform Package
 Install an Android SDK Platform Package
- In the Android Studio toolbar, click the SDK Manager icon () to open the Android SDK page in the Default Settings dialog.
- In the SDK Platforms tab, select Android 8.0 (Oreo) with an API Level value of 26, and click Apply. Description of the illustration sdkmgrdialog.png
- Click OK in the confirmation dialog that appears and accept the license agreement to proceed with the installation.
- Once the installation completes, click Finish and then click OK to close the Default Settings dialog.
 ) to open the Android SDK page in the Default Settings dialog.
 Description of the illustration sdkmgrdialog.png
Create and Start an Android Virtual Device
 Create and Start an Android Virtual Device
- In the Android Studio toolbar, click the AVD Manager icon ( ) and click Create Virtual Device in the Android Virtual Device Manager dialog that opens.
- In the Phone category of the Choose a device definition page of the Virtual Device Configuration dialog, select Nexus 5X and click Next.
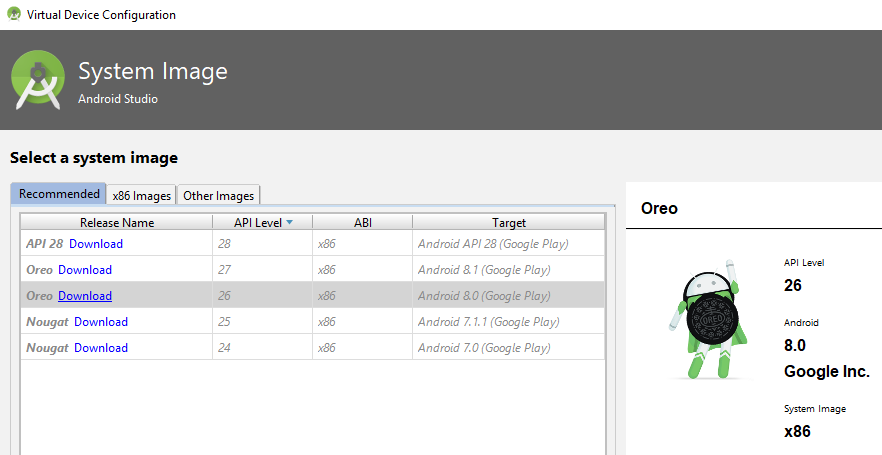
- In the Recommended tab of the Select a system image page, click Download for the Oreo entry with an API Level of 26. Description of the illustration downloadoreo.png The SDK Quickfix Installation wizard opens.
- Accept the license agreement to proceed with the download of the system image for Android 8.0 with API Level 26. Once the installation completes, click Finish and then click Next in the Select a system page.
- In the Verify Configuration page, review and accept the default settings such as the AVD Name value of Nexus 5X API 26, then click Finish.
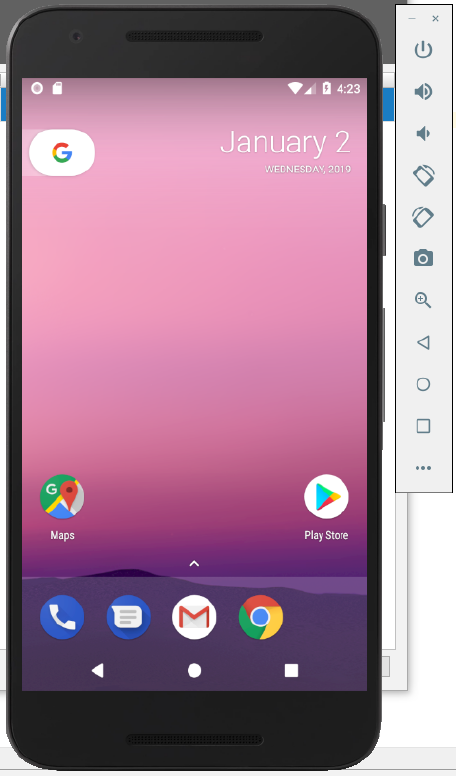
- In the Android Virtual Device Manager dialog, click the Launch this AVD in the emulator icon () under the Actions column for the newly-created Nexus 5X API 26 AVD.
 Description of the illustration downloadoreo.png The SDK Quickfix Installation wizard opens.
 ) under the Actions column for the newly-created Nexus 5X API 26 AVD.
The Android emulator starts and loads the Nexus 5X API 26 AVD. A toolbar appears to the right of the AVD that provides UI controls to interact with the AVD.
 Description of the illustration sdkmgrdialog.png
Install the Java SE Development Kit 8
 Install the Java SE Development Kit 8
- Go to the Java SE Development Kit 8 Downloads page at http://www.oracle.com/technetwork/java/javase/downloads/jdk8-downloads-2133151.html, accept the license agreement, and download the Java SE Development Kit installation file for your platform.
- Follow the JDK installation instructions for your platform at https://docs.oracle.com/javase/8/docs/technotes/guides/install/toc.html.
Create Environment Variables
 Create Environment Variables
To function correctly, the Apache Cordova command-line interface that the Oracle JET command-line interface communicates with requires that you configure environment variables. These environment variables reference the installation location of the Android SDK that is installed by Android Studio and the Java SE Development Kit 8.
- For Windows.
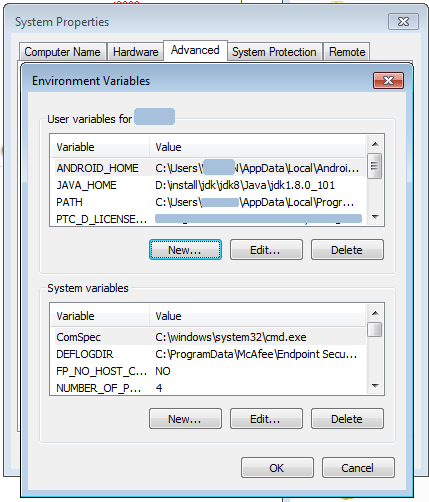
- Open the Environment Variables dialog from the System Properties dialog by navigating Control Panel >System and Security >System >Advanced System Settings >Environment Variables.
- Click New in the Environment Variables dialog and set the values of the variables to the location of the JDK and Android SDK locations, as shown in the following image. You can obtain the Android SDK location from the Android SDK page of the Default Settings dialog that you access in Android Studio by clicking Tools >SDK Manager. Description of the illustration envvar.png
- For Mac and Linux-type systems, the settings depend upon your default shell. For example, on a Mac system using the Bash shell, add the following lines in
 Description of the illustration envvar.png
Источник


