- Install Android Development Tools
- Before You Begin
- Background
- What Do You Need?
- Install and Set Up Android Studio
- Install an Android SDK Platform Package
- Create and Start an Android Virtual Device
- Install the Java SE Development Kit 8
- Create Environment Variables
- Установка Android Studio
- Подготовка к установке
- Как установить Android Studio на Windows
- Как установить Android Studio на Mac OSX
- Как установить Android Studio на Linux
- Полный список
- 1. Java SDK (JDK)
- 2. Среда разработки + Android SDK
 Install Android Development Tools
 Install Android Development Tools
Before You Begin
 Before You Begin
This 15-minute tutorial shows you how to install Android Studio, which includes the Android SDK, and create an Android Virtual Device (AVD) on which you install an Oracle JavaScript Extension Toolkit (Oracle JET) hybrid mobile application during a later tutorial. The time to complete doesn’t include processing time as a result of your activities.
Background
The Oracle JET command-line interface invokes the Android SDK that you install with Android Studio to build an Android application package (APK) file from the source files of your hybrid mobile application. This APK file is installed on an AVD to enable you to test the hybrid mobile application.
What Do You Need?
- A computer that meets the system requirements to install Android Studio. See System requirements at https://developer.android.com/studio/
Install and Set Up Android Studio
 Install and Set Up Android Studio
Depending on the operating system of your computer, the Android Studio installation wizard prompts you with dialogs where you choose between standard or custom install types. Choose the options recommended by the Android Studio installation wizard as these options include the components that you require to create and install a hybrid mobile application on an AVD. They also include an Android emulator and an emulator accelerator appropriate for your computer, be that Windows, Mac, or Linux.
- Go to the Download page for Android Studio on the Android Developer’s website at https://developer.android.com/studio/ and click DOWNLOAD ANDROID STUDIO.
- Review and accept the terms and conditions in the Download Android Studio dialog that appears and click DOWNLOAD ANDROID STUDIO FOR PLATFORM where PLATFORM refers to the operating system of your machine, such as Windows, Mac, or Linux.
- Go to the Install Android Studio guide at https://developer.android.com/studio/install and follow the instructions for your operating system to install and start Android Studio.
- If you run Android Studio behind a firewall or secure network, an Android Studio First Run dialog appears which displays a button (Setup Proxy) that you click to enter the proxy server settings for your environment. This allows Android Studio to complete the download of the components for a standard install.
- In the Welcome to Android Studio dialog, select Start a new Android Studio project, and then, in the Create New Project wizard, accept the default options to progress to the final screen in the wizard and click Finish.
This enables the Android Studio toolbar with the options that you need to create an AVD. It also downloads and configures the Gradle build tool that the Android SDK invokes to build the APK file when you complete the creation of your Oracle JET hybrid mobile application.
If you run Android Studio behind a firewall or secure network, a Proxy Settings dialog appears that enables you to configure proxy settings for the Gradle build tool that Android Studio downloads and configures. Provide the proxy settings for your environment to ensure that the Gradle build tool functions correctly.
Install an Android SDK Platform Package
 Install an Android SDK Platform Package
- In the Android Studio toolbar, click the SDK Manager icon () to open the Android SDK page in the Default Settings dialog.
- In the SDK Platforms tab, select Android 8.0 (Oreo) with an API Level value of 26, and click Apply. Description of the illustration sdkmgrdialog.png
- Click OK in the confirmation dialog that appears and accept the license agreement to proceed with the installation.
- Once the installation completes, click Finish and then click OK to close the Default Settings dialog.
 ) to open the Android SDK page in the Default Settings dialog.
 Description of the illustration sdkmgrdialog.png
Create and Start an Android Virtual Device
 Create and Start an Android Virtual Device
- In the Android Studio toolbar, click the AVD Manager icon ( ) and click Create Virtual Device in the Android Virtual Device Manager dialog that opens.
- In the Phone category of the Choose a device definition page of the Virtual Device Configuration dialog, select Nexus 5X and click Next.
- In the Recommended tab of the Select a system image page, click Download for the Oreo entry with an API Level of 26. Description of the illustration downloadoreo.png The SDK Quickfix Installation wizard opens.
- Accept the license agreement to proceed with the download of the system image for Android 8.0 with API Level 26. Once the installation completes, click Finish and then click Next in the Select a system page.
- In the Verify Configuration page, review and accept the default settings such as the AVD Name value of Nexus 5X API 26, then click Finish.
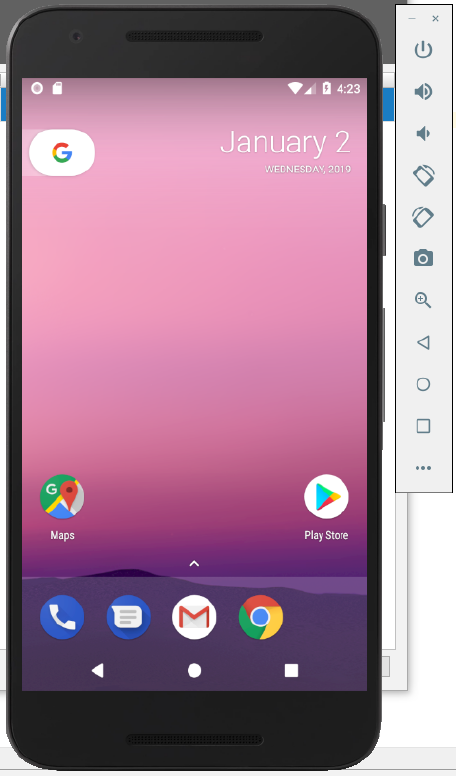
- In the Android Virtual Device Manager dialog, click the Launch this AVD in the emulator icon () under the Actions column for the newly-created Nexus 5X API 26 AVD.
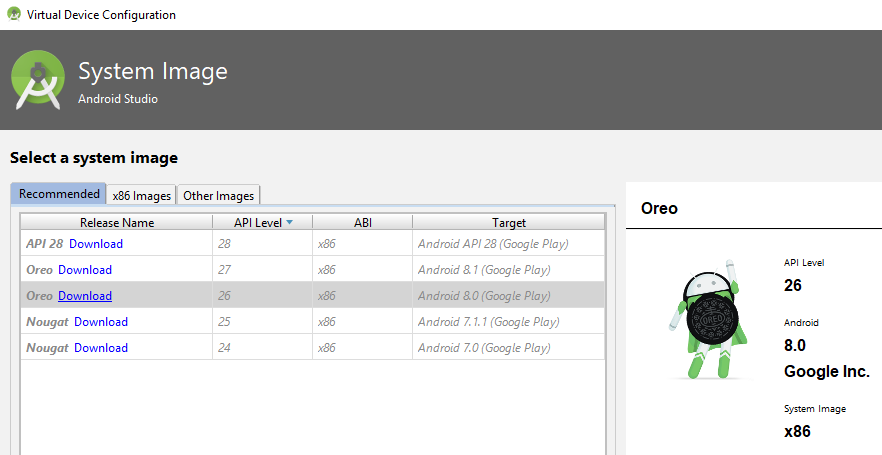 Description of the illustration downloadoreo.png The SDK Quickfix Installation wizard opens.
 ) under the Actions column for the newly-created Nexus 5X API 26 AVD.
The Android emulator starts and loads the Nexus 5X API 26 AVD. A toolbar appears to the right of the AVD that provides UI controls to interact with the AVD.
 Description of the illustration sdkmgrdialog.png
Install the Java SE Development Kit 8
 Install the Java SE Development Kit 8
- Go to the Java SE Development Kit 8 Downloads page at http://www.oracle.com/technetwork/java/javase/downloads/jdk8-downloads-2133151.html, accept the license agreement, and download the Java SE Development Kit installation file for your platform.
- Follow the JDK installation instructions for your platform at https://docs.oracle.com/javase/8/docs/technotes/guides/install/toc.html.
Create Environment Variables
 Create Environment Variables
To function correctly, the Apache Cordova command-line interface that the Oracle JET command-line interface communicates with requires that you configure environment variables. These environment variables reference the installation location of the Android SDK that is installed by Android Studio and the Java SE Development Kit 8.
- For Windows.
- Open the Environment Variables dialog from the System Properties dialog by navigating Control Panel >System and Security >System >Advanced System Settings >Environment Variables.
- Click New in the Environment Variables dialog and set the values of the variables to the location of the JDK and Android SDK locations, as shown in the following image. You can obtain the Android SDK location from the Android SDK page of the Default Settings dialog that you access in Android Studio by clicking Tools >SDK Manager. Description of the illustration envvar.png
- For Mac and Linux-type systems, the settings depend upon your default shell. For example, on a Mac system using the Bash shell, add the following lines in
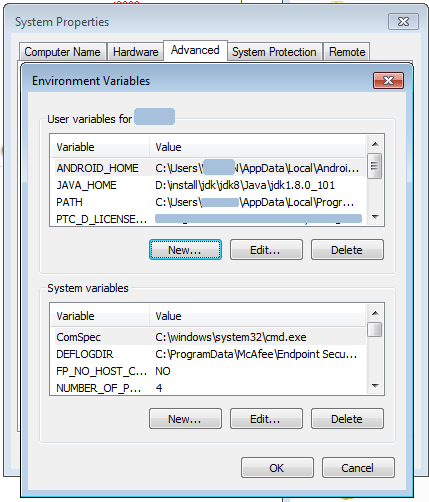 Description of the illustration envvar.png
Источник
Установка Android Studio
Подготовка к установке
Android Studio использует инструменты Java Develipment Kit в работе. До недавнего времени перед установкой Android Studio нужно было скачать и установить JDK с официального сайта Oracle. Сейчас такой необходимости нет, поскольку Android Studio уже содержит встроенный пакет инструментов JDK.
Если вам необходимо установить официальный JDK, следуйте инструкции Установка JDK (Java Development Kit)
Android Studio предоставляет все необходимое, чтобы приступить к разработке приложений для Android, в том числе инструменты Android SDK.
Загрузите Android Studio по ссылке download Android Studio
Как установить Android Studio на Windows
- Запустите файл .exe после загрузки.
- Следуйте инструкциям мастера установки, чтобы установить Android Studio и все необходимые инструменты SDK . На некоторых системах Windows, скрипт запуска не определяет , где установлена Java . Если вы столкнулись с этой проблемой , необходимо установить переменную окружения , указывающую правильное расположение. Выберите Start menu > Computer > System Properties > Advanced System Properties. Затем откройте Advanced tab > Environment Variables и добавьте новую системную переменную JAVA_HOME котрая указывает на папку, куда установлен пакет JDK, например C:\Program Files\Java\jdk1.7.0_21 .
Отдельные инструменты и другие пакеты SDK сохраняются вне каталога приложений в Android Studio. Если вам нужен доступ к инструментам непосредственно , использовать терминал для навигации к месту, где они установлены. Например:
Как установить Android Studio на Mac OSX
- Запустите файл .dmg после загрузки.
- Перетащите Android Studio в папку Applications.
- Откройте Android Studio и следуйте инструкциям мастера установки, чтобы установить необходимые инструменты SDK. В зависимости от настроек безопасности , когда вы пытаетесь открыть Android Studio, вы можете увидеть предупреждение, что пакет поврежден и должен быть перемещен в корзину . Если это произойдет, перейдите к System Preferences > Security & Privacy и под Allow applications downloaded from, выберите Anywhere. Затем откройте Android Studio снова.
Если вам нужно использовать Android SDK инструменты из командной строки , вы можете получить к ним доступ по адресу:
Как установить Android Studio на Linux
- Распакуйте загруженный ZIP файл в папку для ваших приложений .
- Запустите Android Studio, набрав в терминале android-studio/bin/ studio.sh . Вы можете добавить android-studio/bin/ в PATH переменную окружения, чтобы иметь возможность запускать Android Studio из любого каталога .
- Если SDK еще не установлен, следуйте инструкциям мастера установки, чтобы установить необходимые инструменты SDK.
Примечание : Возможно, вам понадобится установить пакеты ia32-libs, lib32ncurses5-dev, и lib32stdc++6. Эти пакеты необходимы для поддержки 32-битных приложений на 64-битных системах.
Android Studio с Android developer tools загружена и установлена, но для завершения подготовки к работе нужно загрузить необходимые компоненты Android SDK.
Источник
Полный список
Для того, чтобы писать программы — нужна среда разработки. В этом уроке мы подробно рассмотрим, как установить и настроить эту среду разработки.
Я буду описывать установку применимо к операционной системе Windows 7.
Урок обновлен 04.06.2017
В этой статье много скриншотов и инструкций. Учитывайте, что версии ПО постоянно меняются, и у вас все может выглядеть по-другому и версии могут быть другими.
1. Java SDK (JDK)
Т.к. разработка приложений ведется на Java, нам нужно скачать и установить соответствующее SDK, называемое еще JDK (если, конечно, оно уже не установлено).
Скачать можно здесь. Нажимайте там ближайшую кнопку JDK Download, выбирайте версию под вашу операционную систему, скачивайте и устанавливайте. Если ссылка не работает, то просто гуглите «java sdk download».
После установки рекомендую перезагрузить комп.
2. Среда разработки + Android SDK
В среде разработки мы будем создавать программу и получать на выходе готовое приложение. Сейчас существует несколько сред разработки, мы выберем рекомендуемую гуглом Android Studio.
Открывайте эту страницу и там жмите кнопку Download Android Studio. Если вам нужна какая-то специфическая версия, то жмите Download Options и там выбирайте вашу версию.
Учитывайте, что файл может весить до 2 гигов.
Итак, скачали exe-файл. Запускаем его. Жмем Next, пока он не спросит пути.
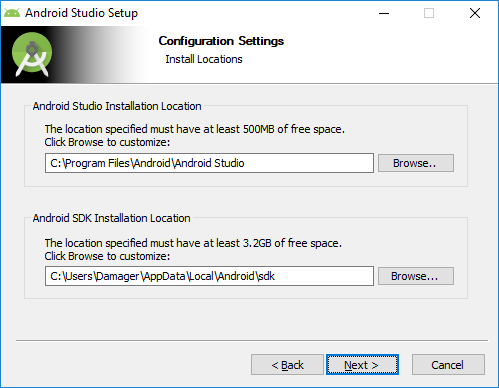
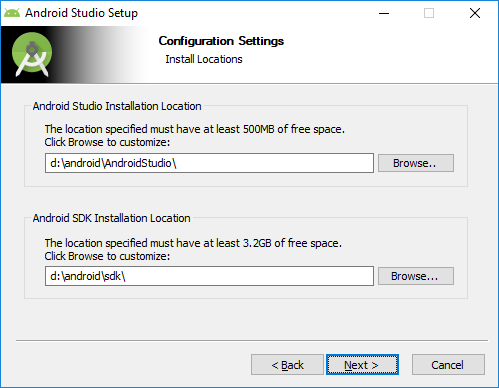
От нас требуется указать два пути. Первый путь будет использован для установки Android Studio. Второй — для установки Android SDK.
Давайте заменим их на свои. Для этого создадим каталог android. На всякий случай сделайте так, чтобы путь к нему был без пробелов и русских символов. Например — :\android. У меня это будет d:\android. И этот путь подставим в визард.
Жмем несколько раз Next, пока не начнется установка. Когда установка закончится, запустится Android Studio. Если не запустилась, то ищите ее ярлык в Пуске.
Первым делом она спросит, не надо ли импортировать настройки с прошлой версии.
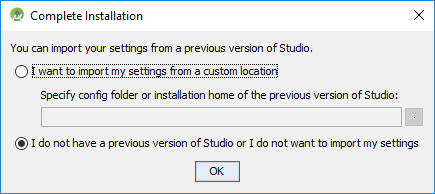
Оставляем выбранным нижний пункт и жмем Ок. У нас пока нет старых настроек.
Далее появится визард установки

Тут оставляем Standard

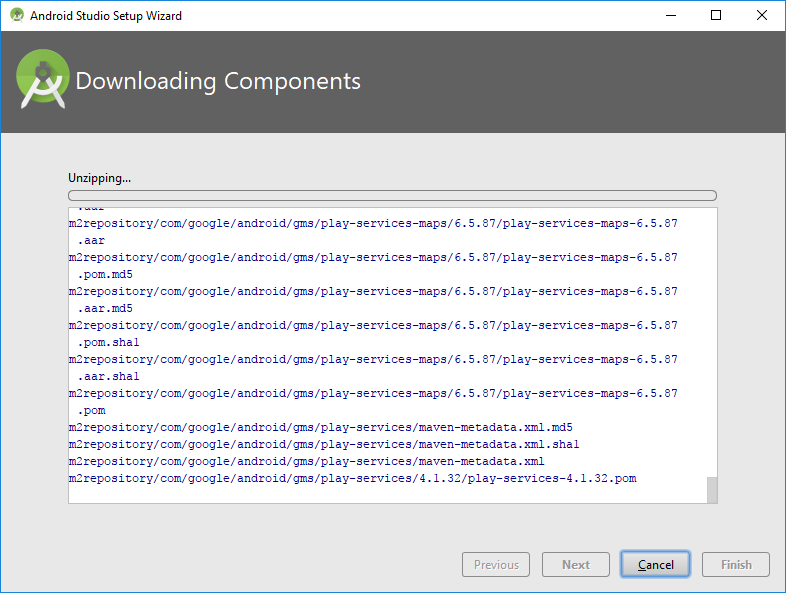
Визард сообщает нам, что ему необходимо загрузить несколько компонентов для завершения установки

Пошел процесс загрузки

Затем процесс распаковки
В итоге, когда он закончит, жмем Finish, и открывается Welcome экран.

После выполнения этих шагов мы получили среду разработки, с помощью которой можно кодить Android-приложения. Если что-то не получается или выдает ошибку — попробуйте посмотреть форум или погуглить, наверняка вы не первый сталкиваетесь с такой проблемой и в сети уже есть описание решения.
Android Studio периодически будет клянчить у вас скачать и установить ей обновления. Очень не советую этого делать, пока вы новичок. Вы после обновления вряд-ли заметите какие-то новшества в новой версии студии, а проблемы себе можно создать немалые.
На следующем уроке мы настроим Android Virtual Device (AVD), создадим наше первое приложение и запустим его. AVD – это эмулятор смартфона с операционной системой Android, на котором можно запускать и тестировать приложения. Не подключать же свой смартфон каждый раз.
Также мы рассмотрим структуру проекта приложения.
Присоединяйтесь к нам в Telegram:
— в канале StartAndroid публикуются ссылки на новые статьи с сайта startandroid.ru и интересные материалы с хабра, medium.com и т.п.
— в чатах решаем возникающие вопросы и проблемы по различным темам: Android, Kotlin, RxJava, Dagger, Тестирование
— ну и если просто хочется поговорить с коллегами по разработке, то есть чат Флудильня
— новый чат Performance для обсуждения проблем производительности и для ваших пожеланий по содержанию курса по этой теме
Источник


