Job scheduler android developer
Android Job Scheduler Example
For scheduling background tasks, Android provides JobScheduler. It allows you to specify conditions for running work. Job schedule is part of android platform and maintains background jobs of all application installed on the device at one place allowing for optimal usage of device resources. JobSchedule can be used to run short and long running tasks such as downloading data, cleaning cache, processing of data, etc.
Now let’s see how you can create and schedule a job using JobScheduler.
JobService
JobService is an android service component with callback methods which the JobSchedule calls when a job needs to be run. That means your background job code needs to be added to callback methods of JobService. To create JobService, you need to extend JobService class and implement its methods onStartJob and onStopJob.
These callback methods are passed JobParameters as an argument by the JobScheduler. JobParameters contains parameters that are set when job is scheduled. These call back methods return boolean value, false indicates that the job is complete and true tells that job is still running in the background, in this case you need to call jobFinished method to inform job scheduler about the finished state after the job is complete.
Since job service is an android component, it runs on main thread. That’s why the tasks which are in job service callback methods needs to be run on background thread.
Since it is a service, you need to define it in the manifest xml file and it needs to be protected with android.permission.BIND_JOB_SERVICE permission.
Scheduling Job
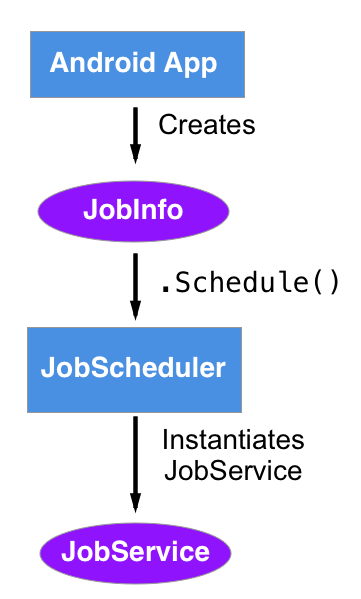
To schedule a job, first you need to get JobScheduler instance by calling getSystemService on the context object passing JOB_SCHEDULER_SERVICE argument to it.
Then you need to instantiate ComponentName object by passing context and job service class that you created.
Then you can create JobInfo object using JobInfo.Builder and setting various configuration parameters. JobInfo.Builder has various setter methods which allow you to define your Job. See the following sections for more details.
Then finally, call schedule() on job scheduler object passing job info object to it.
Creating JobInfo
As shown above JobInfo is created using JobInfo.Builder class by using its setter methods, following are the details.
To create a job that runs every time after elapsing of a specified time, you can use setPeriodic method passing time in milliseconds.
To create a job that needs to be rerun if it fails, you need to use setBackOffCriteria() method passing time interval for the first time retry and retry policy which is used to calculate time interval for retries after first retry.
You can make a job delayed by specified amount of time by setting minimum latency and you can also specify maximum delay by calling setOverrideDeadline. These two setting are applicable for only non-periodic jobs.
To create a job that stays as scheduled even after device reboots, you need call setPersisted() method on JobInfo.Builder passing true as value to it. This setting requires RECEIVE_BOOT_COMPLETED permission.
If your job needs network connection and you want to run the job when network of specified kind is used, then you need to specify required network type by calling setRequiredNetworkType() method passing network type.
You can configure your job to run when the device is charging and idle by calling setRequiresCharging and setRequiresDeviceIdle methods respectively or you can ask the scheduler to not run the job when battery is low by calling setRequiresBatteryNotLow() method and passing true.
Similarly, you can schedule a job to run only when storage is not low by calling setRequiresStorageNotLow() method and setting it to true.
To pass data to JobService, you need to set extras by creating PersistableBundle object. JobScheduler passes PersistableBundle object to JobService call back methods.
JobScheduler Example
I’ll show you how to use JobScheduler in android app with an example. The example job reads latest data from Firebase firestore database, updates device local database with new data and deletes expired data from local database. For local database access, Room persistency library is used.
Источник
Android JobScheduler — Schedule your jobs like a master!

May 3, 2020 · 7 min read
Before job schedulers, whenever I encountered a use case where I wanted to do some background processing, I had to make decisions about which android primitive to use. I had to weigh in the pros and cons of each and then proceed with it.
- AsyncTasks
- Combination of handlerThreads and services.
3. Java 5 executor services.
4. Combination of AlarmManager with broadcast receivers and intent services and many more.
One thing was common in all these appr o aches, as a developer, I had to handle lots of things apart from the business logic, such as when do we trigger this service? How to make sure the services fire even if the app is killed, how to make sure that alarms are fired at regular intervals? If work is aborted, then how will we retry? When to acquire wake locks and when to release them and many more things. I had to write lots of code for doing all these things.
After the introduction of JobScheduler, we as developers we have to prepare a contract of how we need the job to get scheduled and what are the conditions in which jobs will execute and hand it over to the Android framework, and we can focus on the work that needs to be done. Android will execute your job at correct times. Android system has a service running called “JobSchedulerService” which executes your requests. We will learn more about the internals of this service in upcoming posts.

If we want to know job schedulers thoroughly, we need to understand the various classes present the API and their uses. We will deal with 2 basic classes that will help us create jobs right after this article.
JobInfo — The class is an abstraction that hides the task that needs to be done and the conditions under which the tasks will get executed. As I explained earlier, this is our contract with the JobScheduler. We do not have to build this class directly, we have accessor methods in this class to examine the contract. We have a builder available to build instances of JobInfo. We submit job info to the job schedulers. We can post multiple work items to a single jobInfo. We will learn how to do it. Usually, related work should be kept under the same job info.
The analogy should be JobInfo is your offlice job, and each work item object ie JobWorkItem is work which you get. One JobInfo can use used to enqueue multiple JobWorkItem
JobInfo.Builder — Create your contract with the JobScheduler service using this builder. Now let’s understand why the APIs look like what they are.
Suppose you are exposing a service to other applications so that you can process requests coming from them. You will need to establish a contract for the kinds of requests you receive. The contract must specify,
- The request which needs to get processed.
2. Must specify a unique identifier for each request so that requests can be accessed at any point in time.
3. Any special requests or flags which give additional information about how the requests need to be processed.
This the same with JobScheduler. JobInfo.Builder exposes a constructor that accepts jobID and the piece of work that needs to get executed. A bare minimum to create a contract!
Through this class, we can specify criteria for our jobs, whether we need a network or not, if yes, then what type of network, the job is periodic or not, its battery requirements, delay tolerance and many more.
There are lots of constraints that we can specify and certain rules which are followed by framework while evaluating these constraints. Will will discuss that in another post.
After android Q you can just create job info without any constraint and the job scheduler happily accepts it. Before Q the app will crash. So the question is how the job will get executed then without any constraints? Majority of contraints have default values. Execution strategy will be determined by the default values of contraints. More details later on. Let’s keep our focus on!
JobService — This is the block of work that we create and provide to the android JobSchedulerService via the JobInfo and whenever the constraints match, JobService’s callbacks are fired.

For each job service we create, we need to add this permission in the android manifest.
We can execute one or more units of related work inside a JobService by enqueuing multiple work items to single JobInfo, for now, we will understand just with JobService.
The API exposes 3 methods,
Once we submit our job info to the job scheduler service using schedule() call, what happens is demonstrated in diagram 1. We will call the job scheduler service as “ System” from now for ease of speaking.
- Once the System determines that the constraints, we provided are satisfied, it calls onStartJob() callback of your job service, this is where we should respond to it and do our job. The system acquires wakelock on your behalf, if we do not have to do anything computation-intensive then we can finish our work and return false from this callback.
Returning false means we say that our job is done, release all the wake-locks and other resources acquired on my behalf, and mark the job as done.
Returning true tells the system that, the job is not done right now, we do not know when it will get finished as it might be running in the background. But once the job is finished, we will let you know. Job completion, in this case, is indicated by the jobFinished() method. Till we call this method, system will hold on to all the resources for us.
2. Whenever the constraints for our jobinfo are no longer satisfied, the system gives a callback to onStopJob() of JobService. Here, we need to make sure that we stop our job entirely or we can save the state so that we can resume when the constraints are satisfied again. Once this method returns, the system will release all the resources. The return values here also convey different meanings.
Returning true means we want to job to reschedule it later when constraints are again met.
Returning false means we want to end this job entirely right now and the job scheduler will not call onStartJob() when the constraint will be satisfied again
These callbacks and methods allow us to bring in save — n — resume strategy in our approach. The best approach would be to divide the whole job into multiple granular units and mark the state of the job as and when work is done so that the next execution can pick up from where we left the last time.
I will explain this with a working example where work is mimicked by a counter task which will count till 100, each count can be considered a granular unit of work. It can be downloading an image or writing/reading a record to/from the server.
Code to schedule the above JobService is
The above job should run when the network is available, when you run the above job it will start printing numbers from 0,1,2,3. When the network is disconnected by turning wifi off it stops the job and prints Job paused. When the network is again turned on, it resumes from 3,4,5. and so on.
If your job is such that you can’t break it into pieces then, finish it on onStopJob() callback by returning true from it. When the next time the constraints will be satisfied, the whole job will be re-run.
If your job does not require any background processing and asynchronous work then, no need to create async tasks or any other multi-threading primitive. Just do your work in onStartJob() itself and return false to indicate that your job is done. This is useful if you just want to send some broadcast or something of that kind.
The job scheduler provides some APIs to query, cancel, and enqueue jobs, which doesn’t require much explanation.
This is how we work with JobScheduler APIs. Next, we will see how we can enqueue multiple work items to a given JobInfo. It is always a good idea to tie related work into a single JobInfo.
Источник
Android JobSchedulers & Usages

You’ve seen that you can trigger events based on the real-time clock, or the elapsed time since boot using the AlarmManager class. Most tasks, however, do not require an exact time but should be scheduled based on a combination of system and user requirements.
For example, a news app might like to update the news in the morning but could wait until the device is charging and connected to wifi to update the news, to preserve the user’s data and system resources.
The JobScheduler class is meant for this kind of schedule; it allows you to set the conditions or parameters of running your task. Given these conditions, the JobScheduler calculates the best time to schedule the execution of the job. Some examples of these parameters are the persistence of the job across reboots, the interval that the job should run at, whether or not the device is plugged in, or whether or not the device is idle.
Here is an example when you would use this job scheduler:
1.Tasks that should be done once the device is connected to a power supply
2.Tasks that require network access or a Wi-Fi connection.
3.The task that is not critical or user-facing
4.Tasks that should be running on a regular basis as batch where the timing is not critical
JobScheduler is pretty straightforward. JobScheduler is only available on devices running API 21+.
There are only three things you need to do:
- Create a Job Service to handle your job
- Add that JobService to the manifest
- Schedule your job using a JobInfo object to define your conditions
Creating a JobService
JobService is a specialized Service (i.e. extends Service) with a couple of methods to help us handle our job.
To create a Job Service, start by extending the JobService class and overriding ‘ onStartJob’ and ‘ onStopJob’.

Also, when your job is finished (has been completed or canceled) you’re responsible for calling the job finished method. The jobFinished method tells Android that your job is done and lets it release the wakelock for your app. If you don’t call the jobFinished method your app could be responsible for draining your user’s battery!
Adding to Manifest
The new JobService must be registered in the Android manifest with the BIND_JOB_SERVICE permission.
Creating JobInfo object
All conditions for job scheduler through the JobInfo object .
To build that JobInfo object, you need two things every time
job number: to help you distinguish which job this is &
JobService.
There are many conditions & based on requirement we can set job info objects.
Источник


