- Testing on Android using JUnit 5
- Configuring Gradle
- JVM tests only
- Writing the tests
- Descriptive test names
- Structuring tests
- Instrumentation tests
- Wrap up
- Like what you read? Please spread the word.
- Junit 5 gradle android
- JUnit5 + Android
- Motivation
- Setup
- top-level build.gradle
- app-level build.gradle
- Running the tests
- from the command line
- from Android Studio
- JUnit5 Samples
- Important Changes
- Package Name Changes
- Disabled
- Extensions
- DisplayName
Testing on Android using JUnit 5
Published on 30 Nov 2018 · 8 minute read
JUnit 4 has always been the standard unit testing framework for Android development, however, a production version of JUnit 5 has been available for quite a while. JUnit 5 is the next generation of JUnit testing and has quite a new structure. From a user-perspective it offers a number of useful new features and various other benefits. Often Android developers are used to waiting a while for new things from the Java-world to be an option on Android. In the case of JUnit 5, with some changes to your Gradle dependencies, you can use it right now from your Java and Kotlin unit tests.

Testing on Android with JUnit 5
The architecture of JUnit 5 is quite a significant change from before, with the framework being split into three major components.
- JUnit Platform is the underlying layer on which testing frameworks can run on the JVM and offers up the API for different test engines.
- JUnit Jupiter defines how we write JUnit 5 tests and then contains an engine for running these tests on the platform.
- JUnit Vintage gives us an engine for running our previous JUnit 4 tests. We don’t need to worry about having to update all of our tests in one go, as we can use the vintage engine to run these and have both JUnit 4 and 5 tests within our project.
As users of the testing framework, it’s likely that the most interesting part is the new features we get access to. Nested tests allow us to put our tests into groups, increasing readability and allowing us to reduce repetition within test names. Parameterised tests are really powerful and can also reduce duplicating tests to give different inputs, the parameters can even be provided through a variety of mechanisms. Dynamic tests offer an API to generate tests on the fly using a test factory, rather than hard-coding each of the tests.
Parameterised tests run tests with different inputs
The JUnit 5 extension model allows us to extend the test framework and is the evolution of concepts from JUnit 4 such as @Rule and custom runners. The extension model will allow JUnit 5 to evolve with all developers and tool makers having the same public extension API. There are many more features beyond those listed here, all of which can be found in the user guide.
Now, let’s get JUnit 5 running in our Android project. 🛠
Configuring Gradle
Thanks to Marcel Schnelle (mannodermaus) there is an easy-to-use Gradle plugin that will configure all the testing tasks to use JUnit 5. The plugin has a few minimum requirements that our project needs to meet, at the time of writing this is the Android Gradle plugin 3.2.0+, Gradle 4.7+ and Java 8+.
We will start by adding the plugin to our root build.gradle file using the latest version, which at time of writing is 1.3.2.0.
→ /build.gradle
After a successful Gradle sync, we will be ready to apply the plugin to any Android modules we wish to use JUnit 5 in.
→ /app/build.gradle
If there are JUnit 4 tests in the project we are configuring, then we will also need to keep the JUnit 4 dependency and enable the JUnit vintage test engine mentioned above.
Once the plugin and the Gradle dependencies have been configured, we can run tests in the same way as we were previously using the same Gradle tasks and run configurations in Android Studio.
If we need them, there are some options for configuring the test environment within Gradle. Our settings go in a junitPlatform block within the existing testOptions , where we may already be doing some configuration. The most common use-case would be for filtering which tests are executed. We could use the filters to divide our tests into unit and integration and then have them run for different variants, as an example.
For any more information on the plugin, all the setup and usage instructions can be found on GitHub.
JVM tests only
If our unit tests are only going to be ran on the JVM, no Robolectric or Android required, then we can get away without the Gradle plugin. To do this we can remove the plugin classpath entry from the root build.gradle and the line where the plugin is applied within the app module build.gradle . Instead we need to add some configuration to testOptions to enable running with JUnit 5.
→ /app/build.gradle
We lose the per-variant filters that were demonstrated above if we go down this route. However, for most Android projects that aren’t using Robolectric this should definitely be sufficient. 👍
Writing the tests
Let’s write some tests to explore the new features of JUnit 5 and how we should go about using it in our apps. We will be using AssertJ for our assertions, mainly for readability within the samples. We will be testing a very simple repository that allows us to look up contacts using their IDs, starting with the JUnit 4 version.
Converting this test to JUnit 5 is as simple as changing the import for @Test . Projects with many more tests, using more features of JUnit 4, may have more changes that are required. As mentioned above, we can start new tests in JUnit 5 and then either leave the JUnit 4 ones as is, or convert them gradually.
Descriptive test names
A common structure for tests is breaking them into given, when and then.
- The given clause involves setting up the conditions for the test, such as mocking or configuring the component we are about to test.
- Within the when clause, we execute the behaviour we are looking to verify.
- It is in the then clause that we check the behaviour is working correctly with any assertions.
This structure is fairly clear within the body of the test function, however, in the naming of the function some issues may start to arise.
Some approaches could be taken to reduce the length, such as using shorter wording in the given clauses and potentially removing the then clause from the name. This does result in losing some detail, which can be really useful in test names to quickly see in the test report what is going on and to demonstrate what a test is supposed to do. It is also much easier to read a descriptive sentence than the camel-case seen in function names.
JUnit 5 introduces the @DisplayName annotation, which can be used to provide a descriptive name for the test report. The same result can be achieved in Kotlin through the use of back-ticks around the function name. The advantage of the @DisplayName approach is that we keep the searchable and familiar function name, whereas the back-tick approach avoids the need to maintain both the function name and annotation.
Structuring tests
A common reason for test names growing in length is having multiple tests with the same starting condition. Beyond naming, a similar starting condition can cause test bodies to grow in length as well! To solve the issue, JUnit 5 introduces @Nested , allowing you to group a set of tests into an inner class. The group can have a shared starting state and can also have a display name specified, reducing the length of individual test function names. The nested structure is shown within the test report, making it very readable.
After fleshing out the tests for this repository more, with a few tests in each group, we can peek at the test report to see how it all looks. 👀
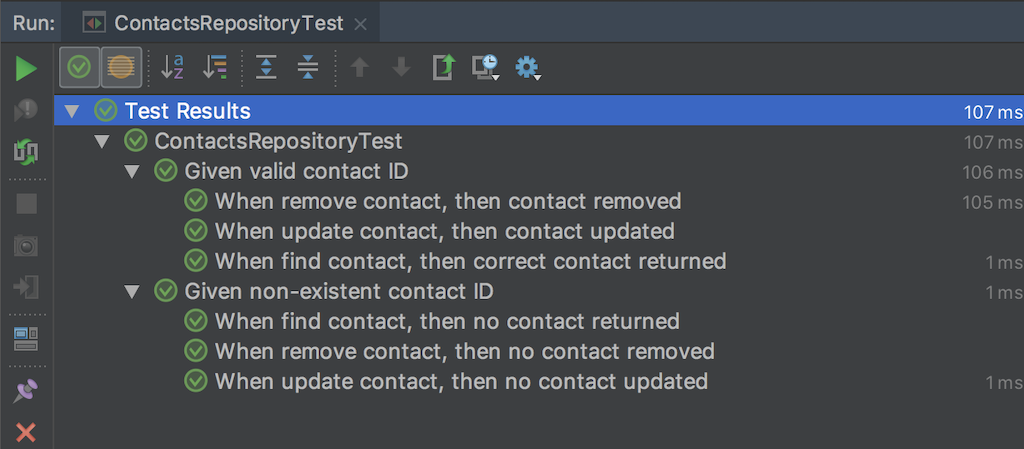
Android Studio test report
The code we have written is available on GitHub.
Instrumentation tests
We have been discussing unit tests only and as we all know instrumentation tests, usually using Espresso, are also very important. Currently, our Espresso tests will be using JUnit 4, which can be left as it was previously. This means using the JUnit 4 test runner, as opposed to adding the JUnit 5 vintage engine and using the new infrastructure.
Instrumentation tests using the JUnit 5 Gradle plugin are still considered experimental
The Gradle plugin we used to introduce JUnit 5 on Android has support for instrumentation tests, which at the time of writing is considered experimental. From checking the GitHub issues page for the plugin, many people have had problems using JUnit 5 for their instrumentation test suite. When the situation changes this article will be updated with the current details of using it.
Since JUnit 5 is built upon Java 8, to use it we need a minSdkVersion of 26 or above. Before we start freaking out, this can be achieved by running the tests with a product flavour that has the minimum SDK increased to this level. 😅
To write and run our instrumentation tests using the JUnit 5 framework, we will need some Gradle configuration. A little bit more is required than for unit tests, due to needing to tell the system to to use the plugin’s runner builder and ensuring tests running on the device work correctly.
→ /app/build.gradle
It is noteworthy that instrumentation tests tend to have less need for JUnit 5, due to there being less tests and fewer variants of similar tests, in general. This will of course depend heavily from project to project though! To find out more, please check out the plugin’s GitHub page.
Wrap up
We have only considered a few small aspects of writing JUnit 5 tests, as there is simply so much to look at. To find out more, there is a detailed user guide covering all parts of the framework and how to go about writing tests and customising the test process.
By using JUnit 5 in our Android app testing we are using the latest evolution of the JUnit framework. It gives us access to more features, helps us make tests as readable as possible, reduce duplication within our tests and extending the test framework has never been easier. Hopefully it will catch on more in the Android community and become the “standard” for Android development sooner rather than later. 🚀
Are you using JUnit 5 in your Android project, or did you have any issues getting it setup? What ways have you seen it improve your testing process? Please feel open to reaching out to me on Twitter @lordcodes with any questions or thoughts you have, or about anything else.
If you like what you have read, please don’t hesitate to share the article and subscribe to my feed if you are interested.
Thanks for reading and happy coding! 🙏
Last updated on 19 Feb 2020
Like what you read? Please spread the word.
If you would like to share it, it would be very much appreciated.
Hi, I hope you enjoyed the article. I am Andrew — a builder of Android and iOS apps, games and developer tools. Articles on this blog focus on all aspects of Android and iOS development using Kotlin and Swift. When it comes to coding, my particular focus is on code quality and automated testing. Aside from development I am an avid gamer and music fan.
Источник
Junit 5 gradle android
android-junit5 
A Gradle plugin that allows for the execution of JUnit 5 tests in Android environments using Android Gradle Plugin 4.0.0 or later.
This plugin configures the unit test tasks for each build variant of a project to run on the JUnit Platform. Furthermore, it provides additional configuration options for these tests through a DSL attached to android.testOptions .
Instructions on how to write JUnit 5 tests can be found in their User Guide. Furthermore, this repository provides a small showcase of the functionality provided by JUnit 5 here.
Snapshots of the development version are available through Sonatype’s snapshots repository.
More information on Getting Started can be found on the wiki.
The latest version of this plugin requires:
- Android Gradle Plugin 4.0.0 or above
- Gradle 6.1.1 or above
Instrumentation Test Support
There is experimental support for Android instrumentation tests, which requires some additional configuration & dependencies. Furthermore, because JUnit 5 is built on Java 8 from the ground up, its instrumentation tests will only run on devices running Android 8.0 (API 26) or newer. Older phones will skip the execution of these tests completely, marking them as «ignored».
To start writing instrumentation tests with JUnit Jupiter, make the following changes to your module’s build script:
The android-test-core artifact includes an extension point for the ActivityScenario API; more information on that can be found in the wiki.
At this time, Google hasn’t shared any immediate plans to bring first-party support for JUnit 5 to Android. The following list is an aggregation of pending feature requests:
This repository contains multiple modules, divided into two sub-projects. The repository’s root directory contains build logic shared across the sub-projects, which in turn use symlinks to connect to the common build scripts in their parent folder.
- instrumentation : The root folder for Android-based modules, namely the instrumentation libraries & a sample application. After cloning, open this project in Android Studio.
- plugin : The root folder for Java-based modules, namely the Gradle plugin for JUnit 5 on Android, as well as its test module. After cloning, open this project in IntelliJ IDEA.
Источник
JUnit5 + Android
Motivation
While UI testing tends to use various frameworks like Espresso or Robolectric; JUnit is still a staple of pure logic testing. For Android, most of us are still using JUnit4. On my Java projects (non-Android), I have been using JUnit5 instead. While there are quite a few new features one might point out, the one that initially caught my attention was the more aesthetically pleasing report box.
For the purpose of this post, I’ll assume you are starting with an empty project, compileSdkVersion 26+ and buildToolsVersion “26.0.1” or higher.
Setup
Marcel Schnelle was nice enough to contribute the android-junit5 gradle plugin that we’ll be using.
top-level build.gradle
In your top-level build.gradle , you currently have a section that looks something like this:
You will want to add this line inside that dependencies block:
app-level build.gradle
At the top of the app-level build.gradle , you probably have something like this:
Add this line just under it:
Go down the page to your dependencies section.
If you have something like
You will want to remove that. Any JUnit4 tests that you keep should be handled by the JUnit5 vintage engine.
Inside that dependencies block, add the following instead:
You will want to configure the platform as well. Create this section as a sibling to android and dependencies (ie: at the same level):
Of course, you’ll probably want to define these versions in a top-level ext or maybe a junit.gradle; but we are trying to keep it simple and in line with the README provided by the plugin.
Running the tests
There are a couple ways you can run the tests.
from the command line
That will run through your tests (debug and release) and output a summary that looks similar to this (depending on the number of tests you have):
from Android Studio
The simplest way is to right-click on your test and choosing Run .
You can also setup Run Configurations, etc — but for now, I would recommend running the individual tests one-off while you are trying it out.
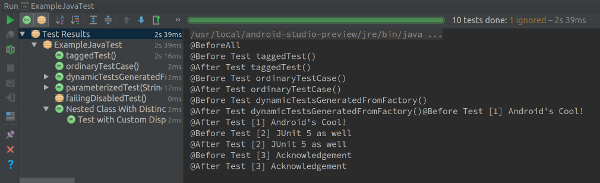
While it won’t provide the same summary block as you would see from the CLI, it does indicate pass/skip/fail:
JUnit5 Samples
To get you started, Marcel has provided ExampleJavaTest.java and ExampleKotlinTest.kt. There are quite a few good examples and I recommend perusing those before you start writing your own JUnit5 tests. Of specific note is the comment at the beginning of each one that show the comparison between JUnit4 and JUnit5 for Java or Kotlin.
You can also go directly to the JUnit5 User Guide to get samples and details.
Let’s look at a couple highlights. I will tend to focus on what the failure messages look like, since success messages are pretty bland 😉
Important Changes
If you haven’t already, don’t forget to sync your project to capture the updated dependencies before moving forward.
Package Name Changes
- JUnit3 used junit.framework
- JUnit4 used org.junit
- JUnit5 uses org.junit.jupiter
Disabled
Instead of @Ignore use @Disabled
Extensions
Runner , @Rule and @ClassRule replaced with Extensions
DisplayName
You can specify a more verbose display name to be used in error reports and logs.
Источник


