- Unit Testing in Android using JUnit
- Step by Step Implementation
- 10 ноября 2016 г. Простые Unit-тесты в Android
- Общие сведения
- Настройка
- Local-тесты в Android
- Instrumented тесты в Android
- Заключение
- Developing Android unit and instrumentation tests — Tutorial
- 1. Introduction into Android testing
- 1.1. Testing Android applications
- 1.2. What to test on Android applications
- 1.3. Tooling support for Android testing
- 1.4. Android project organization for tests
- 2. Android unit testing
- 2.1. Unit testing in Android
- 2.2. Required dependencies in the Gradle build file
- 2.3. Running the unit tests
- 2.3.1. Using Gradle
- 2.3.2. Using Android Studio
- 2.4. Location of test reports
- 2.5. Activating default return values for mocked methods in android.jar
- 3. Exercise: Create unit test
- 3.1. Preparation: Create Android project
- 3.2. Add JUnit dependency
- 3.3. Create test
- 3.4. Run unit tests
- 4. Writing tests to run on the Android device
- 4.1. Instrumentation tests
- 4.2. How the Android system executes tests
- 4.3. Mocking objects in Android
- 4.4. Location of instrumentation tests
- 4.5. Define dependencies and testInstrumentationRunner in the Gradle build file
- 4.6. Using the @RunWith(AndroidJUnit4.class)
- 4.7. Run the tests on Android
- 4.8. Location of test reports
- 4.9. How to replace the application for instrumentation tests
Unit Testing in Android using JUnit
Unit testing is done to ensure that developers write high-quality and errorless code. It is advised to write Unit tests before writing the actual app, you will write tests beforehand and the actual code will have to adhere to the design guidelines laid out by the test. In this article, we are using JUnit to test our code. JUnit is a “Unit Testing” framework for Java Applications which is already included by default in android studio. It is an automation framework for Unit as well as UI Testing. It contains annotations such as @Test, @Before, @After, etc. Here we will be using only @Test annotation to keep the article easy to understand. Note that we are going to implement this project using the Kotlin language.
Step by Step Implementation
Step 1: Create a new Project
To create a new project in Android Studio please refer to How to Create/Start a New Project in Android Studio. Note that select Kotlin as the programming language.
Step 2: Add dependency to the build.gradle file and click “sync now”
Step 3: Working with the RegistrationUtil.kt file
Create a new Kotlin file RegistrationUtil and choose its type as an object. Since this is a singleton we do not need to create an object of it while using it in other classes. It has a function called validRegistrationInput which requires three arguments username, password, and confirm password. We will be testing this function with different sets of inputs with the following test cases.
- Username, password, confirm password should not be empty.
- Password must contain at least two digits.
- Password matches the confirmed password.
- Username must not be taken.
Источник
10 ноября 2016 г. Простые Unit-тесты в Android

Вот и настало время разобраться и написать небольшую заметку о том, что из себя представляет тестирование логики Android-приложений. К этому вопросу я пришел не сразу, однако учиться никогда не поздно!
Общие сведения
Для начала определимся, что такое тесты и зачем их нужно писать. Из Wikipedia:
Модульное тестирование, или юнит-тестирование (англ. unit testing) — процесс в программировании, позволяющий проверить на корректность отдельные модули исходного кода программы.
Идея состоит в том, чтобы писать тесты для каждой нетривиальной функции или метода. Это позволяет достаточно быстро проверить, не привело ли очередное изменение кода к регрессии, то есть к появлению ошибок в уже оттестированных местах программы, а также облегчает обнаружение и устранение таких ошибок.
Другими словами, тесты — это методы, которые проверяют работоспособность нашего кода. Но каким образом это делается? Давайте по порядку. Тест считается выполненным, если он выполнился без ошибок. А для разного рода проверок используются вспомогательные методы вроде «семейства» методов assertXXX (см. примеры ниже).
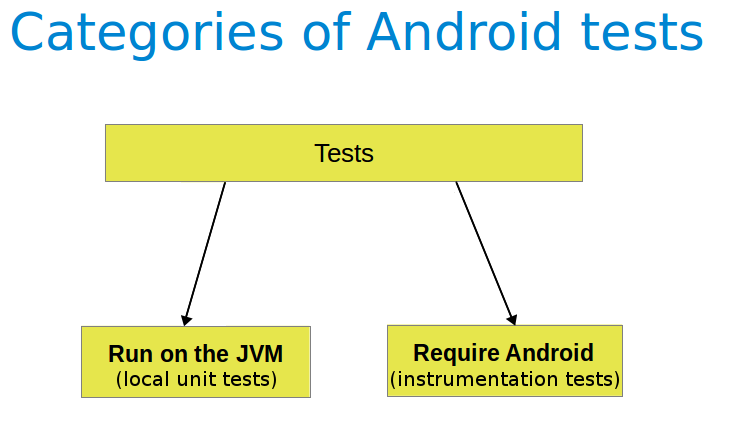
Unit-тестирование в Android можно разделить на 2 типа:
- Локальные unit-тесты (Local unit tests) — тесты, для выполнения которых используется только JVM. Они предназначены для тестирования бизнес-логики, которая не взаимодействует с операционной системой.
- Инструментальные unit-тесты (Instrumented unit tests) — тесты, с помощью которых тестируется логика, «завязанная» на Android API. Их выполнение происходит на физическом девайсе/эмуляторе, что занимает значительно больше времени, чем локальные тесты.
Выбор одного из этих 2 типов зависит от целей тестируемой логики. Естественно, если это возможно, лучше писать локальные тесты.
Также при создании тестов стоит уделить внимание организации пакетов. Существует следующая структура, которой стоит придерживаться:
- app/src/main/java — исходный код приложения;
- app/src/test/java — здесь размещаются локальные тесты;
- app/src/androidTest/java — сюда помещаем инструментальные тесты.
Настройка
Если вы почему-то не используете Android Studio, которая генерирует пакеты при создании проектов, стоит запомнить структуру выше. К тому же, IDE конфигурирует Gradle-файл модуля app:
Для упрощения написания тестов огромной популярностью пользуется фреймворк Mockito. В его возможности входит имитация и наблюдение объектов, а также вспомогательные средства проверок. Чтобы начать его использовать, добавим зависимость:
Local-тесты в Android
Теперь давайте рассмотрим 2 простейших теста, которые проверяют на соответствия 2 объекта (в нашем случае — числа):
Для этого создадим в пакете для локальных тестов класс и разместим в нем наши методы. Чтобы JUnit знал, что эти методы являются тестами, они помечаются соответствующей аннотацией @Test . Метод же assertEquals() кидает ошибку AssertionError в случае, если первый (ожидаемый) и второй (результат) не соответствуют друг другу.
Давайте запустим их (нажав правой кнопкой на класс и выбрав Run ‘ExampleUnitTest’ в появившемся меню) и посмотрим на результат выполнения:

Видно, что первый метод выполнился, а во втором произошла ошибка, т.к. 5 != (2 + 2). Также можно настроить тест на ожидаемое исключение используя параметр expected :
В таком случае тест выполнится, т.к. это исключение мы ожидали. Для длинных операций можно также указать параметр timeout и установить значение в миллисекундах. Если метод не выполнится в течение заданного времени, тест будет считаться проваленным:
Есть еще такой хитрый механизм как Matchers. К примеру, их на вход принимает метод assertThat(T actual, Matcher matcher) и возвращают методы класса org.hamcrest.CoreMatchers . Матчеры представляют собой логические операции совпадения. Рассмотрим несколько из них:
Как видно из названий, is() можно описать как оператор «равно», is(not()) как «неравно», а hasItem() — как проверку на наличие элемента в списке. И читается это как связное предложение. Здесь можно найти весь перечень матчеров.
Пока мы видели несложные примеры, на основании которых уже можно писать простые тесты. Но я бы хотел рассмотреть библиотеку Mockito, с чьей помощью наши тесты станут по-настоящему крутыми!
Как упоминалось выше, Mockito используется для создания «заглушек». Они называются mock-объектами. Их цель — заменить собой сложные объекты, которые не нужно/невозможно тестировать. Объявить их можно двумя способами:
Обратите внимание, что для того, чтобы использовать аннотацию @Mock , класс нужно пометить аннотацией @RunWith(MockitoJUnitRunner.class) или вызвать MockitoAnnotations.initMocks(this); в @Before -методе:
Получив «замоканный» объект, можно творить настоящие чудеса! К примеру, для того, чтобы «переопределить» название приложения из строкового ресурса, можно сделать следующее:
Теперь при вызове метода getString() будет возвращаться «Fake string», даже если он вызван неявно (за пределами теста):
Но что если мы хотим переопределить все строковые ресурсы? Неужели нам придется прописывать эту конструкцию для каждого из них? Естественно, нет. Для этого предусмотрены методы anyXXX() , (anyInt() , anyString() , etc. Теперь, если заменить R.string.app_name на anyInt() (не забываем, что в Android все ресурсы имеют тип Integer) — все строки будут заменены на нашу строку.
А убедиться в этом мы можем, дописав assertThat() в конце нашего теста:
В случае, когда мы хотим выбросить Exception, можно использовать конструкцию when(. ).thenThrow(. ); .
Есть еще магический метод verify() который провалит тест в случае, если указанный метод не был до этого вызван. Взглянем на код:
Работает это так: мы передаем в verify(mockedList) наш мок-лист, после чего указываем, какие именно методы нас интересуют. В данном случае добавление строки и очистка списка. Неотъемлемый инструмент, как по мне 🙂
Но по-настоящему потенциал этого метода раскрывается при использовании spy-объектов. Их главное отличие в том, что они не создаются напрямую, в отличие от mock’ов. А толку-то с них, спросите вы? А толк в том, что создав «шпиона» вы можете следить за ним также, как и за фейковым объектом:
Instrumented тесты в Android
При помощи этого типа тестов мы получаем доступ к реальному контексту, а также ко всем возможностям Android API. Помимо этого, у нас есть «режим Бога», при помощи которого мы можем управлять жизненным циклом активности. Для того, чтобы тест распознавался как инструментальный, нам нужно пометить класс соответствующей аннотацией:
Сами же тесты мы помечаем так же, как и в случае локальных — при помощи аннотации @Test . Давайте проверим, соответствует ли пакет нашего контекста нашему приложению:
С помощью имеющегося инструментария можно прослушивать состояние активностей:
. или и вовсе управлять их состоянием:
Заключение
Это, пожалуй, самые важные вещи, которые мне удалось найти при первом знакомстве. Поэтому не закидывайте камнями, как говорится 🙂 Но, я думаю, для начала этого будет достаточно. Для тех, кто хочет узнать больше о возможностях junit, рекомендую почитать официальную документацию, а вот материал про возможности инструментальных тестов.
Источник
Developing Android unit and instrumentation tests — Tutorial
This tutorial describes how to write unit and instrumentation tests for your Android application. It describes how to execute these tests via Android studio and Gradle. This tutorial assumes that you are familiar with Android programming in general.
1. Introduction into Android testing
1.1. Testing Android applications
Android applications run on a variety of devices. Also the Android framework and the surrounding open source frameworks evolve at a high speed. To ensure that you application works well, it is import to write software tests. This helps you to enhance and maintain the Android application.
Unit testing for Android can be classified into:
Local unit tests — tests which can run on the JVM.
Instrumented unit tests — tests which require the Android system.
Local unit tests run much faster compared to the time required to deploy and run tests on an Android device. Prefer writing local unit tests and only run tests on Android, if you require a real Android system.
If you write local unit test and have dependencies to Android API, you need to replace them, e.g., via a mocking framework like Mockito.
1.2. What to test on Android applications
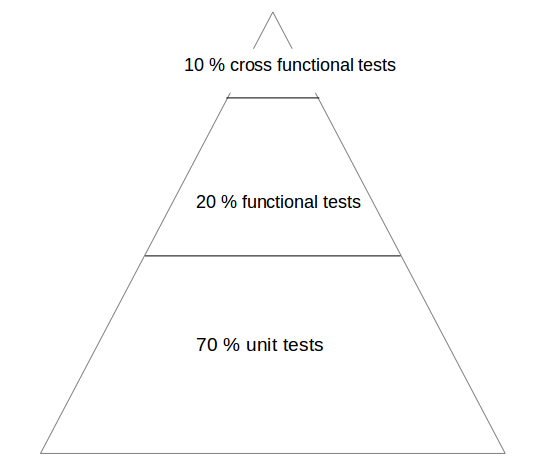
Your test should focus on the business logic of your application. A good rule of thumb is to have the following distribution of tests:
70-80 % unit tests to ensure stability of your code basis
20-30 % functional tests to ensure that the application really works
some cross functional tests if your application integrates intensively with other Application components
You should test your application at least on one device with the lowest possible configuration. In addition you should test on one device with the highest available configuration, e.g., pixel density, screen resolution to ensure that it works fine on these devices.
1.3. Tooling support for Android testing
The Android Testing Support library (ATSL) project from Google provides tooling for Android testing. For example, it ( AndroidJUnitRunner ).
If you run local unit tests, a special version of the android.jar (also known as the Android mockable jar ) is created by the tooling. This modified JAR file is provided to the unit test so that all fields, methods and classes are available. Any call to the Android mockable JAR results, by default, in an exception, but you can configure Android to return default values. See Activating default return values for mocked methods in android.jar for details.
The library provides a JUnit 4-compatible test runner ( AndroidJUnitRunner ), the Espresso test framework and the UI Automator test framework. Espresso test framework can be used to test the User Interface of your application. UI Automator allows to write cross application functional tests.
AndroidJunitRunner provides access to the instrumentation API, via the InstrumentationRegistery .
InstrumentationRegistry.getInstrumentation() , returns the Instrumentation currently running.
InstrumentationRegistry.getContext() , returns the Context of this Instrumentation’s package.
InstrumentationRegistry.getTargetContext() , returns the application Context of the target application.
InstrumentationRegistry.getArguments() , returns a copy of arguments Bundle that was passed to this Instrumentation. This is useful when you want to access the command line arguments passed to the instrumentation for your test.
It also gives access to the life cycle via the ActivityLifecycleMonitorRegistry .
1.4. Android project organization for tests
The following is the default directory structure for your application and test code:
app/src/main/java — for your source code of your main application build
app/src/test/java — for any unit test which can run on the JVM
app/src/androidTest/java — for any test which should run on an Android device
If you follow this conversion, the Android build system runs your tests on the correct target (JVM or Android device).
If you receive the following error message: «error duplicate files in path. Path in archive: LICENSE.txt» you can add the following to your app/gradle.build file.
2. Android unit testing
2.1. Unit testing in Android
A unit test verifies in isolation the functionality of a certain component. For example, assume a button in an Android activity is used to start another activity. A unit test would determine, if the corresponding intent was issued, not if the second activity was started
A unit tests for an Android application can be:
local unit test — which runs on the JVM
Android unit test — which runs on the Android runtime
If they run on the JVM, they are executed against a modified version of the android.jar Android library. In this version all final modifiers have been stripped off. This makes it easier to use mocking libraries, like Mockito.
The local unit tests of an Android project should be located in the app/src/test folder.
2.2. Required dependencies in the Gradle build file
To use JUnit tests for your Android application, you need to add it as dependency to your Gradle build file.
2.3. Running the unit tests
2.3.1. Using Gradle
Run your unit tests with the gradlew test command.
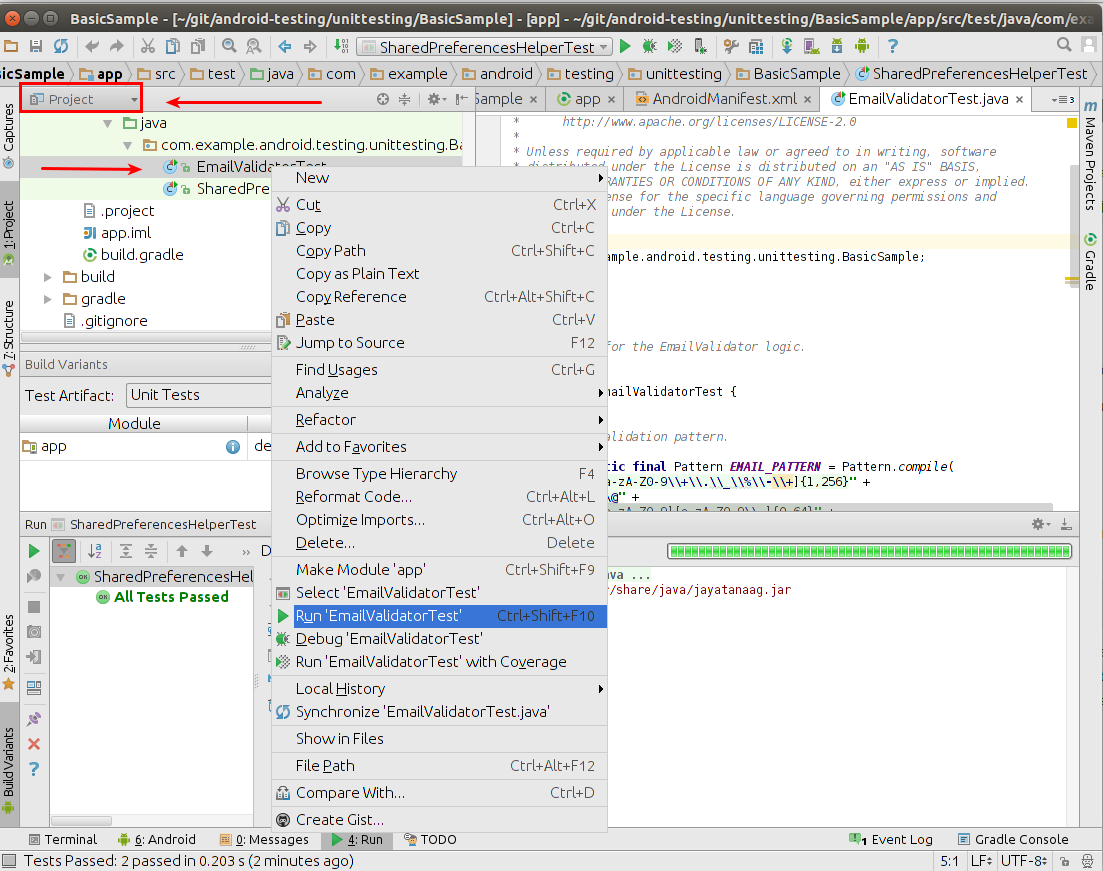
2.3.2. Using Android Studio
To run a unit test, right-click on your test class in the Project window and select Run.
2.4. Location of test reports
The Test reports are created in the app/build/reports/tests/debug/ directory. The index.html gives an overview and links to the individual test pages.
2.5. Activating default return values for mocked methods in android.jar
By default, all calls to methods in the modified android.jar file throw exceptions. This default should ensure that your unit tests only test your code and do not depend on any particular behavior of the Android platform. If you want to configure a certain behavior, you can use a mocking framework to replace these call.
You can also instruct the Gradle build system to return default values for method calls in the `android.jar`with the following configuration in your Gradle build file.
3. Exercise: Create unit test
In this exercise you learn how to create a simple JUnit4 test for an Android project.
3.1. Preparation: Create Android project
Create the Android project as described in Android temperature converter.
3.2. Add JUnit dependency
Ensure you have the dependency to Junit in your app/build.gradle file.
3.3. Create test
In your app/src/test directory create the following two test methods for the ConverterUtil class.
3.4. Run unit tests
Ensure your unit tests are correctly implemented by running test tests. They should run successfully.
4. Writing tests to run on the Android device
4.1. Instrumentation tests
The Android testing API provides hooks into the Android component and application life cycle. These hooks are called the instrumentation API and allow your tests to control the life cycle and user interaction events.
Under normal circumstances your application cannot control the life cycle events and the user drives the application. For example, if Android creates your activity the onCreate() method is called. Or if the user presses a button your corresponding code is called. Via instrumentation you can control these events via your test code. For example, your instrumentation test can start the activity. Afterwards, it can call the finish() and restart the activity to test if the instance state of the activity is correctly restored.
Instrumented unit tests are unit tests that run on Android devices and emulators instead of running on the Java virtual machine. These tests have access to the real device and its resources and are useful to unit test functionality which cannot be easily mocked by mocking frameworks. An example is a test which validates a Parcelable implementation.
An instrumentation-based test class allows you to send key events (or touch events) to the application under test.
With user interface testing framework like Espresso, the developer rarely has to use the instrumentation API directly.
4.2. How the Android system executes tests
The InstrumentationTestRunner is the base test runner for Android tests. This test runner starts and loads the test methods. Via the instrumentation API it communicates with the Android system. If you start a test for an Android application, the Android system kills any process of the application under test and then loads a new instance. It does not start the application, this is the responsibility of the test methods. The test method controls the life cycle of the components of the application.
The test runner also calls the onCreate() method of the application and activity under test during its initialization.
4.3. Mocking objects in Android
The mocking framework Mockito can also be used for instrumentation tests. This allows you to replace parts of the Android system which are not interesting for the test. The Android framework provided in the past specialized mocking classes but these are not necessary anymore.
4.4. Location of instrumentation tests
As described in Android project organization for tests the unit tests of an Android project should be located in the app/src/androidTest/java folder.
4.5. Define dependencies and testInstrumentationRunner in the Gradle build file
To use JUnit tests for your Android application you need to add the dependency to JUnit to your Gradle build file. You also need to specify android.support.test.runner.AndroidJUnitRunner as testInstrumentationRunner in the build file.
4.6. Using the @RunWith(AndroidJUnit4.class)
It is also recommended annotating the test with the @RunWith(AndroidJUnit4.class) annotation. AndroidJUnit4 extends JUnit4, so if you use pure Junit4 syntax and ActivityTestRule it is not required. But you need it, if you want to run, i.e., Espresso tests with ActivityTestRule and JUnit4.
4.7. Run the tests on Android
Run your local unit tests via Gradle with the gradlew connectedCheck command.
To run your local unit tests via Android Studio, right-click on your test class in the Project window and select Run.
4.8. Location of test reports
The test reports are created in the app/build/reports/androidTests/connected/ directory. The index.html gives an overview and links to the individual test pages.
4.9. How to replace the application for instrumentation tests
You can replace the application class for the instrumentation tests by overriding the AndroidJUnitRunner and its newApplication method.
Источник


