- Test code using JUnit in JVM – tutorial
- Add dependencies
- Add the code to test it
- Create a test
- Run a test
- What’s next
- Building Local Unit Tests in Android Kotlin
- Introduction
- Prerequisites
- Step 1 — Creating an Android project
- Step 2 — Creating the Test class
- Step 3 — Writing tests
- Step 4 — Writing the funtion implementation
- Conclusion
- About the author
- Want to learn more about the EngEd Program?
- Unit Testing with Kotlin Coroutines: The Android Way
- What will we learn?
- Preparing our setup:
- Testing suspend functions with runBlocking() and runBlockingTest()
- runBlocking()
- runBlockingTest()
- Test Coroutines running on Dispatchers.Main with TestCoroutineDispatcher and MainCoroutineRule
- TestCoroutineDispatcher
- MainCoroutineRule
- Inject Dispatcher to test Coroutine dispatchers other than Dispatchers.Main e.g., Dispatchers.IO
- Test LiveData using InstantTaskExecutorRule
- Observe LiveData changes with LiveDataTestUtil
- Unit Testing with Dagger 2: Brewing a potion with Fakes, Mocks, and Custom Rules in Android
- If you have Dagger in your project but never used it for testing, it’s high time to give it a try. Dagger makes your…
Test code using JUnit in JVM – tutorial
This tutorial will show you how to write a simple unit test and run it with the Gradle build tool.
The example in the tutorial has the kotlin.test library under the hood and runs the test using JUnit.
To get started, first download and install the latest version of IntelliJ IDEA.
Add dependencies
Open a Kotlin project in IntelliJ IDEA. If you don’t already have a project, create one.
Specify JUnit 5 as your test framework when creating your project.
Open the build.gradle(.kts) file and add the following dependency to the Gradle configuration. This dependency will allow you to work with kotlin.test and JUnit :
Add the test task to the build.gradle(.kts) file:
If you created the project using the New Project wizard, the task will be added automatically.
Add the code to test it
Open the main.kt file in src/main/kotlin .
The src directory contains Kotlin source files and resources. The main.kt file contains sample code that will print Hello, World! .
Create the Sample class with the sum() function that adds two integers together:
Create a test
In IntelliJ IDEA, select Code | Generate | Test. for the Sample class.
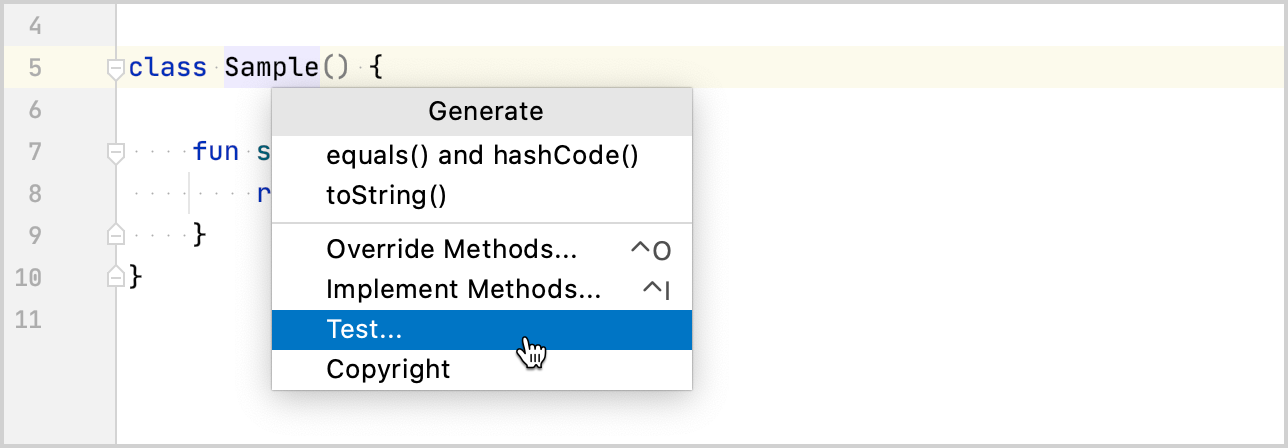
Specify the name of the test class. For example, SampleTest .
IntelliJ IDEA creates the SampleTest.kt file in the test directory. This directory contains Kotlin test source files and resources.
You can also manually create a *.kt file for tests in src/test/kotlin .
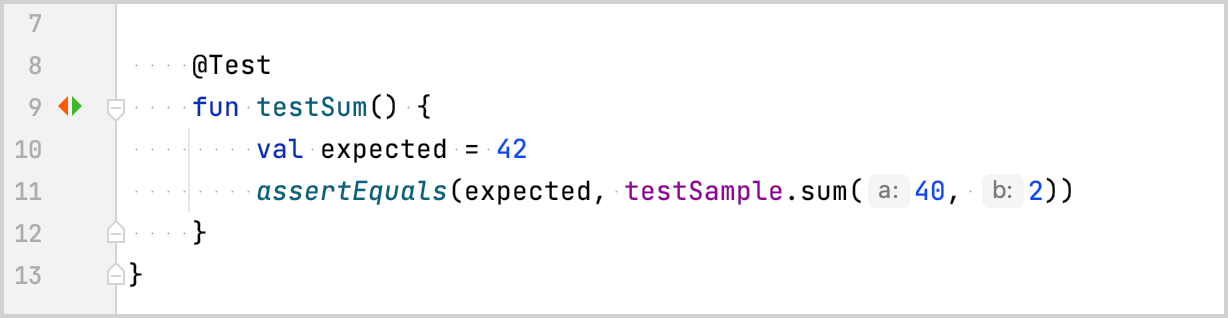
Add the test code for the sum() function in SampleTest.kt :
Define the test testSum() function using the @Test annotation.
Check that the sum() function returns the expected value by using the assertEquals() function.
Run a test
Run the test using the gutter icon.
You can also run all project tests via the command-line interface using the ./gradlew check command.
Check the result in the Run tool window:
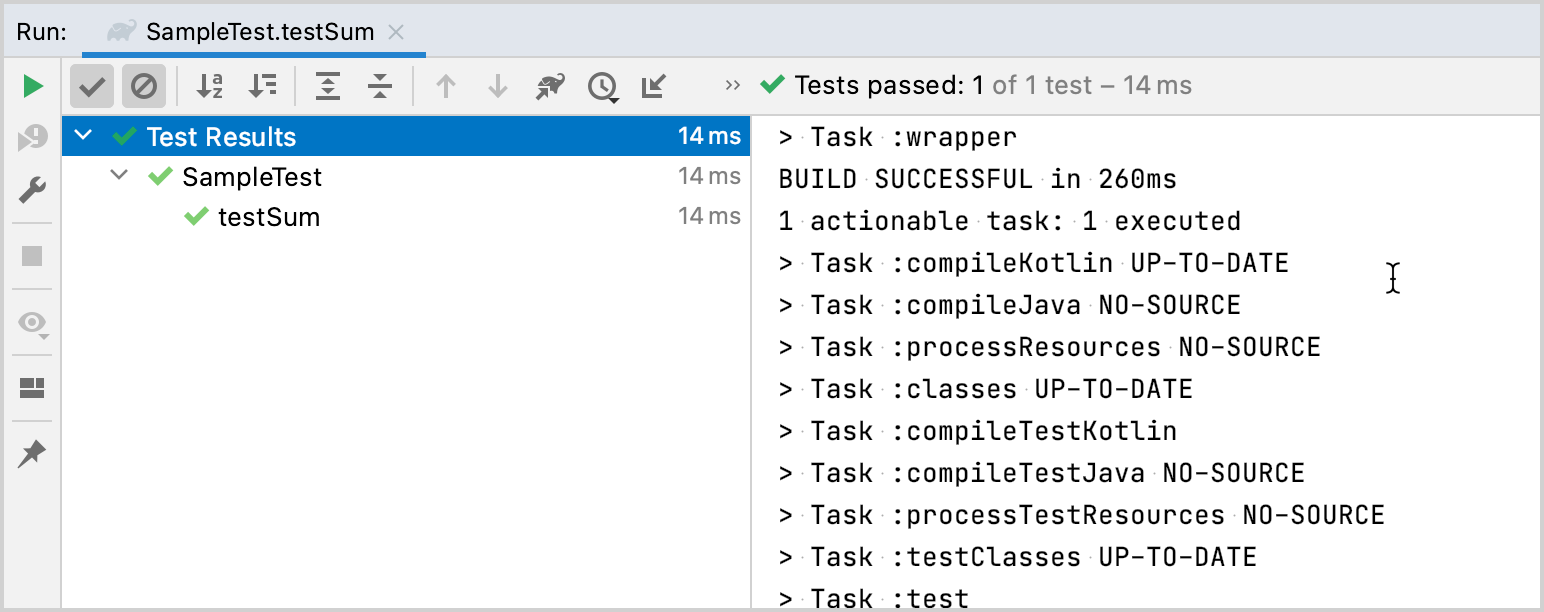
The test function was executed successfully.
Make sure that the test works correctly by changing the expected variable value to 43:
Run the test again and check the result:
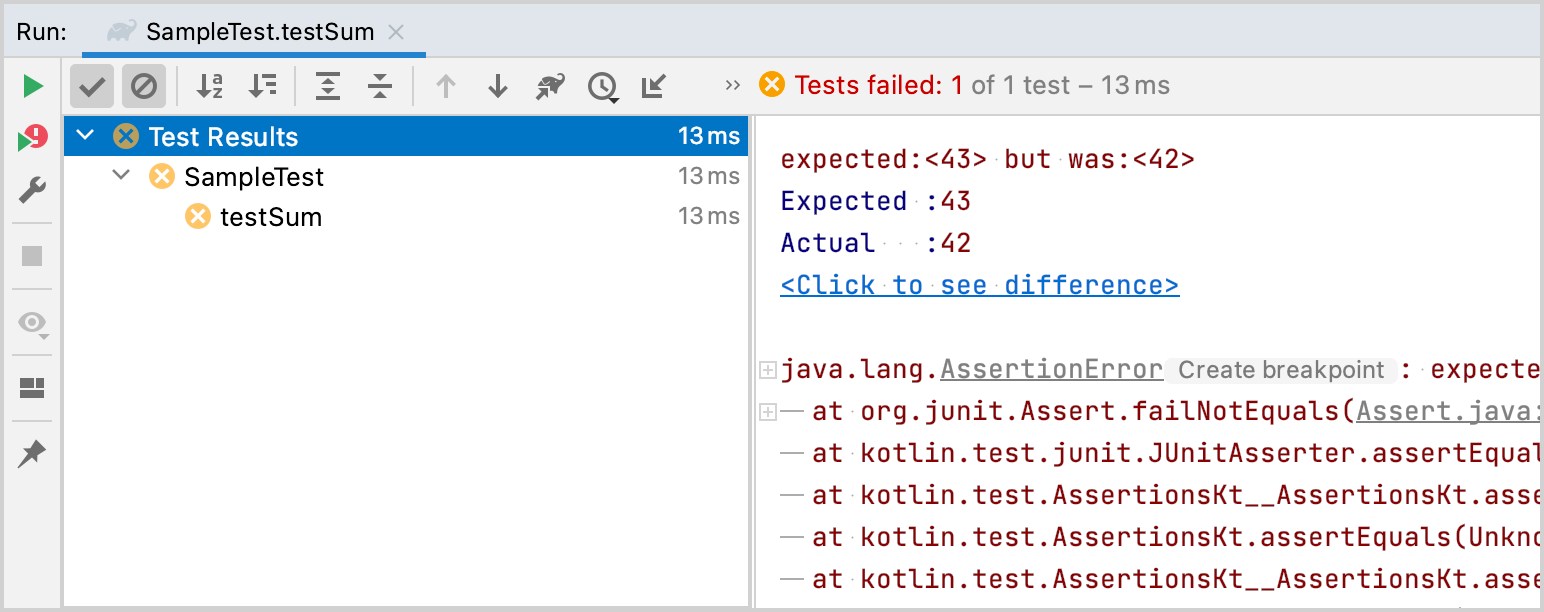
The test execution failed.
What’s next
Once you’ve finished your first test, you can:
Try to write another test using other kotlin.test functions. For example, you could use the assertNotEquals() function.
Watch these video tutorials on YouTube, which demonstrate how to use Spring Boot with Kotlin and JUnit 5.
Источник
Building Local Unit Tests in Android Kotlin
January 10, 2021
Unit testing is a crucial feature of software development. It brings about a development paradigm known as Test Driven Development (TDD). These tests typically test the business logic of applications. In Test Driven Development, the developer writes tests that define what a specific function should do by pointing out the expected results. After the tests are appropriately structured, the developer then writes the implementation of the function.
Introduction
Android developers also write and use unit tests. The most popular library used to write these unit tests is JUnit4 and the Assert class. The Truth library from Google is an alternative to the Assert class.
This library does relatively the same function as the Assert class but with a more readable code. Unit tests run on the Java virtual machine (JVM). For this reason, tests run faster, and one does not have to wait for the emulator or physical device to boot up to test the logic implemented. This article will serve as a guide on how to write local unit tests in Android using Kotlin.
Prerequisites
To follow through with this tutorial, you will need:
- Android Studio installed.
- A basic understanding of Kotlin programming language.
Let’s get started
Step 1 — Creating an Android project
In this step, we’re going to create our application. Open Android Studio and start a new project using the empty activity template. On the next page, give the application a name and keep the default settings.

Click Finish and wait for the project build process to complete.
After the build finishes, go to the app level build.gradle file and add the following dependencies.
By default, the JUnit dependency is available in any newly created project. However, add it if it is not included. As you can see, we have added the dependencies with the keyword testImplementation and not the standard implementation keyword. What that means is that the dependency only applies to the test source set. We will go into the source set details later in the article.
Step 2 — Creating the Test class
As mentioned earlier, we are going to practice the Test-Driven-Development approach in Android. We, therefore, need to declare our expected results before writing the actual implementation.
Let’s go through what is expected of our function. We are going to create a util class that holds authentication functions. The class will have a method to simulate the sign-up feature. This is the function we are going to focus on through this article. The function should validate the input we pass to it.
Let’s list down the behavior of the function.
The function should:
- Return false when the username or password is empty.
- Return false when the username is already taken. For this, we are going to create a sample list of usernames that have been taken.
- Return false when the password and repeat password don’t match.
- Return false when the password is less than two digits.
To write tests for our function, we first have to create the method. We can not call a function that does not exist. To do this, create a Kotlin object and name it AuthUtil .

We make it an object to allow us to access the function without creating an instance of the class. Add the following code to the class.
Here, we add a sample list of users and create the signUp function. The function takes in the necessary string parameters. It also returns a default value (true). We add the return value to avoid errors. Now that we have our test subject. Let’s go ahead and create the tests.
To create the test class: Right-click on the class name and select generate then click Test . On the next screen, select JUnit4 as the testing library. Leave the other fields to default values and click OK .

The next dialog box that appears prompts you to select the test source set. There are two types of test source sets. One is the test source set, and the other one is the Android test source set.
The test source set is where we write business logic tests. On the other hand, the Android test source set is where we write tests for functions that entirely depend on the Android platform. An example of this type of test is the UI test.
For our case, we select the test source set since our function does not depend on the Android platform.

That’s it, our test class has been created. Now let’s go ahead and write the tests.
Step 3 — Writing tests
By default, creating the test class using this approach opens up the class. Before we write our first test, let’s look at a standard test naming convention. To make test names more readable, developers use backticks to name their test functions.
This allows one to add spaces and other special characters to the function name. However, this naming convention should only be used in test functions and not in normal functions.
Let’s now write our first test.
First, add the following imports at the top of the class.
The first test should check whether the function returns false when the user passes an empty username or password . Add the following code to implement this.
We use the @Test annotation to declare a function as a test. To test the behavior, we have passed in empty strings to the signUp function.
We have then used the assetThat function to check whether the return value is false since that is what we expect. Check out this link for more details about the assertThat function.
To run the test individually, right-click on the test name and select run . The test should fail since we had set the signUp function to return true .
The second test should check whether the username entered already exists. If it exists, the function should return false .
Write the code below to implement this.
We pass in an already taken username to test this behavior. The expected result is false, but our function returns true, so the test will fail when we run it
For the third test, we are going to pass in different values for password and repeat password. This test should return false .
Add the following code to implement this.
Now, the last test. The function should not allow passwords that are less than two characters. For this, we pass in a one-character password. We expect it to return false, so the test should fail when we run it.
Add the test implementation as follows.
That’s all the tests we need. This is how the full test class should look.
To run all the tests at once, right-click on the test class name and select Run .
All the tests should fail.
Step 4 — Writing the funtion implementation
Now that our tests are all set let’s go ahead and write the actual function implementation. The function should fulfill all the test cases.
Add the following code inside the signUp method.
As a result, the AuthUtil object should look as shown.
We use the when statement to validate the values. All four statements create the behavior required for the function. When none of them are successful, we return true. This means that the input has passed all the tests. Navigate to the AuthUtiTest class and run the tests. The tests should pass.
This is the expected output from the run window.

Conclusion
With that information, you can now write your unit tests. Unit tests fasten the software development process. This is because one declares the behavior before implementing it.
In doing so, one does not have to worry about other components of the application. The focus should be on the function being implemented and tested. You also don’t need to run the whole application to test a single method.
Peer Review Contributions by: Wanja Mike
About the author
Peter Kayere is an undergraduate student at Jomo Kenyatta University of Agriculture and Technology studying Computer Technology. Peter has a great passion in software development particularly mobile web and android application development. Peter’s most used programming languages are Kotlin and Javascript.
Want to learn more about the EngEd Program?
Discover Section’s community-generated pool of resources from the next generation of engineers.
Источник
Unit Testing with Kotlin Coroutines: The Android Way


In our app testing strategy, Unit tests are the fundamental tests. With the Unit test, we can verify if the individual logic we have written is correct. We can run those Unit tests after each build to make sure any new changes don’t cause impacts on the existing code. Thus Unit tests help us quickly catch and fix issues before the release.
If you are new to Android Development or already have years of experience, you should be quite familiar with Kotlin now. And after the deprecation of AsyncTask from API level 30, the best option you have is to go for RxJava or Kotlin’s Coroutines for Asynchronous Programming. This article is all about Kotlin’s Coroutines and different approaches to test them. We will also explore the support libraries and best practices.
What will we learn?
- Testing suspend functions with runBlocking() and runBlockingTest()
- Test Coroutines running on Dispatchers.Main with TestCoroutineDispatcher and MainCoroutineRule
- Inject Dispatcher to test Coroutine Dispatchers other than Dispatchers.Main e.g., Dispatchers.IO
- Test LiveData using InstantTaskExecutorRule
- Observe LiveData changes with LiveDataTestUtil
Preparing our setup:
For the demonstration of the project, we will be using the following three dependencies:
Testing suspend functions with runBlocking() and runBlockingTest()
A suspending function is a function that can be paused and resumed at a later time. Those functions can execute a long-running operation and wait for it to complete without blocking. A suspend function can only be called from another suspend function or a Coroutine.
runBlocking()
If our app has any suspend functions, we have to call it from another suspend function or launch it from a Coroutine. We can mitigate the problem by using the runBlocking() function. This function runs a new Coroutine and blocks the current thread interruptibly until its completion. Let’s look at an example:
From the above example, we have a MainViewModel with a checkSessionExpiry() function. This function checks if the user session has expired and returns an appropriate boolean value. To simulate an IO task, we have used the delay function. Inside the MainViewModelTest class, we have one test function that checks if the return value is true. If you run the test it will pass, but you will notice a delay of 5 seconds. That’s because the runBlocking() function can’t skip the delay operation.
runBlockingTest()
runBlockingTest() is a part of the kotlinx.coroutines.runBlocking package. This test is similar to runBlocking() function, but it will immediately progress past delays and into a launch and async blocks. You can use this to write tests that execute in the presence of calls to delay without causing your test to take extra time. Our previous test will run without any delays if we launch the same test with runBlockingTest() .
1. This test is marked as an ExperimentalCoroutinesApi so in the future it may change
2. Never use runBlocking() in your app. It’s meant to be used for Unit tests only
Test Coroutines running on Dispatchers.Main with TestCoroutineDispatcher and MainCoroutineRule
TestCoroutineDispatcher
We had a successful Unit test with runBlocking() and runBlockingTest() , but have you noticed we launched both tests in the Dispatcher.IO thread? What will happen if we use Dispatcher.Main instead of Dispatcher.IO ? Let’s see an example:
1. viewModelScope is a part of the androidx.lifecycle package. This scope is tied to the ViewModel and will be canceled when ViewModel will be cleared, i.e ViewModel.onCleared() is called.
2. By default, viewModelScope always runs on the main thread. But you can configure it to run on another thread by setting up a Dispatcher
If we try to run the Unit test in the Dispatcher.Main thread, our test will fail with the following error:
It makes sense because we can’t use the main looper in the Unit test. Let’s try replacing the Dispatcher with a TestCoroutineDispatcher .
- All consecutive usages of Dispatchers.Main will use given dispatcher under the hood
- Resets the state of the Dispatchers.Main to the original main dispatcher
- Clean up the TestCoroutineDispatcher to make sure no other work is running
MainCoroutineRule
So far, we have found ways to test our Dispatcher.IO and Dispatcher.Main Coroutines. By default, Coroutines work for Dispatcher.Main , but to test Dispatcher.IO , we have to use the TestCoroutineDispatcher for replacing the main dispatchers with the test dispatcher. This works correctly but doesn’t scale up very well. Whenever our test class increases, we have to use the same boilerplate again and again. To overcome this issue, we can create a custom MainCoroutineRule and add it to our test classes with @Rule annotation.
MainCoroutineRule sets the main Coroutines dispatcher to a TestCoroutineScope for Unit testing. The TestCoroutineScope provides control over the execution of Coroutines. All we have to is use it as a @Rule
Inject Dispatcher to test Coroutine dispatchers other than Dispatchers.Main e.g., Dispatchers.IO
Previously, we explored ways to test Coroutines for both Dispatchers.Main and Dispatchers.IO . But, what will happen when we have to replace a dispatcher dynamically for a Unit test? Let’s consider the following example:
Here, we are setting the TestCorotutineDispatcher as the main Dispatcher via MainCoroutineRule which takes control over the MainDispatcher, but we still have no control over the execution of the Coroutine launched via viewModelScope.launch(Dispatchers.IO) . Also, if we run the test now, It will fail with assertion error because our test will run on the other thread which is different from the ViewModel thread. Now, how should we resolve this?

Dispatchers should be injected into your ViewModels so you can properly test. Passing the Dispatcher via the constructor would make sure that your test and production code use the same dispatcher.
Our updated ViewModel and the test class should look this:
Run the test, and it should be successful now.
Test LiveData using InstantTaskExecutorRule
So far, we have covered everything required for testing our Coroutines. As a bonus, I would like to discuss more testing the LiveData . Let’s start with an example:
It looks like a perfect test to proceed. But if we run the Unit test, there will be an error:
That’s because LiveData is a part of the Android lifecycle, and it needs to access the main looper to proceed. Fortunately, we only need a single line of code to resolve this. Just add InstantTaskExecutorRule as a @Rule from the androidx.arch.core.executor.testing package. Now re-run the test, and it should be successful.
InstantTaskExecutorRule is a JUnit Test Rule that swaps the background executor used by the Architecture Components with a different one that executes each task synchronously.
Observe LiveData changes with LiveDataTestUtil
If you need to observe LiveData changes, then you can use an extension function called LiveDataTestUtil. It will help you observe LiveData changes without any extra effort.
If you use Dagger in your project, you can check out another article to explore the Unit testing technique with Dagger.
Unit Testing with Dagger 2: Brewing a potion with Fakes, Mocks, and Custom Rules in Android
If you have Dagger in your project but never used it for testing, it’s high time to give it a try. Dagger makes your…
Also, check out the article about generating Unit test coverage reports with JaCoCo.
Источник


