- Как сделать сканер штрих кода android studio
- Creating a Barcode Scanner using Android Studio
- What is this article about
- Prerequisite
- Let’s write some code
- Как создать приложение для считывания штрих-кода на андроид
- Android SDK: Create a Barcode Reader
- Premium Option: QR-Code & Barcode Reader
- 1. Create a New Android Project
- Step 1
- Step 2
- 2. Add ZXing to Your Project
- Step 1
- Step 2
- 3. Do Some Scanning
- Step 1
- Step 2
- 4. Retrieve Scanning Results
- Step 1
- Step 2
- Step 3
- Conclusion
Как сделать сканер штрих кода android studio
В народе довольно популярны приложения, умеющие сканировать штрих коды и QR-коды на различных вещах и продуктах и выдающие о них необходимую полезную информацию. В сегодняшнем уроке мы сделаем свое собственное приложение, способное работать с этими замысловатыми кодами. Но наше приложение не будет полностью работающим сканером, написанным лично нами, мы сделаем всего лишь приложение, которое будет использовать для анализа кодов известное на Play Market приложение под названием Barcode Scanner (бесплатное). Наше приложение будет с помощью намерения Intent запускать это упомянутое выше приложение, там будет происходить анализ необходимого кода, а результат анализа будет передаваться назад нашему приложению с помощью метода OnActivityResult, а затем высвечиваться уже в нашем приложении с помощью всплывающего Toast сообщения.
Для начала создаем новый проект, выбираем Blank Activity.
Первым делом создадим пользовательский интерфейс приложения. Он будет состоять из двух кнопок для запуска сканеров штрих кода и QR-кода. При нажатии на кнопки пользователю будет предложено загрузить приложение Barcode Scanner с маркета. Открываем файл activity_main.xml и добавляем туда следующие элементы:
Теперь переходим к работе с кодом. В принципе, ничего нового мы здесь не увидим, все довольно знакомое. Переход на другое приложение с помощью Intent, выполнение alert dialog для предложения пользователю перейти на Play Market для загрузки сканера, метод для обработки результатов программы сканера и получения данных с него OnActivityResult и их вывод в Toast сообщении.
Открываем файл MainActivity.java и добавляем в него следующий, довольно понятный код:
Вот и все, на этом наш сканер готов. Запускаем и проверяем:
Источник
Creating a Barcode Scanner using Android Studio

Step by step guide to building a barcode scanning application using Android Studio.
What is this article about
This article will guide you through creating an android application using which you can make use of your mobile camera to scan a barcode and read the data in them.
Prerequisite
- The latest version of Android Studio installed. ( download from here )
- A mobile device to test the application. (you can make use of the inbuild android emulator but in some pc, it may cause some issues.)
- Knowledge of java or any object-oriented programing language.
Let’s write some code
- Create a new application in android studio and name it Barcode Scanner.
- Open up your app-level Gradle file and add the below dependency there.
3. Now hit on Sync now button and wait for the build to complete. Once the build is complete open up your manifest file and add the necessary permissions.
also, add the metadata field in your manifest file, inside the application tag and above the activity tag.
here’s a full view of my manifest file
4. Now you have set up all the dependency needed for the barcode scanner to work and all the permission necessary. Let’s build the UI for the app.
5. Open your activity_main.xml file and write the below code inside.
Now your view should look something like this

here we have something called a sufaceview in android and a textview field to display the text scanned by the barcode.
SurfaceView: It provides a dedicated drawing surface embedded inside the view hierarchy.
You have completed the UI code for the Barcode App, now let’s write the java code to make wonders happen.
6. Open MainActivity.java file and you will see the following code.
let’s add some code of our own
7. First, we need to bind the views.
8. Now we will write the method to scan the image for a barcode.
this method will help us scan and display the text in the textview we created in the XML file.
9. The complete java code will look something like this.
Now try scanning this barcode and you will see the value that is embedded in the barcode in the textview.

The final screen should something like this.
Источник
Как создать приложение для считывания штрих-кода на андроид
[wpanchor этом уроке научимся создавать приложение для чтения штрих-кодов и QR-кодов с использованием стандартной библиотеки Mobile Vision API.
Еще с выпуском Google Play services версии 7.8 разработчики добавили интерфейсы Mobile Vision, которые обеспечивают API для обнаружения штрих-кода. Они считывают и декодируют множество различных типов штрих-кодов, быстро, легко и локально.
Классы для обнаружения и анализа штрих-кодов доступны в пространстве имен com.google.android.gms.vision.barcode. Основной рабочей лошадкой является класс BarcodeDetector. Он выполняет обработку объектов Frame и возвращает массив штрих-кодов SparseArray .
Тип Barcode представляет собой единый общепризнанный штрих-код и его значение. В случае 1D штрих-кодов, таких как коды UPC, это будет просто номер, который закодирован в штрих-коде. Его значение доступно в поле rawValue, в то время как тип штрих-кода (то есть его кодировку) можно найти в поле format.
Для 2D штрих-кодов, которые содержат структурированные данные, такие как QR-коды — в поле valueFormat устанавливается определенный тип значения, соответствующего полю данных. Так, например, если обнаружен тип URL , то поле valueFormat вернет константу URL, а объект Barcode.UrlBookmark будет содержать значение URL-адреса. Помимо URL-адресов, существует множество различных типов данных, которые QR-код может хранить. Например, почтовый адрес, дату и время события календаря, мероприятие в календаре, информацию контакта, номер телефона, местоположение на карте и другие данные, полный список которых приводится в документации. Ссылки на документацию здесь.
Использование в приложении Mobile Vision API позволяет считывать штрих-коды в любом положении.
Важно отметить, что синтаксический разбор всех штрих-кодов выполняется локально, поэтому вам не нужно использовать соединение с сервером для чтения данных из кода. Например, при считывании линейного штрих-кода PDF-417, который может вместить до 1 КБ текста, можно сразу же получить всю закодированную в нем информацию.
Итак, для разработки приложения нам понадобится:
- Среда разработки Android Studio
- Смартфон на Android 4.2.2 или более поздней версии
- Последняя версия Android SDK, включая компонент SDK tools. Вы можете получить его с помощью Android SDK Manager в Android Studio.
- Google Play Services SDK. Вы можете получить его также в Android SDK Manager в Android Studio.
Создаем новый проект в Android Studio. При создании выбираем шаблон Empty Activity.

На следующем шаге нужно убедиться, что ваше приложение может использовать службы Google Play, в состав которых входит Mobile Vision API. Для этого нужно обновить файл build.gradle вашего проекта.
В секции зависимостей должны быть такие строки. Обновите Gradle при необходимости.
Службы Google Play часто обновляются, и чтобы получить последнюю версию, в Android Studio выберите инструменты > Android > SDK Manager.
Затем найдите строчку для сервисов Google Play и убедитесь, что у вас установлена версия 26 и выше. Если нет — установите компонент.

Теперь создадим пользовательский интерфейс.
В Android Studio выберите папку «res» и откройте ее вложенную папку «layout». Здесь вы увидите «activity_main.xml». Откройте его в редакторе макетов.
Вы можете видеть, что ваш макет содержит текстовое поле
. Нужно изменить макет, как показано ниже. Теперь здесь будет кроме текстового поля также кнопка и изображение. Для всех экранных компонентов прописываем идентификаторы, чтобы потом обращаться к ним в коде.
По нажатию на кнопку будет происходить загрузка и обработка изображения штрих-кода, которое будет отображаться в ImageView. После завершения обработки штрих-кода информация, считанная из него, будет отображаться в TextView.
Обычно приложения для считывания штрих-кодов получают изображение с камеры устройства, или обрабатывают превью камеры. Для реализации этого потребуется достаточно много кода, и в конце урока я покажу пример реализации такого приложения. Чтобы упростить этот пример, мы обработаем готовое изображение qr-кода, которое уже присутствует в вашем приложении.
Вот пример изображения qr-кода, которое вы можете скачать отсюда.

Назовите его qr.png и добавьте в папку проекта res/drawable.Android Studio обеспечит доступ к файлу в качестве ресурса с идентификатором: R.drawable.qr
Теперь перейдем к написанию кода приложения.
В файле MainActivity.java в методе onCreate добавьте следующий код.
Это настраивает обработчик событий (onClick), срабатывающий когда пользователь нажимает кнопку. Остальной код напишем в методе onClick.
Начнем с загрузки изображения штрих-кода. Сначала находим ImageView по идентификатору. Затем используется BitMapFactory для декодирования ресурса R.drawable.qr в растровое изображение. Полученное растровое изображение передаем ImageView.
Далее создаем экземпляр класса BarcodeDetector, используя Builder и настраиваем его на поиск QR-кодов и матрицы данных (есть много других типов штрих-кодов, которые он мог бы найти).
Вполне возможно, что первый раз наш детектор штрих-код сработает, когда служба Google Play еще не будет готова для обработки штрих-кодов. Поэтому мы должны проверить, что наш детектор работает, прежде чем использовать его. Если нет, нам придется ждать окончания загрузки или сообщить пользователям, что нужно найти подключение к Интернету или освободить место на устройстве. Прежде чем мы обратимся к текстовому полю, нужно объявить и найти его выше в методе onCreate.
Теперь допишем метод вывода сообщения.
Теперь, когда наш детектор создан и мы знаем, что он работает, создаем кадр из растрового изображения и передаем его детектору. Тот возвращает нам массив штрих-кодов SparseArray.
Обратите внимание, что Mobile Vision API способен обнаруживать несколько штрих-кодов в одном кадре. В этом случае массив SparseArray будет заполнен несколькими записями.
Обычно на этом этапе нужно пробежать по массиву SparseArray и обработать каждый штрих-код отдельно. Нужно предусмотреть возможность, что штрих-кодов может быть несколько, или ни одного. В нашем случае мы знаем, что у нас есть только 1 штрих-код, и можем прописать жесткий код для него. Для этого мы берем штрих-код, называемый «thisCode», который будет первым элементом в массиве. Затем присваиваем значение его поля rawValue текстовому полю textView — и все.
Теперь все, что вам нужно сделать, это запустить приложение.
Запускать лучше на реальном устройстве. На эмуляторе работать не будет, потому что на эмуляторах по умолчанию отсутствует сервис Google Play.
Вот приложение запустилось на устройстве, жмем кнопку. Если вы используете изображение штрих-кода qr.png, вы увидите в текстовом поле данные, закодированные в QR-код — это адрес нашего сайта fandroid.info.

Это был простой пример приложения, демонстрирующий работу Mobile Vision API. Но полноценный сканер штрих-кодов должен получать изображение с камеры устройства, или обрабатывать превью камеры.
Разработчики подготовили пример такого приложения на Github, вы можете скачать его код по ссылке.
Клонируйте или скачайте проект, и откройте в Android Studio модуль barcode-reader.
При запуске приложения из этого проекта мы можем увидеть, как оно работает. Первоначально открывается стартовый экран, на котором можно включить автофокус или вспышку. Кнопка считывания штрих-кода запускает камеру. Приложение отслеживает появление штрих-кодов на превью и рисует рамки на обнаруженных штрих-кодах. При нажатии на область обнаруженного штрих-кода превью закрывается, передавая при этом данные обнаруженного штрих-кода в текстовое поле на стартовом экране. Подробнее смотрите в видео.
Это приложение также использует Mobile Vision API. Но при рассмотрении проекта в Android Studio можно увидеть, что кода здесь побольше, чем в нашем простом примере.

Приложение состоит из восьми классов. Три из них отвечают за интерфейс и работу с камерой.
- Класс CameraSource предоставляет управление камерой для получения предварительного просмотра.
- Класс CameraSourcePreview отвечает за отображение превью на экране.
- Класс GraphicOverlay отображает графические объекты поверх связанного предварительного просмотра камеры.
- Класс MainActivity отображает стартовое окно с настройками и кнопкой запуска сканирования, и получает данные штрих-кода для размещения в TextView.
- Класс BarcodeTrackerFactory реализует паттерн «Фабрика» и используется для создания трекеров штрих-кода — по одному для каждого штрих-кода.
- Класс BarcodeGraphicTracker это трекер, который используется для обнаружения штрих-кодов на экране, и их отслеживания для наложения графики, а также удаления графики, когда штрих-код покидает зону видимости.
- Класс BarcodeGraphic используется для отрисовки экземпляра накладываемого на штрих-код изображения с учетом его положения, размера и идентификатора.
- Класс BarcodeCaptureActivity — это активити, которое запускается при нажатии кнопки считывания штрих-кода в стартовом окне приложения. Это активити отображает превью камеры и определяет штрих-коды на нем, выполнzет их считывание и наложение графических рамок на каждый штрих-код с помощью вышеперечисленных классов.
Я не буду в рамках этого урока углубляться в более подробное объяснение кода от разработчиков, а оставлю это вам в качестве домашнего задания. Тем более что код прекрасно документирован, каждый класс и метод содержит комментарии на английском языке. Читать и разбираться в таком коде очень полезно, особенно начинающему разработчику.
Источник
Android SDK: Create a Barcode Reader
In this tutorial, we’ll use the ZXing (Zebra Crossing) library to carry out barcode scanning within an Android app. We’ll call on the resources in this open source library within our app, retrieving and processing the returned results.
Since we’re using the ZXing library, we don’t need to worry about users without the barcode scanner installed, because the integration classes provided will take care of this for us. By importing the ZXing integration classes into our app, we can make user scans easier and focus our development efforts on handling the scan results. In a follow-up series coming soon, we’ll develop a book scanning app where we’ll build on the app we created in this tutorial. We’ll also add support for Google Books API so that we can display information about scanned books.
Premium Option: QR-Code & Barcode Reader
If you’re looking for a shortcut, you can find some ready-made QR code and barcode readers for Android apps at Envato Market.
For example, QR-Code & Barcode Reader uses the camera of a mobile device to read barcodes and QR codes.
The program automatically recognises the type of encoded data, providing a nice preview and various sharing options. It will add a new contact if the QR code is a business card, or it will send an SMS or call someone depending on the encoded data. Search engine selection is ideal for online product search, price and review comparison.
Automation features like bulk scan mode or auto action open wide opportunities for enterprise integration. The project compilation requires the zBar open-source barcode scanning library, which claims to be the fastest among others available on market and is included here.

 QR-Code & Barcode Reader on Envato Market
You can search Envato Market for other options to help you, or get an Android app developed on Envato Studio. Otherwise, read on for the full step-by-step instructions for creating a barcode reader yourself.
1. Create a New Android Project
Step 1
In Eclipse, create a new Android project. Enter your chosen application, project, and package names. Let Eclipse create a blank activity for you, with the name of your choice for both the activity and its layout.


Step 2
Open your main layout file. With the default settings, Eclipse starts your layout with a Relative Layout object, which you can leave as is. Inside of it, replace the existing content (typically a Text View) with a button.
After the button, add two Text Views in which we will output scanning information.
Add the button text string to your «res/values/strings» XML file.
The user will press the button to scan. When the app receives a result from the barcode scanning operation, it will display the scan content data and format name in the two Text Views.
2. Add ZXing to Your Project
Step 1
ZXing is an open source library that provides access to tested and functional barcode scanning on Android. Many users will already have the app installed on their devices, so you can simply launch the scanning Intents and retrieve the results. In this tutorial we are going to use the Scanning via Intent method to make scanning easier. This method involves importing a couple of classes into your app and lets ZXing take care of instances where the user does not have the scanner installed. If the user doesn’t have the barcode scanner installed, they’ll be prompted to download it.
Tip: Since ZXing is open source, you can import the source code into your projects in its entirety. However, this is really only advisable if you need to make changes to its functionality. You can also compile the project and include its JAR file in your own apps if you prefer. For most purposes, using Scanning via Intent is a reliable and easy to implement options, plus your users will have access to the most recent version of the ZXing app.
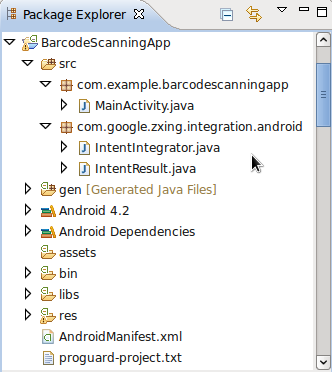
In Eclipse, add a new package to your project by right-clicking the «src» folder and choosing «New«, then «Package«, and entering «com.google.zxing.integration.android» as the package name.


Step 2
Eclipse offers several ways to import existing code into your projects. For the purposes of this tutorial, you’ll probably find it easiest to simply create the two required classes and copy the code from ZXing. Right-click your new package, choose «New» then «Class» and enter «IntentIntegrator» as the class name. You can leave the other default settings the way they are. Once you’ve created this class, do the same for the other class we’ll be importing, giving it «IntentResult» as its class name.


Copy the code from both classes in the ZXing library and paste it into the class files you created. These are IntentIntegrator and IntentResult. Refer to the source code download if you’re in any doubt about where the various files and folders should be or what should be in them.
You can now import the ZXing classes into your main Activity class.
Go ahead and add the other import statements we’ll use for this tutorial. Bear in mind that Eclipse may have already added some for you.
Feel free to have a look at the content of the two ZXing classes. It’s fairly straightforward, but the details of the barcode scanning processing are carried out elsewhere in the library. These two classes really act as an interface to the scanning functionality.
3. Do Some Scanning
Step 1
Let’s implement scanning when the user clicks the button we added. In your app’s main activity class, the default onCreate method entered by Eclipse should look something like this.
Above this method, add the following instance variables to represent the button and two Text Views we created in the layout file.
In onCreate, after the existing code, instantiate these variables using the ID values we specified in the XML.
Next, add a listener to the button so that we can handle presses.
Extend the opening line of the class declaration to implement the OnClickListener interface.
Step 2
Now we can respond to button clicks by starting the scanning process. Add an onClick method to your activity class.
Check whether the scanning button has been pressed inside this method.
Inside this conditional block, create an instance of the Intent Integrator class we imported.
Now we can call on the Intent Integrator method to start scanning.
At this point, the scanner will start if it’s installed on the user’s device. If not, they’ll be prompted to download it. The results of the scan will be returned to the main activity where scanning was initiated, so we’ll be able to retrieve it in the onActivityResult method.
Tip: When you call the initiateScan method, you can choose to pass a collection of the barcode types you want to scan. By default, the method will scan for all supported types. These include UPC-A, UPC-E, EAN-8, EAN-13, QR Code, RSS-14, RSS Expanded, Data Matrix, Aztec, PDF 417, Codabar, ITF, Codes 39, 93, and 128. The ZXing library also includes barcode scanning options that we’re not going to cover in this tutorial. You can check the project out at Google Code for more info.
4. Retrieve Scanning Results
Step 1
When the user clicks the scan button, the barcode scanner will launch. When they scan a barcode, it will return the scanned data to the onActivityResult method of the calling activity. Add the method to your main activity class.
Inside the method, try to parse the result into an instance of the ZXing Intent Result class we imported.
Step 2
As with any data being retrieved from another app, it’s vital to check for null values. Only proceed if we have a valid result.
If scan data is not received (for example, if the user cancels the scan by pressing the back button), we can simply output a message.
Back in the if block, let’s find out what data the scan returned. The Intent Result object provides methods to retrieve the content of the scan and the format of the data returned from it. Retrieve the content as a string value.
Retrieve the format name, also as a string.
Step 3
Now your program has the format and content of the scanned data, so you can do whatever you want with it. For the purpose of this tutorial, we’ll just write the values to the Text Views in our layout.
Run your app on a device instead of an emulator so that you can see the scan functioning. Try scanning a book or any other barcode you might have.


When the scan is initiated, the user is taken to the ZXing app to scan a barcode. 

The scan results are returned to the app.
Conclusion
In this tutorial, we’ve run through the process of facilitating barcode scanning within Android apps using the ZXing library. In your own apps, you might want to carry out further processing on the retrieved scan results, such as loading URLs or looking the data up in a third party data source. In the follow-up to this tutorial, we’ll use the barcode scanning functionality to create a book scanning app that will allow us to retrieve data about scanned books from the Google Books API.
Don’t forget that if you’re having trouble creating the barcode reader yourself, you can find some ready-made options on Envato Market to help you.
Источник


