- Настройка Android SDK
- 1. Скачать Android SDK
- 2. Установить Android SDK
- 3. Удостовериться, что система определяет ваше устройство
- 4. Добавить путь до Android SDK в Unity
- Начало разработки под Android
- Подготовка среды разработки для Android
- Доступ к функциям Android
- Привязка C, C++ или Java кода к скриптам
- Occlusion Culling (отсечение невидимой геометрии)
- Настройка начальной заставки
- Решение проблем и сообщения об ошибках
- Как Unity для Android отличается от версии для настольных компьютеров
- JavaScript со строгой типизацией
- ETC — рекомендуемый способ сжатия текстур
- Проигрывание видео.
- Android environment setup
- 1. Install Android Build Support and the Android SDK & NDK tools
- 2. Enable USB debugging on your device
- Customizing the Android SDK & NDK Tools and OpenJDK installation
- Change the OpenJDK path
- Change the Android SDK Tools path
- Change the Android NDK path
- Android environment setup
- 1. Install Android Build Support and the Android SDK & NDK tools
- 2. Enable USB debugging on your device
- ADB debugging for Chrome OS devices
- Connecting to your Chrome OS device
- Customizing the Android SDK & NDK Tools and OpenJDK installation
- Change the OpenJDK path
- Change the Android SDK Tools path
- Change the Android NDK path
- Updating the Android SDK Target API
Настройка Android SDK
Прежде чем вы сможете запустить написанный код на Android-устройстве, нужно выполнить несколько простых действий. Это относится как к работе с Unity, так и к созданию приложений с нуля.
1. Скачать Android SDK
Зайдите на страницу Android Developer SDK. Скачайте архив с последней версией Android SDK и распакуйте его.
2. Установить Android SDK
Следуйте инструкциям на странице Installing the SDK (причём, вы можете свободно пропустить опциональные части, относящиеся к Eclipse). В шаге 4 руководства Installing the SDK убедитесь, что добавили как минимум одну Android platform (Android платформу) с уровнем API равным или выше 9 (платформа 2.3 или выше), Platform Tools и USB drivers (USB драйверы), если вы используете Windows.
3. Удостовериться, что система определяет ваше устройство
Это может быть не так просто, особенно на Windows системах, в которых драйвера часто бывают источником проблем. Также, с вашим устройством может идти дополнительная информация или особые драйверы от производителя.
Для Windows: если Andoid устройство автоматически определяется системой, вам все равно придётся обновить драйверы на те, который поставляются с Android SDK. Это делается через диспетчер устройств Windows. —>Если устройство не определяется автоматически, используйте драйверы из Android SDK или особые драйверы, предоставленные производителем. —>Дополнительную информацию можно найти здесь: USB Drivers for Windows
Для Mac: если вы разрабатываете на OSX, тогда обычно не требуется никаких дополнительных драйверов.
Важно: Не забудьте включить “Отладку по USB” на вашем устройстве. Перейдите в Настройки -> Параметры разработчика , для включения отладки по USB. Начиная с Android Jelly Bean 4.2, параметры разработчика по умолчанию скрыты. Для их включения, понажимайте несколько раз пальцем на строку в меню Настройки -> Об устройстве -> Номер сборки . После этого вам станет доступен пункт Настройки -> Параметры разработчика .
Если вы не уверены, что ваше устройство корректно установилось в системе, пожалуйста, прочтите страницу Решение проблем при разработке под Android для дополнительной информации.
4. Добавить путь до Android SDK в Unity
При первой сборке проекта под Android (или если Unity не сможет обнаружить SDK), вас попросят указать местоположение папки, в которую вы установили Android SDK (вы должны выделить корневую папку установленного SDK). Путь до Android SDK также можно изменить в редакторе, выбрав в меню Unity > Preferences и перейдя в раздел External Tools окна настроек.
Источник
Начало разработки под Android
Разработка игр для устройств с Android OS требует подхода, схожего с разработкой под iOS. С другой стороны, аппаратное обеспечение Android-устройств не подчиняется чётким стандартам, что заставляет решать вопросы, которые отсутствуют при работе с iOS. Также присутствуют различия между версиями Unity для Android и iOS.
Подготовка среды разработки для Android
Прежде чем вы сможете протестировать свои игры на устройстве, вам нужно будет подготовить среду разработки. В частности — скачать и установить Android SDK нужной платформы и добавить ваше устройство в систему (этот процесс отличается для Windows и Mac). Об этом подробно написано на сайте Android-разработчиков, а также дополнительную информацию может предоставлять производитель вашего устройства. Так как это достаточно сложный процесс, мы приготовили небольшую инструкцию которая поможет вам подготовить всё необходимое для разработки. Если вам понадобится больше информации, вы сможете получить её на портале Android-разработчиков.
Доступ к функциям Android
Unity предоставляет API для доступа к средствам ввода и настройкам Android. Доступные классы задокументированы на странице Написание кода для Android сборок.
Привязка C, C++ или Java кода к скриптам
Unity позволяет вызывать функции, написанные на C/C++, непосредственно из скриптов (Java-функции могут быть вызваны непрямым способом). Чтобы узнать как из Unity получать доступ к функциям из нативного кода, посетите страницу о сборке плагинов для Android.
Occlusion Culling (отсечение невидимой геометрии)
Unity предоставляет поддержку occlusion culling, что очень полезно при оптимизации для мобильных платформ. Больше информации можно найти на странице Occlusion culling.
Настройка начальной заставки
Заставка, отображаемая при запуске игры, может быть настроена — см. эту страницу для дополнительной информации.
Решение проблем и сообщения об ошибках
Существует множество причин, из-за которых ваше приложение вылетает или не работает должным образом. Наше руководство по решению специфических для Android проблем поможет вам разобраться с причинами ошибок в кратчайшие сроки. Если после прочтения руководства вы предполагаете, что проблема именно в Unity — вам следует составить сообщение об ошибке. Обратитесь к этой странице за инструкциями.
Как Unity для Android отличается от версии для настольных компьютеров
JavaScript со строгой типизацией
Для улучшения производительности в Android-версии Unity динамическая типизация в JavaScript всегда отключена (как если бы к каждому скрипту автоматически применялась #pragma strict). Это важно помнить, если вы переносите на Android проект со старших платформ, и если вы столкнётесь с ошибками компиляции — проблему стоит искать в первую очередь в типизации. С такими ошибками обычно легко справиться, убедившись что типы всех переменных явно указаны или приведёны при инициализации.
ETC — рекомендуемый способ сжатия текстур
Хоть Unity Android и поддерживает DXT/PVRTC/ATC текстуры, Unity распакует текстуры в формат RGB(A) при выполнении, если эти методы сжатия на поддерживаются на конкретном устройстве. Это может серьёзно повлиять на производительность GPU отрисовки, потому рекомендуется использовать формат ETC. Он является фактическим стандартом для Android, и должен поддерживаться всеми современными устройствами. С другой стороны, ETC не поддерживает альфа-канал, и иногда 16-битные RGBA текстуры будут лучшим выбором по критериям качества, размера и скорости рендеринга там, где нужен альфа-канал.
Также возможно создать несколько дистрибутивов игры (apk-файлов) с разными форматами текстур, чтобы Android Market сам предоставлял для каждого устройства наиболее подходящий из дистрибутивов. За подробностями обратитесь к этой странице.
Проигрывание видео.
Видео текстуры (MovieTexture) не поддерживаются на Android, но программно доступно полноэкранное поточное проигрывание. Для дополнительной информации о поддерживаемых форматах файлов и API скриптинга, ознакомьтесь со страницой класса MovieTexture или со страницей поддерживаемых на Android форматах медиа.
Источник
Android environment setup
To build and run for Android, you must install the Unity Android Build Support platform module. You also need to install the Android Software Development Kit (SDK) and the Native Development Kit (NDK) to build and run any code on your Android device. By default, Unity installs a Java Development Kit based on OpenJDK.
Note: Unity supports Android 4.4 “KitKat” and above. See AndroidSdkVersions for details.
1. Install Android Build Support and the Android SDK & NDK tools
Use the Unity Hub to install Android Build Support and the required dependencies: Android SDK & NDK tools, and OpenJDK.
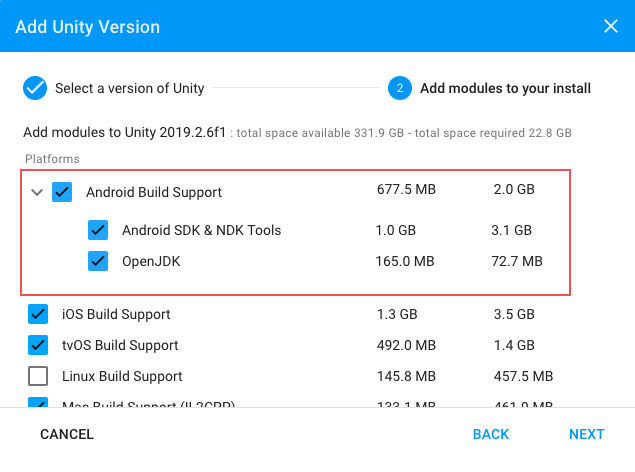 Add Android modules
You can install Android Build Support, the Android SDK & NDK tools and OpenJDK when you install the Unity Editor, or add them at a later time.
For information on adding the Android modules:
Note: If you’re using Unity on macOS 10.15 (Catalina) and you don’t install Android tools through the Unity Hub, your operating system’s default security settings will prevent the Android NDK binaries being executed. You must either change these security settings, or download a signed Android NDK (r16b) from the Android developer website.
If you are using a 2018 version of Unity, see the Unity 2018.4 documentation for information on manually installing these dependencies.
2. Enable USB debugging on your device
To enable USB debugging, you must enable Developer options on your device. To do this, find the build number in your device’s Settings menu. The location of the build number varies between devices; for stock Android, it’s usually Settings > About phone > Build number. For specific information on your device and Android version, refer to your hardware manufacturer.
After you navigate to the build number using the instructions above, tap on the build number seven times. A pop-up notification saying “You are now X steps away from being a developer” appears, with “X” being a number that counts down with every additional tap. On the seventh tap, Developer options are unlocked.
Note: On Android versions prior to 4.2 (Jelly Bean), the Developer options are enabled by default.
Go to Settings > Developer options (or, if this does not work, on some devices the path is Settings > System > Developer options), and check the USB debugging checkbox. Android now enters debug mode when it is connected to a computer via USB.
Connect your device to your computer using a USB cable. If you are developing on a Windows computer, you might need to install a device-specific USB driver. See the manufacturer website for your device for additional information.
The setup process differs for Windows and macOS and is explained in detail on the Android developer website. For more information on connecting your Android device to the SDK, refer to the Run Your App section of the Android Developer documentation.
Customizing the Android SDK & NDK Tools and OpenJDK installation
Unity recommends that you use the Unity Hub to install Android SDK & NDK tools, to ensure that you receive the correct versions and configuration. Unity installs Android SDK & NDK Tools and OpenJDK respectively in the SDK, NDK and OpenJDK folders under /Unity/Hub/Editor/[EditorVersion]/Editor/Data/PlaybackEngines/AndroidPlayer/.
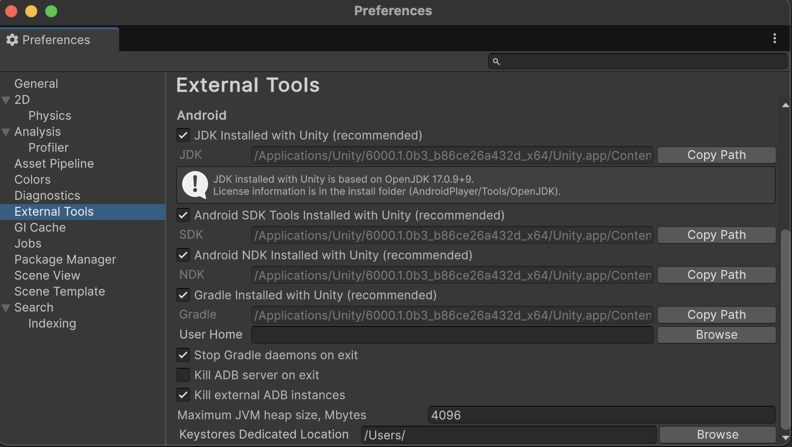
If you have multiple versions of Unity with the same required dependencies (be sure to check System requirements for the latest) and you want to avoid duplicating the installation of Android SDK & NDK Tools and OpenJDK, you can specify a shared location in the Unity Preferences window. To do this, go to Preferences > External tools and enter the directory paths in the SDK and NDK fields:
 Preferences window showing external tools settings for Android
Warning: Unity does not officially support versions of the OpenJDK, SDK, or NDK other than the ones it supplies.
To change the OpenJDK, SDK Tools, or NDK that Unity uses to build Android apps:
- Open the Project.
- Open the Preferences window (Windows and Linux: Edit >Preferences; macOS: Unity >Preferences).
- In the left navigation column, select External Tools.
Change the OpenJDK path
- Uncheck JDK Installed with Unity (recommended).
- In the JDK field, enter the path to the JDK installation folder, or use the Browse button to locate it.
Change the Android SDK Tools path
- Uncheck Android SDK Tools Installed with Unity (recommended).
- In the SDK field, enter the path to the SDK installation folder, or use the Browse button to locate it.
Unity works with the most recent version of the Android SDK available at the time of the Unity version release.
Change the Android NDK path
- Uncheck Android NDK Installed with Unity (recommended).
- In the NDK field, enter the path to the NDK installation folder, or use the Browse button to locate it.
Each version of Unity requires a specific version of the Android NDK to be installed:
| Unity version | NDK version |
|---|---|
| 2017.4 LTS | r13d |
| 2018.4 LTS | r16b |
| 2019.1 | r16b |
| 2019.2 | r16b |
| 2019.3 | r19 |
See the System requirements page for a complete list of requirements.
Источник
Android environment setup
To build and run for Android, you must install the Unity Android Build Support platform module. You also need to install the Android Software Development Kit (SDK) and the Native Development Kit (NDK) to build and run any code on your Android device. By default, Unity installs a Java Development Kit based on OpenJDK.
Note: Unity supports Android 4.4 “KitKat” and above. See AndroidSdkVersions for details.
1. Install Android Build Support and the Android SDK & NDK tools
Use the Unity Hub to install Android Build Support and the required dependencies
See in Glossary : Android SDK & NDK tools, and OpenJDK.
 Add Android modules
You can install Android Build Support, the Android SDK & NDK tools and OpenJDK when you install the Unity Editor, or add them at a later time.
For information on adding the Android modules:
If you are using a 2018 version of Unity, see the Unity 2018.4 documentation for information on manually installing these dependencies.
2. Enable USB debugging on your device
To enable USB debugging, you must enable Developer options on your device. To do this, find the build number in your device’s Settings menu. The location of the build number varies between devices; for stock Android, it’s usually Settings > About phone > Build number. For specific information on your device and Android version, refer to your hardware manufacturer.
After you navigate to the build number using the instructions above, tap on the build number seven times. A pop-up notification saying “You are now X steps away from being a developer” appears, with “X” being a number that counts down with every additional tap. On the seventh tap, Developer options are unlocked.
Note: On Android versions prior to 4.2 (Jelly Bean), the Developer options are enabled by default.
Go to Settings > Developer options (or, if this does not work, on some devices the path is Settings > System > Developer options), and check the USB debugging checkbox. Android now enters debug mode when it is connected to a computer via USB.
Connect your device to your computer using a USB cable. If you are developing on a Windows computer, you might need to install a device-specific USB driver. See the manufacturer website for your device for additional information.
The setup process differs for Windows and macOS and is explained in detail on the Android developer website. For more information on connecting your Android device to the SDK, refer to the Run Your App section of the Android Developer documentation.
ADB debugging for Chrome OS devices
For information on how to set up your development environment for Chrome OS devices, and enable ADB An Android Debug Bridge (ADB). You can use an ADB to deploy an Android package (APK) manually after building. More info
See in Glossary debugging, see Google’s documentation on Chrome OS Developer Environments.
Connecting to your Chrome OS device
Before you can deploy to your device you need to manually connect with ADB via the device’s IP address.
To begin you need the IP address. Open up the Settings app and choose Network in the sidebar. Next click on the active network interface.
If the interface is wireless then next choose the SSID that you are connected to. In the details you will see your IP address. Make a note of it.
If you are using a wired connection your IP address will be shown on the first details page.
Now we are ready to connect. For the sake of this example let’s say that the device’s IP is 192.168.0.100. In a shell or terminal run the following command
adb connect 192.168.0.100
If the connection was successful you will see a message such as connected to 192.168.0.65:5555 . And adb devices should verify that the device is connected. List of devices attached 192.168.0.65:5555 device
From now on you may run ADB commands to target the device just as you would over a USB connection.
Note: If your device or host machine goes to sleep or loses network connectivity you may need to reconnect.
Customizing the Android SDK & NDK Tools and OpenJDK installation
Unity recommends that you use the Unity Hub to install Android SDK & NDK tools, to ensure that you receive the correct versions and configuration. Unity installs Android SDK & NDK Tools and OpenJDK respectively in the SDK, NDK and OpenJDK folders under /Unity/Hub/Editor/[EditorVersion]/Editor/Data/PlaybackEngines/AndroidPlayer/.
If you have multiple versions of Unity with the same required dependencies (be sure to check System requirements for the latest) and you want to avoid duplicating the installation of Android SDK & NDK Tools and OpenJDK, you can specify a shared location in the Unity Preferences window. To do this, go to Preferences > External tools and enter the directory paths in the SDK and NDK fields:
 Preferences window showing external tools settings for Android
Warning: Unity does not officially support versions of the OpenJDK, SDK, or NDK other than the ones it supplies.
To change the OpenJDK, SDK Tools, or NDK that Unity uses to build Android apps:
- Open the Project.
- Open the Preferences window (Windows and Linux: Edit >Preferences; macOS: Unity >Preferences).
- In the left navigation column, select External Tools.
Change the OpenJDK path
- Uncheck JDK Installed with Unity (recommended).
- In the JDK field, enter the path to the JDK installation folder, or use the Browse button to locate it.
Change the Android SDK Tools path
- Uncheck Android SDK Tools Installed with Unity (recommended).
- In the SDK field, enter the path to the SDK installation folder, or use the Browse button to locate it.
Unity works with the most recent version of the Android SDK available at the time of the Unity version release.
Change the Android NDK path
- Uncheck Android NDK Installed with Unity (recommended).
- In the NDK field, enter the path to the NDK installation folder, or use the Browse button to locate it.
Each version of Unity requires a specific version of the Android NDK to be installed:
| Unity version | NDK version |
|---|---|
| 2018.4 LTS | r16b |
| 2019.4 LTS | r19 |
| 2020.3 LTS | r19 |
See the System requirements page for a complete list of requirements.
Updating the Android SDK Target API
Unity Hub installs the latest version of the Android SDK Target API required by Google Play.
If you need to use a more recent version, you can change the Target API from the Target API Level field in the Player Settings window (menu: Edit > Project Settings > Player, then select the Android platform). You can find the Target API Level option in the Other Settings > Identification section.
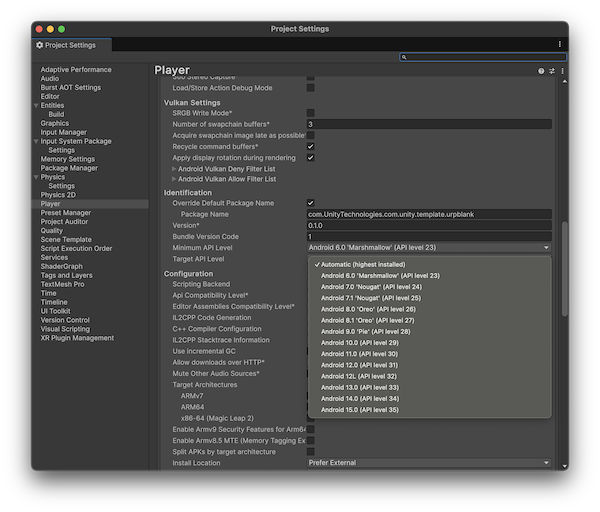 Selecting a target API for the Android SDK
After you select an option other than the default, Unity prompts you to update the Android SDK API. You can choose to either:
- Update the Android SDK
- Continue to use the highest installed version of the Android SDK
Note: If you select an older version of the Target API, the Unity Android SDK Updater will not be able to perform the update and will give you this message:
Android SDK does not include your Target SDK of (version). Please use the Android SDK Manager to install your target SDK version. Restart Unity after SDK installation for the changes to take effect.
In this case, to update the Android SDK Target API, you must use the Android sdkmanager from either Android Studio or the command line tool. Regardless of the method you chose, make sure to select the correct Android SDK folder for Unity in the Edit > Preferences > External Tools window.
On Windows, if the Unity Editor is installed in the default folder ( /Program Files/ ), you must run the sdkmanager with elevated privilege (Run as Administrator) to perform the update.
Источник


