- Полный список
- Создание калькулятора чаевых на Kotlin: как это работает?
- Начинаем
- Разработка раздела затрат
- Разработка раздела счетов
- Разработка раздела «Люди и чаевые»
- Добавляем Views
- Доделываем кнопки
- Раздел подсчета затрат
- Финальные шаги
- Калькулятор котлин android studio
- Android Tutorial
- Wednesday, 22 July 2020
- how to create calculator app in kotlin android
- how to create calculator app in kotlin android
- Android Programming with Kotlin for Beginners — How to Create a simple Calculator App with Android Studio and Kotlin
- Learn the basics of Android Studio and programming with Kotlin.
- In this course, you will create a simple calculator app with Android Studio and Kotlin. You will learn basic things about the android frameworks activities, fragments, and views.
- Building a Simple Calculator in Kotlin Using Android Studio
- Description
- Step 1: Create an “Empty Activity” on Android Studio.
- Codenames, Tags, and Build Numbers | Android Open Source Project
- Android development releases are organized into families with alphabetical codenames that are inspired by tasty treats…
- Step 2: Adding colors to the colors.xml file
- Step 3: Modifying the styles.xml file
- Step 4: Configuring the “activity_main.xml” file
- Step 5: Placing the expression builder library inside the Gradle.
- Step 6: Actual Kotlin coding for the calculator
- Step 7: Run the app using the emulator
- User Interaction
- Known Issues and Limitations
Полный список
В этом уроке мы:
— пишем приложение — калькулятор
Попробуем написать простейший калькулятор, который берет два числа и проводит с ними операции сложения, вычитания, умножения или деления. Результат отображает в виде полного выражения.
Project name: P0191_SimpleCalculator
Build Target: Android 2.3.3
Application name: SimpleCalculator
Package name: ru.startandroid.develop.simplecalculator
Create Activity: MainActivity
Откроем main.xml и нарисуем экран:
Тут есть два поля ввода, 4 кнопки и текстовое поле для вывода. Обратите внимание на атрибут inputType для EditText. Он задает тип содержимого. Я указал numberDecimal – т.е. в поле получится ввести только цифры и запятую, буквы он не пропустит. Это удобно, не надо самому кодить различные проверки.
Для TextView указан атрибут gravity. Он указывает, как будет расположен текст в TextView. Не путайте с layout_gravity, который отвечает за размещение TextView в ViewGroup.
Теперь нам надо читать содержимое полей, определять какую кнопку нажали и выводить нужный результат. Открываем MainActivity.java и пишем код
Думаю, все понятно по каментам. Читаем значения, определяем кнопку, выполняем операцию и выводим в текстовое поле. Обработчиком нажатий на кнопки выступает Activity.
Все сохраним и запустим.

Давайте для большего функционала сделаем меню с пунктами очистки полей и выхода из приложения. Пункты будут называться Reset и Quit.
Добавим две константы – это будут ID пунктов меню.
(добавляете только строки 3 и 4)
И напишем код создания и обработки меню:
Сохраним все, запустим. Появилось два пункта меню:
Reset – очищает все поля
Quit – закрывает приложение
В качестве самостоятельной работы вы можете реализовать проверку деления на ноль. И выводить какое-нить сообщение с помощью Toast или прямо в поле результата.
На следующем уроке:
— рассмотрим анимацию View-компонентов
Присоединяйтесь к нам в Telegram:
— в канале StartAndroid публикуются ссылки на новые статьи с сайта startandroid.ru и интересные материалы с хабра, medium.com и т.п.
— в чатах решаем возникающие вопросы и проблемы по различным темам: Android, Kotlin, RxJava, Dagger, Тестирование
— ну и если просто хочется поговорить с коллегами по разработке, то есть чат Флудильня
— новый чат Performance для обсуждения проблем производительности и для ваших пожеланий по содержанию курса по этой теме
Источник
Создание калькулятора чаевых на Kotlin: как это работает?

Рассказываем, как создать простое приложение для расчета чаевых на языке Kotlin. Если точнее, то Kotlin 1.3.21, Android 4, Android Studio 3. Статья будет интересной, в первую очередь, для тех, кто начинает свой путь в разработке Android-приложений. Она позволяет понять, что и как работает внутри приложения.
Такой калькулятор пригодится, когда нужно подсчитать сумму чаевых с компании, решившей провести время в ресторане или кафе. Конечно, не все и не всегда оставляют официантам на чай, это больше западная традиция, но процесс разработки такого приложения в любом случае интересен.
Напоминаем: для всех читателей «Хабра» — скидка 10 000 рублей при записи на любой курс Skillbox по промокоду «Хабр».
Вот как выглядит приложение в процессе работы:
Вы вводите желаемый процент с общей суммы, количество участников встречи и получаете результат — сумму чаевых, которые стоит оставить.
Начинаем
Полный интерфейс приложения выглядит следующим образом:
Первое действие — загрузка основы проекта. Открываем ее в Android Studio 3.0 или более поздней версии. Строим и запускаем проект и видим белый экран. Все нормально, так и должно быть.
Действия пользователя прописаны в проекте в хронологическом порядке, чтобы все было понятно. Для его просмотра открываем View -> Tool Windows -> TODO.
Изучаем проект и открываем colors.xml для оценки цветовой палитры. В strings.xml размещены текстовые данные (подписи), а в styles.xml есть несколько шрифтовых шаблонов.
Разработка раздела затрат
Открываем activity_main.xml и добавляем расположенный ниже код в LinearLayout (#1):
Теперь можно настроить стиль директории values или поиграть с цветами, используя инструмент material.io.
Сейчас проект выглядит так:
Как видите, расчет затрат производится по данным, которые вносит пользователь.
Разработка раздела счетов
Добавляем код, размещенный ниже, в LinearLayout после Expense Section (#2):
Закрываем LinearLayout после списка TODOs, а затем добавляем новый код, размещая его внутри LinearLayout (#3):
Поскольку главная задача приложения — расчет индивидуальных затрат для каждого из участников посиделок в ресторане, то основное значение играет costPerPersonTextView.
EditText ограничивает ввод данных одной строкой, у этого параметра должно быть значение NumberDecimal inputType.
Запускаем проект для теста и вводим параметры общего ущерба (разбитые чашки, тарелки и т.п.)
Разработка раздела «Люди и чаевые»
Чтобы добавить выбора объема чаевых, вставляем расположенный ниже код в новую секцию LinearLayout (#4):
Этот участок кода необходим для точного расчета суммы чаевых. Дефолтное значение текста — 20. ImageButtons снабжены иконками в папке с правами записи.
Полностью копируем раздел и добавляем следующее (#5):
- ImageButton ids (subtractPeopleButton, addPeopleButton)
- TextView ids (numberOfPeopleStaticText, numberOfPeopleTextView)
- DefaultText для numberOfPeopleTextView (должен быть 4).
Теперь при запуске приложения есть возможность добавить сумму счета, также работают кнопки «Добавить/Вычесть», но пока ничего не происходит.
Добавляем Views
Открываем MainActivity.kt и добавляем вот это в функцию initViews (#6):
Доделываем кнопки
Чтобы добавить поддержку клика кнопок, внедряем View.OnClickListener на уровне класса (#7):
Скомпилировать проект прямо сейчас не выйдет, нужно выполнить еще несколько действий (#8):
В плане кнопок и свитчей у Kotlin все организовано очень круто! Добавляем размещенный ниже код во все функции increment и decrement
Здесь код защищает функции приращения с максимальными значениями (MAX_TIP & MAX_PEOPLE). Кроме того, код защищает функции декремента с минимальными значениями (MIN_TIP & MIN_PEOPLE).
Теперь связываем кнопки со слушателями в функции initViews (#13):
Теперь можно добавлять общий ущерб, чаевые и количество участников встречи. Ну и теперь самое главное…
Раздел подсчета затрат
Этот код подсчитывает затраты (#14):
Ну а здесь вызывается функция, которая дает возможность учесть количество людей в компании и подсчитать чаевые (#15):
Запускаем приложение. Выглядит и работает оно отлично. Но может быть и лучше.
Если вы попытаетесь удалить сумму счета, а затем увеличить число подсказок или друзей, приложение упадет, поскольку еще нет проверки для нулевого значения затрат. Более того, если вы попытаетесь изменить сумму счета, расходы не будут обновлены.
Финальные шаги
Добавляем TextWatcher (#16):
Затем встраиваем слушатель billEditText (#17):
Плюс добавляем код для выполнения TextWatcher (#18):
Ну а теперь работает абсолютно все! Поздравляю, вы написали собственный «Калькулятор чаевых» на Kotlin.
Источник
Калькулятор котлин android studio
This example shows how to use Kotlin common module (located in common/) in different environments. Currently for
Common Kotlin module contains arithmetic expressions parser.
The common module may be used in an Android application.
To build and run the Android sample do the following:
- Open the root project in Android Studio 3.1
- Create a new Android App configuration. Choose module android .
- Now build and run the configuration created.
The iOS project compiles Kotlin module to a framework (see ios). The framework can be easily included in an existing iOS project (e.g. written in Swift or Objective-C)
To build and run the iOS sample do the following:
Open ios/calculator.xcodeproj with Xcode.
Open the project’s target through project navigator, go to tab ‘General’. In ‘Identity’ section change the bundle ID to the unique string in reverse-DNS format. Then select the team in ‘Signing’ section.
See the Xcode documentation for more info.
Now build and run the application with Xcode.
The iOS application is written in Swift. It uses Kotlin module as a library. Kotlin module is built into Objective-C framework by invoking Gradle from custom «Run Script» build phase, and this framework is imported into the Xcode project.
The common module can also be used in JVM application built by Kotlin/JVM compiler with Gradle. To build and run it, go to jvm directory and use
Источник
Android Tutorial
Blog purpose for android basic example for android app developer. any query please my contact
Wednesday, 22 July 2020
how to create calculator app in kotlin android
how to create calculator app in kotlin android
In this article today learn how to create calculator app in kotlin android lets start learn tutorial.
In this program, you’ll learn to make a simple calculator using when expression in Kotlin. This calculator would be able to add, subtract, multiply, and divide two numbers.
Android Programming with Kotlin for Beginners — How to Create a simple Calculator App with Android Studio and Kotlin
Learn the basics of Android Studio and programming with Kotlin.
In this course, you will create a simple calculator app with Android Studio and Kotlin. You will learn basic things about the android frameworks activities, fragments, and views.
Robot planning with Kotlin for Beginners. You can make a simple computer App with Android work and Kotlin. You can learn basic things about the robot model actions, fragments and views. Basic Model View Presenter building, What is the action? What is the fragment? What is the perspective? How to have a Constraint design?
Kotlin is the programming language that was made by the one individual that produced IntelliJ thought and is fully supported by Google as the « first-class » word for Android. In its system, Kotlin is very related to Java; is solves these similar topics, it’s objective oriented and statically typed. But what’s important is that Kotlin has a structure that is cleaner, it brings more features and gets some thoughts coming from practical programming. Swift is the programming word that was produced by Apple. It’s the general-purpose, multi-paradigm, compiled programming word that is primarily applied for iOS, macOS, watchOS, tvOS, and Unix. Swift has been developing a lot in the last years, it adopts good scheduling patterns and brings modern features which makes programming simple& adaptable. Writing code is Swift is really interactive and you will quickly make the hold of it.
Источник
Building a Simple Calculator in Kotlin Using Android Studio

In this tutorial, we will learn how to build a simple calculator in Kotlin using Android Studio.

Description
In this tutorial, we will develop a “ 10-key” calculator on Android Studio using Kotlin. The buttons included should be:
- Number Keys: “ 1”, “ 2”, “ 3”, “ 4”, “ 5”, “ 6”, “ 7”, “ 8”, “ 9”, “ 0”.
- Operation Keys: “ +”, “ —”, “ *”, “ /”
- Other Keys: “ =”, “ CLEAR”. Here the “ CLEAR” key should clear out the screen and everything in the memory. The “ =” key should apply the operation and give the result.
- Additional the calculator will have a “ DEL” key which is the same as the “backspace” and will remove the last character on the screen.
- A “ .” key should show a decimal.
Now we know how our calculator should look and work like, let’s get started. I will try to provide all the essential steps, in order for you to understand.
Step 1: Create an “Empty Activity” on Android Studio.
Let us create a new project. Since our calculator comprises only one activity (we need only one activity Kotlin file and one XML layout file) we need to select an “ empty activity”. This can be done as shown below:
New → New Project → Empty Activity
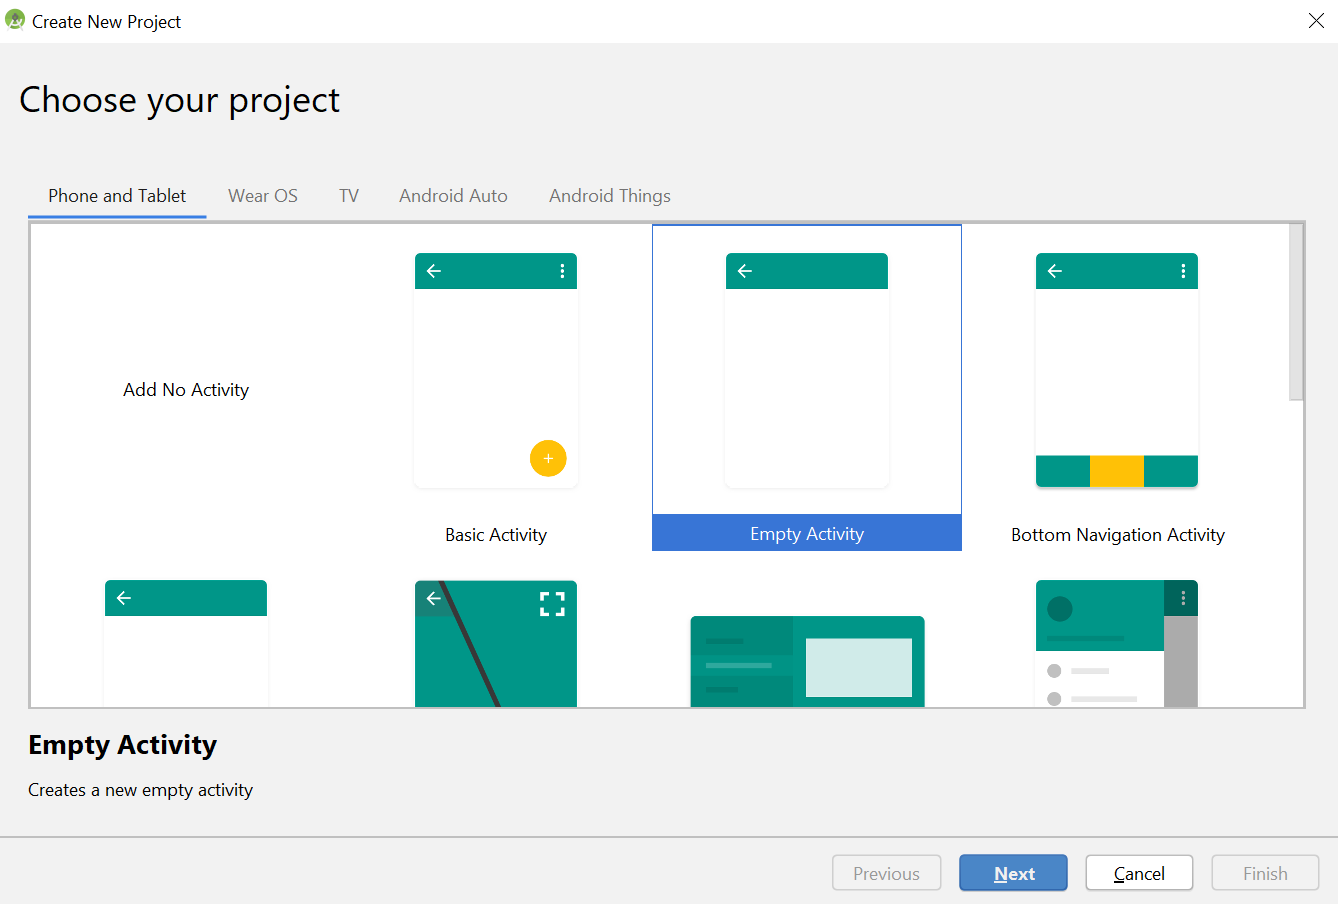
After you create an empty activity, configure your projects such as name, package name, location, language, and API level. Follow the screenshot below to configure your project for consistency. Make sure you select the language as Kotlin (obviously I’m coding in Kotlin). And then click on finish, then your project would be loaded.

To know more about the API level you can refer to google’s official documentation given below, it’s not mandatory to select API 15 as shown in the above screenshot. Just select it for consistency for the tutorial’s sake.
Codenames, Tags, and Build Numbers | Android Open Source Project
Android development releases are organized into families with alphabetical codenames that are inspired by tasty treats…
Step 2: Adding colors to the colors.xml file
As the name suggests in the color files, we can specify the colors for all the buttons of the calculator. The colors.xml file can be found in:
app →res →values →colors.xml
Step 3: Modifying the styles.xml file
The style file is used to define the format or the look for a UI. A style can be applied to an individual View (from within a layout file) or to an entire Activity or application (from within the manifest file).
The styles.xml can be found in
app →res →values →styles.xml
All the above are just style properties for the calculator defined in the styles.xml file. To brief out
NumberButtonStyle: Keys → 1, 2, 3, 4, 5, 6, 7, 8, 9, 0
Step 4: Configuring the “activity_main.xml” file
This is the main layout file here you need not use the UI editor, rather you can code the entire layout using XML. Here we can use the text view layout rather than buttons for the keys. I’m placing all the text view inside a linear layout. It is a mechanical process because of multiple text views. So just follow along with me right now.
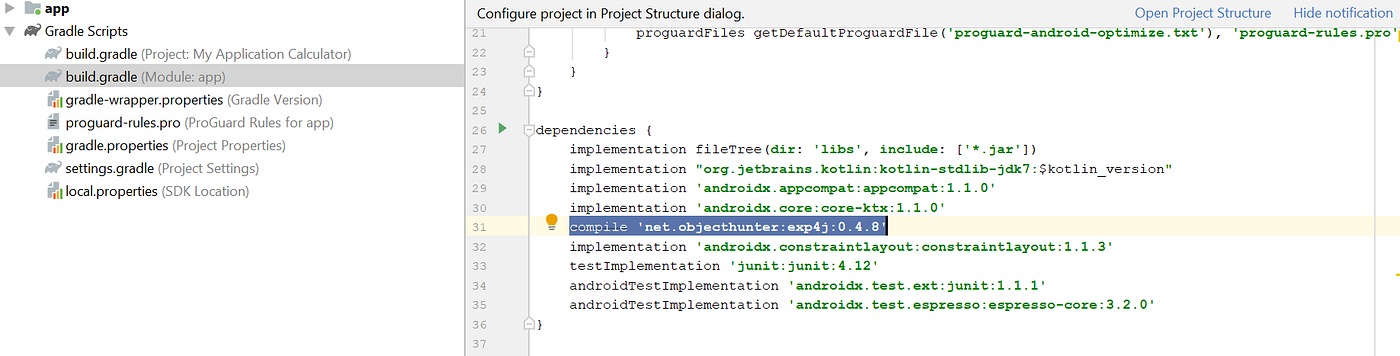
Step 5: Placing the expression builder library inside the Gradle.
I have used the Expression Builder library to calculate the expressions. With the help of a GitHub repository, I learned how to do this. I was struggling to use the equals button for generating the result. So now just place the expression builder library inside the Gradle.
app →Gradle Scripts→build.gradle
Step 6: Actual Kotlin coding for the calculator
First, I’m appending 1, 2, 3,…..0 when the users press the keys to the text view, respectively. To do this, I have created a function called evaluateExpression() which does the appending job to the text view. Then in the Equals function, I am using the Expression Builder library and calling its method Expression Builder to do the calculations. The code is pretty much self-explanatory. The main_activity.kt can be found in:
app → java →com.example.myapplicationcalculator →MainActivity.kt
In my case, the package name is com.example.myapplicationcalculator, it might vary in your case.
Step 7: Run the app using the emulator
This is the last step, now that you have written all the Kotlin code, XML file now let’s test the result. To do this, we can use the androids built-in emulator. Click the Green button which looks like a play button at the top right side or just press Shift + F10. If you don’t know how to configure and use the android built-in emulator. Please check the video down below:
Alternatively, If you are having a problem using the emulator or if your laptop is heating a lot. Don’t worry there is always a second option. Use Genymotion as an external emulator. You can video how to set up Genymotion below:
Now all set and done when you run the emulator you will get a beautiful simple calculator if not then double-check your code.

User Interaction
This android application requires user interaction to operate. The user interacts with the application by performing the rudimentary task of pressing buttons on the keypad of the calculator. By entering numbers, the user can complete basic mathematical operations such as addition, subtraction, multiplication, and division. Using this calculator is trivial; a user only needs to feed the inputs into the calculator using the keypad and then specify what operations they want to perform by clicking on one out of the four operation buttons (+, -, *, /). This calculator can recognize both positive and negative numbers. Also, it recognizes the order of operations; a collection of rules that show which operations to perform first to evaluate the expression. Often the rules are denoted as PEMDAS, where P- Parenthesis, E–Exponents, M- Multiplication, D-Division, A–Addition and S–Subtraction. For example, if the user enters 2+9*5 then the calculator prompts the result as 47, rather than 55. This calculator does not support parenthesis and exponents so the order of operations according to PEMDAS, in this case, is “*” i.e. 9*5 followed by “+” i.e. 45+2 and the result is 47.

The above table 1 shows the buttons and functions of the basic calculator. These operations resemble the basic calculator that everybody knows of these days. This calculator displays up to 18 characters on the screen for example (1/3 = 0.3333333333333333). This calculator has good user experience and design it looks and feels slightly like advanced calculators that we often use in our android phones. In fact, I intended to design it based on my current android smartphone.
Known Issues and Limitations
By using this calculator, we cannot use the keyboard shortcuts to enter the inputs. We can only use the buttons provided in the calculator itself to enter the inputs. This is not a big thing to worry about because this is an android application. Everybody runs this application on their smartphone you don’t need a keyboard to enter the numbers.
Also, this calculator does not provide any error messages if someone tries to divide by 0. If someone enters two operations simultaneously, then the calculator does not display any error messages. For example, by entering the expression 5**+9, the calculator does not freeze or crash, rather it waits for the user to change the operations and make it a valid mathematical expression.
Other than these two limitations, the application meets all the criteria that are listed in the description section above. I have used the text view layout as buttons because I found this as an easy way of organizing buttons next to one another. I had some problems while I was manually laying the buttons next to another. Every-time when I executed the application using an emulator the buttons were scattered all across the screen, even though I constrained the layout. With the help of the text view layout, I could solve this issue.
Hence we have knowingly or unknowingly built a beautiful simple calculator using Kotlin on Android Studio. This is just a simple calculator we can add some more features also build a scientific one. But this is more than enough for a good start to get hands-on Kotlin and Android Studio Coding. I would recommend you guys to type the code rather than copy-pasting, sometimes when you copy-paste you end up getting errors because of package mismatch. Everybody has different packages in the android studio, so type and learn. If you guys have any doubts regarding this tutorial, then post a response or comment down below. I will respond quickly. Until then see you, Good Bye.
Источник


