How to use Widgets to control your Kasa devices and Kasa scenes on Android devices?
*Note: 1. Please update your Kasa app to newest version first.
2. Your Android devices must support widgets feature.
3.There is slight difference on operation and interface based on different Android devices.
With widgets, you can conveniently control your Kasa devices and Kasa scenes from the Home screen on your Android devices. This guide will help you to set the widget feature of Kasa App.
Step 1: Touch and hold an empty area on the home screen to enter home screen editing mode. Tap on the ‘Widgets’ and you can see all of your widgets. Find ‘Kasa’ widget and tap it.

Step 2: There are several Kasa widgets including Kasa Cam, Kasa Device and Kasa scene. Touch and hold a widget and drag it to an empty area on the home screen. You can add widgets you want.
Check that there are enough empty spaces on the home screen for the widget. If there is not enough space, add an empty screen page or free up some space on the current home screen page

Kasa Device widgets: Tap on Kasa Device (3×1) or Kasa Device (4×1) widget, select a device and this widget will show on the home screen. With Kasa Device (3×1) widget, you can switch on/off Kasa devices. With Kasa Device (4×1) widget, you can adjust color/brightness. For Kasa Device (4×1) widget, only Kasa devices with adjustable color/brightness can be selected.

Kasa Scene widgets: Tap on Kasa Scene (1×1) widget, select a scene and this widget will show on the home screen. Kasa Scene (4×2) widget will automatically pull all scenes currently exist on user’s profile. The 4×2 can show as many as 50 scenes. A scroll bar will appear if it does not fit the widget window size.

Kasa Cam widgets: Tap on Kasa Cam (4×3) widget, select a kasa camera and this widget will show on the home screen. With Kasa Cam widget, you can tap on ‘Go Live’ and easily go to Live Page. Meanwhile you can view the clip of activity detection.
When there are multiple activities in the account, an UP and Down arrow appears to the right of the clip window. User can choose which clip to view by pressing the up and down arrows.
The activity clip refreshes every 30 MINUTES. When user presses the up and down arrow, it also refreshes the activity clip history to grab latest clips from the server.
User can add multiple camera widget but only 1 camera per widget can be shown.

Adjust the size of widgets: Touch and hold a widget on the home screen until your Phone vibrates. A blue frame with dots will appear. Drag the dot to adjust the size.

Delete widgets: Touch and hold a widget on the home screen until your Phone vibrates. Drag the widget to Remove.
Move widgets: Touch and hold a widget on the home screen until your Phone vibrates. Drag the widget to any position on the screen.
Step 3: Go back to the home screen and enjoy the widget feature of Kasa App.
Источник
How to use Widgets to control your Kasa devices and Kasa scenes on Android devices?
*Note: 1. Please update your Kasa app to newest version first.
2. Your Android devices must support widgets feature.
3.There is slight difference on operation and interface based on different Android devices.
With widgets, you can conveniently control your Kasa devices and Kasa scenes from the Home screen on your Android devices. This guide will help you to set the widget feature of Kasa App.
Step 1: Touch and hold an empty area on the home screen to enter home screen editing mode. Tap on the ‘Widgets’ and you can see all of your widgets. Find ‘Kasa’ widget and tap it.
Step 2: There are several Kasa widgets including Kasa Cam, Kasa Device and Kasa scene. Touch and hold a widget and drag it to an empty area on the home screen. You can add widgets you want.
Check that there are enough empty spaces on the home screen for the widget. If there is not enough space, add an empty screen page or free up some space on the current home screen page
Kasa Device widgets: Tap on Kasa Device (3×1) or Kasa Device (4×1) widget, select a device and this widget will show on the home screen. With Kasa Device (3×1) widget, you can switch on/off Kasa devices. With Kasa Device (4×1) widget, you can adjust color/brightness. For Kasa Device (4×1) widget, only Kasa devices with adjustable color/brightness can be selected.
Kasa Scene widgets: Tap on Kasa Scene (1×1) widget, select a scene and this widget will show on the home screen. Kasa Scene (4×2) widget will automatically pull all scenes currently exist on user’s profile. The 4×2 can show as many as 50 scenes. A scroll bar will appear if it does not fit the widget window size.
Kasa Cam widgets: Tap on Kasa Cam (4×3) widget, select a kasa camera and this widget will show on the home screen. With Kasa Cam widget, you can tap on ‘Go Live’ and easily go to Live Page. Meanwhile you can view the clip of activity detection.
When there are multiple activities in the account, an UP and Down arrow appears to the right of the clip window. User can choose which clip to view by pressing the up and down arrows.
The activity clip refreshes every 30 MINUTES. When user presses the up and down arrow, it also refreshes the activity clip history to grab latest clips from the server.
User can add multiple camera widget but only 1 camera per widget can be shown.
Adjust the size of widgets: Touch and hold a widget on the home screen until your Phone vibrates. A blue frame with dots will appear. Drag the dot to adjust the size.
Delete widgets: Touch and hold a widget on the home screen until your Phone vibrates. Drag the widget to Remove.
Move widgets: Touch and hold a widget on the home screen until your Phone vibrates. Drag the widget to any position on the screen.
Step 3: Go back to the home screen and enjoy the widget feature of Kasa App.
Источник
How to set up your HomeKit-supported Kasa devices
HomeKit-supported Kasa devices can be managed in the Home app and work with your other HomeKit compatible accessories. This guide will help you set up your HomeKit- supported Kasa devices.
A Kasa smart plug is used as an example.
Note: Please first factory reset the device before the configuration.
How to factory reset the plug?
While the plug is powered up, press and hold the power button on the right panel of the plug for about 10 seconds until the LED flashes amber rapidly to factory reset the plug.
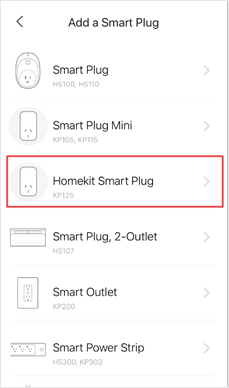
- Open your Kasa Smart app, tap + on the upper right corner and select your device.

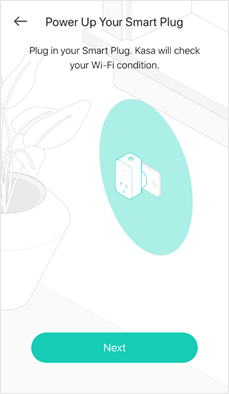
- Power up your plug and check whether its LED blinks the color required.
If not, please factory reset your plug.
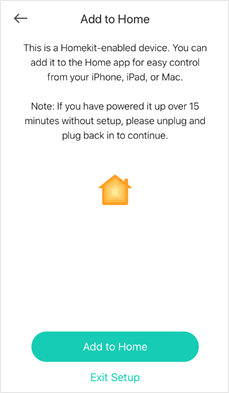
- Tap Add to Home and add your device to home, and authorize Kasa to access your Home data so that you can control your device from the Home app.

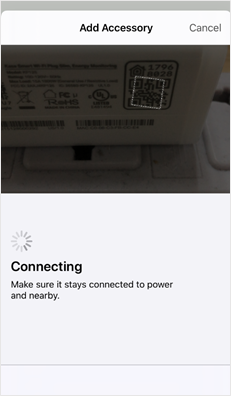
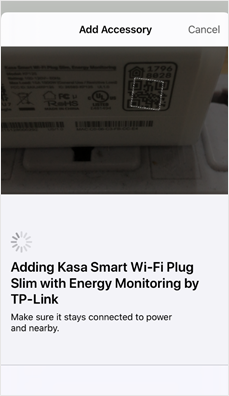
- Scan the HomeKit QR code on your device. It will add your device automatically.
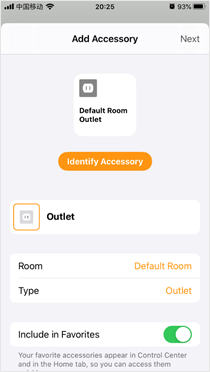
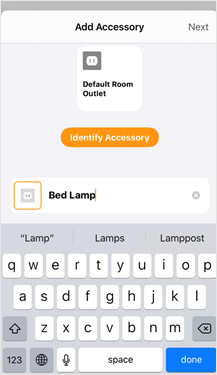
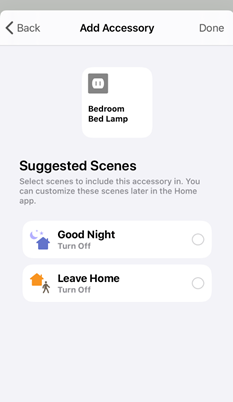
- Your device is added to the Home app successfully. You can edit its name and choose which room it is in. Tap Next, you can set scenes. Then tap Done.

- Your Kasa Smart app will discover the device automatically. Add it to your Kasa Smart app you can also manage it and customize its settings in the Kasa Smart app.
Источник
Как подключить умную Wi-Fi розетку к домашней сети с помощью приложения Kasa?
Мобильное приложение Kasa предназначено для локального и удалённого управления умными Wi-Fi розетками TP-Link. С помощью Kasa мы можем легко управлять умными розетками, где бы мы ни находились. Но в первую очередь необходимо подключить умную розетку TP-Link к домашней сети Wi-Fi.
Выполните следующие действия перед началом настройки:
- Загрузите приложение Kasa из App Store или Google Play и установите его на свой смартфон.
- Подключите смартфон к домашней сети Wi-Fi (только на 2.4 ГГц).
- Подключите вашу умную Wi-Fi розетку к электрической розетке.
Выполните настройку:
1. Зарегистрируйте облачную учётную запись TP—Link для удалённого управления умными розетками
Откройте приложение Kasa на своем смартфоне. Если вы впервые настраиваете Smart Plug (умную розетку) через приложение Kasa, вы указанные ниже скриншоты:
a. Если у вас еще нет учетной записи, зарегистрируйте свой адрес электронной почты.
Нажмите “CREATE ACCOUNT” (создать учётную запись), введите свой адрес электронной почты и придумайте пароль, после чего вы получите ссылку для активации на свой e-mail. Нажмите на ссылку в электронном письме, чтобы завершить регистрацию учётной записи в TP-Link Cloud. После этого вы сможете использовать эту учётную запись для входа в Kasa и управлять умной Wi-Fi розеткой, даже если вы не дома.


b. Если у вас уже есть учетная запись, нажмите “Log in” (войти) и войдите в свою учётную запись.
c. Если вы хотите зарегистрироваться позже, нажмите “Skip” (пропустить), чтобы пропустить этот шаг.
2. Добавление умной розетки в Kasa
a. Нажмите на значок Smart Plug, чтобы добавить умные розетки.
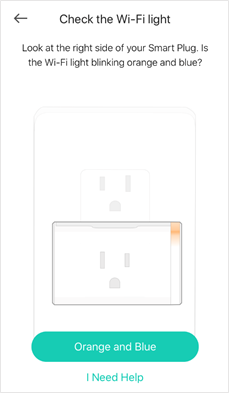
b. Проверьте индикатор Wi-Fi: он загорится ярким оранжевым цветом, после того, как вы подключите умную розетку к сети питания. Нажмите Next (далее), чтобы продолжить.


c. Затем подождите около 15 секунд, или пока индикатор Wi-Fi не замигает оранжевым и зелёным. Нажмите Next (далее), чтобы продолжить настройку.
d. Различия между Android и iOS телефонами, подключаемыми к Wi-Fi сети умной розетки:
Для Android:
Kasa автоматически определит вашу умную Wi-Fi розетку – для этого потребуется около минуты.


Для IOS:
Вам необходимо подключиться к Wi-Fi сети умной розетки вручную. Kasa предоставит вам руководство после нажатия на кнопку Next (далее).


Далее следуйте инструкциям: перейдите на вашем iOS-телефоне на страницу настроек WLAN (Wi-Fi) и подключитесь к Wi-Fi сети вашей умной розетки, имя Wi-Fi сети будет “TP-Link_Smart Plug_XXXX”.


Далее вернитесь на страницу настроек Kasa. Kasa подключит вашу умную розетку.

e. После успешного подключения вам потребуется придумать имя для этой умной Wi-Fi розетки. Нажмите Next (далее), чтобы продолжить.
f. Выберите значок для умной Wi-Fi розетки из списка или выберите из папки Albums (альбомов) на вашем смартфоне, либо сделайте снимок.


g. Включите Remote Control (Удаленное управление), чтобы умная Wi-Fi розетка была доступна, когда вы находитесь вне дома.
h. Подключите умную Wi-Fi розетку к домашней сети. Выберите свою беспроводную сеть (в качестве примера используется сеть onhub). Если вы хотите использовать другую сеть Wi-Fi, нажмите different network (другая сеть), чтобы подключиться к ней.


i. Подождите примерно одну минуту.


j. Нажмите на значок Smart Plug, после чего вы увидите страницу Status (состояние) этой умной Wi-Fi розетки. Здесь вы можете контролировать рабочий статус этой Wi-Fi розетки, например Energy Usage (энергопотребление). Вы также можете настроить дополнительные параметры, такие как Schedule/Away Mode/Timer (расписание/режим ожидания/таймер).


Примечание:
Если вам нужен Remote Access (удалённый доступ) для умной Wi-Fi розетки с помощью Kasa, сначала включите Remote Control (удалённое управление), зарегистрируйтесь и войдите в систему с облачной учётной записью TP-Link.
Как мы ранее указали в этой статье, мы можем зарегистрировать облачную учетную запись TP-Link и включить Remote Control (Удаленное управление) на Шаге 1 и Шаге g.
Также мы можем включить или отключить Remote Control (Удаленное управление) с помощью нижеуказанного метода:
Пожалуйста, обратитесь к следующим FAQ, если вам нужна дополнительная информация по настройкам удаленного управления:
Источник


