- Android Keystore System
- In this document
- Blog articles
- Unifying Key Store Access in ICS
- Security Features
- Extraction Prevention
- Key Use Authorizations
- Choosing Between a Keychain or the Android Keystore Provider
- Using Android Keystore Provider
- Generating a New Private Key
- Generating a New Secret Key
- Working with Keystore Entries
- Listing Entries
- Signing and Verifying Data
- Requiring User Authentication For Key Use
- How to recover data of your Android KeyStore?
- 1. Check your log files
- 3. Do hack
- Finding your Keystore’s Signature
- For Debug / Non-Custom Signed Builds
- For Release / Custom Signed Builds
- Creating Keystores and Signing Android Apps
- Considerations
- Creating keystores
- Signing your APK
Android Keystore System
In this document
Blog articles
Unifying Key Store Access in ICS
The Android Keystore system lets you store cryptographic keys in a container to make it more difficult to extract from the device. Once keys are in the keystore, they can be used for cryptographic operations with the key material remaining non-exportable. Moreover, it offers facilities to restrict when and how keys can be used, such as requiring user authentication for key use or restricting keys to be used only in certain cryptographic modes. See Security Features section for more information.
The Keystore system is used by the KeyChain API as well as the Android Keystore provider feature that was introduced in Android 4.3 (API level 18). This document goes over when and how to use the Android Keystore provider.
Security Features
Extraction Prevention
Key Use Authorizations
Supported key use authorizations fall into the following categories:
- cryptography: authorized key algorithm, operations or purposes (encrypt, decrypt, sign, verify), padding schemes, block modes, digests with which the key can be used;
- temporal validity interval: interval of time during which the key is authorized for use;
- user authentication: the key can only be used if the user has been authenticated recently enough. See Requiring User Authentication For Key Use.
As an additional security measure, for keys whose key material is inside secure hardware (see KeyInfo.isInsideSecurityHardware() ) some key use authorizations may be enforced by secure hardware, depending on the Android device. Cryptographic and user authentication authorizations are likely to be enforced by secure hardware. Temporal validity interval authorizations are unlikely to be enforced by the secure hardware because it normally does not have an independent secure real-time clock.
Whether a key’s user authentication authorization is enforced by the secure hardware can be queried using KeyInfo.isUserAuthenticationRequirementEnforcedBySecureHardware() .
Choosing Between a Keychain or the Android Keystore Provider
Use the KeyChain API when you want system-wide credentials. When an app requests the use of any credential through the KeyChain API, users get to choose, through a system-provided UI, which of the installed credentials an app can access. This allows several apps to use the same set of credentials with user consent.
Use the Android Keystore provider to let an individual app store its own credentials that only the app itself can access. This provides a way for apps to manage credentials that are usable only by itself while providing the same security benefits that the KeyChain API provides for system-wide credentials. This method requires no user interaction to select the credentials.
Using Android Keystore Provider
To use this feature, you use the standard KeyStore and KeyPairGenerator or KeyGenerator classes along with the AndroidKeyStore provider introduced in Android 4.3 (API level 18).
AndroidKeyStore is registered as a KeyStore type for use with the KeyStore.getInstance(type) method and as a provider for use with the KeyPairGenerator.getInstance(algorithm, provider) and KeyGenerator.getInstance(algorithm, provider) methods.
Generating a New Private Key
Generating a new PrivateKey requires that you also specify the initial X.509 attributes that the self-signed certificate will have. You can replace the certificate at a later time with a certificate signed by a Certificate Authority.
Generating a New Secret Key
Working with Keystore Entries
Using the AndroidKeyStore provider takes place through all the standard KeyStore APIs.
Listing Entries
List entries in the keystore by calling the aliases() method:
Signing and Verifying Data
Sign data by fetching the KeyStore.Entry from the keystore and using the Signature APIs, such as sign() :
Similarly, verify data with the verify(byte[]) method:
Requiring User Authentication For Key Use
When generating or importing a key into the AndroidKeyStore you can specify that the key is only authorized to be used if the user has been authenticated. The user is authenticated using a subset of their secure lock screen credentials (pattern/PIN/password, fingerprint).
This is an advanced security feature which is generally useful only if your requirements are that a compromise of your application process after key generation/import (but not before or during) cannot bypass the requirement for the user to be authenticated to use the key.
Источник
How to recover data of your Android KeyStore?

These methods can save you by recovering Key Alias and Key Password and KeyStore Password.
You should always keep the keystore file safe as you will not be able to update your previously uploaded APKs on PlayStore. It always need same keystore file for every version releases.
But it’s even worse when you have KeyStore file and you forget any credentials shown in above box.
But Good thing is you can recover them with certain tricks [Yes, there are always ways]. So let’s get straight to those ways.
1. Check your log files
→ For windows users,
Go to windows file explorer C://Users/your PC name/.AndroidStudio1.4 ( your android studio version)\system\log\idea.log.1 ( or any old log number)
Open your log file in Notepad++ or Any text editor, and search for:
and if you are lucky enough then you will start seeing these.
- Pandroid.injected.signing.store.file = This is file path where the keystore file was stored
2. Pandroid.injected.signing.store.password = This is K ey store password
3. Pandroid.injected.signing.key.alias = This is Key alias name
4. Pandroid.injected.signing.key.password = This is Key password
Launch the Console utility and scrolled down to
/Library/Logs -> AndroidStudioBeta(Version of your studio) ->idea.log.1 (or any old log number)
Search for android.injected.signing and you can get them.
2. In case you remember KeyStore password but not the Alias name
→ Launch command prompt(i.e CMD)
→ keytool -list -keystore [will show all available options]

→ Directly run keytool -list -v -keystore
path example —> «C:\\users\admin\docs\main.keystore»
It will ask for KeyStore password and then shows name of alias,

3. Do hack
→ Any time you upload any app to PlayStore, save your keystore file and credentials at any safe place
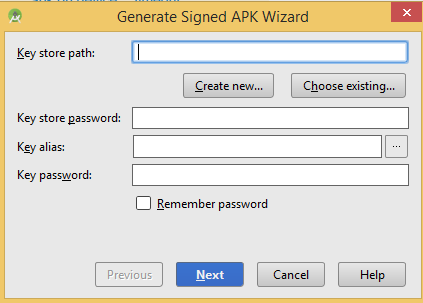
→ The remember password checkbox shown in image top of the page, will not gonna save it for life time, if you upgrade your studio, there are chances you will loose them.
→ At least, save your KeyStore Password, as in certain tricks it’s the most vital.
Источник
Finding your Keystore’s Signature
The MD5 or SHA1 signature of a Xamarin.Android app depends on the .keystore file that was used to sign the APK. Typically, a debug build will use a different .keystore file than a release build.
For Debug / Non-Custom Signed Builds
Xamarin.Android signs all debug builds with the same debug.keystore file. This file is generated when Xamarin.Android is first installed.The steps below detail the process for finding the MD5 or SHA1 signature of the default Xamarin.Android debug.keystore file.
Locate the Xamarin debug.keystore file that is used to sign the app. By default, the keystore that is used to sign debug versions of a Xamarin.Android application can be found at the following location:
C:\Users\USERNAME\AppData\Local\Xamarin\Mono for Android\debug.keystore
Information about a keystore is obtained by running the keytool.exe command from the JDK. This tool is typically found in the following location:
C:\Program Files (x86)\Java\jdkVERSION\bin\keytool.exe
Add the directory containing keytool.exe to the PATH environment variable. Open a Command Prompt and run keytool.exe using the following command:
When run, keytool.exe should output the following text. The MD5: and SHA1: labels identify the respective signatures:
Locate the Xamarin debug.keystore file that is used to sign the app. By default, the keystore that is used to sign debug versions of a Xamarin.Android application can be found at the following location:
/.local/share/Xamarin/Mono for Android/debug.keystore
Information about a keystore is obtained by running the keytool command from the JDK. This tool is typically found in the following location:
/System/Library/Java/JavaVirtualMachines/VERSION.jdk/Contents/Home/bin/keytool
Add the directory containing keytool to the PATH environment variable. Open a Terminal and run keytool by using the following command:
When run, keytool should output the following text. The MD5: and SHA1: labels identify the respective signatures:
For Release / Custom Signed Builds
The process for release builds that are signed with a custom .keystore file are the same as above, with the release .keystore file replacing the debug.keystore file that is used by Xamarin.Android. Replace your own values for the keystore password, and alias name from when the release keystore file was created.
When the Visual Studio Distribute wizard is used to sign a Xamarin.Android app, the resulting keystore resides in the following location:
C:\Users\USERNAME\AppData\Local\Xamarin\Mono for Android\Keystore\alias\alias.keystore
For example, if you followed the steps in Create a New Certificate to create a new signing key, the resulting example keystore resides in the following location:
C:\Users\USERNAME\AppData\Local\Xamarin\Mono for Android\Keystore\chimp\chimp.keystore
For more information about signing a Xamarin.Android app, see Signing the Android Application Package.
When the Visual Studio for Mac Sign and Distribute. wizard to sign your app, the resulting keystore resides in the following location:
For example, if you followed the steps in Create a New Certificate to create a new signing key, the resulting example keystore resides in the following location:
Источник
Creating Keystores and Signing Android Apps
 The SK Engineering Team
 The SK Engineering Team
As a security measure, Android requires that apps be signed in order to be installed. Signing an app first requires creating keystores. A keystore is a storage mechanism for security certificates. A public key certificate is used to sign an APK before deployment to services like the Google Play Store. Signing the APK in this fashion allows Google to provide a high level of certainty that future updates to your APK of the same app come from you and not some malicious third party.
Considerations
There are some things you will need to consider before first deploying your Android app. Primary among these is the expected lifespan of your app. You will not be able to deploy the same app signed by another key at any point in the near future. Android, as well as Google Play, enforces the use of the same key for updates to an APK. If you need to sign your app with another key for any reason, you will have to deploy the app with a new package name. Any ratings your app had on Google Play will be lost. You will also lose touch with your user base unless you have notified them in some way to expect the existing app to be obsolete.
Creating keystores
After you have decided on an app’s lifespan, you’ll want to generate your keystore. Java includes a tool for just this purpose: keytool . keytool is located in your Java JDK installation and should be on your path for the purposes of this article. keytool will quickly generate a public/private key pair and store them in a keystore for you after you answer a few simple questions.
keytool has a number of commands. The most common command used for signing Android builds -genkeypair , commonly abbreviated -genkey . The other commands may be useful to you, but uncommonly so. Again, there are lots of options for this keytool command. The primary -genkey options we are concerned with are in the table below with a brief description:
| -keystore | Filename of the generated keystore |
| -alias | Keypair alias name |
| -keyalg | Algorithm used to generate keypair |
| -keysize | Keypair size, in bits |
| -validity | Keypair validity duration, in days |
In other words, running the command
keytool -genkey -v -keystore release.keystore -alias example -keyalg RSA -keysize 2048 -validity 10000
would result in a keystore file called release.keystore which contained an RSA-2048 public/private keypair by the alias name of example and validity of 10,000 days (more than 27 years).
Before running this command, you’ll want to decide on strong passwords for the keystore and key. You’ll need both of these passwords to sign an APK — they can be the same password if you’re into that kind of thing. The tool will also collect some metadata like your name and organization, but all of that is optional.

Signing your APK
After running the command you’ll be the proud owner of a brand new Java Keystore. You probably want to set up your project to use the keystore to sign your APK, so let’s have a look at that.
If you’re using gradle to build your Android project, you will create a android.signingConfig and associate it with one or more android.buildTypes . The two passwords, keystore name, and alias name will all be needed in order to sign an APK. You can handle this in at least a few different ways. The simplest is to enter the relevant information directly into your gradle build script:
If you want to control access to the passwords you can move the information out of the build.gradle file and put it in your local environment or in a properties file to load at build time. To maintain security and control of the information, it’s likely that you would not want to check the keystore properties file into your source control.
Here is an example [from Google] of how to load the information from a file that would be located in your app’s root directory with the project level build.gradle file:
keystore.properties would contain (in this example):
If you prefer the environment variable method, create a script to add the variables to your environment and try something like this:
There are some trade-offs to both of these methods. Figure out what works best for your organization’s methodology and use that one. For the environment variable method, for example, you have to load these variables into your environment somehow. This is less than ideal if you want to generate a signed APK with Android Studio.
If you prefer to sign your APK manually instead of as part of the build process, you’ll want to use apksigner , located at
You’ll want to zipalign your APK, zipalign will ensure that your app’s uncompressed data starts at a predictable offset inside the APK. zipalign ed APKs are required to publish to the Google Play store.
After your APK is zipalign ed, sign it using apksigner :
You will be prompted at the command line to enter the password for your keystore.
If your keystore and key passwords differ, you’re in for a treat! Using the command above, you will be asked for the keystore password, but will not be asked for the key password. Entering either password results in exceptions and you won’t be having a good time. You’ll need to tell apksigner that you want to specify each password individually. Apparently, this is supposed to be the default behavior, but it hasn’t worked for me. To force apksigner to ask you for the keystore and key password independently, use the —ks-pass and —key-pass options. Following each option with stdin will tell apksigner to capture the password from you at the command line.
I hope this has educated you a bit more about how creating keystores and signing an Android APK works.
Источник


