- Signing Your Applications
- In this document
- See also
- Signing Overview
- Signing in Debug Mode
- Signing in Release Mode
- Signing Android Wear Apps
- Signing Your App in Android Studio
- Automatically Signing Your App
- Signing Considerations
- Securing Your Private Key
- Expiry of the Debug Certificate
- Signing Your App Manually
- Authenticating Your Client
- Using Play App Signing
- Self-signing Your Application
- Using Keytool on the certificate
- Using Keytool on an APK or AAB
- Using Gradle’s Signing Report
- Полный список
- Подпись приложения
- keytool
- jarsigner
- Визард
Signing Your Applications
In this document
See also
Android requires that all apps be digitally signed with a certificate before they can be installed. Android uses this certificate to identify the author of an app, and the certificate does not need to be signed by a certificate authority. Android apps often use self-signed certificates. The app developer holds the certificate’s private key.
Signing Overview
You can sign an app in debug or release mode. You sign your app in debug mode during development and in release mode when you are ready to distribute your app. The Android SDK generates a certificate to sign apps in debug mode. To sign apps in release mode, you need to generate your own certificate.
Signing in Debug Mode
In debug mode, you sign your app with a debug certificate generated by the Android SDK tools. This certificate has a private key with a known password, so you can run and debug your app without typing the password every time you make a change to your project.
Android Studio signs your app in debug mode automatically when you run or debug your project from the IDE.
You can run and debug an app signed in debug mode on the emulator and on devices connected to your development manchine through USB, but you cannot distribute an app signed in debug mode.
By default, the debug configuration uses a debug keystore, with a known password and a default key with a known password. The debug keystore is located in $HOME/.android/debug.keystore, and is created if not present. The debug build type is set to use this debug SigningConfig automatically.
For more information about how to build and run apps in debug mode, see Building and Running.
Signing in Release Mode
In release mode, you sign your app with your own certificate:
- Create a keystore. A keystore is a binary file that contains a set of private keys. You must keep your keystore in a safe and secure place.
- Create a private key. A private key represents the entity to be identified with the app, such as a person or a company.
Add the signing configuration to the build file for the app module:
The package in app/build/apk/app-release.apk is now signed with your release key.
Note: Including the passwords for your release key and keystore inside the build file is not a good security practice. Alternatively, you can configure the build file to obtain these passwords from environment variables or have the build process prompt you for these passwords.
To obtain these passwords from environment variables:
To have the build process prompt you for these passwords if you are invoking the build from the command line:
After you complete this process, you can distribute your app and publish it on Google Play.
Warning: Keep your keystore and private key in a safe and secure place, and ensure that you have secure backups of them. If you publish an app to Google Play and then lose the key with which you signed your app, you will not be able to publish any updates to your app, since you must always sign all versions of your app with the same key.
The rest of this document provides detailed instructions about how to generate a private key and sign your apps in release mode with Android Studio.
Signing Android Wear Apps
When publishing Android Wear apps, you package the wearable app inside of a handheld app, because users cannot browse and install apps directly on the wearable. Both apps must be signed. For more information on packaging and signing Android Wear apps, see Packaging Wearable Apps.
Signing Your App in Android Studio
To sign your app in release mode in Android Studio, follow these steps:
- On the menu bar, click Build >Generate Signed APK.
On the Generate Signed APK Wizard window, click Create new to create a new keystore.
If you already have a keystore, go to step 4.
On the New Key Store window, provide the required information as shown in figure 1.
Your key should be valid for at least 25 years, so you can sign app updates with the same key through the lifespan of your app.

Figure 1. Create a new keystore in Android Studio.
On the Generate Signed APK Wizard window, select a keystore, a private key, and enter the passwords for both. Then click Next.

Figure 2. Select a private key in Android Studio.
On the next window, select a destination for the signed APK and click Finish.

Figure 3. Generate a signed APK in Android Studio.
Automatically Signing Your App
In Android Studio, you can configure your project to sign your release APK automatically during the build process:
- On the project browser, right click on your app and select Open Module Settings.
- On the Project Structure window, select your app’s module under Modules.
- Click on the Signing tab.
Select your keystore file, enter a name for this signing configuration (as you may create more than one), and enter the required information.

Figure 4. Create a signing configuration in Android Studio.
Under Signing Config, select the signing configuration you just created.

Figure 5. Select a signing configuration in Android Studio.
You can also specify your signing settings in Gradle configuration files. For more information, see Configuring Gradle Builds.
Signing Considerations
You should sign all of your apps with the same certificate throughout the expected lifespan of your applications. There are several reasons why you should do so:
- App upgrade: When the system is installing an update to an app, it compares the certificate(s) in the new version with those in the existing version. The system allows the update if the certificates match. If you sign the new version with a different certificate, you must assign a different package name to the application—in this case, the user installs the new version as a completely new application.
- App modularity: Android allows apps signed by the same certificate to run in the same process, if the applications so requests, so that the system treats them as a single application. In this way you can deploy your app in modules, and users can update each of the modules independently.
- Code/data sharing through permissions: Android provides signature-based permissions enforcement, so that an app can expose functionality to another app that is signed with a specified certificate. By signing multiple apps with the same certificate and using signature-based permissions checks, your apps can share code and data in a secure manner.
If you plan to support upgrades for an app, ensure that your key has a validity period that exceeds the expected lifespan of that app. A validity period of 25 years or more is recommended. When your key’s validity period expires, users will no longer be able to seamlessly upgrade to new versions of your application.
If you plan to publish your apps on Google Play, the key you use to sign these apps must have a validity period ending after 22 October 2033. Google Play enforces this requirement to ensure that users can seamlessly upgrade apps when new versions are available.
Securing Your Private Key
Maintaining the security of your private key is of critical importance, both to you and to the user. If you allow someone to use your key, or if you leave your keystore and passwords in an unsecured location such that a third-party could find and use them, your authoring identity and the trust of the user are compromised.
If a third party should manage to take your key without your knowledge or permission, that person could sign and distribute apps that maliciously replace your authentic apps or corrupt them. Such a person could also sign and distribute apps under your identity that attack other apps or the system itself, or corrupt or steal user data.
Your private key is required for signing all future versions of your app. If you lose or misplace your key, you will not be able to publish updates to your existing appn. You cannot regenerate a previously generated key.
Your reputation as a developer entity depends on your securing your private key properly, at all times, until the key is expired. Here are some tips for keeping your key secure:
- Select strong passwords for the keystore and key.
- Do not give or lend anyone your private key, and do not let unauthorized persons know your keystore and key passwords.
- Keep the keystore file containing your private key in a safe, secure place.
In general, if you follow common-sense precautions when generating, using, and storing your key, it will remain secure.
Expiry of the Debug Certificate
The self-signed certificate used to sign your application in debug mode has an expiration date of 365 days from its creation date. When the certificate expires, you will get a build error.
To fix this problem, simply delete the debug.keystore file. The default storage location is in
/.android/ on OS X and Linux, in C:\Documents and Settings\ \.android\ on Windows XP, and in C:\Users\ \.android\ on Windows Vista and Windows 7.
The next time you build, the build tools will regenerate a new keystore and debug key.
Note that, if your development machine is using a non-Gregorian locale, the build tools may erroneously generate an already-expired debug certificate, so that you get an error when trying to compile your application. For workaround information, see the troubleshooting topic I can’t compile my app because the build tools generated an expired debug certificate.
Signing Your App Manually
You do not need Android Studio to sign your app. You can sign your app from the command line using standard tools from the Android SDK and the JDK. To sign an app in release mode from the command line:
Generate a private key using keytool . For example:
This example prompts you for passwords for the keystore and key, and to provide the Distinguished Name fields for your key. It then generates the keystore as a file called my-release-key.keystore . The keystore contains a single key, valid for 10000 days. The alias is a name that you will use later when signing your app.
Compile your app in release mode to obtain an unsigned APK.
Sign your app with your private key using jarsigner :
This example prompts you for passwords for the keystore and key. It then modifies the APK in-place to sign it. Note that you can sign an APK multiple times with different keys.
Verify that your APK is signed. For example:
Align the final APK package using zipalign .
zipalign ensures that all uncompressed data starts with a particular byte alignment relative to the start of the file, which reduces the amount of RAM consumed by an app.
Источник
Authenticating Your Client
Certain Google Play services (such as Google Sign-in and App Invites) require you to provide the SHA-1 of your signing certificate so we can create an OAuth2 client and API key for your app.
Using Play App Signing
If you’ve published your app using Play App Signing, a requirement when using Android App Bundle, you can get your SHA-1 from the Google Play Console on the Release > Setup > App Integrity page.
Self-signing Your Application
If you’re not using Play App Signing, follow the instructions below to use Keytool or Gradle’s Signing Report to get your SHA-1.
Using Keytool on the certificate
Open a terminal and run the keytool utility provided with Java to get the SHA-1 fingerprint of the certificate. You should get both the release and debug certificate fingerprints.
To get the release certificate fingerprint:
To get the debug certificate fingerprint:
The keytool utility prompts you to enter a password for the keystore. The default password for the debug keystore is android . The keytool then prints the fingerprint to the terminal. For example:
Using Keytool on an APK or AAB
To get the certificate of an application binary:
Using Gradle’s Signing Report
You can also get the SHA-1 of your signing certificate using the Gradle signingReport command:
The signing report will include the signing information for each of your app’s variants:
To learn more about digital signing on Android, see Signing Your Applications.
Except as otherwise noted, the content of this page is licensed under the Creative Commons Attribution 4.0 License, and code samples are licensed under the Apache 2.0 License. For details, see the Google Developers Site Policies. Java is a registered trademark of Oracle and/or its affiliates.
Источник
Полный список
— создаем ключи и подписываем приложение
Тема этого урока не относится непосредственно к программированию. И вполне себе можно кодить без этих знаний. Но для общего развития, думаю, об этом все-таки стоит поговорить. Данные знания пригодятся вам, например, когда будете делать приложение с гугл-картой, или когда будете выкладывать свое творение на маркет.
Подпись приложения
Вообще, в процессе подписи и верификации участвуют закрытый/открытый ключи и сертификат. Если кому интересно, то можете погуглить эти понятия и почитать подробнее. Я же, чтобы не усложнять урок, буду просто называть все это ключом. Для понимания темы урока этого будет достаточно.
Вы создали приложение и хотите его протестировать на реальном устройстве или эмуляторе. Для того, чтобы установить и запустить приложение, оно должно быть подписано. Если вы еще не публиковали на маркете свои приложения, то, скорее всего, про то, что приложение надо подписывать, вы слышите первый раз. И точно помните, что ни с какими подписями не возились. Создавали проект, кодили все, что нужно, сохраняли и запускали и все прекрасно работало. Так происходило, потому что Eclipse сам создавал ключ и сам подписывал приложение этим ключом, чтобы вам на первых порах не приходилось думать об этом. И когда ваше приложение устанавливалось, оно было уже подписанным. А если попытаться установить неподписанное приложение, то получим ошибку.
Итак, приложение обязательно должно быть подписанным, и Eclipse любезно берет это на себя. Он подписывает их debug-ключом. Раньше срок его действия был всего один год. Android проверяет срок действия ключа только при установке. Т.е. если вы установили приложение и срок действия ключа истек, вы все равно сможете использовать установленное приложение. А вот установить или обновить приложение, подписанное истекшим ключом, не получится. Система выдаст ошибку.
Сейчас срок debug-ключа равен 30 лет. Но приложение, подписанное debug-ключом, не получится опубликовать на маркете. А значит, нам надо будет создавать свой ключ и подписывать им приложение.
keytool
Для создания ключа нам понадобится утилита keytool. Ее можно найти по адресу \bin. Она умеет создавать новые ключи и показывать информацию о уже существующих. Давайте сначала попробуем посмотреть информацию о существующем ключе. Для этого возьмем тот самый debug-ключ, который используется для подписи приложений по умолчанию. Узнать где он находится можно в настройках Eclipse: Window > Preferences >Android > Build.

Файл debug.keystore имеет расширение keystore. Это можно перевести как хранилище ключей. Это действительно так, один такой файл может содержать в себе несколько ключей. Для того чтобы обратится к конкретному ключу внутри хранилища используется alias (алиас, можно рассматривать его как имя ключа).
Посмотрим, какие ключи есть в хранилище debug.keystore. Используем команду list. С помощью параметров keystore и storepass укажем имя файла хранилища и пароль к хранилищу:
keytool -list -keystore debug.keystore -storepass android
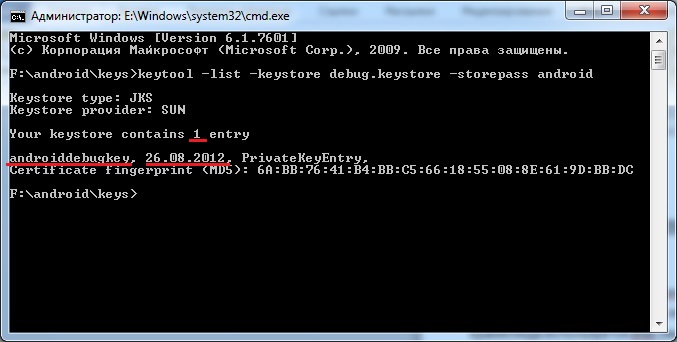
Мы видим, что здесь хранится один ключ с алиасом androiddebugkey, и создан он был 26.08.2012. Этот ключ и используется Eclipse-ом для подписи вашего приложения по умолчанию. Хранилище и ключ имеют одинаковый пароль — android.
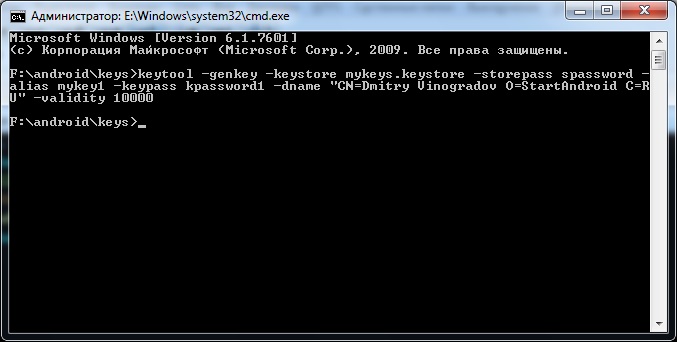
Давайте создадим свой ключ. Для этого используем команду genkey и к ней идет куча параметров.
keytool -genkey -keystore mykeys.keystore -storepass spassword -alias mykey1 -keypass kpassword1 -dname “CN=Dmitry Vinogradov O=StartAndroid C=RU” -validity 10000
Выглядит страшно, но на самом деле все несложно. Просто надо понимать следующее:
хранилище — это файл и оно защищено паролем
ключ в хранилище имеет алиас и свой пароль
также ключ содержит информацию о владельце и имеет ограниченный срок действия
Именно эти вышеперечисленные параметры мы и задали в скрипте.
keystore — имя файла хранилища
storepass — пароль к хранилищу
alias — алиас создаваемого ключа
keypass — пароль к ключу
dname — информация о владельце ключа
validity — срок действия ключа (в днях)
dname задается в определенном формате. Я указал только имя, организацию и страну.
После выполнения этой команды в хранилище mykeys.keystore создался ключ с вышеуказанными параметрами. Если указанное хранилище не существует, то оно будет создано.
Теперь давайте снова используем команду list и поглядим на только что созданный ключ
keytool -list -keystore mykeys.keystore -storepass spassword
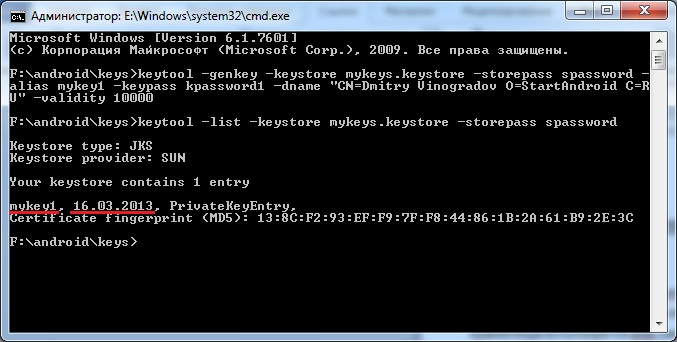
Видим, что внутри все так, как мы и создавали — один ключ с алиасом mykey1.
Туда же можно поместить второй ключ. Но теперь запишем скрипт создания ключа в несколько урезанном виде. Мы не будем указывать пароли к хранилищу и ключу, и информацию о владельце.
keytool -genkey -keystore mykeys.keystore -alias mykey2 -validity 10000

и программа спросит нас о недостающих данных. Сначала пароль к хранилищу, затем данные о владельце ключа (я заполнял не все требуемые значения), затем пароль для создаваемого ключа и подтверждение пароля.
Функционально разницы нет, но при таком способе вам не надо знать формат ввода параметра dname (утилита все спросит сама), и посторонним не видны пароли, которые вы вводили.
Теперь в хранилище два ключа. Выполним list и убедимся.
keytool -list -keystore mykeys.keystore
Обратите внимание, что я не ввел пароль от хранилища (например, чтобы не «светить» его). Утилита спросит меня:

Видно, что был запрошен пароль и в хранилище сейчас два ключа.
Команду list можно еще выполнить с параметром v. Этот параметр добавляет информативности.

Теперь для каждого ключа виден не только алиас и дата создания, но и инфа о владельце, срок действия и пр.
Параметр v также можно использовать и с командой genkey. После создания ключа будет выведено немного информации о нем в консоль.
jarsigner
Итак, разобрались с keytool. Знаем, как создавать хранилище с ключами и как посмотреть инфу о существующих. Осталось узнать, как подписать приложение ключом. Для этого используется другая утилита — jarsigner.
Скрипт подписи выглядит так:
jarsigner -keystore mykeys.keystore -storepass spassword -keypass kpassword1 Package1.apk mykey1
Имена параметров нам знакомы по keytool: хранилище (keystore), пароль (storepass) к нему и пароль (keypass) к ключу. А последние два параметра – это имя APK-файла, который вы хотите подписать и алиас ключа из указанного хранилища, который вы хотите использовать для подписи.
После этого приложение будет подписано и система примет его к установке.
Ради интереса давайте попробуем установить неподписанный APK. Чтобы создать его надо щелкнуть правой кнопкой мыши на проекте в Eclipse и выбрать Android tools > Export Unsigned Application Package. Далее указываем путь, куда сохранить APK-файл. Eclipse создает приложение из проекта и сохраняет его в указанный каталог. После этого он выводит сообщение, что перед публикацией приложения необходимо его подписать и сжать (утилитой zipalign).

Попробуем установить приложение на эмулятор с помощью adb. Получаем ошибку Failure [INSTALL_PARSE_FAILED_NO_CERTIFICATES]:

Система обнаружила, что приложение не подписано.
Если же сначала закинуть APK на эмулятор и там запустить файловым менеджером, получим такое сообщение при установке:

Визард
Eclipse предоставляет визард, который позволяет реализовать все вышеописанные шаги по подготовке приложения к установке. Для этого надо на проекте в Eclipse щелкнуть правой кнопкой и выбрать Android tools > Export Signed Application Package.
Визард на всякий случай уточнит проект

Затем надо выбрать: использовать существующее хранилище или создавать новое. Если используем существующее, то выбираем его и вводим пароль к этому хранилищу.

Жмем Next, и визард спрашивает, какой из существующих ключей использовать, либо дает возможность создать новый.

Выбираем существующий ключ, вводим пароль к нему

Осталось указать путь и имя файла, куда Eclipse сохранит готовое, подписанное и сжатое приложение. Заодно он сразу показывает срок действия сертификата.

Жмем Finish и получаем готовое приложение, которое можно публиковать на маркете.
Если же у вас пока нет ключа, то визард поможет вам его создать, чтобы не надо было возиться с консолью и keytool.
В этом случае вы указываете, что хотите создать хранилище

Далее надо создать ключ

Здесь вы указываете алиас, пароль, срок действия (в годах) и инфу о владельце.
Ну и остается указать путь к создаваемому файлу

По идее, я мог бы сразу показать вам этот визард, который за вас все сделает, но я думаю, что вы не понимали бы значение всех его экранов и полей. А это не очень хорошая практика – пользоваться тем, чего не понимаешь. Поэтому я подробно расписал механизм ключей и подписи приложений, чтобы вы представляли себе, как устроен этот процесс и что делает визард.
По поводу срока действия ключа, в хелпе пишут, что рекомендуется ставить 25 лет. И что при публикации приложения на маркете, проверяется, что срок действия закончится позднее, чем 22 октября 2033. Думаю, эта дата будет периодически сдвигаться.
На следующем уроке:
— разбираемся, что такое Package для приложения
Присоединяйтесь к нам в Telegram:
— в канале StartAndroid публикуются ссылки на новые статьи с сайта startandroid.ru и интересные материалы с хабра, medium.com и т.п.
— в чатах решаем возникающие вопросы и проблемы по различным темам: Android, Kotlin, RxJava, Dagger, Тестирование
— ну и если просто хочется поговорить с коллегами по разработке, то есть чат Флудильня
— новый чат Performance для обсуждения проблем производительности и для ваших пожеланий по содержанию курса по этой теме
Источник


