- Compiling for Android
- Note
- Requirements
- Setting up SCons
- Compiling
- Toolchain
- Building the APK
- Compiling export templates
- Godot 3.1 – How to export to Android in simple steps
- Installing the export templates
- Downloading Android SDK and the JDK
- Creating a key using the command line
- Navigating to the Android export editor settings
- Setting up the location for the Adb
- Setting up the location for the Jarsigner
- Setting up the location of the Debug Keystore
- Getting ready to make a build
- Making your build
- Releasing the build to Google Play Games
- How to make a release keystore?
- Set the reference in the export
- Calinou / build_android.bat
Compiling for Android
Note
For most cases, using the built-in deployer and export templates is good enough. Compiling the Android APK manually is mostly useful for custom builds or custom packages for the deployer.
Also, you still need to do all the steps mentioned in the Exporting for Android tutorial before attempting your custom export template.
Requirements
For compiling under Windows, Linux or OSX, the following is required:
- Python 2.7+ (3.0 is untested as of now).
- SCons build system.
- Android SDK version 19 [Note: Please install all Tools and Extras of sdk manager]
- Android build tools version 19.1
- Android NDK
- Gradle
- OpenJDK 6 or later (or Oracle JDK 6 or later)
Setting up SCons
Set the environment variable ANDROID_HOME to point to the Android SDK.
Set the environment variable ANDROID_NDK_ROOT to point to the Android NDK.
To set those environment variables on Windows, press Windows+R, type “control system”, then click on Advanced system settings in the left pane, then click on Environment variables on the window that appears.
To set those environment variables on Linux, use export ANDROID_HOME=/path/to/android-sdk and export ANDROID_NDK_ROOT=/path/to/android-ndk .
Compiling
Go to the root dir of the engine source code and type:
This should result in a regular .so in \bin folder as if it was compiled with flags: tools=no target=debug . The resulting file will be huge because it will contain all debug symbols, so for next builds, using target=release_debug or target=release is recommended.
Copy the .so to the libs/armeabi Android folder (or symlink if you are in Linux or OSX). Note: Git does not support empty directories so you will have to create it if it does not exist:
Or alternatively, if you are under a Unix system you can symlink:
Remember that only one of libgodot_android.so must exist for each platform, for each build type (release, debug, etc), it must be replaced.
Note: The file inside libs/armeabi must be renamed to “libgodot_android.so”, or else unsatisfied link error will happen at runtime.
If you also want to include support for x86 Android, add the following compile flag: android_arch=x86 , then copy/symlink the resulting binary to the x86 folder:
This will create a fat binary that works in both platforms, but will add about 6 megabytes to the APK.
Toolchain
We usually try to keep the Godot Android build code up to date, but Google changes their toolchain versions very often, so if compilation fails due to wrong toolchain version, go to your NDK directory and check the current number, then set the following environment variable:
Building the APK
To compile the APK, go to the Java folder and run gradlew.bat build (or ./gradlew build on Unix):
In the java/bin subfolder, the resulting apk can be used as export template.
Note: If you reaaaally feel oldschool, you can copy your entire game (or symlink) to the assets/ folder of the Java project (make sure engine.cfg is in assets/) and it will work, but you lose all the benefits of the export system (scripts are not byte-compiled, textures not converted to Android compression, etc. so it’s not a good idea).
Compiling export templates
Godot needs the freshly compiled APK as export templates. It opens the APK, changes a few things inside, adds your file and spits it back. It’s really handy! (and required some reverse engineering of the format).
Compiling the standard export templates is done by calling scons with the following arguments:
Источник
Godot 3.1 – How to export to Android in simple steps

Building and setting up the export for Android in Godot can feel a bit intimidating for newcomers, however you only have to do this once. Afterwards you are able to send a build to your mobile device in a matter of seconds, by just pressing a button and having a mobile device attached through USB.
The first thing you have to do in Godot is ensure you have the Export Templates setup. You can do this by going to Editor/Manage Export Templates in Godot. Afterwards you click on the download button. Afterwards you go to Editor/Editor Settings select the Export tab, and Android. From there you can set the locations for the Adb, Debug Keystore and Jarsigner locations. You can get the Adb from the Android SDK, the debug keystore is made using the JDK keytool which is downloadable through Github or Oracle.
Installing the export templates
In order to install the export templates, navigate to the top window and select Editor. From there you can select Manage Export Templates. Afterwards you click on the download button like the image below. And you then select Official 3.1.2 [HTTPS]. Note that this can change based on the version you are currently using of Godot. Sometimes when the link is not available, you have the option to install a template through a file. You can find older export templates and releases here. You can also get the latest Github release with export templates on the Unofficial Godot Engine builds site by Hugo Locurcio. Do note tough that the export template needs to match the current Godot version.
The images below show you how to do it visually.
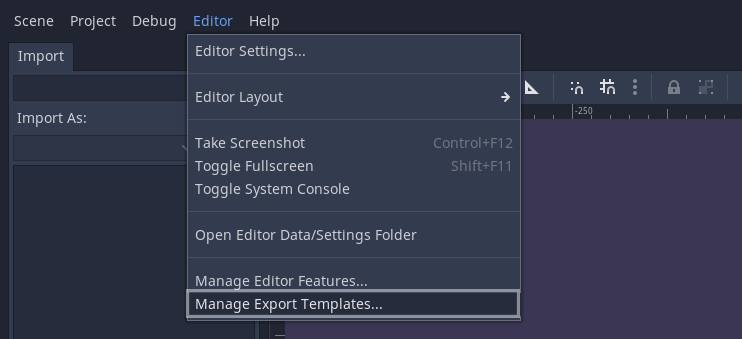 Here you can see how to navigate to the Manage Export Templates selection
 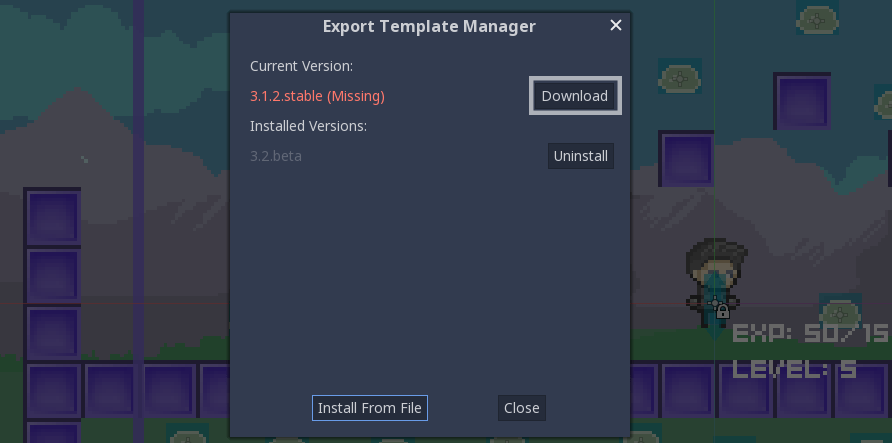 After opening the Export Template Manager menu, click on Download
 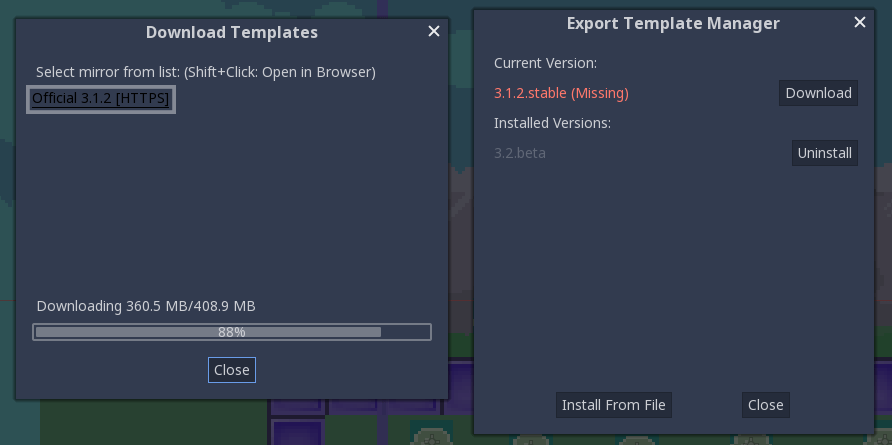 Installing the export templates using the official link
After the download is done, the export templates get installed automatically. Kind in mind that you will have to repeat this process for each new version you have to install. This step is fairly easy tough, I think we can manage this.
Downloading Android SDK and the JDK
In order to setup these things you have to download the Android SDK and you have to download OpenJDK or OracleJDK. It is recommended to stay at JDK version 8 or higher, as lower versions may have issues. I personally installed java-1.8.0-openjdk, the third option on the OpenJDK github page.
Creating a key using the command line
After you have installed both the SDK and OpenJDK. You should be able to use this command with the command line. For windows you can go to the command like by opening the search bar (pressing the windows button) and searching for CMD and pressing enter. You can then copy the following command into the command line.
For Windows 10, you can then find the keystore in “C:\Users\YourUserName”, it is named “debug.keystore”. Make sure to keep the folder to this location available, since we will need it later on.
If you are certain you have installed both the JDK and SDK and the command does not work due to it not being recognized, then there is a chance the system variables are not setup properly. You can find a guide here that shows you how to point the system variables to the JDK folder.
Navigating to the Android export editor settings
In order to start setting up the references, you have to navigate to Editor/Editor Settings
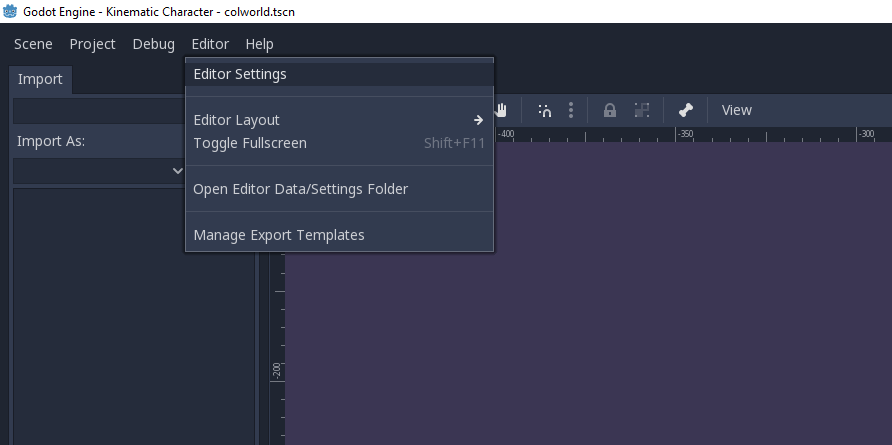 As you can see, the Editor Settings is located under the Editor tab
Afterwards, you scroll down on the left side until you get to the Export tab, and you select Android
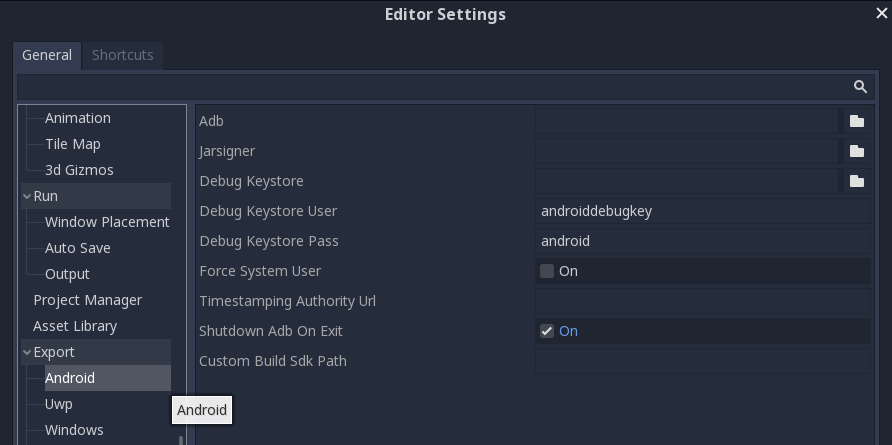 All the settings for the Android Export
Setting up the location for the Adb
For Adb you have to go to the SDK folder and then into the “platform-tools” folder. For windows 10 this is generally located at:
If you are unsure where to find the Sdk folder, open up the Android SDK and navigate to the new project settings like the image below.
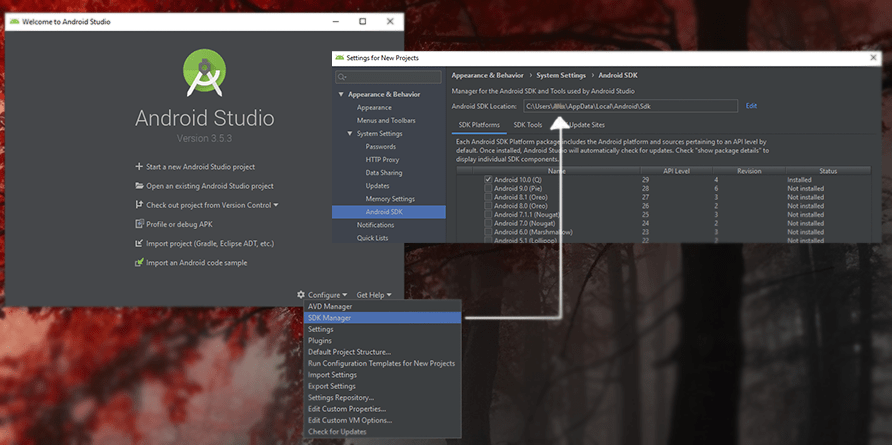 Example of how to find the android Sdk location on your computer using Android Studio
Setting up the location for the Jarsigner
The Jarsigner is located in the OpenJDK or OracleJDK folder you have unpacked previously.
When installing the OpenJDK on my device it was located at:
Setting up the location of the Debug Keystore
This keystore was made earlier in this article, once created, it gets placed in the User folder:
Getting ready to make a build
Navigate to Project/Export to go to the export window

Add a new export preset by pressing the Add… button and selecting Android
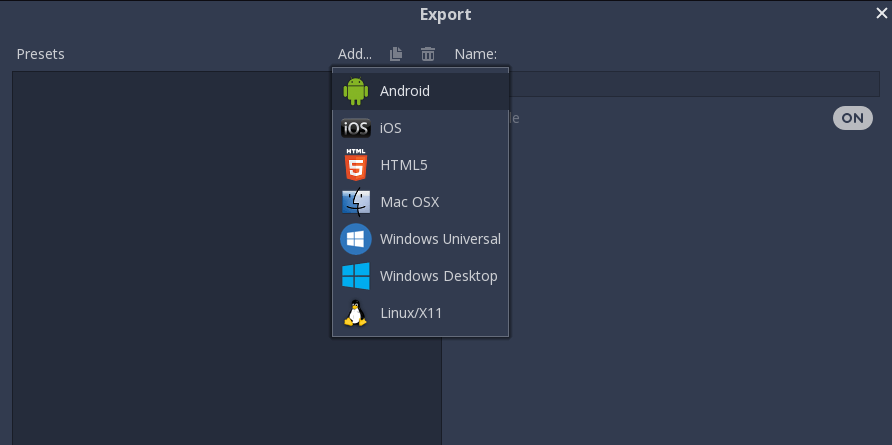 How to add a new present in the export options
Now finally, set the Unique name and name of the package.
How I generally name the Unique name is com.myComp.ProductName and the name is what will be displayed on your android device. So that should be equal to your product name. Spaces are allowed.
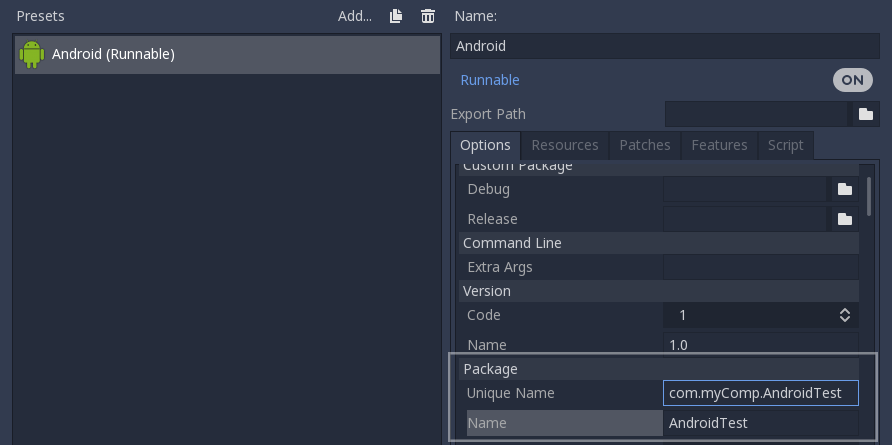 How to setup the package Unique name and general name
Making your build
There are two ways to make a build. One is to press the Export Project button in the export window. The other option is to use the icon that is available in the editor window. Personally I prefer using the icon, as this will automatically install the build to the phone. Just make sure it is connected to your computer using USB with USB Logging on, using developer mode. If you are unsure how to enable developer mode. Then you have to google “How to enable developer mode ”.
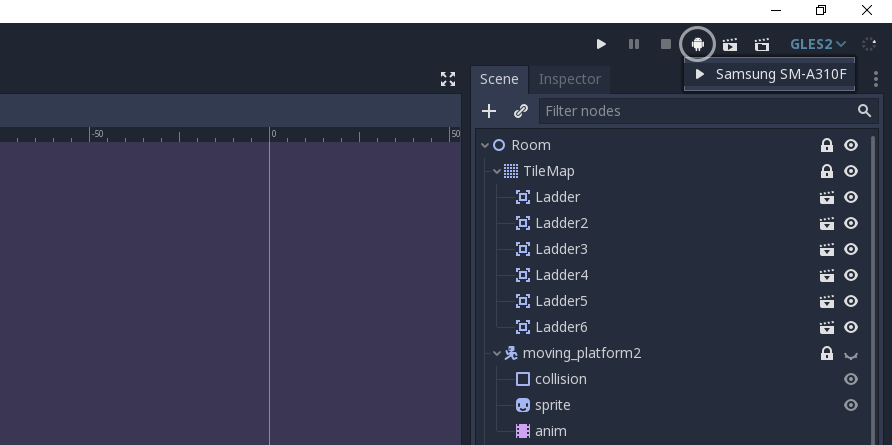 How to quickly build the project to your device
After pressing the button above, you will have the game running in no time on your device.
Releasing the build to Google Play Games
When exporting a build to Google Play Games, it is important to use a release keystore. This is because the debug keystore is merely meant for development and testing purposes. It is also not advised to release games using a debug keystore.
Signing a keystore is like branding the application with your credentials. And it is possible to assign the same keystore to multiple applications. The debug keystore has base credentials.
Eventually when you want to release to the play store you use a Release keystore. It is important that you keep this key safe, since you will only be able to push updates if you sign the application with the initial key. Preventing malicious users from pushing harmful code in case the account gets stolen.
How to make a release keystore?
Again, like the steps above to create a debug key, there is a parameter to create a release key. Make sure to set yourKeyAlias to an alias of your choice.
After doing this, you will get the question for a password. Make sure to note it down, because losing it means losing your key. And it has happens to people before that they had to republish a game on Google Play due to this.
After entering the password twice, you will get a lot of questions such as first/last name. Organisational unit, etc. You can leave these blank. At the end you get a question asking if it is all correct, you then type in yes. After creating the key, you may get this message:
Doing this will change the keystore into a file with the “.pfx” extention, from what I’ve seen godot only accepts the .keystore format. So we can ignore this for now.
Set the reference in the export
Finally we set the reference to our release key in the export like the image below.
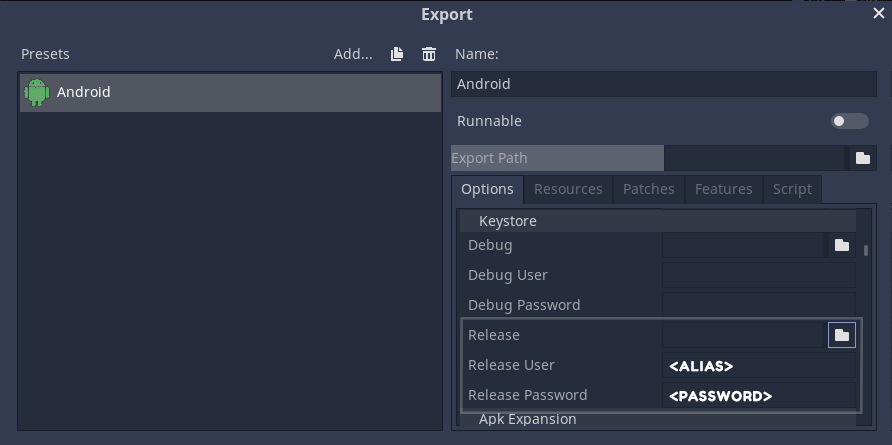
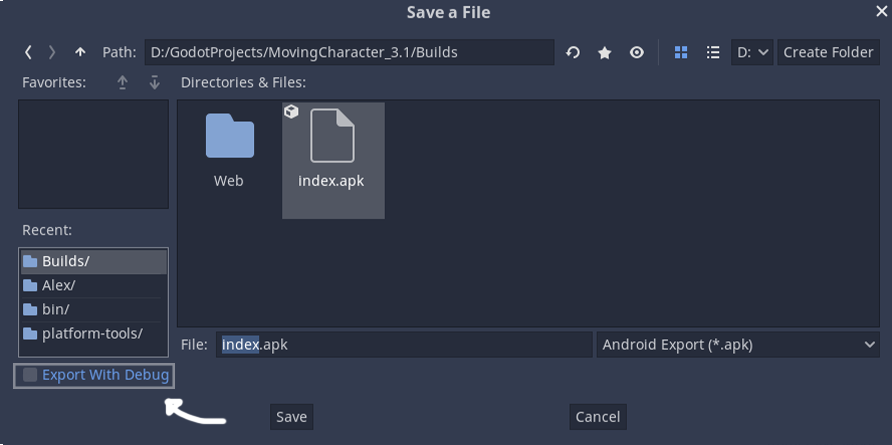
Also, when you have pressed export, do not forget to toggle this off, else it will still sign it using the debug key!
Thank you for reading, and I hope it has helped you. If you have interest in implementing ads into your game and you happen to be using Godot 3.2, then I recommend reading “How to integrate Google Ads (Admob) for Android”
Источник
Calinou / build_android.bat
This file contains bidirectional Unicode text that may be interpreted or compiled differently than what appears below. To review, open the file in an editor that reveals hidden Unicode characters. Learn more about bidirectional Unicode characters
| :: This script must be run from a Windows machine with |
| :: Android SDK and NDK installed. |
| :: NOTE: You need Pywin32 to be installed to use multi-threaded compilation. |
| :: You may need to set «threads» to 1 for the first build, even if you have it installed. |
| :: Place this script at the root of your Godot Git clone. |
| :: CC0 1.0 Universal |
| set threads = %NUMBER_OF_PROCESSORS% |
| :: Set paths to MinGW, Android SDK and Android NDK |
| set PATH = %PROGRAMFILES% \mingw-w64\x86_64-6.2.0-posix-seh-rt_v5-rev0\mingw64\bin\; %PATH% |
| set ANDROID_HOME = %LOCALAPPDATA% \Android\android-sdk |
| set ANDROID_NDK_ROOT = %LOCALAPPDATA% \Android\android-ndk |
| :: Build Godot for Android |
| call » C:\Python27\Scripts\scons.bat » p=android -j %threads% verbose=no tools=no target=release_debug |
| call » C:\Python27\Scripts\scons.bat » p=android -j %threads% verbose=no tools=no target=release |
| :: Package it into an APK |
| cd platform/android/java |
| call » gradlew.bat » build |
| :: Copy APKs in user’s export templates folder |
| cd ../../../bin |
| copy android_debug.apk %APPDATA% \Godot\templates\android_debug.apk |
| copy android_release.apk %APPDATA% \Godot\templates\android_release.apk |
You can’t perform that action at this time.
You signed in with another tab or window. Reload to refresh your session. You signed out in another tab or window. Reload to refresh your session.
Источник


