- Create your first multiplatform application – tutorial
- Run your application
- Run your application on Android
- Run on a different Android simulated device
- Run on a real Android device
- Run your application on iOS
- Run on a different iPhone simulated device
- Run on a real iPhone device
- Run tests
- Run tests on iOS
- Run tests on Android
- Update your application
- Next steps
- Make your Android application work on iOS – tutorial
- Prepare an environment for development
- Make your code cross-platform
- Decide what code to make cross-platform
- Create a shared module for cross-platform code
- Add a dependency on the shared module to your Android application
- Make the business logic cross-platform
- Replace Android-specific code with cross-platform code
- Connect to platform-specific APIs from the cross-platform code
- Run your cross-platform application on Android
- Make your cross-platform application work on iOS
- Create an iOS project in Xcode
- Connect the framework to your iOS project
- Use the shared module from Swift
- Enjoy the results – update the logic only once
- What else to share?
Create your first multiplatform application – tutorial
Here you will learn how to create and run your first KMM application.
Set up your environment for KMM development by installing the necessary tools on a suitable operating system.
You will need a Mac with macOS to complete certain steps in this tutorial, which include writing iOS-specific code and running an iOS application.
These steps cannot be performed on other operating systems, such as Microsoft Windows. This is due to an Apple requirement.
You can also watch a video of this tutorial created by Ekaterina Petrova, Kotlin Developer Advocate.
In Android Studio, select File | New | New Project.
Select KMM Application in the list of project templates, and click Next.

Specify a name for your first application, and click Next.

In the window that opens, do the following:
Keep the default names for the application and shared folders.
Select the checkbox to generate sample tests for your project.
Select Regular framework in the list of iOS framework distribution options.
Click Finish to create a new project.

If you want to use KMM module as a CocoaPods dependency, select the CocoaPods dependency manager option. To learn more about CocoaPods dependencies, see CocoaPods integration.
Now wait while your project is set up. It may take some time to download and set up the required components when you do this for the first time.
To view the complete structure of your mobile multiplatform project, switch the view from Android to Project. You can understand the KMM project structure and how you can use this.

Run your application
You can run your multiplatform application on Android or iOS.
Run your application on Android
In the list of run configurations, select androidApp and then click Run.


Run on a different Android simulated device
Run on a real Android device
Run your application on iOS
In the list of run configurations, select iosApp and then click Run.


Run on a different iPhone simulated device
If you want to run your application on another simulated device, you can add a new run configuration.
In the list of run configurations, click Edit Configurations.

Click the + button above the list of configurations and select iOS Application.

Name your configuration.
Select a simulated device in the Execution target list, and then click OK.

Click Run to run your application on the new simulated device.
Run on a real iPhone device
Create a run configuration by selecting iPhone in the Execution target list.
Click Run to run your application on the iPhone device.
If your build fails, follow the workaround described in this issue.
Run tests
You can run tests to check that the shared code works correctly on both platforms. Of course, you can also write and run tests to check the platform-specific code.
Run tests on iOS
Open the file iosTest.kt in shared/src/iosTest/kotlin/com.example.kmmapplication.shared .
Directories with Test in their name contain tests.
This file includes a sample test for iOS.

Click the Run icon in the gutter next to the test.
Tests run on a simulator without UI. Congratulations! The test has passed – see test results in the console.

Run tests on Android
For Android, follow a procedure that is very similar to the one for running tests on iOS.
Open the file androidTest.kt in shared/src/androidTest/kotlin/com.example.kmmapplication.shared .
Click the Run gutter icon next to the test.
Update your application
Open the file Greeting.kt in shared/src/commonMain/kotlin/com.example.kmmapplication.shared .
This directory stores the shared code for both platforms – Android and iOS. If you make changes to the shared code, you will see changes in both applications.

Update the shared code – use the Kotlin standard library function that works on all platforms and reverts text: reversed() .
Run the updated application on Android.

Run the updated application on iOS.

Run tests on Android and iOS.
As you see, the tests fail. Update the tests to pass. You know how to do this, right? 😉

Next steps
Once you’ve played with your first KMM application, you can:
Источник
Make your Android application work on iOS – tutorial
Here you can learn how to make your existing Android application cross-platform so that it works both on Android and iOS. You’ll be able to write code and test it for both Android and iOS only once, in one place.
This tutorial uses a sample Android application with a single screen for entering a username and password. The credentials are validated and saved to an in-memory database.
If you aren’t familiar with KMM, you can learn how to create and configure a KMM application from scratch first.
Prepare an environment for development
Install Android Studio 4.2 or Android Studio 2020.3.1 Canary 8 or higher and other tools for KMM development on macOS.
You will need a Mac with macOS to complete certain steps in this tutorial, which include writing iOS-specific code and running an iOS application.
These steps cannot be performed on other operating systems, such as Microsoft Windows. This is due to an Apple requirement.
In Android Studio, create a new project from version control: https://github.com/Kotlin/kmm-integration-sample .
Switch to the Project view.

Make your code cross-platform
To have a KMM application that works on iOS, you’ll first make your code cross-platform, and then you’ll reuse your cross-platform code in a new iOS application.
To make your code cross-platform:
Decide what code to make cross-platform
Decide which code of your Android application is better to share for iOS and which to keep native. A simple rule is: share what you want to reuse as much as possible. The business logic is often the same for both Android and iOS, so it’s a great candidate for reuse.
In your sample Android application, the business logic is stored in the package com.jetbrains.simplelogin.androidapp.data . Your future iOS application will use the same logic, so you should make it cross-platform, as well.

Create a shared module for cross-platform code
The cross-platform code that is used for both iOS and Android is stored in the shared module. KMM provides a special wizard for creating such modules.
In your Android project, create a KMM shared module for your cross-platform code. Later you’ll connect it to your existing Android application and your future iOS application.
In Android Studio, click File | New | New Module.
In the list of templates, select KMM Shared Module, enter the module name shared , and select the Regular framework in the list of iOS framework distribution options.
This is required for connecting the shared module to the iOS application.

The wizard will create the KMM shared module, update the configuration files, and create files with classes that demonstrate the benefits of Kotlin Multiplatform. You can learn more about the KMM project structure.
Add a dependency on the shared module to your Android application
To use cross-platform code in your Android application, connect the shared module to it, move the business logic code there, and make this code cross-platform.
Ensure that compileSdkVersion and minSdkVersion in build.gradle.kts of the shared module are the same as those in the build.gradle of your Android application in the app module.
If they are different, update them in the build.gradle.kts of the shared module. Otherwise, you’ll encounter a compile error.
Add a dependency on the shared module to the build.gradle of your Android application.
Synchronize the Gradle files by clicking Sync Now in the warning.

To make sure that the shared module is successfully connected to your application, dump the greeting() function result to the log by updating the onCreate() method of the LoginActivity class.
Search for Hello in the log, and you’ll find the greeting from the shared module.

Make the business logic cross-platform
You can now extract the business logic code to the KMM shared module and make it platform-independent. This is necessary for reusing the code for both Android and iOS.
Move the business logic code com.jetbrains.simplelogin.androidapp.data from the app directory to the com.jetbrains.simplelogin.shared package in the shared/src/commonMain directory. You can drag and drop the package or refactor it by moving everything from one directory to another.

When Android Studio asks what you’d like to do, select to move the package, and then approve the refactoring.

Ignore all warnings about platform-dependent code and click Continue.

Remove Android-specific code by replacing it with cross-platform Kotlin code or connecting to Android-specific APIs using expect and actual declarations. See the following sections for details.
Replace Android-specific code with cross-platform code
To make your code work well on both Android and iOS, replace all JVM dependencies with Kotlin dependencies wherever possible.
In the login() function of the LoginDataSource class, replace IOException , which is not available in Kotlin, with RuntimeException .
For email validation, replace the Patterns class from the android.utils package with a Kotlin regular expression matching the pattern in the LoginDataValidator class:
Connect to platform-specific APIs from the cross-platform code
A universally unique identifier (UUID) for fakeUser in LoginDataSource is generated using the java.util.UUID class, which is not available for iOS.
Since the Kotlin standard library doesn’t provide functionality for generating UUIDs, you still need to use platform-specific functionality for this case.
Provide the expect declaration for the randomUUID() function in the shared code and its actual implementations for each platform – Android and iOS – in the corresponding source sets. You can learn more about connecting to platform-specific APIs.
Remove the java.util.UUID class from the common code:
Create a Utils.kt file in the shared/src/commonMain directory and provide the expect declaration:
Create a Utils.kt file in the shared/src/androidMain directory and provide the actual implementation for randomUUID() in Android:
Create a Utils.kt file in the shared/src/iosMain directory and provide the actual implementation for randomUUID() in iOS:
For Android and iOS, Kotlin will use different platform-specific implementations.
Run your cross-platform application on Android
Run your cross-platform application for Android to make sure it works.

Make your cross-platform application work on iOS
Once you’ve made your Android application cross-platform, you can create an iOS application and reuse the shared business logic in it.
Create an iOS project in Xcode
In Xcode, click File | New | Project.
Select a template for an iOS app and click Next.

As the product name, specify simpleLoginIOS and click Next.

As the location for your project, select the directory that stores your cross-platform application, for example, kmm-integrate-into-existing-app .
In Android Studio, you’ll get the following structure:

You can rename the simpleLoginIOS directory to iosApp for consistency with other top-level directories of your cross-platform project.

Connect the framework to your iOS project
Once you have the framework, you can connect it to your iOS project manually.
An alternative is to configure integration via Cocoapods, but that integration is beyond the scope of this tutorial.
Connect your framework to the iOS project manually:
In Xcode, open the iOS project settings by double-clicking the project name.
On the Build Phases tab of the project settings, click the + and add New Run Script Phase.

Add the following script:

Move the Run Script phase before the Compile Sources phase.
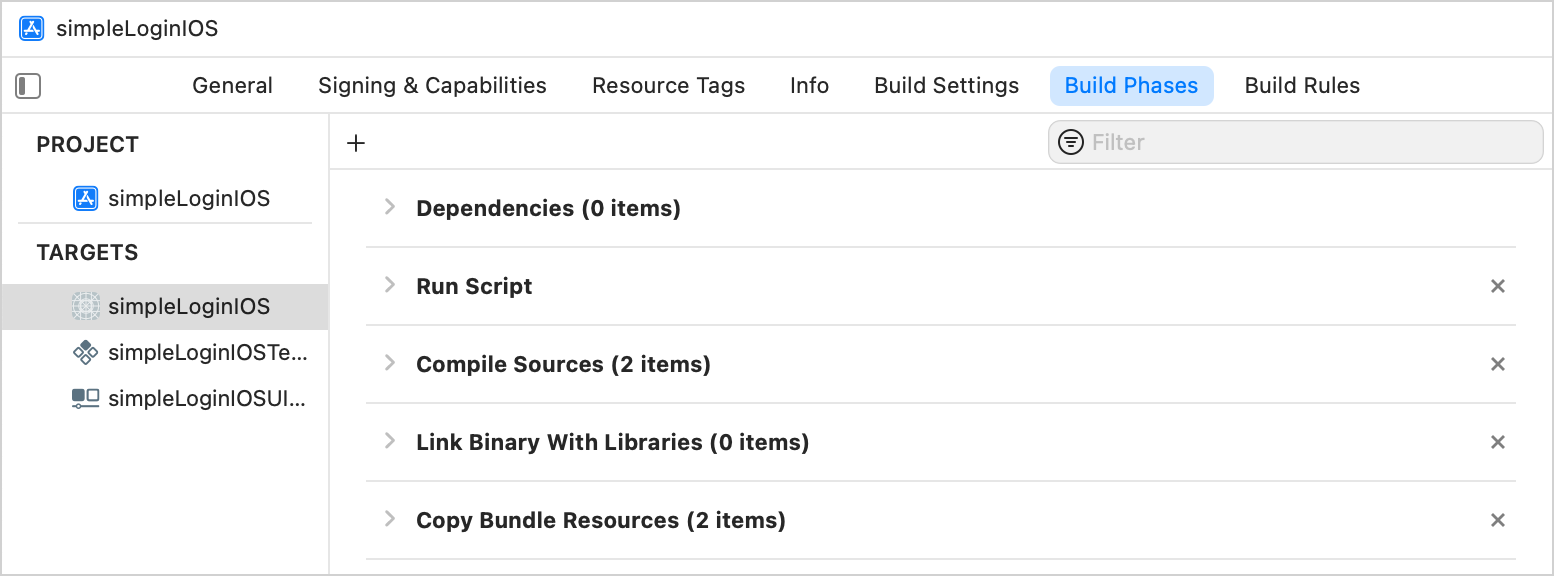
On the Build Settings tab, specify the Framework Search Path under Search Paths – $(SRCROOT)/../shared/build/xcode-frameworks/$(CONFIGURATION)/$(SDK_NAME) .

On the Build Settings tab, specify the Other Linker flags under Linking – $(inherited) -framework shared

Build the project in Xcode. If everything is set up correctly, the project will successfully build.
Use the shared module from Swift
In Xcode, open the ContentView.swift file and import the shared module.
To check that it is properly connected, use the greeting() function from the KMM module:

In simpleLoginIOSApp.swift , import the shared module and specify the arguments for the ContentView() function:

Enjoy the results – update the logic only once
Now your application is cross-platform. You can update the business logic in one place and see results on both Android and iOS.
In Android Studio, change the validation logic for a user’s password in the checkPassword() function of the LoginDataValidator class:
Update gradle.properties to connect your iOS application to Android Studio for running it on a simulated or real device right there:
Synchronize the Gradle files by clicking Sync Now in the warning.
You will see the new run configuration simpleLoginIOS for running your iOS application right from Android Studio.


What else to share?
You’ve shared the business logic of your application, but you can also decide to share other layers of your application. For example, the ViewModel class code is almost the same for Android and iOS applications, and you can share it if your mobile applications should have the same presentation layer.
Источник


