- Kotlin Android Extensions deprecated. Что делать? Инструкция по миграции
- Кратко о Kotlin Android Extensions
- Проблемы Kotlin Android Extensions
- Альтернативные способы
- View Binding от Google
- Начало работы с View Binding
- Использование в Activity
- From Kotlin synthetics to Android ViewBinding: the definitive guide
- Binding your views like a pro in 2 minutes.
- Setup
- Enable view binding
- Remove android extensions plugin
- Parcelize annotations
- Activities
- Fragments
- ViewHolder
- Includes
- With a view group
- With a
- Conclusion
- Kotlin Android Extensions deprecated. Что делать?Инструкция по миграции
- Кратко о Kotlin Android Extensions
- Проблемы Kotlin Android Extensions
- Альтернативные способы
- View Binding от Google
- Начало работы с View Binding
- Использование в Activity
- Migrating the deprecated Kotlin Android Extensions compiler plugin
- But why?
- What are the alternatives?
- View Binding
- How to enable View Binding?
- How to use View Binding?
- Use view binding in activities
- Use view binding in fragments
- Under the hood
- What about the Parcelize feature from Kotlin Android Extensions?
Kotlin Android Extensions deprecated. Что делать? Инструкция по миграции
kotlinx.android.synthetic is no longer a recommended practice. Removing in favour of explicit findViewById
Кратко о Kotlin Android Extensions
Kotlin Android Extensions — это плагин для Kotlin, позволяющий восстанавливать view из Activities, Fragments, и Views без написания стандартного бойлерплэйт-кода типа findViewById.
Плагин генерирует дополнительный код, который позволяет получить доступ к view в виде XML, так же, как если бы вы имели дело с properties с именем id, который вы использовали при определении структуры.
Также он создаёт локальный кэш view. При первом использовании свойства, плагин выполнит стандартный findViewById. В последующем, view будет восстановлен из кэша, поэтому доступ к нему будет быстрее.
Если это всё так удобно, то зачем его сделали deprecated?
Проблемы Kotlin Android Extensions
Альтернативные способы
View Binding от Google
Итак, победителем в этом списке выглядит ViewBinding от Google (не путайте с DataBinding). Давайте кратко рассмотрим, что это такое.
View Binding — это инструмент, который позволяет проще писать код для взаимодействия с view. При включении View Binding в определенном модуле он генерирует binding классы для каждого файла разметки (layout) в модуле. Объект сгенерированного binding класса содержит ссылки на все view из файла разметки, для которых указан android:id
Главные преимущества View Binding — это Null safety и Type safety.
Начало работы с View Binding
Начать работать с ViewBinding достаточно просто. Нужно добавить опцию в build.gradle:
После этого можно уже использовать. Каждый сгенерированный binding класс содержит ссылку на корневой view разметки (root) и ссылки на все view, которые имеют id. Имя генерируемого класса формируется как «название файла разметки», переведенное в camel case + «Binding». Например, для файла разметки result_profile.xml:
Будет сгенерирован класс ResultProfileBinding, содержащий 2 поля: TextView name и Button button.
Использование в Activity
Например у вас вот такой layout:
Результат работы ViewBinding:
Использовать viewBinding можно так:
И теперь, после того, как получили ссылки на view:
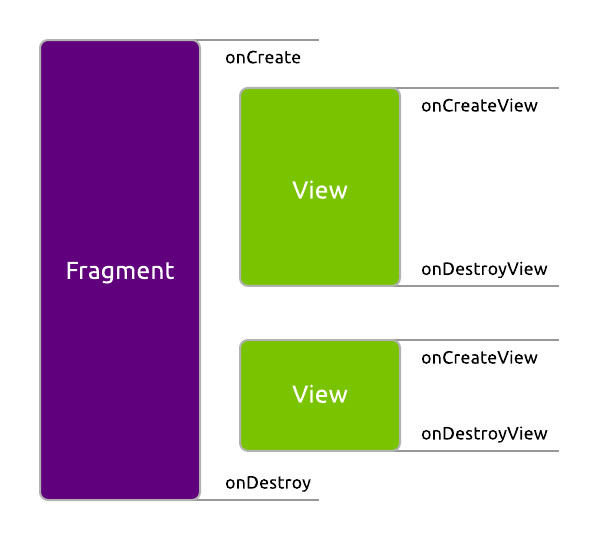
Если вы используете ViewBinding во фрагменте и держите ссылку на binding во фрагменте (а не только в методе onCreateView()) то не забывайте очищать ссылки в методе onDestroyView().
Это необходимо делать из-за жизненного цикла фрагмента и view:
Источник
From Kotlin synthetics to Android ViewBinding: the definitive guide
Binding your views like a pro in 2 minutes.
Since Kotlin 1.4.20, JetBrains deprecated the kotlin-android-extensions plugin in favor of Android View Binding solution.
If you have been using this plugin, it’s time to move on before this feature is completely removed (or switch to Compose?).
For having completely refactored our Android application to use View Binding, we know that it can be somehow painful and sometimes it looks less simple with this new solution. For example, the binding of your view will have to be done differently if you’re working with an Activity or a Fragment. If your layout uses include there are some tricky ways to handle them too.
That’s why we’ve been implementing some convenient methods to make it simpler.

Setup
If you’re refactoring your whole application code, we advise you to do it module per module to avoid committing too many updates.
Enable view binding
To enable the ViewBinding feature, you just need to enable this build feature on your module build.gradle files:
Remove android extensions plugin
If you’ve been using kotlin-android-extensions before, remove the plugin from the build.gradle file too:
Don’t forget to also remove the Android Extensions experimental flag:
Parcelize annotations
The Parcelize annotations have been moved to another package & the previous one has been deprecated.
So, if you used the Kotlin Parcelize annotation to automatize the implementation of your Parcelable objects, you’ll need to use the new plugin :
Then, replace imports in your code from kotlinx.android.parcel to kotlinx.parcelize.
Activities
To set up an Activity to use your binding class you basically have to:
1- Declare a late init variable for your binding class.
2- In the onCreate method, inflate your layout using the static inflate method from the generated Binding class.
3- Call the Activity setContentView with the root view from your binding class.
We can definitely make it way shorter using some extensions:
Our viewBinding method is a simple delegate that inflates lazily the view of the activity by using the inflater method given as a parameter.
In the Activity we just need to declare the binding as a simple val property and set the content view of the activity.
Fragments
Using View Binding in Fragments is quite less easy as you have to do many things to make it works:
- 1- Declare a var property for your binding class instance.
- In the onCreateView callback, inflate the layout for your binding class & return the root view of it.
- To avoid potential leaks, reset your binding class to null in the onDestroyView callback.
As per the official documentation, it should look like that:
That’s a lot of code to add & you should also pay attention to potential leaks on the binding class. This can also be disturbing as the method is quite different from using it in an Activity. Note that you also need to use the !! operator to hide the nullability of the original field.
There’s a lot of room for improvement here and I found a way better solution to deal with it in 1 line:
Yep, really simple!🚀
Here are some explanations:
- We pass to the Fragment constructor the id of our fragment layout, which will be inflated for us.
- We declare the binding property that will handle the fragment lifecycle work for us.
Have a look at this Gist:
Our viewBindingWithBinder simply instantiate a delegate object that will bind the view of our fragment lazily. As the Fragment already inflate the view from the layout id that we pass to it in its constructor, we just need to bind our binding class from it.
The FragmentAutoClearedValueBinding class is the one that will be responsible to clear the reference to the binding class when the fragment gets destroyed by adding an observer to its lifecycle. In the getValue method, we bind the view to our binding class the first time we access our binding property from our fragment.
ViewHolder
If you’ve been using Kotlin synthetics, you probably have something that looks like this:
You can now remove the usage of LayoutContainer and make some updates in your view holder:
Here we have simply changed our constructor to take the binding class in parameter instead of having a view object.
To instantiate your view holder, you can create a static method in a companion object:
Includes
In your layouts, you probably have views that are included in your layout using the include tag. Then, you must be aware that it can be tricky to deal with it with view binding.
With a view group
If your included view has a root view that is a ViewGroup (LinearLayout, FrameLayout, etc.) then you can set an id to the include tag in your main layout.
The generated LayoutBinding class will have a property mergeLayout of type LayoutMergeBinding that reference the layout_mege layout views.
So in an activity, you can easily reference your TextView as:
With a
If your included view uses a tag in it like in this example:
And your main layout is:
Then, the layout_merge.xml file content will be merged into your main layout. But, the binding class will not expose a property titleLbl (it will only contain your root LinearLayout ) 😭.
So, what can you do to access to your titleLbl ? You’ll need to re-bind your view with another binding class. As each layout files have its own binding class, your layout_merge layout will have a LayoutMergeBinding class generated. That’s the one we will use to retrieve our views.
From an activity, you can add another property for the 2nd binding class:
The mergeBinding property will then allow you to access the titleLbl view.
Conclusion
We hope this article was useful to you if you’re still refactoring your views to use ViewBinding or to give you some hints to refactor how you’re using it.
And you, how did you implement it into your app? Don’t hesitate to share with us your tip&tricks!
If you want to join our Bureau of Technology or any other Back Market department, take a look here, we’re hiring! 🦄
Источник
Kotlin Android Extensions deprecated. Что делать?Инструкция по миграции

Возможно, вы уже слышали, что Kotlin Android Extensions — плагин для Kotlin теперь deprecated.
kotlinx.android.synthetic is no longer a recommended practice. Removing in favour of explicit findViewById
Безусловно, это было очень удобно, особенно если у вас проект полностью на Kotlin. Однако, мир меняется и теперь нужно искать альтернативы. В этой статье мы кратко рассмотрим, что такое плагин Kotlin Android Extension, какие были проблемы с ним и что теперь нам, Android-разработчикам делать. Частично, использовался материал этой статьи. Итак, поехали.
Кратко о Kotlin Android Extensions
Kotlin Android Extensions — это плагин для Kotlin, позволяющий восстанавливать view из Activities, Fragments, и Views без написания стандартного бойлерплэйт-кода типа findViewById.
Плагин генерирует дополнительный код, который позволяет получить доступ к view в виде XML, так же, как если бы вы имели дело с properties с именем id, который вы использовали при определении структуры.
Также он создаёт локальный кэш view. При первом использовании свойства, плагин выполнит стандартный findViewById. В последующем, view будет восстановлен из кэша, поэтому доступ к нему будет быстрее.
Если это всё так удобно, то зачем его сделали deprecated?
Проблемы Kotlin Android Extensions
- Используется глобальный нэйминг идентификаторов. Могут возникнуть ситуации, когда один и тот же идентификатор имеется у разных view в разных лэйаутах — соответственно только на этапе работы приложения вы узнаете о том, что использовали не тот id.
- Возможно использовать только в проектах на Kotlin (кэп)
- Отсутствует Null Safety. В случае, когда view представлена в одной конфигурации и отсутствует в другой — может возникнуть краш, т.к отсутствует обработка таких ситуаций
- Невозможно использовать в многомодульных проектах. Очень распространённый сценарий: у вас есть модуль UI Kit, хранящий общие UI-компоненты, которые вы хотите переиспользовать в других модулях. До сих пор висит issues которое вряд ли поправят. В таком сценарии обычно используют старый добрый findViewById 🙁
- Резюмируя приведённые недостатки, нетрудно понять, что этот подход не идеален — хотя, безусловно, очень удобен на небольших проектах. На больших проектах с многомодульной архитектурой и сотнями экранов — использование Kotlin Android Extensions уже не кажется идеальным решением.
Альтернативные способы
- Использование KotterKnife (кек, даже не думайте).
- Старый добрый FindViewById() — уже получше, но так себе.
- Использование AndroidAnnotations (привет из 2015)
- View Binding от Google — бинго!
View Binding от Google
Итак, победителем в этом списке выглядит ViewBinding от Google (не путайте с DataBinding). Давайте кратко рассмотрим, что это такое.
View Binding — это инструмент, который позволяет проще писать код для взаимодействия с view. При включении View Binding в определенном модуле он генерирует binding классы для каждого файла разметки (layout) в модуле. Объект сгенерированного binding класса содержит ссылки на все view из файла разметки, для которых указан android:id
Главные преимущества View Binding — это Null safety и Type safety.
Начало работы с View Binding
Начать работать с ViewBinding достаточно просто. Нужно добавить опцию в build.gradle:
После этого можно уже использовать.
Каждый сгенерированный binding класс содержит ссылку на корневой view разметки ( root ) и ссылки на все view, которые имеют id. Имя генерируемого класса формируется как “название файла разметки”, переведенное в camel case + “Binding”.
Например, для файла разметки result_profile.xml :
Будет сгенерирован класс ResultProfileBinding , содержащий 2 поля: TextView name и Button button .
Использование в Activity
Например у вас вот такой layout:
Результат работы ViewBinding:
Использовать viewBinding можно так:
И теперь, после того, как получили ссылки на view:
Если вы используете ViewBinding во фрагменте и держите ссылку на binding во фрагменте (а не только в методе onCreateView()) то не забывайте очищать ссылки в методе onDestroyView(). Пример:
Это необходимо делать из-за жизненного цикла фрагмента и view:
В целом, переключиться на ViewBinding достаточно не сложно, хотя и жаль, что Kotlin Android Extensions объявлен deprecated. А я напоминаю, что на практическом онлайн-интенсиве по Android-разработке -вы можете быстро освоить современную Android-разработку с наставником.
Подписывайся на канал чтобы не пропустить анонс
Понравилась статья? Не забудь подписаться и поставить лайк, а ещё
- Онлайн — интенсив по Android-разработке с code review
- Не забудьте присоединиться к нам в Telegram — на канале @android_school_ru публикуются полезные материалы для Android-разработчика и скидки на продвинутые курсы
Источник
Migrating the deprecated Kotlin Android Extensions compiler plugin


In Kotlin 1.4.20-M2 JetBrains deprecated Kotlin Android Extensions compiler plugin.
Actually this was expected long time ago, in this commit you can see
kotlinx.android.synthetic is no longer a recommended practice. Removing in favour of explicit findViewById
But why?
There are some well-known issues with kotlinx synthetic
- They expose a global namespace of ids that’s unrelated to the layout that’s actually inflated with no checks against invalid lookups.
- They are Kotlin only
- They don’t expose nullability when views are only present in some configuration.
- All together, these issues cause the API to increase number of crashes for Android apps.
- Also Google is promoting modularisation but synthetic properties don’t work cross-module there is an open issue since January 2018.
What are the alternatives?
- View Binding is the recommendation for view lookup as well as binding, but it does add a bit of overhead when compared to Android Kotlin Extensions.
Compared to Kotlin Extensions, it adds compile time checking of view lookups and type safety. - findViewById the old traditional way that works for both Kotlin and Java.
JetBrains deprecated the Kotlin Android Extensions in favour of View Binding, so we will be exploring how to migrate to View Binding in this article.
View Binding
Not to be confused with Data Binding
View binding is a feature that allows you to more easily write code that interacts with views.
Once view binding is enabled in a module, it generates a binding class for each XML layout file present in that module.
An instance of a binding class contains direct references to all views that have an ID in the corresponding layout.
View Binding is Null-safe for layouts defined in multiple configurations.
View binding will detect if a view is only present in some configurations and create a @Nullable property.
View Binding works with Java and Kotlin.
How to enable View Binding?
You don’t need to include any extra libraries to enable view binding. It’s built into the Android Gradle Plugin starting with the versions shipped in Android Studio 3.6. To enable the feature in the modules that will use it add the following into your build.gradle file.
How to use View Binding?
If view binding is enabled for a module, a binding class is generated for each XML layout file that the module contains.
Each binding class contains references to the root view and all views that have an ID.
The name of the binding class is generated by converting the name of the XML file to Pascal case and adding the word Binding to the end.
Use view binding in activities
Then you can access the views using the binding object
Use view binding in fragments
Using view binding in fragments requires a bit more attention, as view binding doesn’t play well with fragments, as it introduces memory leaks, if you don’t nullify the view in OnDestroy , then it’s not cleared from memory.
Then you can access the views using the binding object the same way we do in activities.
Under the hood
View Binding will generate one binding object for every XML layout in your module.
For example for this activity_main.xml layout file
View Binding will generate ActivityMainBinding.java
View binding will generate a correctly-typed property for each view that has a specified id . It will also generate a property called rootView .
View Binding is Kotlin friendly as all properties are annotated with @Nullable or @NonNull Kotlin knows how to expose them as null-safe types
In ActivityMainBinding.java , view binding generates a public inflate method.
It calls bind where it will take the inflated layout and bind the properties, with some error checking.
The bind method is where generated binding object will call findViewById for each view to bind.
What about the Parcelize feature from Kotlin Android Extensions?
Don’t forget that Parcelize feature in Kotlin is part of the kotlin-android-extensions compiler plugin, so removing the plugin will endup making all your Parcelable classes not compiling if they depend on the Parcelize annotation.
JetBrains extracted the Parcelize from Kotlin Android Extensions to a new plugin, kotlin-parcelize
First you will need to add kotlin-parcelize plugin to your module.
Then change your old import statement from
You could find this IDE error
Don’t worry your app will build fine, this is a false positive error and was reported on youtrack and marked as fixed so should be shipped in the next release hopefully.
Please note this plugin is only available starting from version 1.4.20-M2 which is the same version that deprecated kotlin-android-extensions compiler plugin.
If you want to give it a try you need to install the Kotlin EAP Plugin for IntelliJ IDEA or Android Studio
- Select Tools → Kotlin → Configure Kotlin Plugin Updates.
- In the Update channel list, select the Early Access Preview 1.4.x channel
- Click Check again.
- Then click Install
Here is what you should do to migrate from kotlin-android-extensions Kotlin plugin to ViewBinding and kotlin-parcelize plugin
Источник


