- How to Send Large Files from Your Android Device
- 1. EasyJoin
- 2. WeTransfer
- 3. Send Anywhere
- 4. Google Drive
- Conclusion
- Never Miss Out
- One comment
- Popular Posts
- How to Transfer Large Files Quickly Between Two Android Devices
- Solution 1: By Creating a Personal Hotspot Server
- Solution 2: By Using USB OTG Cable
- How to free up internal storage on Android, including ‘other’ storage
- What’s in ‘Other’ category in your device storage usage list
- Private App Data
- Failed Backups
- Failed OTA Updates
- Hidden Cache & Temporary Data
- How to free up storage space and clean ‘Other’ section in storage
- Use ‘Clean up’ option on your device
- Use a Storage Analyzer/File manager app
- 1. File Manager By Flashlight + Clock
- 2. Storage Analyzer & Disk Usage By Anton Patapovich
- 3. Disk Usage By Ivan Volosyuk
- 4. Ghost Commander By Ghost Squared
- 5. Amaze File Manager By Team Amaze
- Check data used by proprietary apps
- Check Android/obb & Android/data directories
- Move data to SD card & reset your phone
- Go back to stock ROM if you are using a Custom ROM
- Clear device cache in Recovery mode
- Nuclear option: Factory reset your phone
How to Send Large Files from Your Android Device

As our Android phones continue to play a bigger and bigger role in our work lives, it’s only natural that we’ll want to use them for bigger tasks. Take transferring large files for instance. If you have something on your phone that’s 1GB or even just a hundred megabytes, it’s already too big to email.
There are plenty of workarounds to that problem. We’ll show you a trick and a couple of great apps that will help you send your large files from your Android device.
1. EasyJoin
If you’re just looking to share files on your local network, there are several ways you can do so. But the one we most recommend is the lightweight and efficient app EasyJoin.

There are no ads or catches here – just a simple interface that lets you share files directly between local EasyJoin devices without needing an internet connection. Everything you send is protected by end-to-end encryption, and you can also send messages and notifications to other devices.
All the linked devices are neatly listed in the Material-inspired interface, and you can make small tweaks such as changing your visibility to other devices, who you receive messages from, and whether or not you want to receive notifications.
It goes without saying that for local transfers of large files, this is one of the fastest methods available.
2. WeTransfer
WeTransfer is the go-to website for anyone who has found themselves in a file-sending rut and just wanted to get things done with minimal hassle. It allows you to send 2GB of a file for free and 20GB if you are on the premium plan.
![]()
WeTransfer has an Android version, though if you prefer to save on disk space, you can just use the browser version through your phone. The browser version is actually simpler in some ways, as the app is a bit more fancy and presents your added files in “Boards,” letting you share links as well as directly send files.
Using WeTransfer is very simple. You type in your email address (so the recipient knows who it’s from and so you get a notification when your file is received and opened), type in the recipient’s email, and then add your files.
3. Send Anywhere
If you and the recipient are in the same vicinity, then why go through all the hassle of uploading a large file all the way to the Internet only for them to download it again when you can just send it over directly?

No, we’re not talking about Bluetooth (which is slow and only good for small files). We’re talking about Send Anywhere, an app that uses Wi-Fi Direct to beam things directly between devices.
Files (50GB file-size limit) you send are 256-bit encrypted, and you’ll get a key that you need to give to the recipient so that they can receive the file.
4. Google Drive

The desktop version of Gmail now has a feature where it integrates with Google Drive, making it capable of sending files as large as 10GB by sending them via your cloud account.
Frustratingly, the Android version of Gmail lacks this feature, but you can still upload any large file to your Google Drive account, then share it with recipients or link it to an existing file-sending app. You should be able to upload your file to your Drive account by selecting it in a file manager, then going to “Share -> Google Drive” and selecting where you want to save it.
After that, go to the Google Drive app, long-tap the file to bring up the options, then tap the three-dotted menu icon. You can either “Add people” to share the file via Google Drive, or if you want the recipient to get their own copy of it, select “Send a copy,” then choose the file-sending app you want to use. This will import the file directly into that app.
Conclusion
Using one or all of the above, all your big file-sending needs on Android should be addressed. The ability to actually send large files through Gmail via Google Drive is particularly handy, and it’s a bit of a mystery why Google hasn’t integrated this feature into the Android version yet. Hopefully, it’s just a matter of time, as it will make the whole process much simpler.
Never Miss Out
Receive updates of our latest tutorials.
Content Manager at Make Tech Easier. Enjoys Android, Windows, and tinkering with retro console emulation to breaking point.
One comment
I appreciate the information, after some trial and error, I found https://www.dropsend.com/ to be the easiest method for file sending. If you haven’t tried it, You should.
Comments are closed.
Popular Posts

INNOCN PF15-PRO Portable Touchscreen Monitor Review

Android Device Overheating? — Here’s How to Cool It Down
![]()
How to Sync Your Game Progress Between Android Phones

20 Android TV Apps to Supercharge Your Smart TV

10 Best Sticker Packs for WhatsApp

How to Find Downloaded Files on Any Android Device

6 Best Android Auto Alternatives You Can Use

7 Useful Android Volume Control Apps to Fine Tune Your Device’s Volume

How to Sideload Apps on Fire TV, Roku, Android TV, Google Chromecast

How to Completely Block Internet Access for Specific Android Apps

Fix Google Play Services Battery Drain on Android
Affiliate Disclosure: Make Tech Easier may earn commission on products purchased through our links, which supports the work we do for our readers.
Источник
How to Transfer Large Files Quickly Between Two Android Devices
When we have to transfer large files from one Android device to another, we may consider the most commonly used ways; Bluetooth, Cloud Services or Infrared. However, even the latest Bluetooth version 4.0 has a maximum data transfer speed of 25 Mbit/s, which sure takes a considerable period when the transfer file is in Gigabytes. Whereas the transfer speed of Cloud Services depends on the Wi-Fi and the internet speed, while we upload a file first to download it on the other device. Thus, to quickly transfer files from one Android device to another, either we could do it through Wi-Fi Network (by creating personal Hotspot) or by using USB OTG Cable, these two are the fastest ways to transfer files between two Android devices.
Solution 1: By Creating a Personal Hotspot Server
The easiest way to transfer a file is by creating a Personal Hotspot is to do it through the third party application in order to get the swift and rapid facility. Therefore, go to Google Play Store on both Android devices and download an app named as ES File Manager. (Although there are few others significant applications such as Fast File Transfer, and SuperBeam -WiFi Direct) But, this guide is based on ES File Manager.
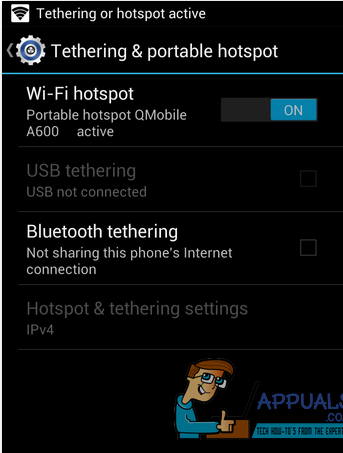
Once the application ES File Manager is installed on both the devices, create a Personal Hotspot on the Android device from where we want our files/file to be transferred. To do that, go to the Android Settings>More Options in Wireless & Networks, tap on Tethering & Portable Hotspot, then on Wi-Fi Hotspot to activate it.
Once it is activated it will start throwing Wi-Fi signals. Now, from the other Android device, connect the same Wi-Fi which the first Android device is hosting.
Open your ES File Manager and browse the files you want to transfer. Long tap on the files to select; once they are selected you will notice a check mark on file logos. Select More option from the bottom right side of the screen, and tap on the Send option. It will automatically start scanning the devices connected to your personal Hotspot, select your connected device. You will notice a confirmation dialogue box on the other Android device, tap on Accept to begin the transfer process.
Solution 2: By Using USB OTG Cable
Android versions 4.4 and greater with latest Kernel versions are more likely to be capable of transferring files through OTG Cable from one Android to another where one of them acts as a Host Server. Android version 4.3 may also work but there is a greater chance that it won’t respond appropriately during the process.
Before you begin, make sure you have access to USB OTG Cable and USB Data Cable. Connect OTG Cable to the Host Android device, in other words, the device where we want our files/file to be received. Connect the USB Data Cable to the other Android device. Now, connect the USB Data Cable to OTG USB Adapter, on connecting both the cables, you will notice the USB Connectivity option appears on the screen of second Android device with USB Data Cable. Tap on Turn ON USB Storage to connect your mass storage to the Host Android device. Once the USB Storage is connected to the Host Android device; search and open File Manager application, tap on the external USB storage attached to your Host Android device. Open that USB Storage and select the files to Copy/Move them to Host Android device. It is one the fastest ways to transfer files; the speed depends on the hardware specification of the devices, but still it is faster than the most commonly used methods of transferring files.
While both Android devices are connected to each other through OTG Cable and USB Data Cable, the Android device with inserted USB Data Cable will start charging its battery from the Host Android with OTG Cable. It’s normal and it does not harm any of the battery.
Источник
How to free up internal storage on Android, including ‘other’ storage
Android as an operating system has become quite efficient in recent years. Google has focused a lot on its file management system and apps have gotten a lot cleaner. The engine that drives ads on your Android device has also become a lot faster and more efficient. But this has come at the cost of storage space, your OS files have become larger, apps have become heavier and games have gotten more resource-intensive.
With all this in mind, it is no surprise that your Android device can fill up quickly despite its large storage capacity. While you can quickly identify which photos, videos, files, documents, apps, and games are consuming the storage real estate, some files might be put under the ‘Other’ category by the system.
The system basically puts any unidentified storage files under the ‘Other’ in your Android device’s stock memory analyzer. If you have been looking for a solution to this problem, then you have landed at the right place.
We have compiled this comprehensive guide that will cover all the reasons for your storage filling up, and provide most if not all the solutions that will be applicable to your device. Let’s get started.
What’s in ‘Other’ category in your device storage usage list
Here’s what is filling the storage marked as ‘Other’ on your device.
Private App Data

The most prominent reason for your storage space filling up under the ‘Other’ tag has been identified to be Private app data. This could be additionally downloaded files, failed OTA updates, cloud sync files and much more.
Most apps and games nowadays have smaller installation files but require heavy downloads over the Wi-Fi to be completely operational. Moreover, there are apps that will sync to the cloud and constantly download and upload data depending on your preferences.
Furthermore, streaming services can often glitch out and fail to delete cache files which can also clog up the storage space on your Android device.
Failed Backups
Google gives you the option to backup your mobile data to the cloud in Google drive. There are also other services that allow you to do the same with attractive pricing options.
Keeping your device synced to the cloud has a lot of advantages, you will have a backup of all your data even if you lose it, you can access all your files on the go despite having low space on the local storage of your device.
Cloud services also offer perks like password vaults, game data backups, free storage space, file hosting and much more. But often these services can glitch out due to regular updates and new features.
Even though most of these issues get fixed instantaneously, there can be failed backups on your device locally that might not be recognized by the backup service itself. There can also be duplicate files on your device that might be taking up extra space which will show up under the ‘Other’ category.
Failed OTA Updates

New devices are usually eligible for a few major OS updates in their lifetime and regular security updates as well. Since the past decade, most of these updates have been provided OTA which is easier for the consumer as the device can be updated remotely without the need for a PC.
On the other hand, the drawback of OTA updates is that they can easily fail on a slow network or a network that frequently resets. Higher internet ping can also lead to the failure of OTA updates and not to mention that they are virtually impossible if you are traveling for long hours.
All these half downloaded updates and temporary installer files can also show up as ‘Other’ data in your device and might require you to clean it up manually.
Hidden Cache & Temporary Data

Your browsers, apps, and games constantly connect to the internet and download a lot of data in the form of text, images, and videos. These could be consumer files, ads, content and much more. All of these files are usually programmed to get cleaned upon exit in order to keep your local storage free from clutter.
But there are instances when these files get leftover, this is a common occurrence in the case of mobile browsers. If you fail to clear up your website data then your browser’s local storage could end up taking a significant amount of storage on your device.
All of these temporary files and cache files will show up as ‘Other’ when you analyze your filesystem using Android’s stock settings app.
How to free up storage space and clean ‘Other’ section in storage
Here’s how to clear the files and data in the ‘Other’ category of storage.
Use ‘Clean up’ option on your device
Almost all Android devices these days give you an option to clean up the storage of your device in the Settings app itself. Here’s how to use it:
- Open the Settings app on your device.
- Scroll down and find the Storage option. On Samsung devices, it’s under Device Care. Alternatively, you can also simply search for ‘storage’ by using the search bar at the top.
- Under Storage, the UI may be different for different Android phone, but you can tap on any item to find more info about its content, and then can selectively delete stuff.
Use a Storage Analyzer/File manager app
The best way to get a good solution is to understand your problem completely. Having an efficient file manager will help you get a more clear look at the larger files on your local storage.
You would be able to sort them according to their size which will help you identify large files much more easily. Additionally, you can also view system files and hidden files on your local storage which might be the root cause for your huge ‘Other’ data. Here are some recommended file analyzers and file managers.
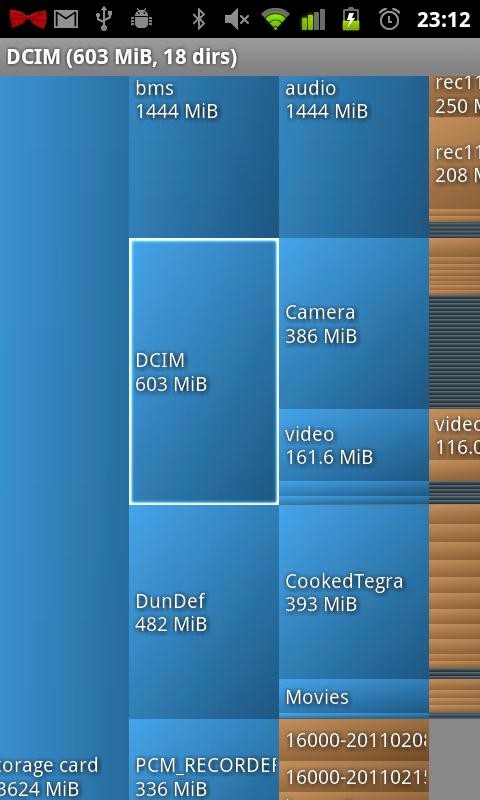
1. File Manager By Flashlight + Clock

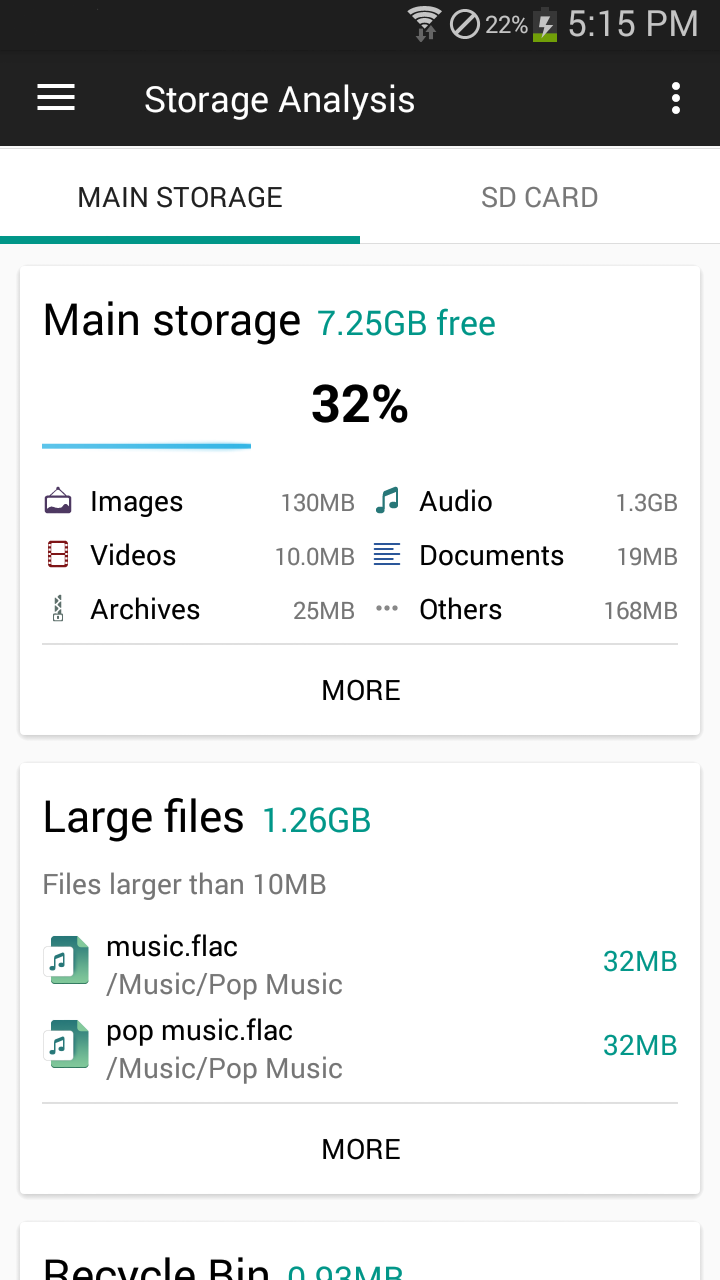
A file manager is one of the most popular apps for managing your storage that is currently available on the play store. It provides a comprehensive look at your local storage, SD card and even external storage options that are connected via OTG.
The file manager will classify your files into predetermined categories like images, videos, audio files, system files, downloads, etc. The File Manager also gives you the ability to sync to cloud and remote services for on the go access as well as allows for a comprehensive storage analysis of your file system.
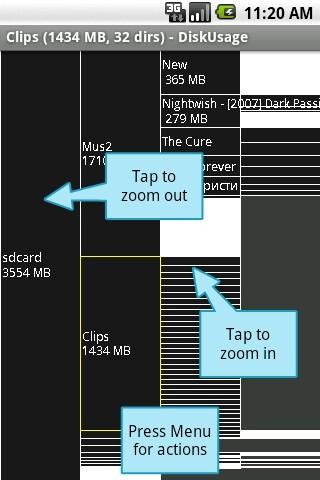
2. Storage Analyzer & Disk Usage By Anton Patapovich

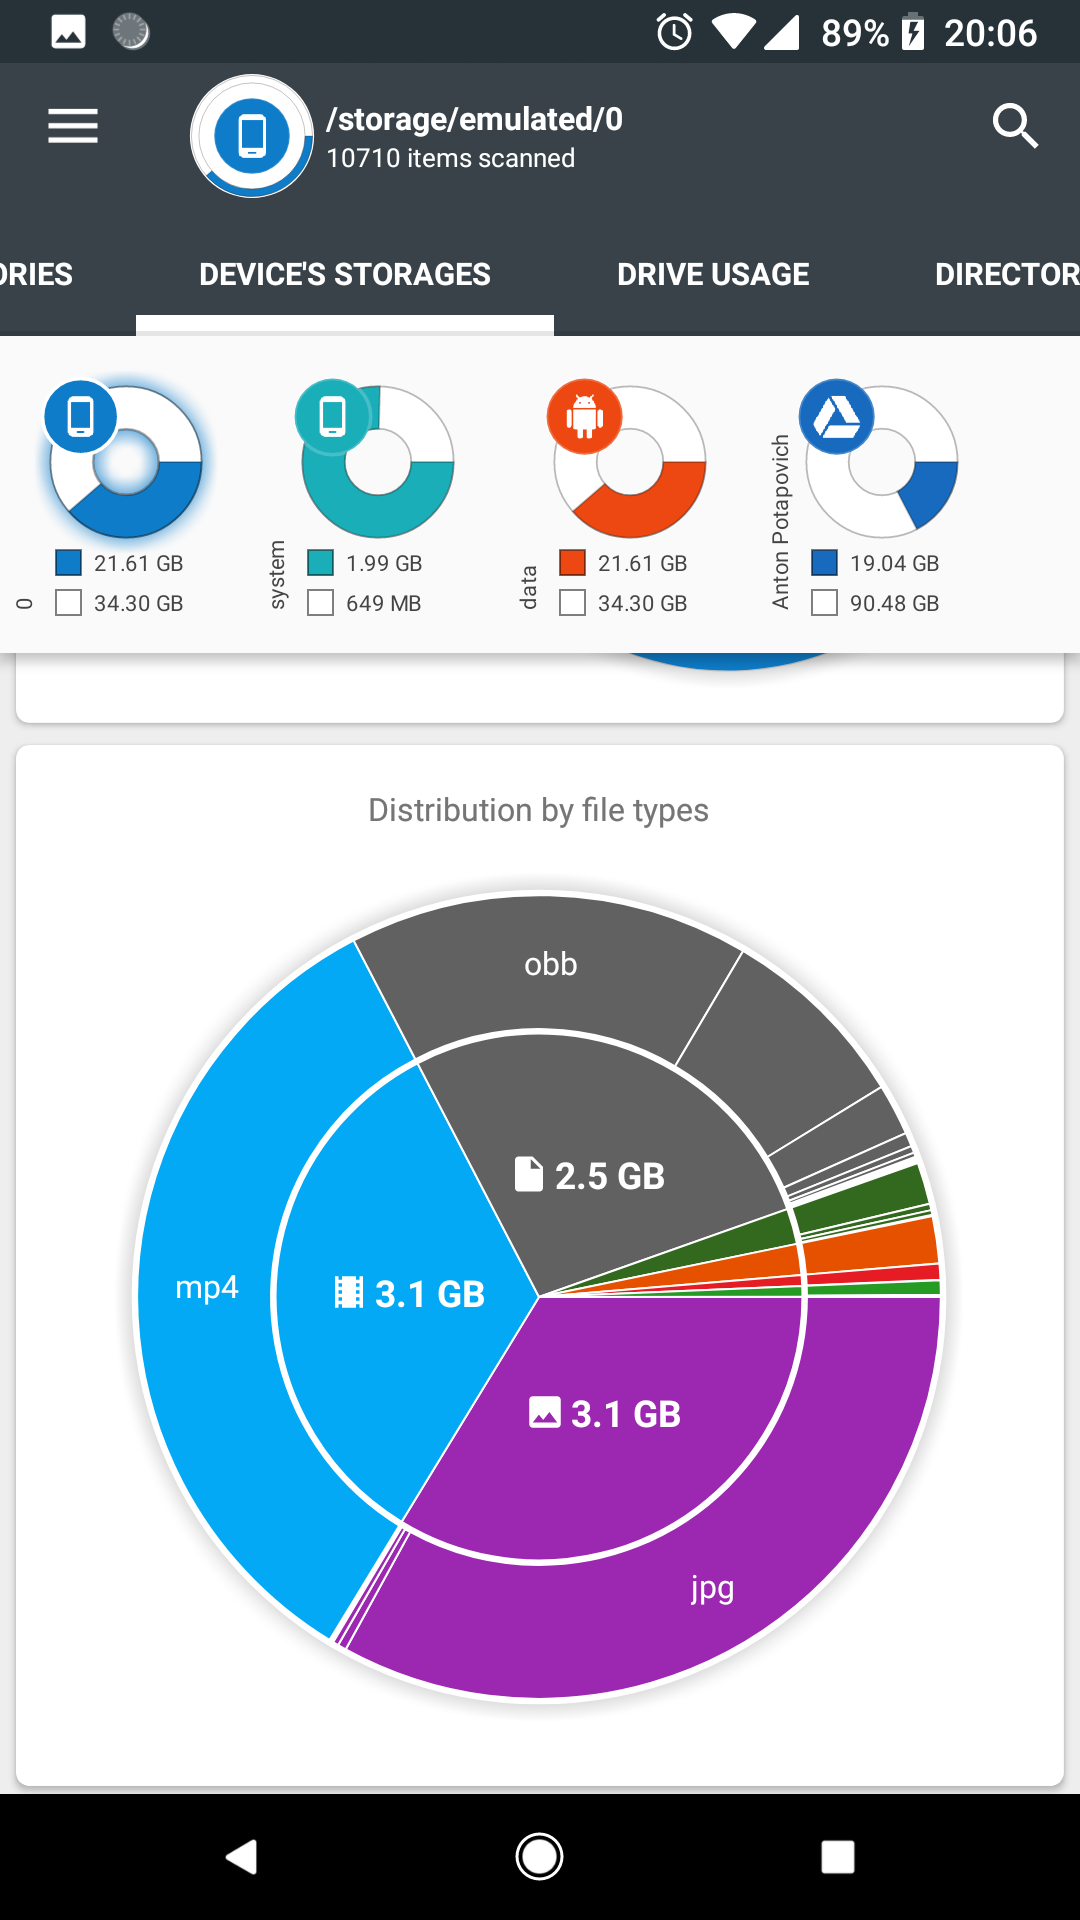
The Storage Analyzer & Disk Usage focuses more on the cleaning aspect of your local storage. It comes with an interactive and detailed UI as well as an inbuilt cache cleaner for your device.
It also has virtualization parameters that will display graphs, pie charts and more according to different variables like storage size, date created, last opened and more. It also comes with a widget that can be directly placed on your home screen as well as a Top 10 feature that will display your largest files for easy cleaning.
3. Disk Usage By Ivan Volosyuk
Disk usage is a comprehensive file manager that focuses on privacy. It is an open-source code project that displays visual data on all your files for easy cleaning.
It has detailed diagrams to identify the largest files and directories on your filesystem which can then be cleaned manually.
4. Ghost Commander By Ghost Squared
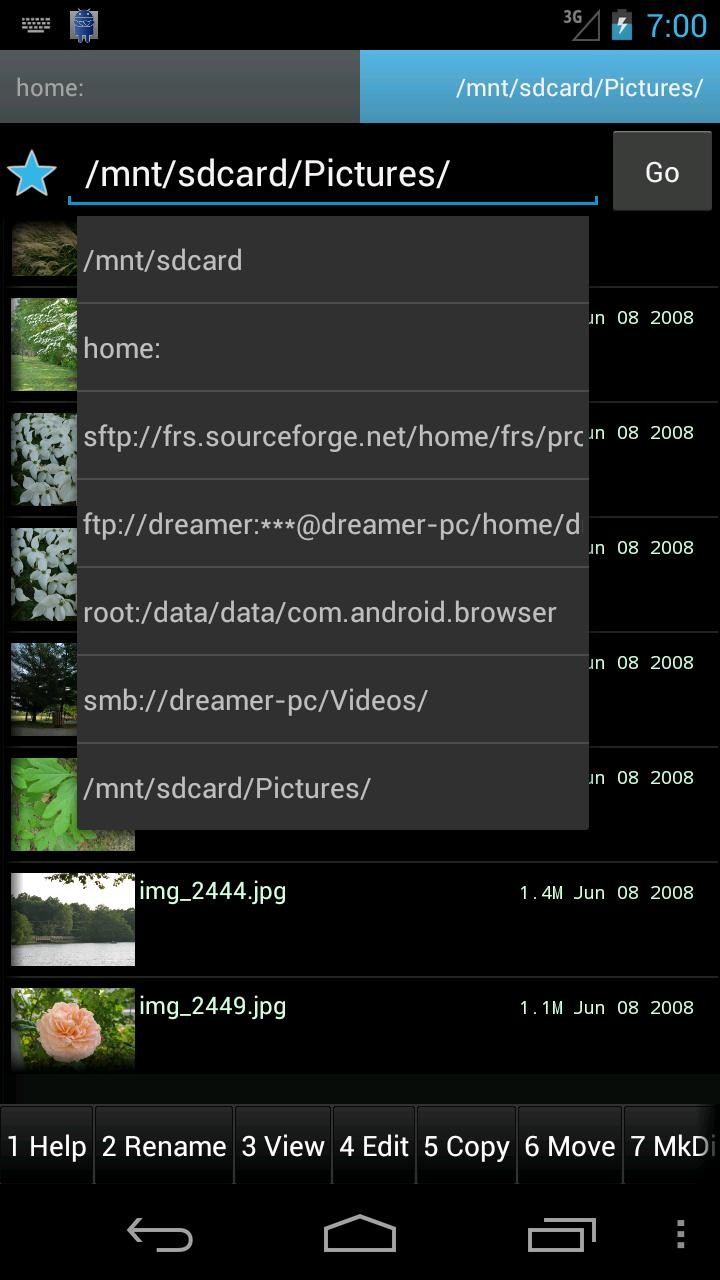

Ghost commander is another privacy-focused dual-panel file manager which is also a dropbox client. It allows for easy sorting of files based on name, size, extension, and date.
The file manager has the ability to modify partitions and supports compressing and decompressing of files as well. The ghost commander also has an FTP client built-in and its own text editor and image viewer
5. Amaze File Manager By Team Amaze

The amaze file manager is another open-source file manager that comes with its own basic material design and support for AES encryption. The file manager also has support for major cloud services and its own database reader.
It also has .zip and .rar support and comes with an in-built APK reader. It is one of the few file managers on our list that does not have in-built ads which is a huge plus.
Check data used by proprietary apps
Android’s in-built stock memory scanner can also be a huge help if your app data is clogging up your local storage. To make use of this feature follow this simple guide.


- Open your ‘Settings’ app.
- Navigate to ‘Storage Options’ and open it.
- If your manufacturer allows, then sort the apps according to their size. If not, then manually scan the apps to find the ones with exorbitant data sizes.
- Open the app and click on clear cache.
- If that does not help, then click on clear all data.
Note: If you click on clear all data, you will have to login again into your app and download the additional data that might have been needed at the time of its initial installation.
Check Android/obb & Android/data directories
Deleted apps are often leftover in your filesystem due to certain glitches of incompatible updates. These leftover app files are also caused due to third party launchers that have not been optimized for your device.
If you are unable to clear your ‘other’ storage using the above-stated methods then you should resort to this method. There might be leftover app files from your deleted apps in your local storage which you might need to clean manually.


- Open your desired File Manager.
- Navigate to settings and enable ‘Show System Files & Folders’.
- Now Navigate to ‘/Android/obb’ in your file manager.
- Most files in this section of your local storage will be named in the following format ‘com.ABC.XYZ’. ABC being the developer name and XYZ being the App name.
- Scan this section for names of deleted apps and delete the ones that you find.
- Once you are done in ‘/Android/obb’ navigate to ‘/Android/data’.
- Follow the same steps as the previous folder to identify left-over data from deleted apps. Delete the ones that you find and then check your ‘Other’ storage.
Move data to SD card & reset your phone
If the above-mentioned methods fail to help clear the ‘Other’ storage section on your local storage then it might be time to adopt severe solutions to solve this problem.
You should start by using the SD card method as it’s faster, easier and does not require a full backup of your device. Follow these steps.
- Insert a high capacity SD card into your device. If your device does not have an SD card slot then consider using an OTG card reader.
- Now create a manual local backup of all your important data files.
- Locally backup your contacts and saved passwords onto the SD card.
- Now reset your device to its factory settings.
- Set up your device as new and restore your files and local contacts backup from your SD card.
Your ‘Other’ storage should have cleared up and things should be back to normal by now.
Go back to stock ROM if you are using a Custom ROM
If your device is rooted and you have been using a custom ROM then there is a high chance that your custom ROM has glitched out. A few major custom ROMS including the likes of Lineage OS, Pixel OS and more have experienced bugs where the file system ends up duplicating itself numerous times.
This can clog up the memory on your local storage which could end up as unidentified files in the ‘Other’ section of your memory scanner. A good idea to solve this problem if the above-mentioned methods do not work is to revert back to your Stock latest ROM and wait for an update from your Custom ROM’s developer.
Additionally, you could also raise a help request on the developer’s Github account in case he/she is regularly active and responsive to bug reports.
Clear device cache in Recovery mode
Another method to try and clear your ‘Other’ category in your file system is to clear your UI cache in Recovery Mode.
Note: Recovery mode is a sensitive menu with options that could potentially brick your Android device if they are messed around with. Proceed with caution and if you are not confident about your technical prowess then you should try the next solution.
Follow the guide linked right above to reboot into recovery mode and clear the cache of your Android device.
Nuclear option: Factory reset your phone
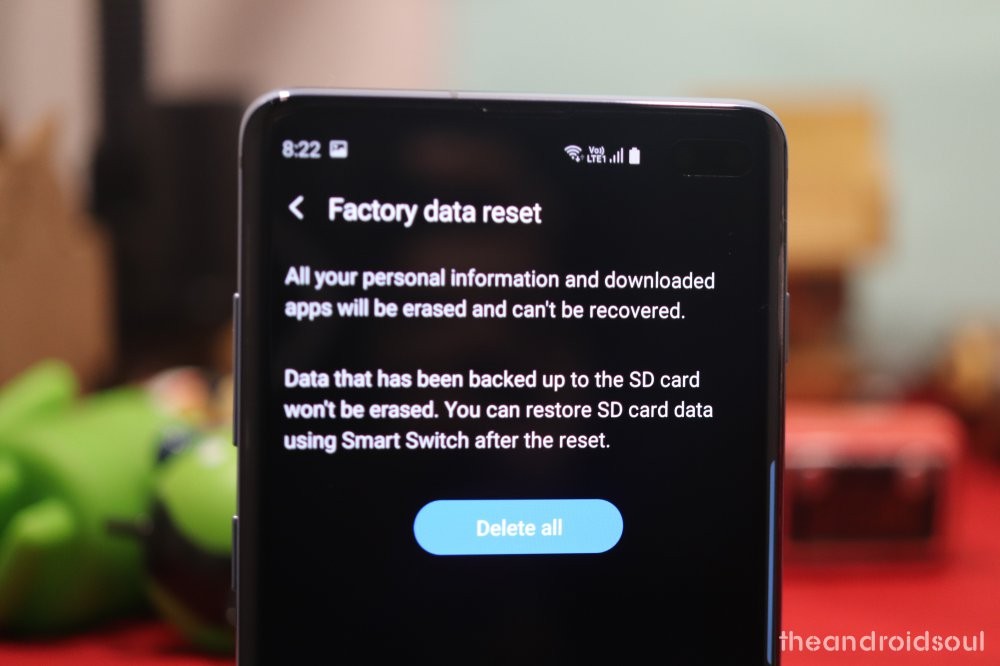
If nothing else seems to work then it would be a good idea to simply reset your device back to its factory settings and set it up as a new device. It may also speed up the phone a bit, for what it’s worth. This will definitely clear up your storage and give you a fresh start.
- Back up your device appropriately. You can force Android to back up your data to Google Drive. And for Samsung devices, using smart switch for backup is a great idea.
- Open the ‘Settings’ app.
- Use the search bar at the top to search for the ‘Factory reset’ option.
- Tap on the ‘Factory reset’ option.
- Proceed to perform the factory reset depending on the UI of your phone.
- Selectively restore your data back to your device and monitor your device storage.
Alternate method: You can also reset the device using the recovery mode. If you not able to start your phone or use your phone properly, you can power it off, reboot to recovery mode, and perform a factory reset from there. See the link right below for a guide on this.
This guide was aimed to help you clear storage from your Android devices. What did you think about our guide? Did we miss out on anything? Let us know in the comments section below.
Источник


