10 steps to create a custom LayoutManager

This article is based on my github project LondonEyeLayoutManager, recently published in Android Weekly. For the sake of simplicity code snippets here might be different from the code in repository.
What we normally do in order to have this kind of functionality that ListView provides? We have to:
- Know how to lay out views on the screen.
- Handle touch events, measure scroll velocity and direction.
- Move views on the screen when scroll is happening.
- Implement views recycling.
With a new RecyclerView & LayoutManager few of these point are handled for us:
1. We don’t have to handle touch events, measure scroll velocity and direction.
LayoutManager provides very convenient API for that:
This API has a drawback : we only get vertical or horizontal scroll. If we need to know if user, for example scrolls diagonally we should calculate it by ourselves. These methods gives us a value by which we should move views on the screen. We should return the actual distance (in pixels) by which we moved our views.
scrollVerticallyBy(dy, recycler, state) was called with dy = 25;
But to the end of a screen we have left 20 pixels. So we move a views by -20px and return -20. You should notice that we are returning a value with an opposite sign.
LayoutManger will “understand” that if we returned less than was scrolled, it should stop sending us these scroll events, we already reached the end. Demo:
It also means that if we return “0” the list will not be scrolled at all.
2. We don’t have to handle recycling.
If we need a view on position we just call the appropriate method from the Recycler.
This is what we have to implement:
- Layout views on the screen.
- Move views on the screen when scroll is happening.
Let’s start implementing our LayoutManager.
Goal: Create a LayoutManager that will layout our views on the circular trajectory.
- Layout in first quadrant. (Y axis in Android is points to the opposite direction than in Cartesian coordinate system).
- Views center should keep it’s center on the circle.

Here is how we are going to do that :
10 steps to implement a LayoutManager.
As I mentioned earlier there is two things that we need to handle: layout views and handle scrolling.
5 steps to handle layout of views:
- Get view by position.
- Add view to the RecyclerView.
- Get view location on the screen.
- Layout this view.
- Increment view position.
Run it in the loop until we layout a view that will be partially visible. It will be indicator that we’re done.
5 steps to handle scrolling:
- Calculate views offset by received scroll value (dx, dy).
- Calculate new position of a view using received offset.
- Change view location.
- Recycle views that become invisible when they were moved.
- Add views to empty space created by moved views if needed.
Perform these operation on each call of scrollVerticallyBy.
And of course these 10 operation are very abstract. We have to do a lot of additional job in order to make it work 🙂 Sorry
Creating the circle
In order to lay out and move views on the circular trajectory we have to create a set of predefined points which will be the center of views. Having this will give us very useful functionality:
When scroll is happening we don’t have to calculate the point on the circle to which we need move the view. We just get index of point that is center of view and increase this index by received scroll offset, a point on the position of increased index will be new center of view.
Points should be located with pixel-pixel precision, that’s why we cannot use “the circle equation” nor the sine/cosine to create points. We will use Mid point circle algorithm to create points but modified a bit. (From now on I will describe the implementation assuming that reader knows how Mid point algorithm works)
Here is an original algorithm copy-pasted from Wikipedia:
This algorithm is creating all 8 octants in parallel. It means that created views in the list will be in following order:
(x1, y1) — 1st Octant (Black)
(x2, y2) — 2nd Octant (Blue)
(x3, y3) — 3rd Octant (Dark Grey)
(x4, y4) — 4th Octant (Cyan)
(x5, y5) — 5th Octant (Green)
(x6, y6) — 6th Octant (Pink)
(x7, y7) — 7th Octant (Yellow)
(x8, y8) — 8th Octant (Red)
And here is the problem: if the center of a view is on first point (x1, y1) and received offset from scrollVerticallyBy(int dy, Recycler recycler) is dy=3 we should move our view by 3 points which means move to point (x4, y4). And point (x4, y4) is in 4th octant. But it should be just moved by few pixels.
To have the list in consecutive order to easily get next or previous point on the circle. So the algorithm has to be modified:
- Create first octant points using Mid point algorithm.
- Mirror points on 2nd octant using points from 1st octant. (after this action we have a points of 1st quadrant).
- MIrror points on the 2nd quadrant using points from 1st quadrant(after this action we have a points of 1st semicircle).
- Mirror points on the 2nd semicircle using points from 1st semicircle.
And right now the points are created consecutively:
(x1, y1) — 1st Octant (Pink)
(x2, y2) — 2nd Octant (Pink)
(x3, y3) — 3rd Octant (Pink)
(x4, y4) — 4th Octant (Pink)
(x5, y5) — 5th Octant (Pink)
(x6, y6) — 6th Octant (Pink)
(x7, y7) — 7th Octant (Pink)
(x8, y8) — 8th Octant (Pink)
And if while scrolling we get dy=3 then our view will be moved correctly.
The same code is used in LondonEyeLayoutManager. We have an abstraction called CircleMirrorHelper that gives the API to perform points mirroring.
And there is a concrete implementation FirstQuadrantCircleMirrorHelper that “knows” how to mirror points in our “concrete” first quadrant.
You may notice a strange signature of methods. Points are added into two maps. It is done to easily perform following operation:
When scroll is happening we get the center point of a view and use it as a key to get an index of this point. We increase(or decrease, depends on the scroll direction) the index by the received value from scrollVerticallyBy(dy, recycler, state) and use this index as a key to get a new point that will be center of a view.
It would look a lot simpler if it would be List
but it was done for the sake of performance. It is faster to get “index by point” when we have a Map of them.
Layouting the views.
To get quadrant specific stuff there is an abstraction called QuadrantHelper.
And there is a concrete implementation FirstQuadrantHelper.
LayoutManager forces us to implement only one method
But we need to override a few more, the most important is onLayoutChildren:
Layouter used in this code snippet is an entity that uses QuadrantHelper to get some information about the views location in concrete quadrant ( FirstQuadrantHelper in our case) and provide following API to LayoutManager:
Let’s explain layoutNextView.
layoutNextView takes previousViewData as a parameter. On the first start previousViewData is:
After we implement onLayoutChildren we have views layouted on the screen, but without scrolling, recycling and other stuff for which we need RecyclerView.
Handle scrolling
To do this we have to override scrollVerticallyBy and/or scrollHorizontallyBy and also return “true” from canScrollVertically and/or canScrollHorizontally.
In our case we only handle vertical scroll.
We have generic interface IScrollHandler and two implementations : PixelPerfectScrollHandler and NaturalScrollHandler. Each of these has their advantages and drawbacks.
Scroll handler also uses QuadrantHelper to get data specific for concrete quadrant.
On the first look scrolling looks pretty simple : you just get the dy and move every view by this value, but this is not the case.
Why “Natural” ? Because when views are scroller it looks very natural. Distance between center of views is kept.
Using this scroll handler views each view will be moved by the same distance ( dy) on the circle which looks great when views has distance between them and they are square shaped:

But when there are no gaps between views they will overlap each other or visual distance between them will be getting bigger.

Here is the code:
In this scroller we can omit first point : Calculate views offset by received scroll value (dx, dy), because our offset is dy.
Method performRecycling is also responsible for filling the gap created by moved views.
Because of inability of NaturalScrollHandler to be used with non-square views I’ve decided to implement another one.
PixelPerfectScrollHandler was designed to follow two rules while scrolling.
This scroll handler keeps view in touch when scrolling. 1. Views center is on the circle 2. Views edges are always in touch with each other. Sometimes these requirements are making views “jump” when scroll: If “view B” is below “view A” and views are scrolled down we can reach a point in which “view B” cannot longer stay below “view A” and keep it’s center on the circle so, in this case “view B” jumps to the side in order to stay in touch with “view A” side by side and keep it’s center on the circle. The logic: 1. Scroll first view by received offset. 2. Calculate position of other views relatively to first view.
Here is a demo of how the “jump” looks like.

After we done moving views we have to recycle views that were hidden and fill a gap that was created by moved views. We call performRecycling, exatly like in the NaturalScrollHandler.
And that’s it
Of course there is a lot of thing to do :
- Animations support.
- Handle inPrelayout
- Save/Restore instance state
- Handle data set changes
And also there are bugs in the project. This is basically a PoC and not a full tested and polished library. So everyone are welcome to contribute.
I really understand that showing some snippets of code probably isn’t enough to fully explain of how to implement custom LayoutManager, but I hope it’s helps someone if they would like (or need) to implement something similar.
Источник
Layout management in Android
last modified December 3, 2012
In this chapter of the Android development tutorial we will talk about layout management. widgets.
When we design the user interface of our application, we decide what components we will use and how we will organise those components in the application. To organise our components, we use specialised non visible objects called layout managers.
There are several layout managers in Android. A LinearLayout lines up its views in one row or column. A FrameLayout is a simple layout manager used to display one view. A RelativeLayout is a layout manager in which the views are positioned in relation to each other or to the parent. The most powerful layout manager is the GridLayout manager. It arranges the views in a grid.
Showing an image with FrameLayout
The first example shows an image using the FrameLayout manager.
Depending on a android virtual device we are using, we put the image in the corresponding subdirectory of the res directory.
In the FrameLayout manager, we put one ImageView .
The FrameLayout is big enough to display the ImageView by setting the layout width and height to wrap_content . It is pushed to the top using the layout_gravity attribute.
The ImageView displays an image. The image is located in a subdirectory of the res directory.
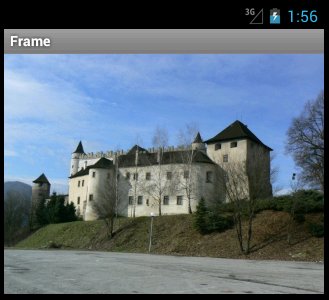 Figure: Showing an image with a FrameLayout
A row of buttons
In the example we create a row of four buttons.
We have a horizontal LinearLayout . In this layout, we add four buttons.
We create a horizontal LinearLayout manager. The width and height of the layout match the parent which means that it fills the entire screen.
Each of the four buttons use the wrap_content property. They are then just big enough to display their content.
Figure: A row of buttons
A row of buttons II
In the third example of this chapter, we show how to programmatically create a row of buttons with a LinearLayout manager.
Four buttons are placed in a horizontal LinearLayout . We will not use the layout XML file in this sample.
A Button widget is created. The text is set for the button with the setText() method.
A horizontal LinearLayout is created.
Buttons are added to the layout manager.
The linear layout manager is set to be the content view of the activity.
A column of buttons
We use the FrameLayout and the LinearLayout managers to create a column of buttons centered on the screen.
A LinearLayout manager with four buttons is placed in the FrameLayout manager.
The FrameLayout does not occupy all the available space. It is just big enough to take all the four buttons. And therefore we can use the layout_gravity attribute to center the LinearLayout and its four buttons.
A vertical LinearLayout is created.
Figure: A column of buttons
RelativeLayout
RelativeLayout lets child views specify their position relative to the parent view or to each other. The views are referenced by their ids.
The XML code displays an EditText with two buttons.
The EditText will be stretched from right to left by setting the android:layout_width to android:match_parent . The widget will be high enough to show its contents. We specify some gap between the widget and the border of the screen with android:layout_marginTop property.
The Send button widget will be placed below the EditText widget. To accomplish this, we use the android:layout_below property. Note that we reference the id of the widget that we relate to.
The Clear button is placed below the EditTex t widget and to the right of the Send button. We accomplish this by two properties. The android:layout_below and the android:layout_toRightOf property.
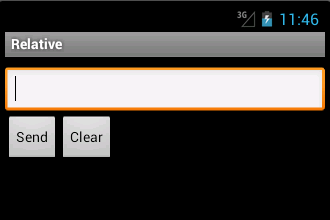 Figure: RelativeLayout example
A GridLayout manager places its children in a rectangular grid. The grid consists of row and columns. The intersections of rows and columns are cells. Each cell is referenced by its index. A view in a grid can occupy one or more cells. The gravity is a property that specifies how a view should be placed in its group of cells.
In the example we put a few buttons in a GridLayout. We show how a button can stretch over several cells.
Using the layout_row and layout_column properties, we place a button at top-left cell. The indeces start from zero.
This button will span two columns. The layout_gravity property will cause the button to fill the two columns.
This button will span three rows and five columns.
A view may not occupy all the space that was allotted to it. This button is horizontally centered within five columns.
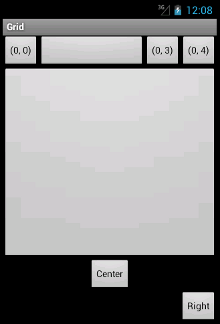 Figure: GridLayout example
In this chapter of the Android development tutorial we worked with layout management.
Источник


