- Learn Android Studio: Build Android Apps Quickly and Effectively
- Android-er
- Monday, May 25, 2015
- Learn Android Studio: Build Android Apps Quickly and Effectively
- Learn Android Studio: Build Android Apps Quickly and Effectively
- Book description
- Learn Android Studio: Build Android Apps Quickly and Effectively
- Top positive review
- Top critical review
- There was a problem filtering reviews right now. Please try again later.
- From the United States
- There was a problem loading comments right now. Please try again later.
- There was a problem loading comments right now. Please try again later.
- There was a problem loading comments right now. Please try again later.
- There was a problem loading comments right now. Please try again later.
- Build Your First Android App in Java
- 1. Welcome!
- What you must know already
- What you’ll learn
- Use Android Studio and Java to write Android apps
- Note: This version of the codelab requires Android Studio 3.6 or higher.
- 2. Install Android Studio
- Note: This version of the codelab requires Android Studio 3.6 or higher.
- 3. Task: Create your first project
- What you’ll learn
- Step 1: Create a new project
- Step 2: Get your screen set up
- Step 3: Explore the project structure and layout
- Step 4: Create a virtual device (emulator)
- Step 5: Run your app on your new emulator
Learn Android Studio: Build Android Apps Quickly and Effectively

English | 2015 | ISBN: 978-1-4302-6601-3 | 468 Pages | PDF | 20 MB
Learn Android Studio covers Android Studio and its rich tools ecosystem, including Git and Gradle: this book covers how Android Studio works seamlessly with Git, for source control, and Gradle, a build and test tool. In addition, this book demonstrates how to develop/collaborate with remote Git web-hosting services such as GitHub and Bitbucket. Four complete Android projects accompany this volume and are available for download from a public Git repository.
With this book, you learn the latest and most productive tools in the Android tools ecosystem, and the best practices for Android app development. You will be able to take away the labs’ code as templates or frameworks to re-use and customize for your own similar apps.
Android Studio is an intuitive, feature-rich, and extremely forgiving Integrated Development Environment (IDE). This IDE is more productive and easier to use for your Android app creations than Eclipse. With this book you will quickly master Android Studio and maximize your Android development time. Source code on the remote web-hosting service is targeted to the latest Android Studio release, version 1.2.
What you’ll learn how to
- get started with the Android Studio IDE
- navigate and use Android Studio
- do version control with Git
- use Gradle
- use the new Android Wear framework
- debug your code using Android Studio
- manage your app projects
- test your apps
- analyze and refactor your code
- customize Android Studio
Homepage
Источник
Android-er
For Android development, from beginner to beginner.
Monday, May 25, 2015
Learn Android Studio: Build Android Apps Quickly and Effectively

Learn Android Studio covers Android Studio and its rich tools ecosystem, including Git and Gradle: this book covers how Android Studio works seamlessly with Git, for source control, and Gradle, a build and test tool. In addition, this book demonstrates how to develop/collaborate with remote Git web-hosting services such as GitHub and Bitbucket. Four complete Android projects accompany this volume and are available for download from a public Git repository.
With this book, you learn the latest and most productive tools in the Android tools ecosystem, and the best practices for Android app development. You will be able to take away the labs’ code as templates or frameworks to re-use and customize for your own similar apps.
Android Studio is an intuitive, feature-rich, and extremely forgiving Integrated Development Environment (IDE). This IDE is more productive and easier to use for your Android app creations than Eclipse. With this book you will quickly master Android Studio and maximize your Android development time. Source code on the remote web-hosting service is targeted to the latest Android Studio release, version 1.2.
What you’ll learn
- How to get started with the Android Studio IDE
- How to navigate and use Android Studio
- How to do version control with Git
- How to use Gradle
- How to use the new Android Wear framework
- How to debug your code using Android Studio
- How to manage your app projects
- How to test your apps
- How to analyze and refactor your code
- How to customize Android Studio
Who this book is for
This book is for Android app developers new to this IDE tool.
Table of Contents
1. Introducing Android Studio
2. Navigating
3. Programming
4. Refactoring
5. Reminders Lab: Part 1
6. Reminders Lab: Part 2
7. Git
8. Layouts
9. Currencies Lab: Part 1
10. Currencies Lab: Part 2
11. Testing and Analyzing
12. Debugging
13. Gradle
14. More SDK Tools
15. Wear
16. Customizing Android Studio
Источник
Learn Android Studio: Build Android Apps Quickly and Effectively
Explore a preview version of Learn Android Studio: Build Android Apps Quickly and Effectively right now.
O’Reilly members get unlimited access to live online training experiences, plus books, videos, and digital content from 200+ publishers.
Book description
Learn Android Studio covers Android Studio and its rich tools ecosystem, including Git and Gradle: this book covers how Android Studio works seamlessly with Git, for source control, and Gradle, a build and test tool. In addition, this book demonstrates how to develop/collaborate with remote Git web-hosting services such as GitHub and Bitbucket. Four complete Android projects accompany this volume and are available for download from a public Git repository.
With this book, you learn the latest and most productive tools in the Android tools ecosystem, and the best practices for Android app development. You will be able to take away the labs’ code as templates or frameworks to re-use and customize for your own similar apps.
Android Studio is an intuitive, feature-rich, and extremely forgiving Integrated Development Environment (IDE). This IDE is more productive and easier to use for your Android app creations than Eclipse. With this book you will quickly master Android Studio and maximize your Android development time. Source code on the remote web-hosting service is targeted to the latest Android Studio release, version 1.2.
Источник
Learn Android Studio: Build Android Apps Quickly and Effectively
Top positive review
![]()
This book does a fantastic job describing Android Studio app development and supporting tools (Git, Gradle, . ). The coding projects it gives are really good, illustrating the essentials of app development. But, some of the most important android software classes that they use (e.g. Intents, Adapters, Broadcasts, Notifications, Transactions, etc) are hard to find, since they are not mentioned in either the Table of Contents or the sparse Index. If there is another edition of the book (I hope there is one), it could improve the Index, add also add a chapter discussing some important classes and methods in the SDK. This should be done before Chapter 7 about Git, where many of these classes are used without any description of them (e.g., Intents). This makes Chapter 7 particularly murky, and difficult to understand. Chapter 8 is clearer, with some discussion of android classes and methods. Then, in Chapters 9 and 10, there are a few good descriptions of android classes etal. For example, Intents are finally described near the end of Chapter 9; although, there is no reference to this in the Index. Also, what it means to inflate android Views is finally described near the start of Chapter 10, but again is not referenced in the Index. These descriptions are needed much earlier in the book, before they are actually used in the «Labs».
I would have given this book 5 stars, except for this lack of clarity, and lack of content referencing.
Top critical review
![]()
I’m assuming that there must be better books for writing Android apps using the Android Studio but I bought this one.
My major issue is that a number of the examples (most?) had IDE warnings and when I got to chapter 9 (which is why I bought this particular book) it all fell apart.
Chapter 9: Currencies Lab: Part 1 is where they create the JSONParser class. As soon as I started importing any of the org.apache.http.* libraries Android Studio started complaining and thought I could eventually make it work (without any help on this from the book or its source files/errate from Apress) it still wasn’t something that I would really want to use because Google has deprecated their usage. As such this book served to be less that useful very quickly.
There was a problem filtering reviews right now. Please try again later.
From the United States
![]()
This book does a fantastic job describing Android Studio app development and supporting tools (Git, Gradle, . ). The coding projects it gives are really good, illustrating the essentials of app development. But, some of the most important android software classes that they use (e.g. Intents, Adapters, Broadcasts, Notifications, Transactions, etc) are hard to find, since they are not mentioned in either the Table of Contents or the sparse Index. If there is another edition of the book (I hope there is one), it could improve the Index, add also add a chapter discussing some important classes and methods in the SDK. This should be done before Chapter 7 about Git, where many of these classes are used without any description of them (e.g., Intents). This makes Chapter 7 particularly murky, and difficult to understand. Chapter 8 is clearer, with some discussion of android classes and methods. Then, in Chapters 9 and 10, there are a few good descriptions of android classes etal. For example, Intents are finally described near the end of Chapter 9; although, there is no reference to this in the Index. Also, what it means to inflate android Views is finally described near the start of Chapter 10, but again is not referenced in the Index. These descriptions are needed much earlier in the book, before they are actually used in the «Labs».
I would have given this book 5 stars, except for this lack of clarity, and lack of content referencing.
There was a problem loading comments right now. Please try again later.
![]()
I’m assuming that there must be better books for writing Android apps using the Android Studio but I bought this one.
My major issue is that a number of the examples (most?) had IDE warnings and when I got to chapter 9 (which is why I bought this particular book) it all fell apart.
Chapter 9: Currencies Lab: Part 1 is where they create the JSONParser class. As soon as I started importing any of the org.apache.http.* libraries Android Studio started complaining and thought I could eventually make it work (without any help on this from the book or its source files/errate from Apress) it still wasn’t something that I would really want to use because Google has deprecated their usage. As such this book served to be less that useful very quickly.
There was a problem loading comments right now. Please try again later.
![]()
Worthless as a self-teaching aid. I tried to follow through the author’s first example, but was frustrated at every turn when nothing worked as it was described in the book. I stuck with it for a while, but it became clear that despite my best efforts too many inconsistencies were building up in my project versus what the author was describing and the likelihood of getting the project to work well enough to be useful tool for learning was going to zero . Perhaps as a reference aid in a classroom environment it would be OK, with a live instructor filling in the gaps and smoothing over the differences between what what seen on the screen and what appeared on the printed page, but I couldn’t make it work.
I deleted all my work in progress and pitched the book. I’m starting over.
There was a problem loading comments right now. Please try again later.
![]()
I don’t find this book easy to follow in some chapters which are kinda confusing, for example on page 102:
«Drag and drop a horizontal LinearLayout inside the vertical LinearLayout. Drag and drop a CustomView control inside the horizontal LinearLayout and set its class property to android. «
there are no pictures or videos to show me how to do it, there are many like that.
I found videos on Youtube very helpful, book alone is hard for Android Studio beginners like me.
There was a problem loading comments right now. Please try again later.
![]()
If you have no experience programming, do not purchase this book thinking it will be easy to learn to program Android apps! I found that Murach’s Android Programming was laid out much more logically and was easier to follow. Also, they slowly build up the complexity as you progress through the chapters. I used the first edition, which was oriented to programming in eclipse. The second edition includes Android Studio — I wished I had purchased that book instead of this one.
I purchased this book several weeks ago and some of the examples are already obsolete!
In chapter 5, the exercise is to build an application called Reminders. If you follow the instructions, an application is created with xml which looks nothing like the xml in the example code for the book which can be downloaded. The instructions say to create a new app. After creating the app, you are supposed to click on the «Hello World» text on the Visual Designer stage, delete it, and then drag a List_View onto the stage. However, Android Studio will not let you do this because the default xml created is considerably different than what is in the source code from the book.
I took two semesters of Java in college, and we programmed Android in the second semester. Without this background, I would have been completely lost for this example. I used eclipse to program in Java and Android, and purchased this book to become proficient in Android Studio. This book may get me there yet, but I need to make it through more chapters to see if it will fit that bill.
I agree with a previous reviewer about the use of git in this book. It is spread out over several chapters and I found some of the explanations very general and not too helpful in getting the tool running. Also, this seems like an advanced topic for people just learning how to program in Android. I think it would fit better later in the book.
Источник
Build Your First Android App in Java
1. Welcome!
In this codelab, you’ll learn how to build and run your first Android app in the Java programming language. (If you’re looking for the Kotlin version of this codelab, you can go here.)
What you must know already
This codelab is written for programmers and assumes that you know either the Java or Kotlin programming language. If you are an experienced programmer and adept at reading code, you will likely be able to follow this codelab, even if you don’t have much experience with Java.
What you’ll learn
- How to use Android Studio to build your app.
- How to run your app on a device or in the emulator.
- How to add interactive buttons.
- How to display a second screen when a button is pressed.
Use Android Studio and Java to write Android apps
You write Android apps in the Java programming language using an IDE called Android Studio. Based on JetBrains’ IntelliJ IDEA software, Android Studio is an IDE designed specifically for Android development.
Note: This version of the codelab requires Android Studio 3.6 or higher.
To work through this codelab, you will need a computer that can run Android Studio 3.6 or higher (or already has Android Studio 3.6 or higher installed).
2. Install Android Studio
Note: This version of the codelab requires Android Studio 3.6 or higher.
You can download Android Studio 3.6 from the Android Studio page.
Android Studio provides a complete IDE, including an advanced code editor and app templates. It also contains tools for development, debugging, testing, and performance that make it faster and easier to develop apps. You can use Android Studio to test your apps with a large range of preconfigured emulators, or on your own mobile device. You can also build production apps and publish apps on the Google Play store.
Note: Android Studio is continually being improved. For the latest information on system requirements and installation instructions, see the Android Studio download page.
Android Studio is available for computers running Windows or Linux, and for Macs running macOS. The OpenJDK (Java Development Kit) is bundled with Android Studio.
The installation is similar for all platforms. Any differences are noted below.
- Navigate to the Android Studio download page and follow the instructions to download and install Android Studio.
- Accept the default configurations for all steps, and ensure that all components are selected for installation.
- After the install is complete, the setup wizard downloads and installs additional components, including the Android SDK. Be patient, because this process might take some time, depending on your internet speed.
- When the installation completes, Android Studio starts, and you are ready to create your first project.
Troubleshooting: If you run into problems with your installation, see the Android Studio release notes or Troubleshoot Android Studio.
3. Task: Create your first project
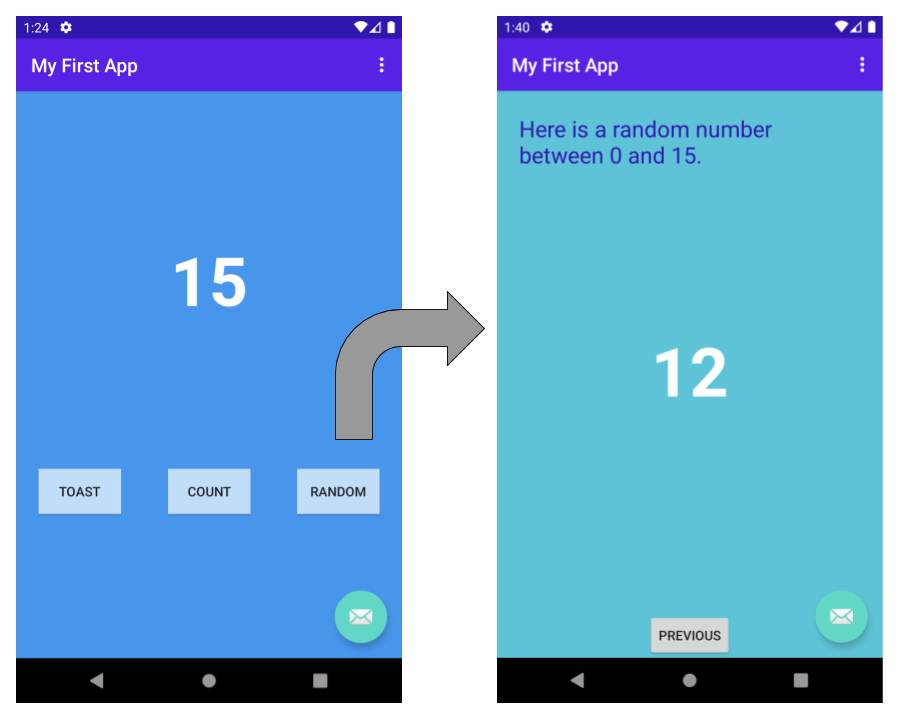
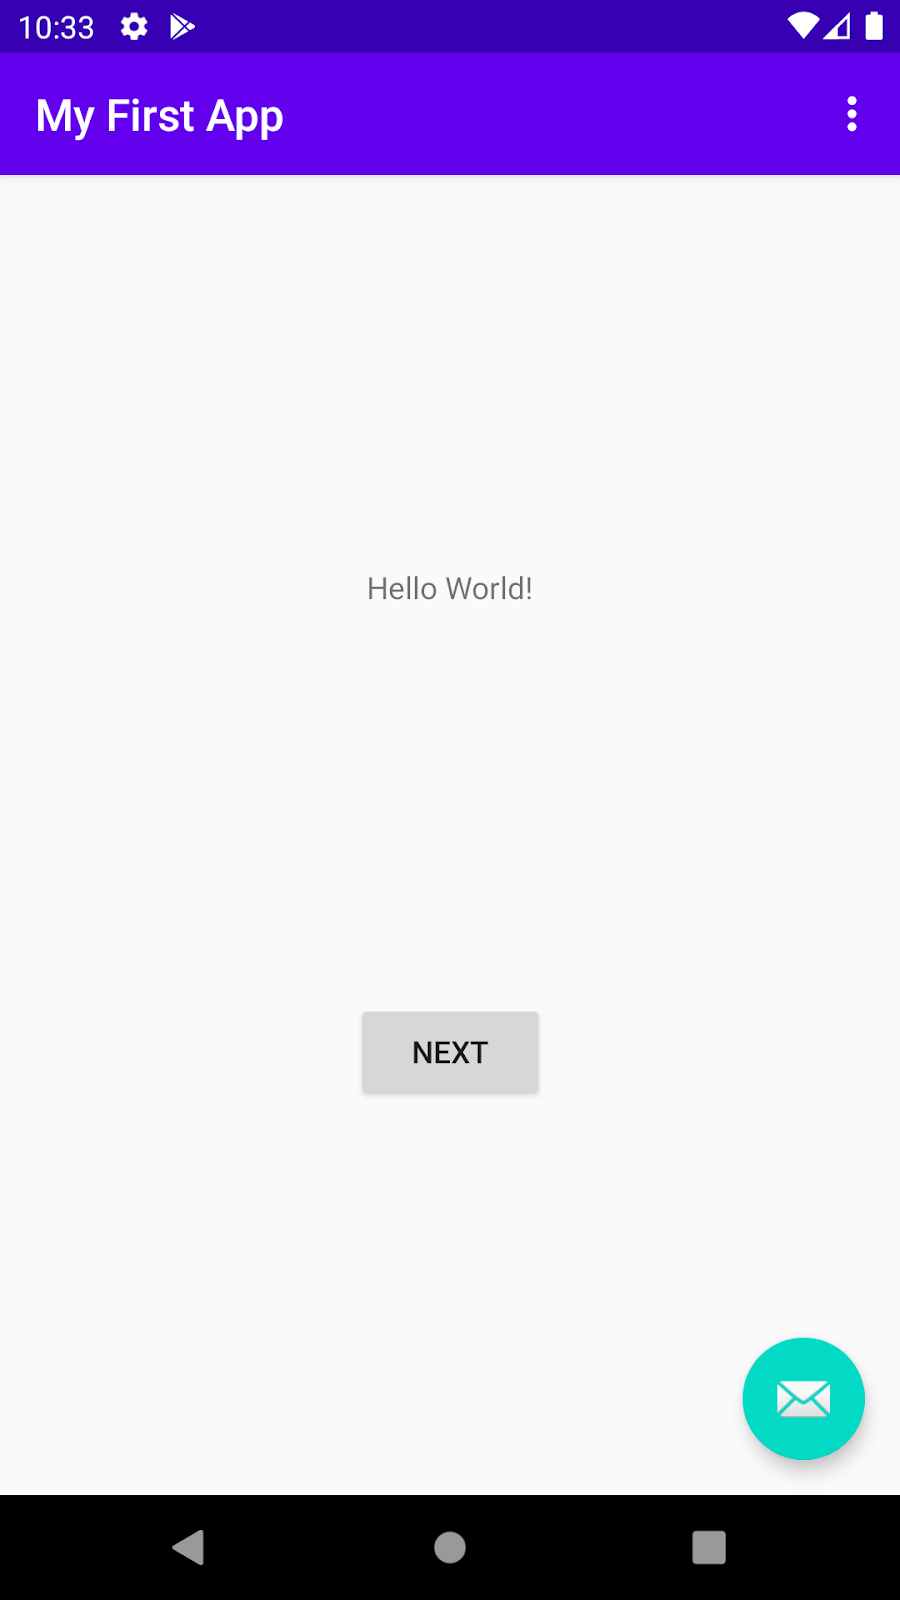
In this step, you will create a new Android project for your first app. This simple app displays the string «Hello World» on the screen of an Android virtual or physical device.
Here’s what the finished app will look like:
What you’ll learn
- How to create a project in Android Studio.
- How to create an emulated Android device.
- How to run your app on the emulator.
- How to run your app on your own physical device, if you have one.
Step 1: Create a new project
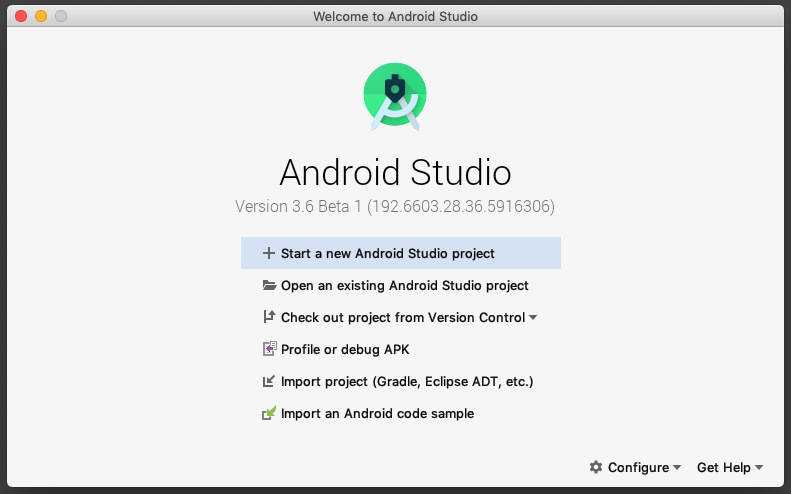
- Open Android Studio.
- In the Welcome to Android Studio dialog, click Start a new Android Studio project.

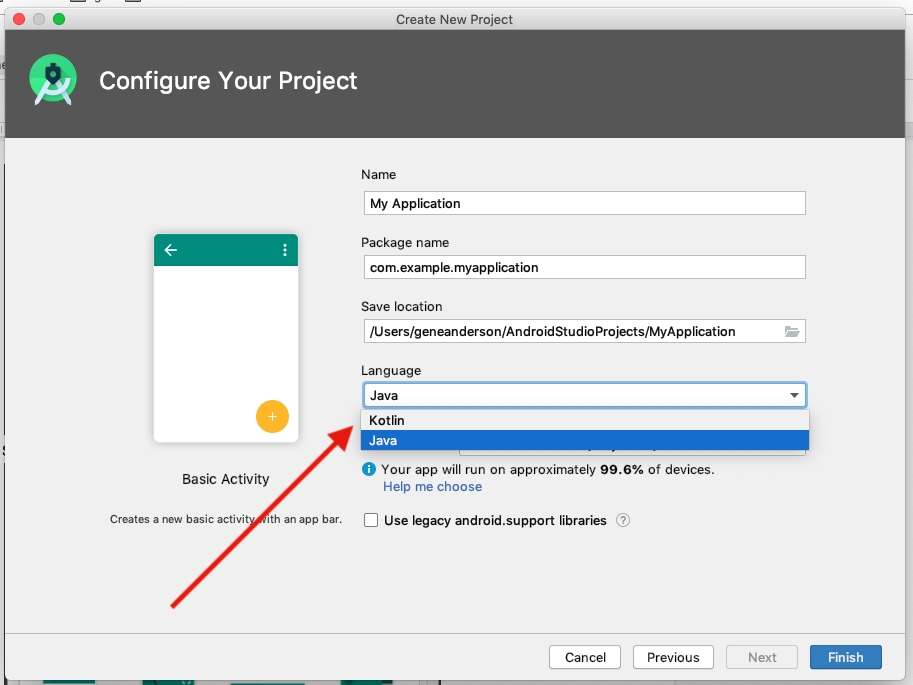
- Select Basic Activity (not the default). Click Next.
- Give your application a name such as My First App.
- Make sure the Language is set to Java.
- Leave the defaults for the other fields.
- Click Finish.

After these steps, Android Studio:
- Creates a folder for your Android Studio project called MyFirstApp. This is usually in a folder called AndroidStudioProjects below your home directory.
- Builds your project (this may take a few moments). Android Studio uses Gradle as its build system. You can follow the build progress at the bottom of the Android Studio window.
- Opens the code editor showing your project.
Step 2: Get your screen set up
When your project first opens in Android Studio, there may be a lot of windows and panes open. To make it easier to get to know Android Studio, here are some suggestions on how to customize the layout.
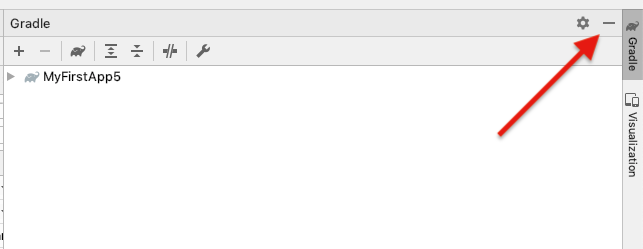
- If there’s a Gradle window open on the right side, click on the minimize button (—) in the upper right corner to hide it.
- Depending on the size of your screen, consider resizing the pane on the left showing the project folders to take up less space.
At this point, your screen should look a bit less cluttered, similar to the screenshot shown below.

Step 3: Explore the project structure and layout
The upper left of the Android Studio window should look similar to the following diagram: 
Based on you selecting the Basic Activity template for your project, Android Studio has set up a number of files for you. You can look at the hierarchy of the files for your app in multiple ways, one is in Project view. Project view shows your files and folders structured in a way that is convenient for working with an Android project. (This does not always match the file hierarchy! To see the file hierarchy, choose the Project files view by clicking (3).)
- Double-click the app (1) folder to expand the hierarchy of app files. (See (1) in the screenshot.)
- If you click Project (2), you can hide or show the Project view. You might need to select View > Tool Windows to see this option.
- The current Project view selection (3) is Project > Android.
In the Project > Android view you see three or four top-level folders below your app folder: manifests, java, java (generated) and res. You may not see java (generated) right away.
- Expand the manifests folder.
This folder contains AndroidManifest.xml . This file describes all the components of your Android app and is read by the Android runtime system when your app is executed. 2. Expand the java folder. All your Java language files are organized here. The java folder contains three subfolders:
com.example.myfirstapp: This folder contains the Java source code files for your app.
com.example.myfirstapp (androidTest): This folder is where you would put your instrumented tests, which are tests that run on an Android device. It starts out with a skeleton test file.
com.example.myfirstapp (test): This folder is where you would put your unit tests. Unit tests don’t need an Android device to run. It starts out with a skeleton unit test file. 3. Expand the res folder. This folder contains all the resources for your app, including images, layout files, strings, icons, and styling. It includes these subfolders:
drawable: All your app’s images will be stored in this folder.
layout: This folder contains the UI layout files for your activities. Currently, your app has one activity that has a layout file called activity_main.xml . It also contains content_main.xml , fragment_first.xml , and fragment_second.xml .
menu: This folder contains XML files describing any menus in your app.
mipmap: This folder contains the launcher icons for your app.
navigation: This folder contains the navigation graph, which tells Android Studio how to navigate between different parts of your application.
values: This folder contains resources, such as strings and colors, used in your app.
Step 4: Create a virtual device (emulator)
In this task, you will use the Android Virtual Device (AVD) manager to create a virtual device (or emulator) that simulates the configuration for a particular type of Android device.
The first step is to create a configuration that describes the virtual device.
- In Android Studio, select Tools >AVD Manager, or click the AVD Manager icon in the toolbar.
- Click +Create Virtual Device. (If you have created a virtual device before, the window shows all of your existing devices and the +Create Virtual Device button is at the bottom.) The Select Hardware window shows a list of pre-configured hardware device definitions.
- Choose a device definition, such as Pixel 2, and click Next. (For this codelab, it really doesn’t matter which device definition you pick).
- In the System Image dialog, from the Recommended tab, choose the latest release. (This does matter.)
- If a Download link is visible next to a latest release, it is not installed yet, and you need to download it first. If necessary, click the link to start the download, and click Next when it’s done. This may take a while depending on your connection speed.

Note: System images can take up a large amount of disk space, so just download what you need.
- In the next dialog box, accept the defaults, and click Finish.
The AVD Manager now shows the virtual device you added.
- If the Your Virtual Devices AVD Manager window is still open, go ahead and close it.
Step 5: Run your app on your new emulator
- In Android Studio, select Run > Run ‘app’ or click the Run icon in the toolbar. The icon will change when your app is already running.
 The icon will change when your app is already running.
If you get a dialog box stating «Instant Run requires that the platform corresponding to your target device (Android N. ) is installed» go ahead and click Install and continue.
- In Run > Select Device, under Available devices, select the virtual device that you just configured. This menu also appears in the toolbar.
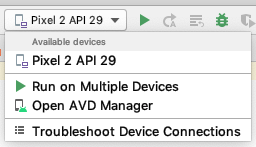
The emulator starts and boots just like a physical device. Depending on the speed of your computer, this may take a while. You can look in the small horizontal status bar at the very bottom of Android Studio for messages to see the progress.
Messages that might appear briefly in the status bar
Gradle build running

Waiting for target device to come on line
Источник


