- Login with Google Using Firebase Authentication in Android Studio (Tutorial)
- How Does It Work? (Video)
- Login with Google Using Firebase in Android Studio (Step by Step)
- Create a new project in Android Studio
- Adding Firebase to Android Project
- Building UI
- Adding functionality
- Running the application
- Email and Password Authentication Using Firebase in Android Studio | Java
- Overview
- Before you begin
- Create a password-based account
- Sign in a user with an email address and password
- Firebase: Аутентификация пользователей с помощью email и пароля в android приложении
Login with Google Using Firebase Authentication in Android Studio (Tutorial)
Do you want to make your users fall in love with your app by creating a smooth UX through login Google account using Firebase? If yes, go ahead to read on.
I don’t need to emphasize what modern users have become — they want the fastest mobile, fastest internet, and fastest pizza delivery.
You might be thinking what’s wrong on asking the critical pieces of information like email, first and last name, and password.
The problem is that users are addicted to the apps that allow instant sign in with Google.
Furthermore, you must understand one fundamental rule in your life to be good at anything. You have to follow the best competitors in the world.
What does it mean?
It means you’ll need to follow the same standards, frameworks, and techniques that the best competitors implement in their apps since they’ve hired the best CRO, ASO and copywriter experts.
TL;DR of the feature is that it:
- Saves time for both the developers and the end-users.
- Gets all the information that you need like: name & emails
How Does It Work? (Video)
More than a billion users are already signed in with Google Play with their Google accounts. When an app authenticates and gets all the information from Google Play.
If a user isn’t signed in with Google Play, it’s essential to sign in to enjoy the app that is an unlikely cause.
Login with Google Using Firebase in Android Studio (Step by Step)
Create a new project in Android Studio
Create a New Project in Android Studio. How? You need to click on File -> New -> New Projects.
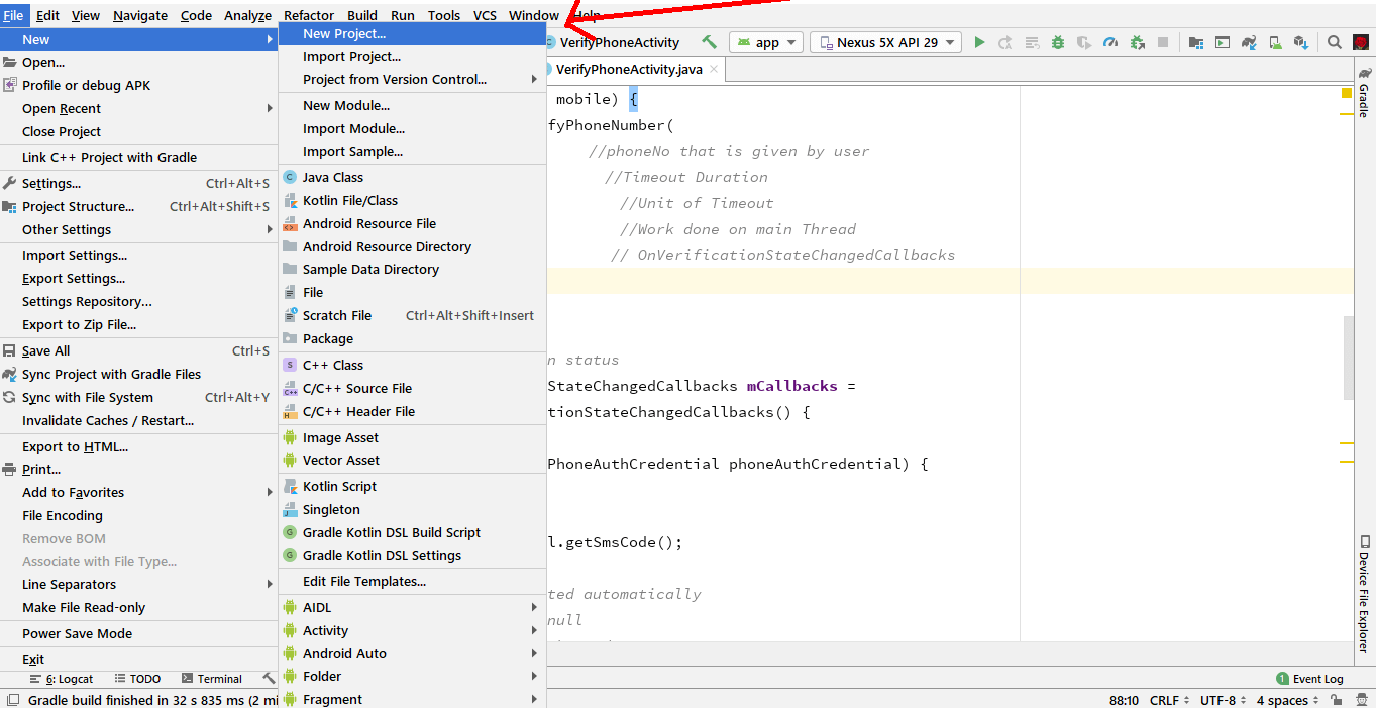
Click on Empty Activity -> Next
![]()
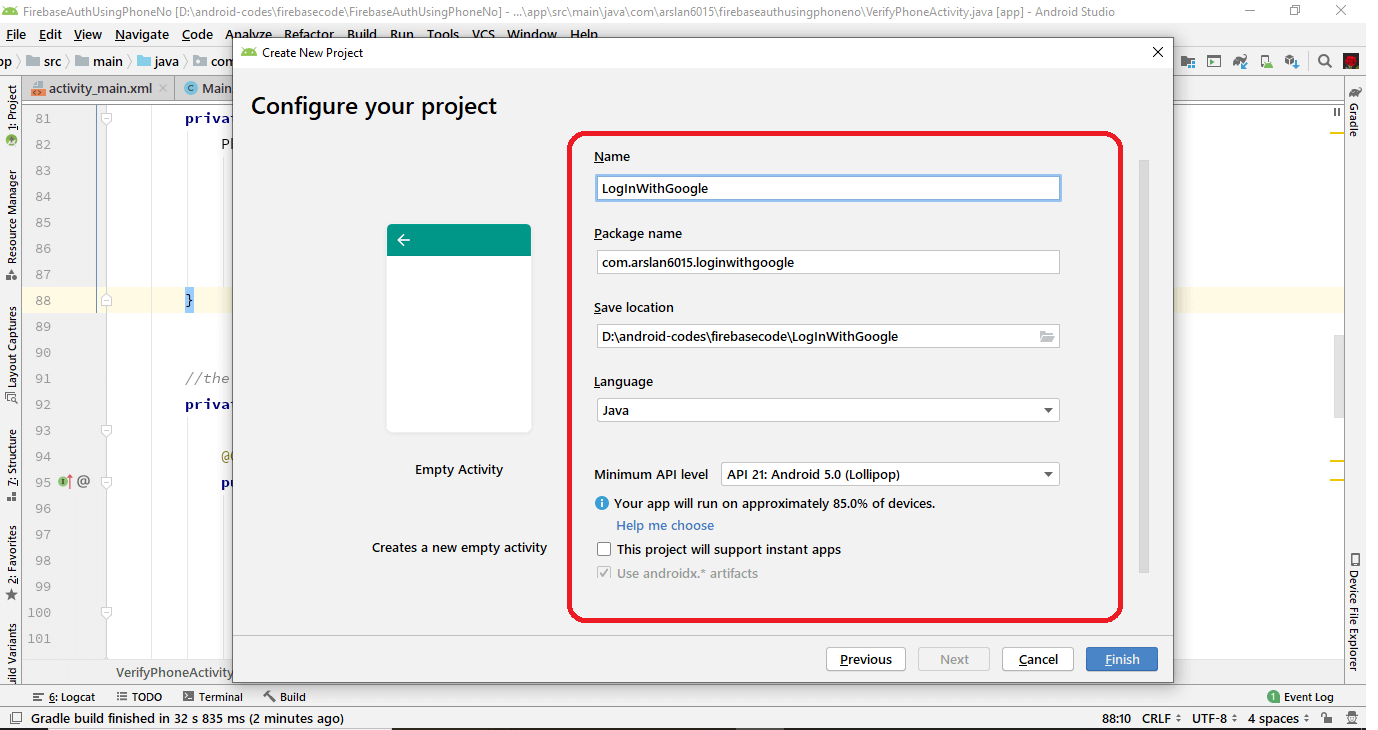
Enter Name -> and Click Next
Adding Firebase to Android Project
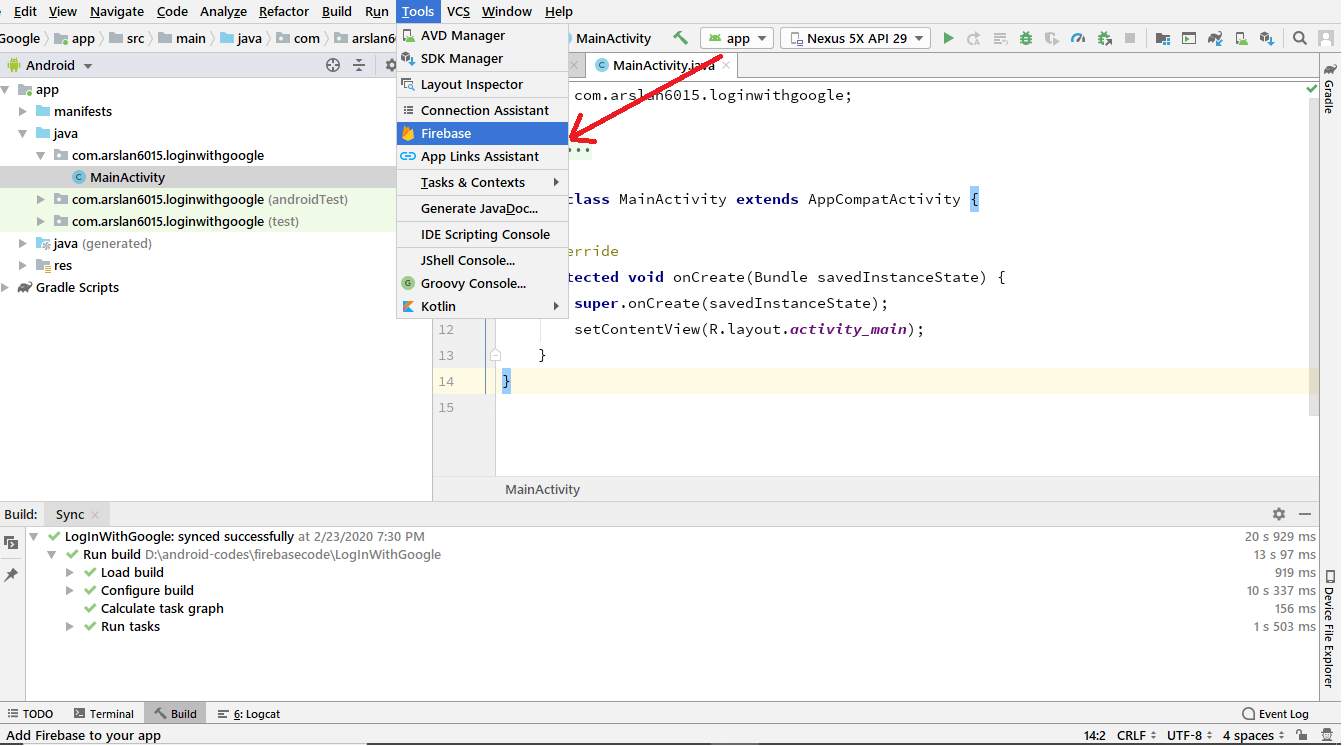
Add Firebase to your project.
by clicking on Tools -> Firebase
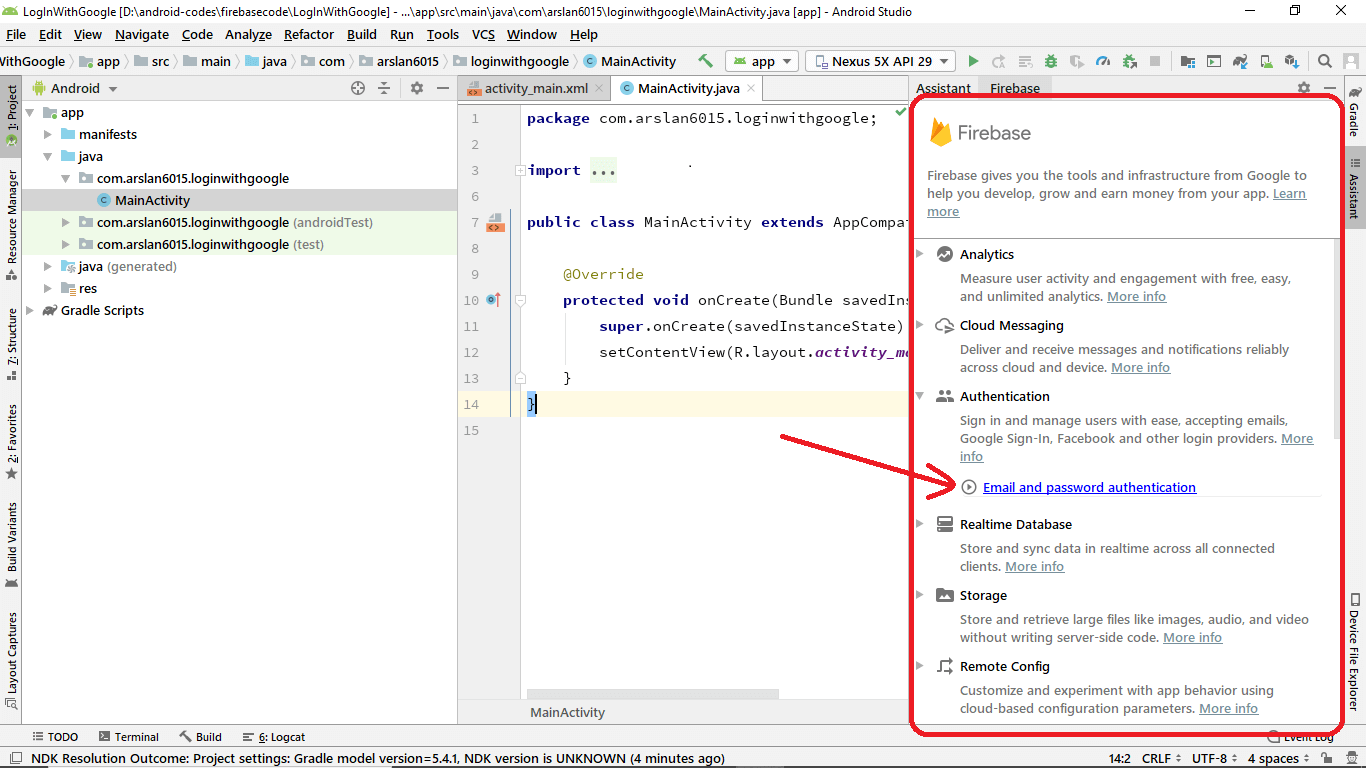
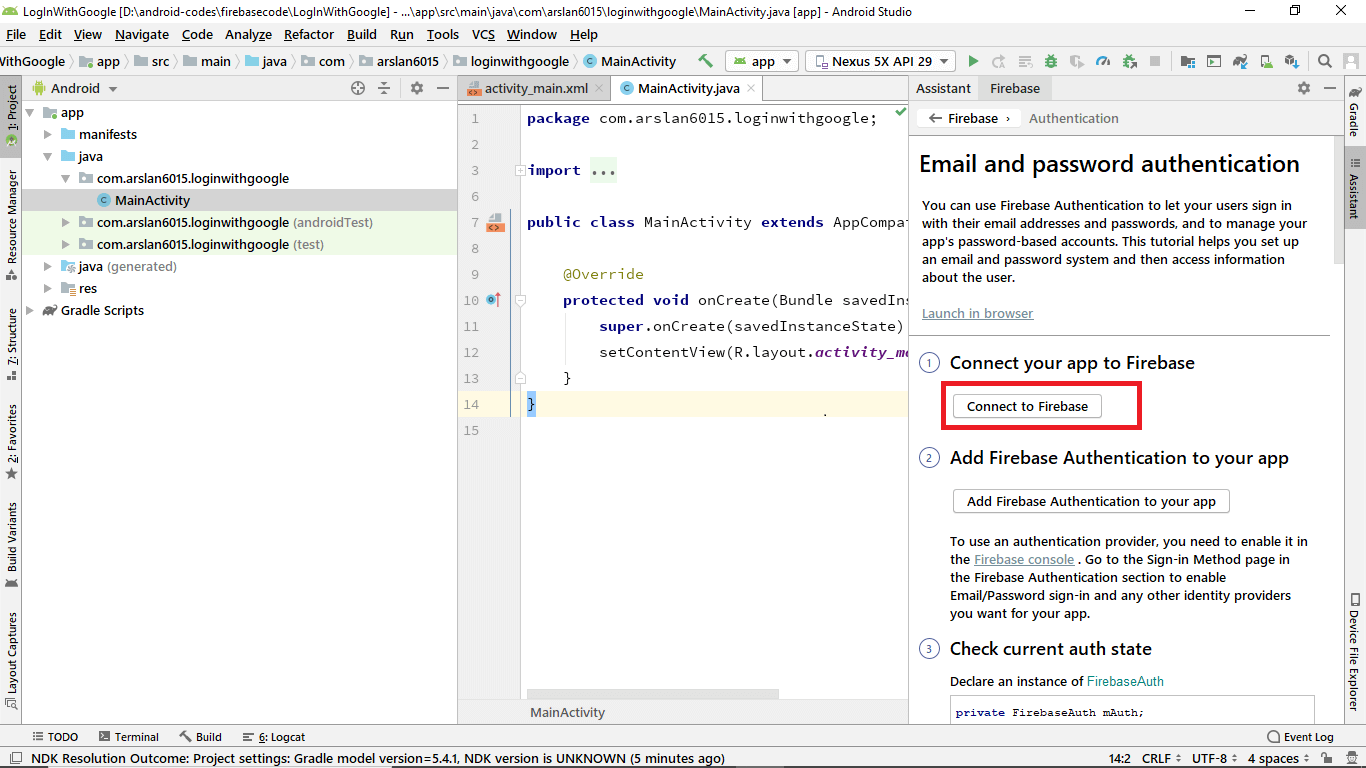
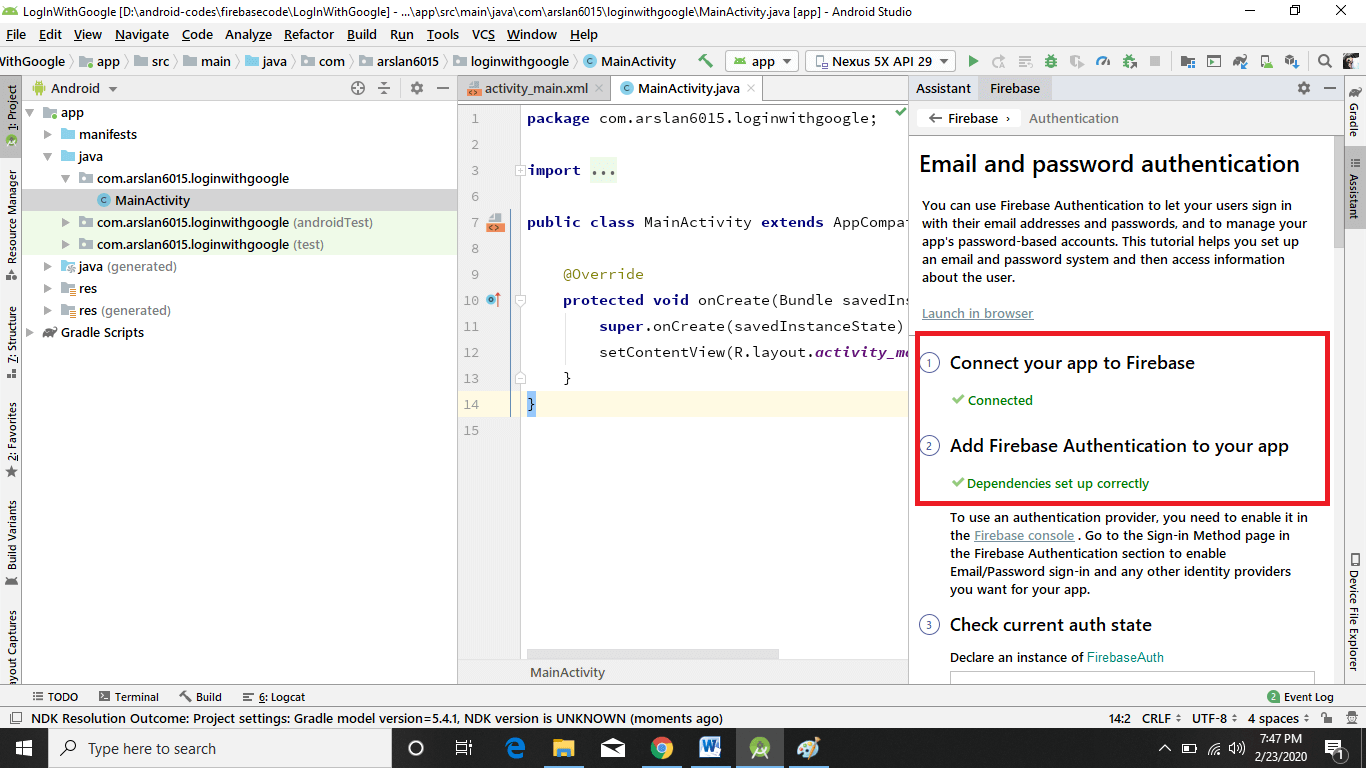
Now Firebase Assistant is open on the right side as you can see in the image below, then click on Email and Password Authentication.
Now click Connect to Firebase
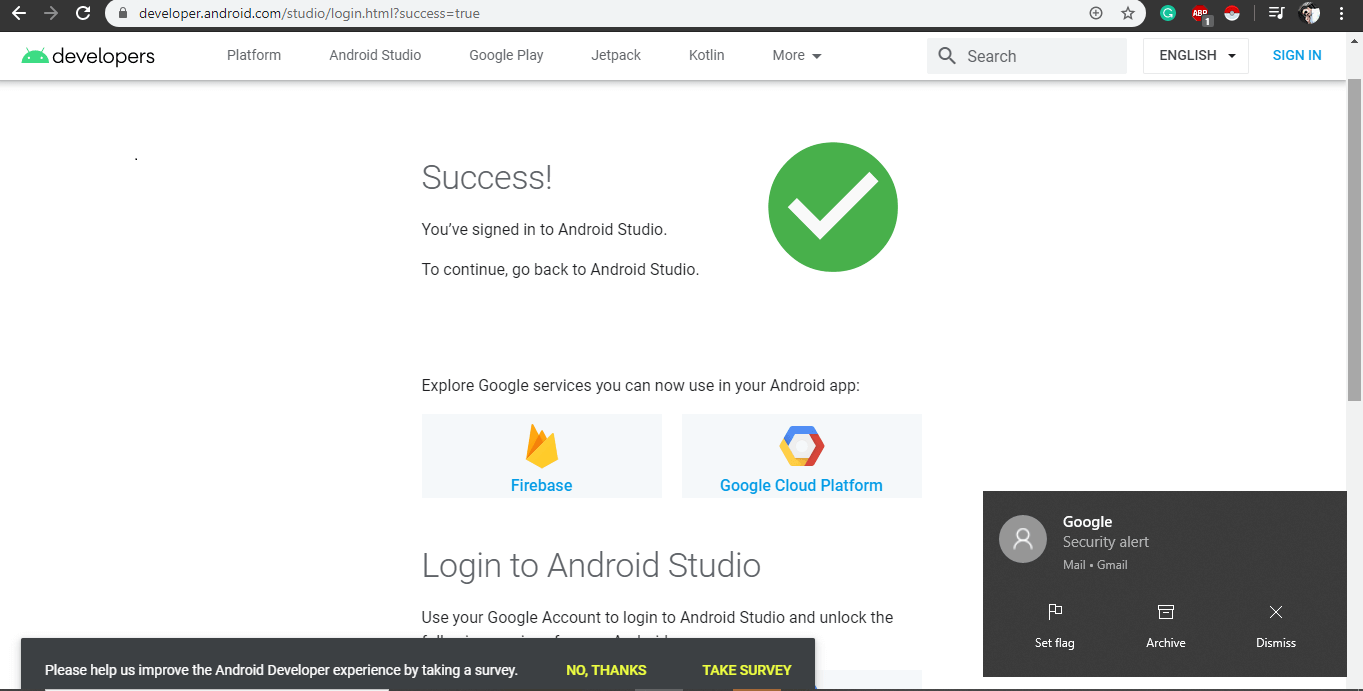
Now if you are not signed with Android Studio then a window appears in the browser where you’ll need sign in to Google account.

Then click Next.

Now you are logged in on Android Studio and an email is also sent through google to your computer stating that “You’ve signed in with Android Studio“.
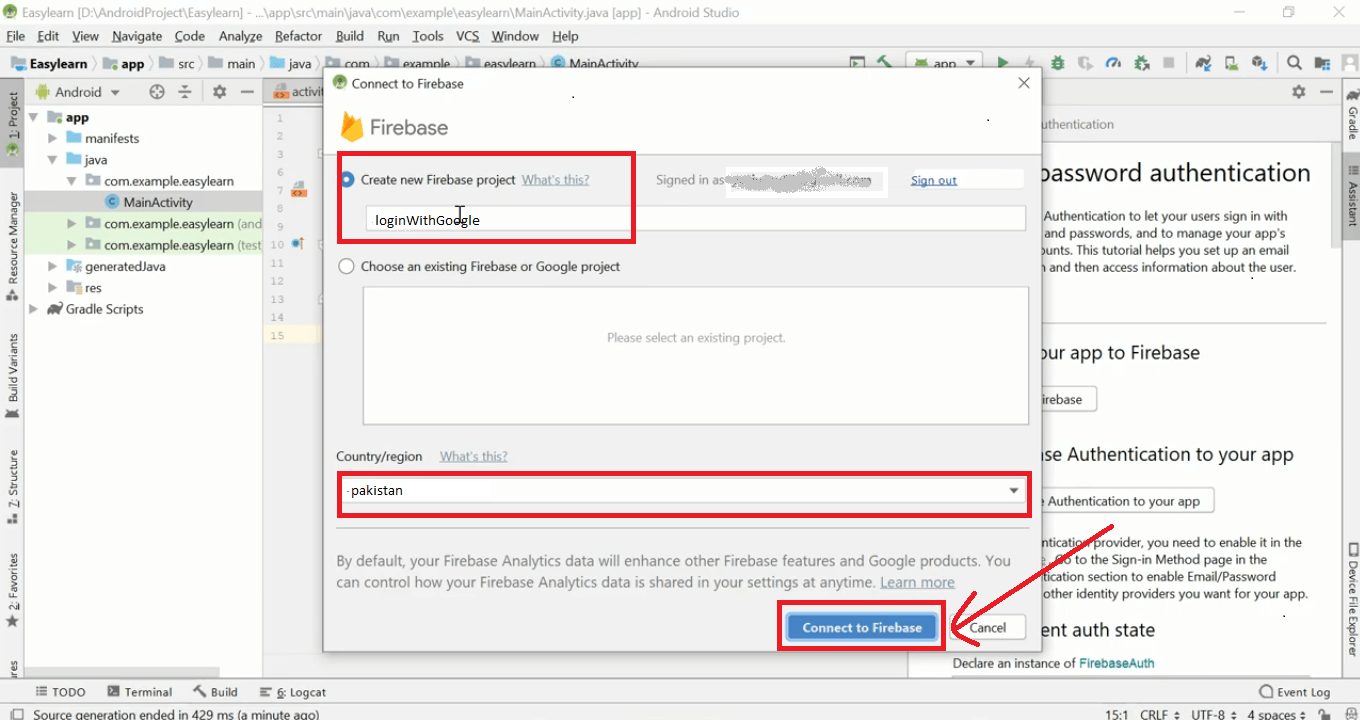
Now open Android Studio you can see a popup box appear just like below. Enter ProjectName (if you want to change) then Select Country and click Connect to Firebase.
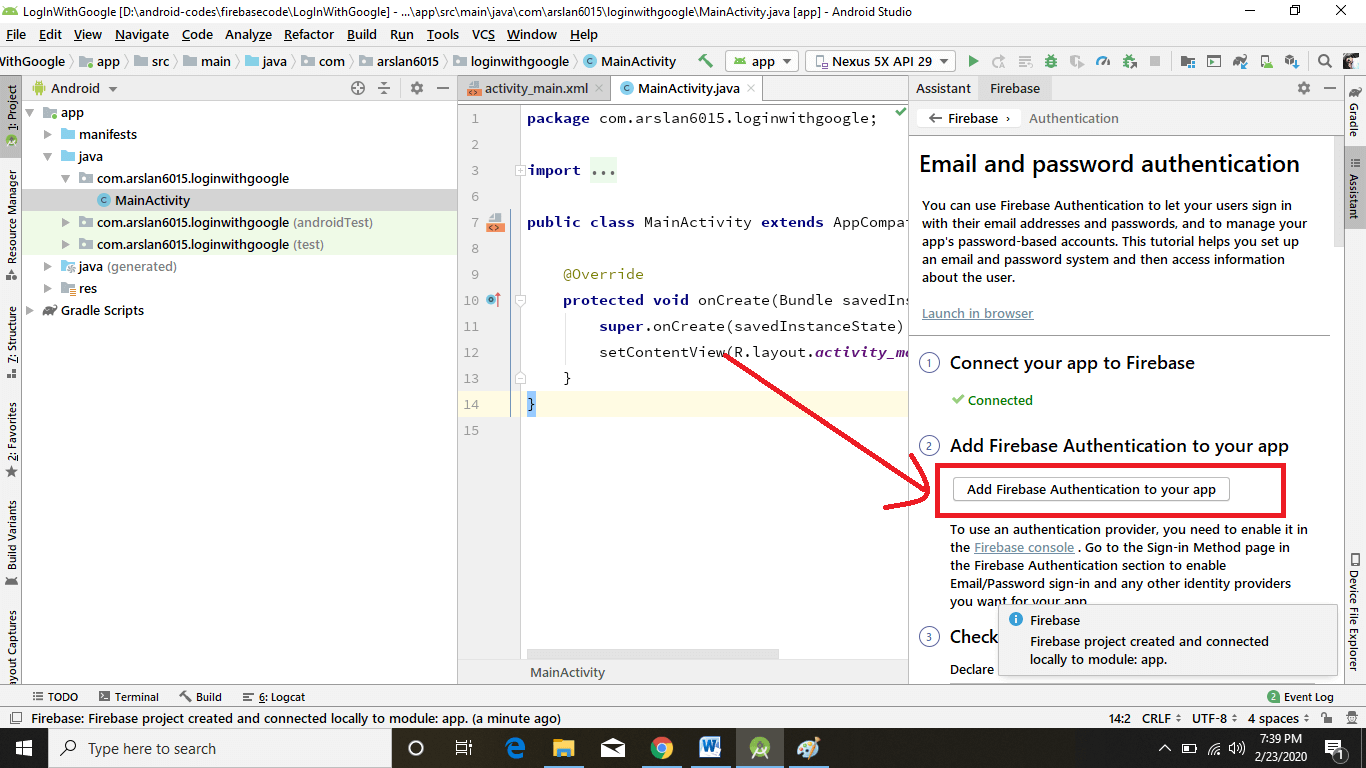
You’re good to go if you see a green color text ✔️ Connected on the bottom right side of the screen. Now click on Add Firebase Authentication to your app.
A popup box appears now click Accept Changes. This will add some dependencies to your project at the app-level and the Project-level.

Now you can see dependencies set up correctly.
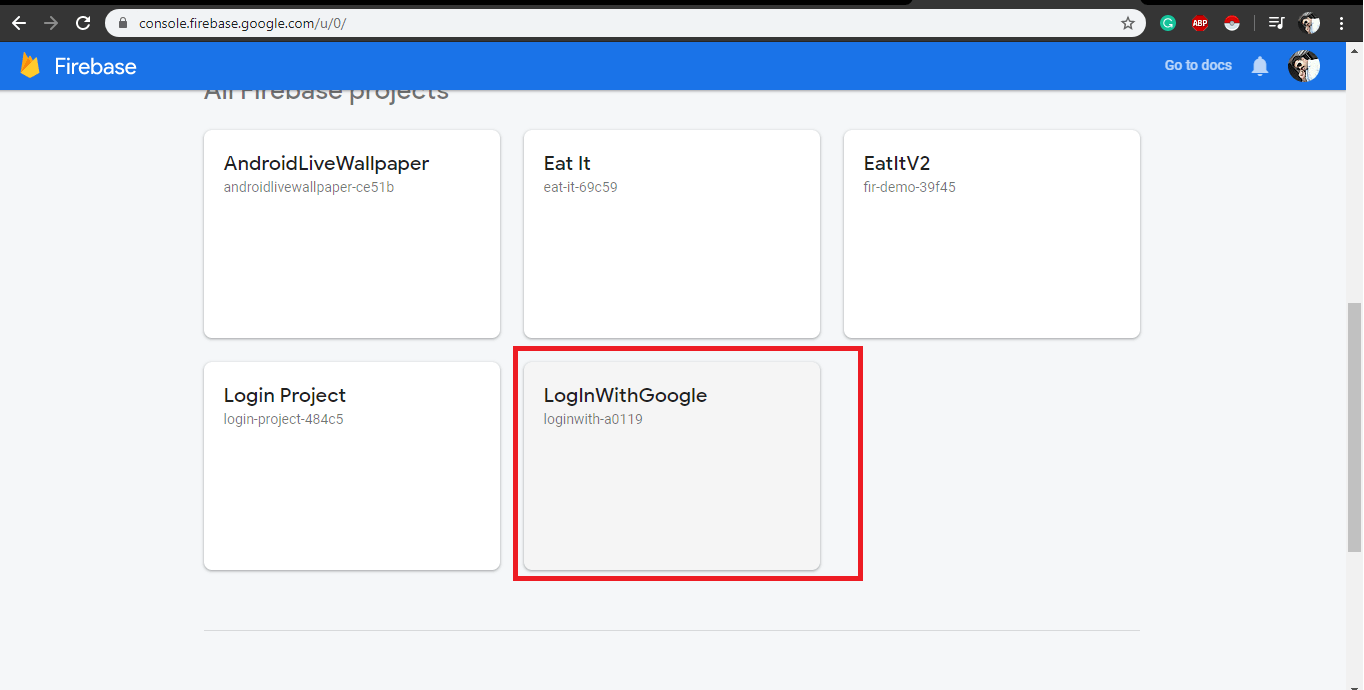
Now open https://console.firebase.google.com/ and log in here with the same account that you are logged in with Android Studio. Now you can see your project has been added. Click on it.
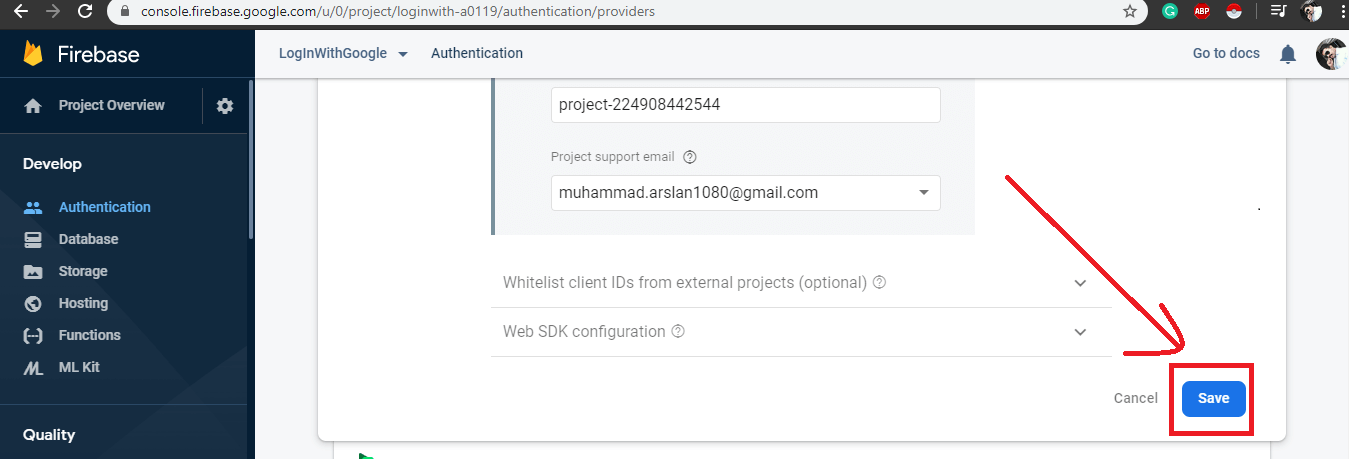
Now click on Authentication Tab -> Sign-In method -> click Google -> Enable Toggle button -> Select Email Address .

Click Save.
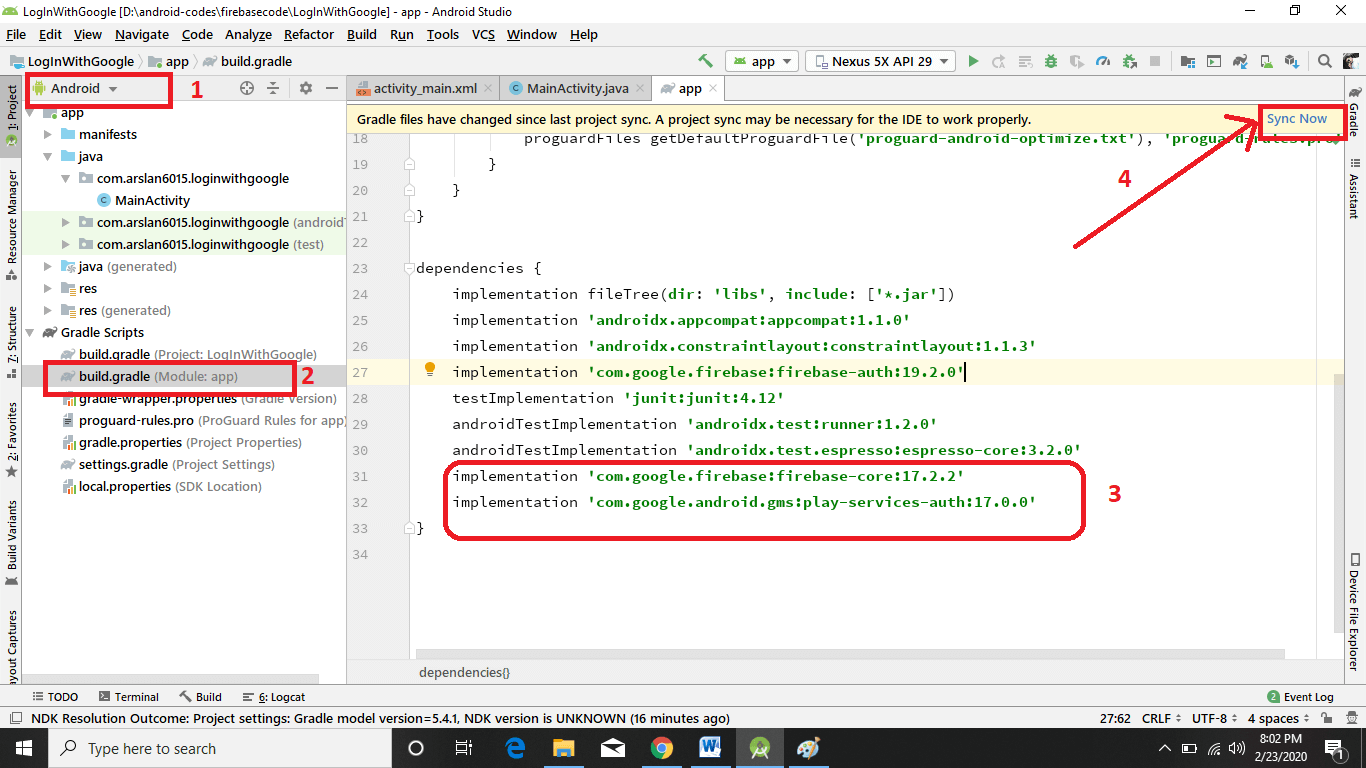
Now open Android Studio -> Select Android -> Gradle Script -> Open build.Gradle file
Now add these two dependencies and click Sync Now.
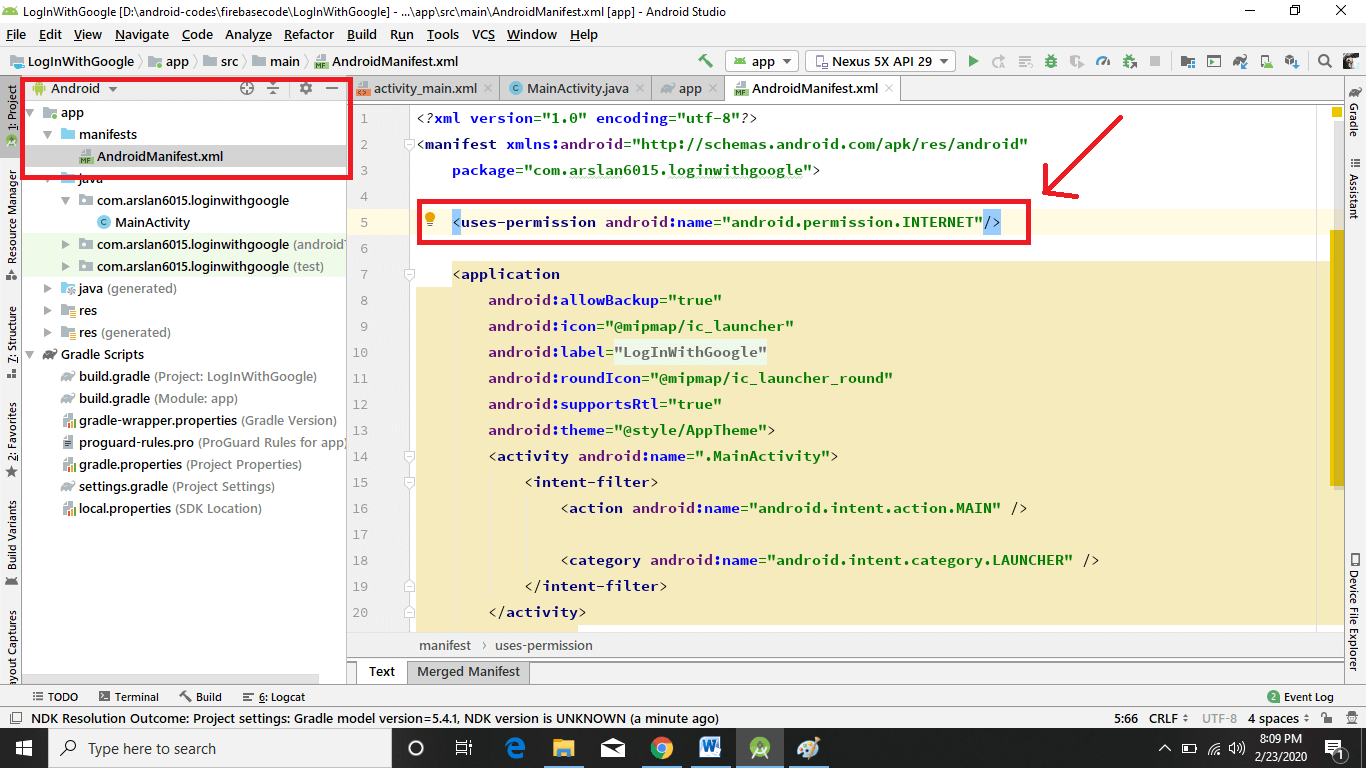
Building UI
Before we start building the interface and start coding the functionality, we need to add internet permission in the Android Manifest file. I am doing it at the very beginning because I often forget to add it and then start scratching my head that why the code is not working!
Add Internet permission in AndroidManifest.xml
Enter code in activity_main.xml
Adding functionality
Enter code in MainActivity.java
Running the application
Run the app and now you can see the output as shown above in the video and you can also see in Firebase console that a new user is added

I hope you have understood how the Firebase Authentication works with Google, and how you can provide the “Continue with Google” button to your Android App.
Not interested in Google Sign in? You can:
Don’t forget to ask a question. I understand many people feel being an idiot in asking a question, please don’t feel hesitation. I’ll be delighted to answer your simplest or hardest question.
Источник
Email and Password Authentication Using Firebase in Android Studio | Java


In this blog post, we’re going to discuss how to authenticate users using their Email and Password with the help of Firebase in android.
Earlier we discussed how to authenticate users using the Google Sing-In method with the help of Firebase in Android. Click here to check.
You can use Firebase Authentication to let your users authenticate with Firebase using their email addresses and passwords and to manage your app’s password-based accounts.
Now let’s see how to sign-in users using Email and Password.
Overview

Before you begin
- If you haven’t already, add Firebase to your Android project.
- If you haven’t yet connected your app to your Firebase project, do so from the Firebase console.
- Enable Email/Password sign-in:
- In the Firebase console, open the Auth section.
- On the Sign-in method tab, enable the Email/password sign-in method and click Save.

- Declare the dependency for the Firebase Authentication Android library in your module (app-level) Gradle file (usually app/build.gradle).
dependencies <
implementation ‘com.google.firebase:firebase-analytics: ’
implementation ‘com.google.firebase:firebase-auth: ’
Create a password-based account
To create a new user account with a password, complete the following steps in your app’s sign-in activity:
- In your sign-up activity’s onCreate method, get the shared instance of the FirebaseAuth object:
private FirebaseAuth mAuth; mAuth = FirebaseAuth.getInstance ();
- When initializing your Activity, check to see if the user is currently signed in:
@Override
public void onStart() <
super.onStart();
// Check if user is signed in (non-null) and update UI accordingly.
FirebaseUser currentUser = mAuth.getCurrentUser();
if(currentUser != null) <
reload();
>
>
- When a new user signs up using your app’s sign-up form, complete any new account validation steps that your app requires, such as verifying that the new account’s password was correctly typed and meets your complexity requirements.
- Create a new account by passing the new user’s email address and password to createUserWithEmailAndPassword(..):
// user account created successfully
showMessage(“Account created”);
userID = mAuth.getCurrentUser().getUid();
DocumentReference documentReference = fStore.collection(“user_profile”).document(userID);
Map user = new HashMap<>();
user.put(“Name”, name);
user.put(“Email”, email);
user.put(“Password”, password);
documentReference.set(user).addOnSuccessListener(new OnSuccessListener () <
@Override
public void onSuccess(Void aVoid) <
Log.d (TAG, “onSuccess: user Profile is created for “ + userID);
>
>).addOnFailureListener(new OnFailureListener() <
@Override
public void onFailure(@NonNull Exception e) <
Log.d (TAG, “onFailure: “ + e.toString());
>
>);
// after we created user account we need to update his profile picture and name
//check user photo is picked or not
if (pickedImgUri != null) <
updateUserInfo(name, pickedImgUri, mAuth.getCurrentUser());
// account creation failed
showMessage(“account creation failed” + task.getException().getMessage());
regBtn.setVisibility(View.VISIBLE );
loadingProgress.setVisibility(View.INVISIBLE );
- If the new account was created, the user is also signed in. In the callback, you can use the getCurrentUser method to get the user’s account data.
Sign in a user with an email address and password
The steps for signing in as a user with a password are similar to the steps for creating a new account. In your app’s sign-in activity, do the following:
- In your sign-in activity’s onCreate method, get the shared instance of the FirebaseAuth object:
mAuth = FirebaseAuth. getInstance();
- When initializing your Activity, check to see if the user is currently signed in:
@Override
public void onStart() <
super.onStart();
// Check if user is signed in (non-null) and update UI accordingly.
FirebaseUser currentUser = mAuth.getCurrentUser();
if(currentUser != null) <
reload();
>
>
- When a user signs in to your app, pass the user’s email address and password to signInWithEmailAndPassword(..):
public void onComplete(@NonNull Task task) <
If sign-in succeeded, you can use the returned FirebaseUser to proceed.
- To sign out a user, call signOut:
public void logout(View view) <
FirebaseAuth.getInstance ().signOut();
>
Источник
Firebase: Аутентификация пользователей с помощью email и пароля в android приложении
Продолжаем работать с Firebase. В этом уроке будем тестировать сервис аутентификации. Идентификация пользователей необходима в большинстве приложений. Это позволяет разделять доступ, надежно хранить личные данные пользователей в облаке и обеспечить персонализированный опыт на всех устройствах пользователя. [wpanchor >
Firebase предоставляет бэкенд, простой в использовании SDK и готовые библиотеки пользовательского интерфейса для реализации аутентификации пользователей в вашем приложении. Он поддерживает аутентификацию как с помощью email и пароля, так и с помощью таких популярных поставщиков идентификации, как Google, Facebook, Twitter и GitHub.
Сервис аутентификации тесно интегрируется с другими сервисами Firebase, использует отраслевые стандарты, такие как OAuth 2.0 и OpenID Connect, так что он может быть легко интегрирован с вашим бэкэндом. Сегодня мы рассмотрим метод аутентификации пользователей с помощью адреса электронной почты и пароля. Firebase Authentication SDK предоставляет методы для создания и управления пользователями, которые используют адреса электронной почты и пароли для входа в систему.
Будем использовать пример, созданный разработчиками Firebase на GitHub. Для этого клонируйте или скачайте репозиторий и откройте проект с именем auth в Android Studio.
Чтобы интегрировать проект с Firebase, откройте меню Tools/Firebase и в окне ассистента выберите Authentication. нажмите кнопку в шаге 1, чтобы связать ваше приложение с Firebase.

В случае успеха в консоли Firebase вы увидите новый проект с именем auth. Зайдите в него и выберите слева пункт меню Authentication. На вкладке «Способ входа» включите пункт «Адрес электронной почты/пароль».

В процессе регистрации пользователей в приложении информация о них будет появляться на вкладке «Пользователи». Здесь можно управлять пользователями — например, добавить пользователя в базу приложения, а также отключить или удалить пользователя.
Вернемся к проекту в Android Studio. Если вы видите в консоли ошибки — сделайте ребилд проекта.
Источник


