- How to draw Horizontal and Vertical lines in an Android App using XML
- Как правильно установить высоту строки для Android?
- ОТВЕТЫ
- Ответ 1
- Ответ 2
- Ответ 3
- Ответ 4
- Ответ 5
- Ответ 6
- Android TextView: выравнивание текста по ширине
- 26 ответов
- ОБНОВЛЕНО
- String resources
- String
- Kotlin
- String array
- Kotlin
- Quantity strings (plurals)
- Kotlin
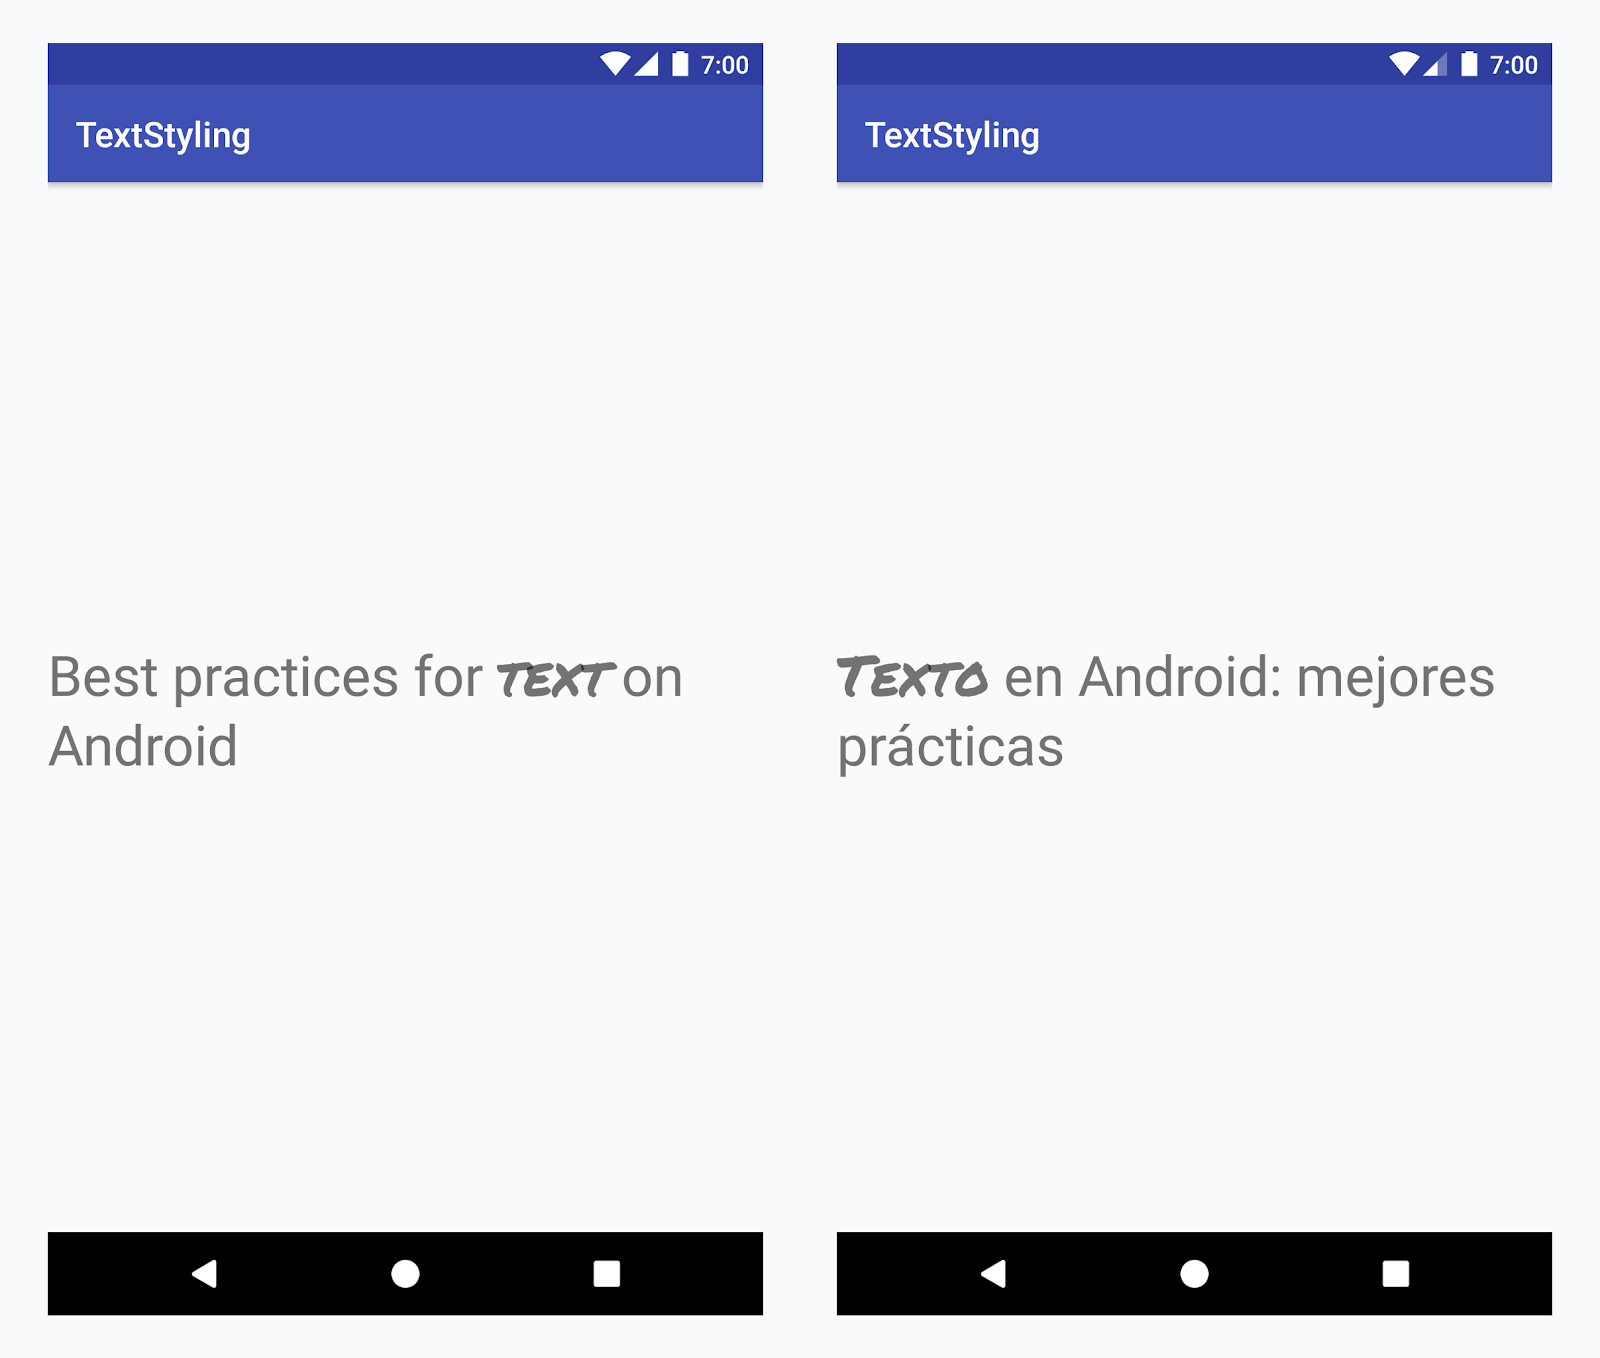
- Format and style
- Handle special characters
- Formatting strings
- Kotlin
- Styling with HTML markup
- Kotlin
- Kotlin
- Styling with spannables
- Kotlin
- Kotlin
- Kotlin
- Styling with annotations
- Example — adding a custom typeface
- Kotlin
- Annotation spans and text parceling
- Kotlin
- Kotlin
How to draw Horizontal and Vertical lines in an Android App using XML
This article demonstrates how to draw a horizontal and a vertical line in an Android app.
Although we have countless XML tags to meet almost all of our needs, unfortunately, we don’t have any tag such as tag to draw the line. However, tag can be used in XML as a workaround.
Attention reader! Don’t stop learning now. Get hold of all the important Java Foundation and Collections concepts with the Fundamentals of Java and Java Collections Course at a student-friendly price and become industry ready. To complete your preparation from learning a language to DS Algo and many more, please refer Complete Interview Preparation Course.
NOTE: The “view” tag is different than the View class in Android.
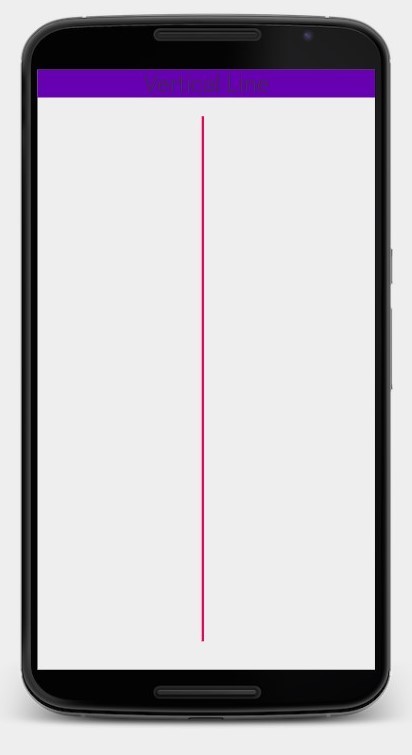
How to draw a Vertical line?
Consider the following XML code to draw a Vertical line in Android:
Here, we use the “View” tag to create a rectangle with a very small width such that it becomes a vertical line. In the above code, a red vertical line of height ‘560dp’ and width ‘2dp’ is drawn which is at a left margin of ‘175dp’ from the left side of the screen and at a top margin of ’20dp’ from the TextView that lies above it. The thickness of this line can be increased or decreased by increasing and decreasing the layout_width of the “View” tag respectively.
Note: To run this code, we can copy and paste this code into the XML Visualizer provided by Udacity. Make sure to erase all the previously written code in the visualizer(if any).
Output:
Drawing a Horizontal line:
A horizontal line can be drawn in a very similar way as a vertical line. Following is the XML code for a horizontal line:
Источник
Как правильно установить высоту строки для Android?
Я архитектор UX, работающий с командой разработчиков Android, которые в основном младшие. У нас возникают проблемы с настройкой высоты строки в Android.
Мы используем спецификацию Material Design как наше руководство для нашего приложения. В частности, здесь вы можете увидеть спецификации высоты линии:
Позвольте использовать Body 2 в качестве нашего примера. Спецификация говорит, что тип 13sp или 14sp, а ведущая (высота линии — то же самое) должна быть 24dp.
Здесь проблема: эти разработчики говорят мне, что нет такого способа установить высоту строки, как в коде. Вместо этого они говорят мне измерить расстояние между двумя строками текста и дать им эту меру — скажем, 4dp. Они хотят этого для каждого стиля текста, который мы используем.
Мы используем эскиз > поток Цепелина для спецификации.
Мне кажется странным, что у меня есть возможность создать стиль шрифта (который может легко быть классом/стилем в коде), который составляет 13 с при старте 24dp и не сможет установить ведущий, но вместо этого нужно добавить Третья мера. В Эскизе или Цепелине нет места для такой меры «между строками».
Это действительно так, как это делается, или есть правильный способ установить высоту строки?
ОТВЕТЫ
Ответ 1
Решение простое. просто используйте эти два атрибута в ваших TextView , lineSpacingExtra и lineSpacingMultiplier .
EDIT
Они предназначены только для контроля расстояния между строками, а не для символов (он же Кернинг). Для управления интервалом между символами вы можете использовать эту библиотеку, которую я создал, KerningViews.
ОБНОВЛЕНИЕ 2
android:lineSpacingExtra добавляет фактическое дополнительное пространство между строками. Вы должны использовать это. Просто чтобы дать вам больше информации, я дал вам атрибут android:lineSpacingMultiplier , который работает как масштабный коэффициент с высотой TextView .
Если вы хотите 15dp пробел между строками, используйте android:lineSpacingExtra=»15dp» , и все готово.
Ответ 2
Я объясню это с точки зрения разработчика Android.
Высота строки обычно означает размер текста + «отступ» сверху/снизу.
Итак, если ваш дизайнер пишет высоту строки 19sp и размер текста 15sp, это означает, что вам нужно иметь дополнительный отступ 4sp.
Чтобы реализовать его в макете, используйте атрибут lineSpacingExtra .
Еще один способ достижения высоты линии — использование масштаба. Например, 1.2 . Это означает, что интервал составляет 120% от размера текста.
В приведенном выше примере высота строки равна 19sp, а размер текста — 15sp. Если мы переведем это в масштаб, оно станет.
Чтобы реализовать его в макете, используйте атрибут lineSpacingMultiplier .
Ответ 3
Начиная с API 28 теперь у нас есть lineHeight
Если вы используете стиль, не забудьте удалить приложение:
Ответ 4
Здесь можно сделать это программно.
Ответ 5
Мои коллеги по дизайну чрезмерно используют высоту строки и ее боль, которая никогда не выглядит сразу после разрыва в приложении.
Я планирую создать собственный класс TextView, который возьмет аргумент XML и опубликует его здесь после.
Ответ 6
Я всегда делаю вещи программно:
Также ознакомьтесь с руководством по дизайну материала о типографии. Это действительно полезно для достижения лучшего вида.
Источник
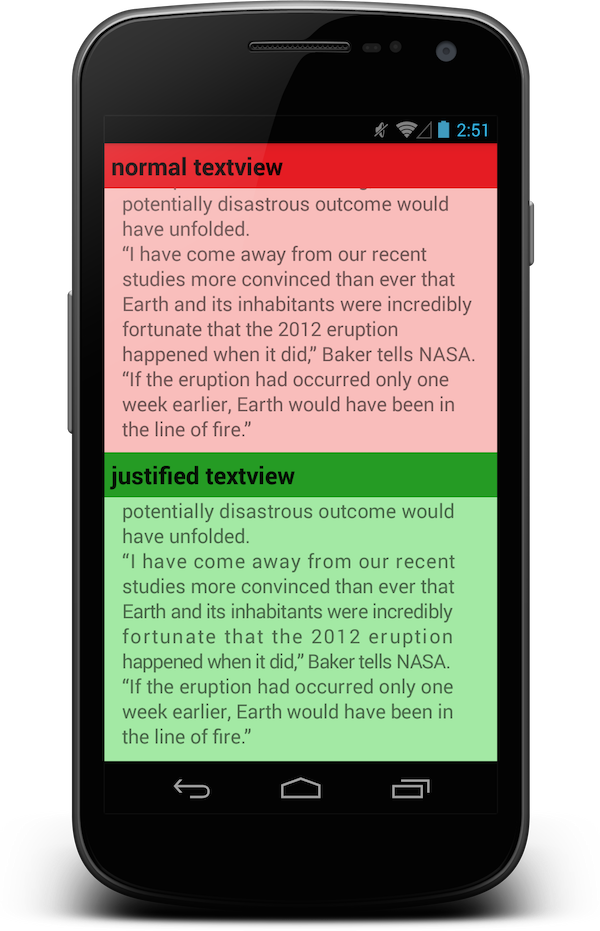
Android TextView: выравнивание текста по ширине
Как добиться выравнивания текста в TextView (с выравниванием текста слева и справа)?
Я нашел возможное решение здесь, но оно не работать (даже если вы измените vertical-center на center_vertical и т. д.).
26 ответов
Для выравнивания текста в android я использовал WebView
Я пока не могу загрузить изображения, чтобы доказать это, но «у меня это работает».
TextView в Android O предлагает полное выравнивание (новое типографское выравнивание).
Вам просто нужно сделать это:
Котлин
Java
XML
По умолчанию: JUSTIFICATION_MODE_NONE ( none в xml).
ОБНОВЛЕНО
Мы создали для этого простой класс. В настоящее время есть два метода достижения того, что вы ищете. Оба требуют НЕТ WEBVIEW и ПОДДЕРЖИВАЕТ SPANNABLES .
ПОДДЕРЖКА : Android 2.0 до 5.X
НАСТРОЙКА

Вы можете использовать проект JustifiedTextView для Android в github. это настраиваемый вид, имитирующий для вас выровненный по ширине текст. Он поддерживает Android 2.0+ и языки справа налево.
Для этого я пишу базу виджетов на собственном текстовом представлении.
Я нашел способ решить эту проблему, но это может быть не очень изящно, но эффект неплохой.
Его принцип заключается в замене пробелов в каждой строке на ImageSpan фиксированной ширины (цвет прозрачный).

Очень просто Мы можем сделать это в файле xml
Вот как я это сделал, на мой взгляд, самый элегантный способ. При использовании этого решения единственное, что вам нужно сделать в макетах:
- добавить дополнительную декларацию xmlns
- измените пространство имен исходного текста TextView s с android на новое пространство имен
- замените TextView на x.y.z.JustifiedTextView
Вот код. Прекрасно работает на моих телефонах (Galaxy Nexus Android 4.0.2, Galaxy Teos Android 2.1). Не стесняйтесь, конечно, заменить мое имя пакета вашим.
/assets/justified_textview.css :
/res/values/attrs.xml :
/res/layout/test.xml :
/src/net/bicou/myapp/widget/JustifiedTextView.java :
Нам нужно настроить рендеринг на программное обеспечение, чтобы получить прозрачный фон на Android 3+. Отсюда и проблема для более старых версий Android.
Надеюсь это поможет!
PS: пожалуйста, обратите внимание, что может быть полезно добавить это ко всей вашей деятельности на Android 3+, чтобы получить ожидаемое поведение:
android:hardwareAccelerated=»false»
Хотя вы все еще не полностью выровненный по ширине текст, теперь вы можете сбалансировать длину строк с помощью android:breakStrategy=»balanced» , начиная с API 23.
Выравнивание текста Android для TextView XML
Просто Android с выравниванием текста по ширине в XML. Вы можете просто реализовать в виджете textview.
По умолчанию android:justificationMode=»none»
Я пишу свой собственный класс для решения этой проблемы. Вот вам просто нужно вызвать статическую функцию выравнивания, которая принимает два аргумента.
- Текстовый объект просмотра
- Ширина содержимого (общая ширина вашего текстового представления)
FILL_HORIZONTAL эквивалентно CENTER_HORIZONTAL . Вы можете увидеть этот фрагмент кода в исходном коде textview:
Для этой проблемы существует CustomView, это настраиваемое текстовое представление поддерживает Justified Text View.
Добавьте указанный выше класс в папку src и используйте этот пример кода для добавления в свой макет:
Просто импортируйте два файла «TextJustifyUtils.java» и «TextViewEx.java» в свой проект.
Теперь, если вы используете обычный textView, например:
Определите переменную и установите для параметра justify значение true,
Обоснование содержания TextView: Его простые ребята просто используют android: justificationMode = «inter_word» в вашем теге TextView.
Просто попробуйте это,
Надеюсь на эту помощь!
Я думаю, что есть два варианта:
Используйте что-то вроде Pango, который специализируется на этом через NDK, и визуализируйте текст в OpenGL или на другой поверхности.
Android пока не поддерживает полное обоснование. Мы можем использовать Webview и выравнивать HTML вместо использования textview. Это прекрасно работает. Если вам непонятно, не стесняйтесь спрашивать меня 🙂
На android, чтобы выровнять текст по левому краю и не иметь усечения цвета фона, попробуйте это, у меня это сработало, давая согласованные результаты на android, ff, т.е. и chrome, но вы должны измерить пространство, которое осталось между текстом при расчете заполнения.
Хакерством является padding-right:1000px; , который сдвигает текст в крайнее левое положение.
Любая попытка сдвинуть код влево или по ширине в css или html приводит к созданию фона только половинной ширины.
Эта строка кода сделает ваш текст оправданным
Вы можете использовать justificationMode как inter_word в xml. Вы должны помнить, что этот атрибут доступен для уровня API 26 и выше. Для этого вы можете назначить targetApi как o. Полный код приведен ниже.
Попробуйте использовать RelativeLayout > (обязательно fill_parent), затем просто добавьте android:layout_alignParentLeft=»true» и
android:layout_alignParentRight=»true» к элементам, которые вы хотели бы видеть снаружи ВЛЕВО и ВПРАВО.
Источник
String resources
A string resource provides text strings for your application with optional text styling and formatting. There are three types of resources that can provide your application with strings:
String XML resource that provides a single string. String Array XML resource that provides an array of strings. Quantity Strings (Plurals) XML resource that carries different strings for pluralization.
All strings are capable of applying some styling markup and formatting arguments. For information about styling and formatting strings, see the section about Formatting and Styling.
String
A single string that can be referenced from the application or from other resource files (such as an XML layout).
Note: A string is a simple resource that is referenced using the value provided in the name attribute (not the name of the XML file). So, you can combine string resources with other simple resources in the one XML file, under one element.
file location: res/values/filename.xml
The filename is arbitrary. The element’s name is used as the resource ID. compiled resource datatype: Resource pointer to a String . resource reference: In Java: R.string.string_name
In XML: @string/string_name syntax: elements: Required. This must be the root node.
A string, which can include styling tags. Beware that you must escape apostrophes and quotation marks. For more information about how to properly style and format your strings see Formatting and Styling, below.
name String. A name for the string. This name is used as the resource ID. example: XML file saved at res/values/strings.xml :
This layout XML applies a string to a View:
This application code retrieves a string:
Kotlin
You can use either getString(int) or getText(int) to retrieve a string. getText(int) retains any rich text styling applied to the string.
String array
An array of strings that can be referenced from the application.
Note: A string array is a simple resource that is referenced using the value provided in the name attribute (not the name of the XML file). As such, you can combine string array resources with other simple resources in the one XML file, under one element.
file location: res/values/filename.xml
The filename is arbitrary. The element’s name is used as the resource ID. compiled resource datatype: Resource pointer to an array of String s. resource reference: In Java: R.array.string_array_name
In XML: @[package:]array/string_array_name syntax: elements: Required. This must be the root node.
Defines an array of strings. Contains one or more elements.
name String. A name for the array. This name is used as the resource ID to reference the array. A string, which can include styling tags. The value can be a reference to another string resource. Must be a child of a element. Beware that you must escape apostrophes and quotation marks. See Formatting and Styling, below, for information about to properly style and format your strings.
example: XML file saved at res/values/strings.xml :
This application code retrieves a string array:
Kotlin
Quantity strings (plurals)
Different languages have different rules for grammatical agreement with quantity. In English, for example, the quantity 1 is a special case. We write «1 book», but for any other quantity we’d write «n books». This distinction between singular and plural is very common, but other languages make finer distinctions. The full set supported by Android is zero , one , two , few , many , and other .
The rules for deciding which case to use for a given language and quantity can be very complex, so Android provides you with methods such as getQuantityString() to select the appropriate resource for you.
Although historically called «quantity strings» (and still called that in API), quantity strings should only be used for plurals. It would be a mistake to use quantity strings to implement something like Gmail’s «Inbox» versus «Inbox (12)» when there are unread messages, for example. It might seem convenient to use quantity strings instead of an if statement, but it’s important to note that some languages (such as Chinese) don’t make these grammatical distinctions at all, so you’ll always get the other string.
The selection of which string to use is made solely based on grammatical necessity. In English, a string for zero is ignored even if the quantity is 0, because 0 isn’t grammatically different from 2, or any other number except 1 («zero books», «one book», «two books», and so on). Conversely, in Korean only the other string is ever used.
Don’t be misled either by the fact that, say, two sounds like it could only apply to the quantity 2: a language may require that 2, 12, 102 (and so on) are all treated like one another but differently to other quantities. Rely on your translator to know what distinctions their language actually insists upon.
It’s often possible to avoid quantity strings by using quantity-neutral formulations such as «Books: 1». This makes your life and your translators’ lives easier, if it’s an acceptable style for your application.
Note: A plurals collection is a simple resource that is referenced using the value provided in the name attribute (not the name of the XML file). As such, you can combine plurals resources with other simple resources in the one XML file, under one element.
file location: res/values/filename.xml
The filename is arbitrary. The
element’s name is used as the resource ID. resource reference: In Java: R.plurals.plural_name syntax: elements: Required. This must be the root node.
A collection of strings, of which, one string is provided depending on the amount of something. Contains one or more elements.
name String. A name for the pair of strings. This name is used as the resource ID. A plural or singular string. The value can be a reference to another string resource. Must be a child of a
element. Beware that you must escape apostrophes and quotation marks. See Formatting and Styling, below, for information about to properly style and format your strings.
quantity Keyword. A value indicating when this string should be used. Valid values, with non-exhaustive examples in parentheses:
| Value | Description |
|---|---|
| zero | When the language requires special treatment of the number 0 (as in Arabic). |
| one | When the language requires special treatment of numbers like one (as with the number 1 in English and most other languages; in Russian, any number ending in 1 but not ending in 11 is in this class). |
| two | When the language requires special treatment of numbers like two (as with 2 in Welsh, or 102 in Slovenian). |
| few | When the language requires special treatment of «small» numbers (as with 2, 3, and 4 in Czech; or numbers ending 2, 3, or 4 but not 12, 13, or 14 in Polish). |
| many | When the language requires special treatment of «large» numbers (as with numbers ending 11-99 in Maltese). |
| other | When the language does not require special treatment of the given quantity (as with all numbers in Chinese, or 42 in English). |
example: XML file saved at res/values/strings.xml :
XML file saved at res/values-pl/strings.xml :
Kotlin
When using the getQuantityString() method, you need to pass the count twice if your string includes string formatting with a number. For example, for the string %d songs found , the first count parameter selects the appropriate plural string and the second count parameter is inserted into the %d placeholder. If your plural strings do not include string formatting, you don’t need to pass the third parameter to getQuantityString .
Format and style
Here are a few important things you should know about how to properly format and style your string resources.
Handle special characters
When a string contains characters that have special usage in XML, you must escape the characters according to the standard XML/HTML escaping rules. If you need to escape a character that has special meaning in Android you should use a preceding backslash.
By default Android will collapse sequences of whitespace characters into a single space. You can avoid this by enclosing the relevant part of your string in double quotes. In this case all whitespace characters (including new lines) will get preserved within the quoted region. Double quotes will allow you to use regular single unescaped quotes as well.
| Character | Escaped form(s) |
|---|---|
| @ | \@ |
| ? | \? |
| New line | \n |
| Tab | \t |
| U+XXXX Unicode character | \uXXXX |
| Single quote ( ‘ ) | |
| Double quote ( » ) | \» Note that surrounding the string with single quotes does not work. Whitespace collapsing and Android escaping happens after your resource file gets parsed as XML. This means that (space, punctuation space, Unicode Em space) all collapse to a single space ( » » ), because they are all Unicode spaces after the file is parsed as an XML. To preserve those spaces as they are, you can either quote them ( » » ) or use Android escaping ( \u0032 \u8200 \u8195 ). Note: From XML parser’s perspective, there is no difference between «Test this» and «Test this» whatsoever. Both forms will not show any quotes but trigger Android whitespace-preserving quoting (that will have no practical effect in this case). Formatting stringsIf you need to format your strings, then you can do so by putting your format arguments in the string resource, as demonstrated by the following example resource. In this example, the format string has two arguments: %1$s is a string and %2$d is a decimal number. Then, format the string by calling getString(int, Object. ) . For example: KotlinStyling with HTML markupYou can add styling to your strings with HTML markup. For example: The following HTML elements are supported:
If you aren’t applying formatting, you can set TextView text directly by calling setText(java.lang.CharSequence) . In some cases, however, you may want to create a styled text resource that is also used as a format string. Normally, this doesn’t work because the format(String, Object. ) and getString(int, Object. ) methods strip all the style information from the string. The work-around to this is to write the HTML tags with escaped entities, which are then recovered with fromHtml(String) , after the formatting takes place. For example:
In this formatted string, a element is added. Notice that the opening bracket is HTML-escaped, using the notation. Then format the string as usual, but also call fromHtml(String) to convert the HTML text into styled text: KotlinBecause the fromHtml(String) method formats all HTML entities, be sure to escape any possible HTML characters in the strings you use with the formatted text, using htmlEncode(String) . For instance, if you are formatting a string that contains characters such as » fromHtml(String) , the characters come out the way they were originally written. For example: KotlinStyling with spannablesA Spannable is a text object that you can style with typeface properties such as color and font weight. You use SpannableStringBuilder to build your text and then apply styles defined in the android.text.style package to the text. You can use the following helper methods to set up much of the work of creating spannable text: KotlinThe following bold , italic , and color methods wrap the helper methods above and demonstrate specific examples of applying styles defined in the android.text.style package. You can create similar methods to do other types of text styling. KotlinHere’s an example of how to chain these methods together to apply various styles to individual words within a phrase: KotlinThe core-ktx Kotlin module also contains extension functions that make working with spans even easier. You can check out the android.text package documentation on GitHub to learn more. For more information on working with spans, see the following links: Styling with annotations
Example — adding a custom typefaceLoad the string resource and find the annotations with the font key. Then create a custom span and replace the existing span. KotlinIf you’re using the same text multiple times, you should construct the SpannableString object once and reuse it as needed to avoid potential performance and memory issues. For more examples of annotation usage, see Styling internationalized text in Android Annotation spans and text parcelingBecause Annotation spans are also ParcelableSpans , the key-value pairs are parceled and unparceled. As long as the receiver of the parcel knows how to interpret the annotations, you can use Annotation spans to apply custom styling to the parceled text. To keep your custom styling when you pass the text to an Intent Bundle, you first need to add Annotation spans to your text. You can do this in the XML resources via the tag, as shown in the example above, or in code by creating a new Annotation and setting it as a span, as shown below: KotlinRetrieve the text from the Bundle as a SpannableString and then parse the annotations attached, as shown in the example above. KotlinFor more information on text styling, see the following links: Content and code samples on this page are subject to the licenses described in the Content License. Java is a registered trademark of Oracle and/or its affiliates. Источник  Когда к мобильному устройству присоединены наушники  ОС Google Android развивается, и по всему видимому |