- How to install Android SDK and setup AVD Emulator without Android Studio
- Understanding the Android SDK
- Installing the Android SDK
- Step 1 — Download the tools package
- Step 2— You need Java 8!
- Step 3 — Download the essential packages
- Step 4 — Set your environmental variables
- Step 5 — Download the platform specific packages you want
- Step 5 — Create a AVD device
- Step 6 — Run the Android Emulator
- AVD Manager & SDK Manager Missing or greyed out in Android Studio
- AVD Manager is missing
- SDK Build Tools are not installed
- SDK Path is Invalid
- Android SDK Manager not visible
- References
- Summary
- How to Install, Setup and Use Android Emulator for Mac, Linux and Windows without installing Android Studio
- — And save yourself a lot of space!
- Step 1: Install Java Development Kit 8.
- Step 2: Install Android SDK.
- Important note for the next two steps:
- Step 3: Install platform and build tools required for React Native.
- Step 4: Create a new virtual device.
How to install Android SDK and setup AVD Emulator without Android Studio
If you are trying to develop to Android, you probably will end up installing the Android Studio to get the Android SDK and the AVD Emulator working properly.
But if you are using another code editor, like Sublime Text or VSCode, installing the Android Studio will just mess up with your setup and consume your precious RAM for no good reason.
I had a hard time figuring out how to properly do this setup due the lack of documentation about it, so i hope this article helps you. 🙂
Recommended previous knowledge:
- SDK (Standard Development Kit); Read about on Wikipedia;
- AVD (Android Virtual Device); Read about on docs;
- CLI (Command Line Interface); Read about on Wikipedia;
- Android API levels; Read about on Vanderbilt University;
- How to open, navigate and execute files in your OS terminal;
- Know what are environmental variables;
Understanding the Android SDK
Basically, the Android SDK is a bunch of packages necessary to develop for Android.
These packages stays in subfolders of a folder called “sdk” (or “android-sdk” sometimes). You do not need to know how these packages really work, just what they do.
The picture below is my Android SDK folder, these are the basic packages you will need in order to get everything working properly.
Here is a brief explanation of each package:
- tools: This package is mainly used to manage the other packages and to create AVD’s;
- emulator: As the name suggest, this is the Android emulator;
- platform-tools: Some tools to communicate with Android devices when you plug then in your computer;
- patcher: This package is automatically downloaded by the SDK. I didn’t find what exactly this is for, so just leave it as it is;
The folders bellow contain sub-folders with the packages for each Android API level.
- platforms: The platform packages are required to compile your app for the specified API level.
- system-images: These are the android images used in the emulator.
- build-tools: These are necessary to build your Android apps
Installing the Android SDK
In order to install the SDK we will use the Command Line Tools. These are some quite simple CLI’s used to manage the Android SDK. You can read the documentation here for more details.
Step 1 — Download the tools package
First, you need to download the tools package. And with this package you can download the others.
- First, go to the Android Studio download page: https://developer.android.com/studio;
- Then click in “ Download Options”;
- There you will find a table named “ Command line tools only”;
- This table contain some zip files. Download the appropriate file for your system ( Windows, Mac or Linux);
- Extract this zip and you will get a folder called tools: This is the tools package i explained earlier;
Create a folder anywhere you prefer to place your SDK. I recommend you to stick with one of these commonly used places:
- Globally: C:\Android\sdk or C:\android-sdk (this is not default, but i usually set my SDK here on Windows)
- One user only: C:\Users\ \AppData\Local\Android\sdk
- Globally: /Library/Android/sdk
- One user only: /Users/ /Library/Android/sdk
And move the tools folder to this new sdk folder. Make sure you have admin access to this folder and any sub-folders inside it, or the tools package will fail to download new packages.
Note: You can also download a pre-build package for your SO (like the one available on Ubuntu repository). But i do not recommend you do to so, because they probably will not be updated and will be harder to manage, since it was automatically installed.
Step 2— You need Java 8!
The Android SDK packages require Java 8. If you do not have it, you need to download. If you are using a newer version, you have to downgrade to Java 8 or you will eventually get some errors, because it is not compatible.
If you do not have the Java 8 SDK, here is how you can install it:
On Ubuntu run these commands:
- # sudo apt-get update
- # sudo apt-get install openjdk-8-jdk
Sorry for MacOS users, i don’t know how to install it on this OS.
Step 3 — Download the essential packages
Now, download the platform-tools and the emulator packages, because they contain some CLI binary files you will need later. I decided to download these packages first in order to set all the necessary environment variables at once and make the rest of the process easier.
Open a terminal window (you need to use a terminal, not the file explorer), go to your sdk folder and navigate to the /tools/bin directory.
This folder contain the SDKManager binary: this is a CLI used to list the available packages in the Google’s repository and download, update or remove them from your SDK folder.
The bellow command will list all packages installed (the first items on the list) and all packages available to download:
To download the packages, simply copy the package names and pass it as a parameter to the SDKManager CLI using the terminal:
# ./sdkmanager platform-tools emulator
If you open your sdk folder you should see these packages folders there.
Step 4 — Set your environmental variables
You need to set the below environmental variables containing the path to our SDK, so any running program can find it in your pc:
ANDROID_SDK_ROOT = Path to your SDK folder
ANDROID_HOME = The same as ANDROID_SDK_ROOT. This variable is now deprecated, but i recommend setting it because some programs still using it to locate your sdk.
And add these folders to the PATH variable, making their binary files accessible from everywhere:
To add the environment variables on WIndows, just follow these steps:
- Open the “Control Panel”;
- Go to “ System and Security” option in the side menu;
- In the window “ System Properties” open the tab “ Advanced”;
- Click in the button “ Environment Variables” in the bottom of the page;
- In the “ Environment Variables” window you will see two tables: “User Variables” and ” System Variables”.
- If you created your sdk folder for one user only, set the variables in the “ User Variables” table;
- But, if you create your sdk folder globally, set the variables in the “ System Variables” table instead;
On Linux, you can set your environment variables in many places. So i choose the ones I found the most appropriate:
- If you created your sdk folder for one user only, set your environment variables in the file
/.bashrc;
Here is how i set these variables in my Ubuntu, using the file /etc/environment:
And sorry again, no MacOS instructions for this task.
You can find more about these environmental variables in the oficial docs here.
Now your SDK is ready! If you do not need to run the emulator there’s no need to follow the next steps.
Step 5 — Download the platform specific packages you want
You need more three packages: The platform, the system-image and the build-tools. You can download these packages for any Android version you prefer. In this article, i will download the packages for the API Level 28.
Use the “ sdkmanager — list” command to find these packages and download them using the command “ sdkmanager
Here’s an example:
Step 5 — Create a AVD device
Creating a AVD device is a simple task: run the AVDManager command (this is a binary file located in the tools/bin folder of your sdk) with the create avd option, a name for the new AVD and the image you want to use.
Here is a example:
# avdmanager create avd — name android28 — package “system-images;android-28;default;x86”
You will be asked if you want to alter some configurations. You can also modify these configurations later in the file config.ini, located in the avd folder (this folder usually is created in your user folder, under the android directory). The currently active configurations can be find in the file hardware-qemu.ini (this file just will be created after the emulator runs for the first time).
Step 6 — Run the Android Emulator
Now you just need to run the emulator command (remember that we added this package to the environmental variables?):
The emulator take some time to init for the first time. But if you done everything correctly you should see this screen:
Источник
AVD Manager & SDK Manager Missing or greyed out in Android Studio
AVD Manager or SDK Manager becomes greyed out or goes missing from the Android Studio is the common issue that arises in Android studio. This guide explores all the possibilities of that happenings and discusses how you can solve them.
You can find the AVD Manager & SDK Manager option under the Tools menu as shown below. In the older version of the Android studio you will find this menu under the Tools -> Android.
It may happen that you may find AVD Manager & SDK Manager options goes missing from the menu as shown below
Table of Contents
AVD Manager is missing
- Android Menu under tools is missing.
- Might see “Failed to find Build Tools revision xx.x.x” as shown below
- AVD Manager is greyed out in the toolbar
This may happen for several reasons
- SDK Build Tools are not installed
- Invalid SDK Path
SDK Build Tools are not installed
SDK Build tools are installed when you create a new project. If it fails then you may have to install it again. You look at the build tab at the bottom of the screen, it will display the error message and option to install the Build tools. Install it and you should be able to see the AVD Manager.
Another way is to go to the SDK Manager. Under SDK Tools you will find the Android SDK Build tools. Install based on the API. Also ensure that you have the latest version of Emulator, Platform-Tools & SDK Tools installed.
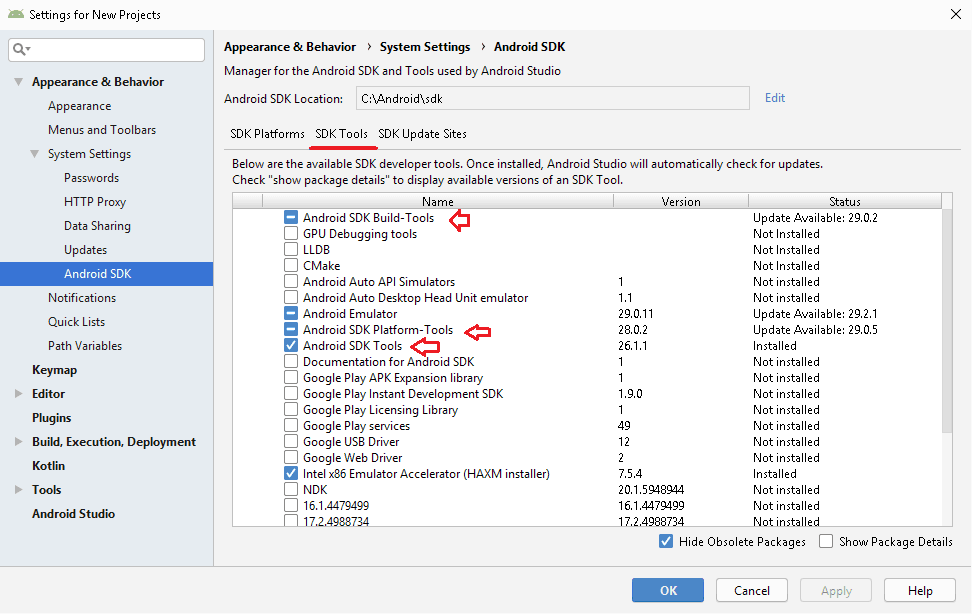
SDK Path is Invalid
Invalid or Missing SDK Path is another reason for such errors. Open the Android SDK Manager ( Tools -> SDK Manager) and check the Android SDK Location as shown in the image below
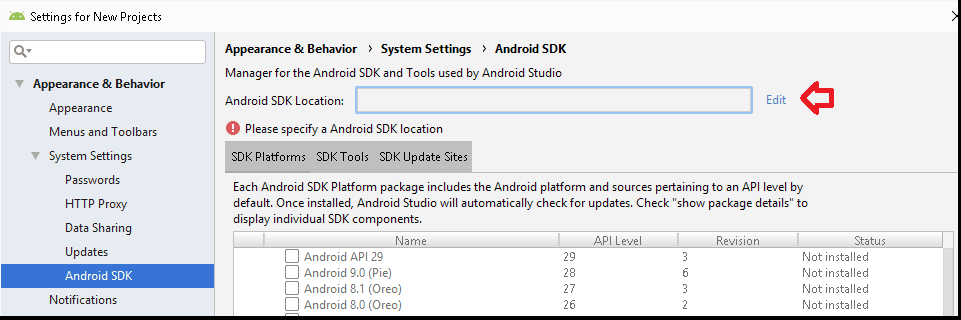 AVD Manager Missing because Android SDK Path is invalid
Ensure that it points to the correct location. The SDK is usually installed at the location C:\Users\ \AppData\Local\Android\sdk . If you cannot find the location or you have logged in as a different user, then you can create the folder and enter it here. Once the path is valid, the Android studio will download & install the required SDK on its own.
Android SDK Manager not visible
If Android SDK Manager is not visible then you need to reinstall the Android Studio. Follow these steps to Uninstall and Install Android Studio.
- Uninstall Android Studio
- Delete the folder C:\Program Files\Android ( C:\Program Files (x86)\Android if 32bit installation)
- Remove the SDK Folder. You will find it here C:\Users\ \AppData\Local\Android\sdk. (unless you have changed it)
- Install the Android Studio
References
Summary
In this guide, we learned how to solve the AVD Manager or SDK Manager missing or greyed out issue in Android Studio.
Источник
How to Install, Setup and Use Android Emulator for Mac, Linux and Windows without installing Android Studio

Jan 12, 2019 · 5 min read
— And save yourself a lot of space!
So let me ask you first —
How many of you have installed Android Studio only to use the emulator for your native app? Oh, and don’t forget the way your system struggles when you try to run it!

And no, I’m not just talking about any average system — even my Macbook Pro with 8GB of RAM makes a lot of noise!
A lot of you might have also c ome across alternatives like Genymotion , Nox , BlueStacks and a lot others. Some are free, while a lot others with really nice features and performance are paid.
So most of us stick to the free ones or end up downloading Android Studio for the really good and easy to use emulator it provides.
But it gets worse when you already have Visual Studio Code , a few tabs on Google Chrome and your music player running!

Okay enough with the memes, let’s quickly set up Android Studio’s emulator in a better way this time — without actually installing Android Studio! ✊
Step 1: Install Java Development Kit 8.
First you’ll need to install JDK 8. Windows and linux users can directly visit the link and download it after accepting the license.
For Mac users, I recommend installing via Homebrew :
Windows and Linux users should make sure that they have set-up path to their Java installation.
Step 2: Install Android SDK.
Once we have installed and set-up Java in our system, we will need to install Android SDK.
Windows and linux users can download the command line tools here.
Mac users can install it by running:
Note for Mac users: If you run into an error like this while installing android SDK :
Then you simply need to run the below command and try installing android-sdk again :
After installing, make sure you have added android-sdk to your system path.
For Mac and Linux users, you need to add the following line to your .bashrc or .zshrc :
Important note for the next two steps:
Incase your system complains about not being able to find the command while trying to issue the next set of commands involving sdkmanager , avdmanager or emulator — you can navigate to the directory where it is present inside the android-sdk folder and run them as ./sdkmanager , ./avdmanager and ./emulator respectively.
For those of you who are feeling lazy to find it yourself :
sdkmanager and avdmanager will be located inside android-sdk/tools/bin whereas emulator can be found inside android-sdk/tools.
Now that we know this, let’s continue towards a better development experience!
Step 3: Install platform and build tools required for React Native.
Now we can go ahead and set-up platform and build tools to help us in creating and running our virtual device in android emulator.
To do this, open your terminal and run the following command :
Once we have downloaded the above packages, run the following command to list all the tools available :
This will fetch the complete list of the available packages on remote that you can download to your system. You can download packages from the list by running :
Note: sdk-path is the string in the leftmost column of the generated list. And it must be wrapped in quotes while running the above command. For example, let’s say we want to create a virtual device which requires Google APIs Intel x86 Atom System Image package, we can install the package by running :
You can download the packages that you need from the list and if you look closely, you’ll find android emulator package there too! But don’t worry I won’t make you go through the long list in your terminal, here’s the command you need to run in order to download the android emulator package :
That’s it! We’ve downloaded the android emulator and we’re ready to set-up our Android virtual device!
Step 4: Create a new virtual device.
Let’s create an android virtual device with the help of Google APIs Intel x86 Atom System Image we downloaded through the previous command, which was :
Now to create a virtual device, run the following command :
This will create a virtual device named myTestDevice using the Intel x86 Atom system image we downloaded .
To check if your device was created, you can run :
This will list all the virtual devices present in your system.
If you followed all the instructions properly, you can see your device listed as well and you must be able to start your virtual device by running :
And now your android emulator will start with the device you just created! But this time in a better way just like you always deserved — without wasting your precious storage space! 🎉
And don’t forget to leave a few claps if you liked this post or share it with someone who might need this! 😄
Don’t forget, you can leave upto 50 claps!! 👏👏
Happy Hacking! Cheers!
Do you have any queries or suggestions? Did you run into some problem while installing or setting up? Leave your comment on the post and I’d love to help you out!
Источник


