- Android Power Management
- Contents
- wakelocks
- Creating a wakelock
- Using a wakelock inside the kernel
- Using a wakelock from user space
- Sample ‘cat /proc/wakelocks’ output
- Patch submission controversy
- Wakelock documentation (from patch)
- Motorola quickwakeup feature
- Earlysuspend
- May 2010 patch submission — «Suspend blockers»
- Android для юниксоида. Используем смартфон в связке с Linux
- Содержание статьи
- WARNING
- Adb-sync
- Adbfs
- Go-mtpfs
- Bash, tmux, mc
- Xakep #228. Как крадут ICO
- Rsync
- SSHButton
- Выводы
- Евгений Зобнин
- Ubuntu Wiki
- PowerManagement
- Planned work for Lucid
- Handling hardware events
- DeviceKit-power quirks
- Power management packages
- Power (saving) states
- Architecture
- How to get disks to spin down and idle correctly (without excessive load cycling)
- 8.10 to 9.10
- 8.04 (Hardy)
- Comments
Android Power Management
Notes on Power Management in Android
Contents
wakelocks
The first version of Android utilized a system called «wakelocks», which was a set of patches to the Linux kernel to allow a caller to prevent the system from going to low power state.
Each wakelock is defined with a name and type. The type is one of:
- WAKE_LOCK_IDLE, or
- WAKE_LOCK_SUSPEND.
The name is an arbitrary ASCII string.
When a wake lock of type «IDLE» is in effect, the system will not enter idle (low power) state, and this should make the device more responsive. That is, it does not have to wake up from idle to respond to interrupts or events. When a wake lock of type «SUSPEND» is held, then the system will not suspend, which takes even longer to resume from.
You can, from user space, see the currently defined wakelocks and a bunch of information about their status, using ‘cat /proc/wakelocks’
Below is an example of output from that command.
To see the code for this, see the file:
NOTE: See the Discussion page for a note on this file.
Creating a wakelock
Kernel code can define a wakelock, and get a handle to it, by calling:
From user space, a process can write a name to
to create and lock a suspend lock with that name.
Using a wakelock inside the kernel
Kernel code can acquire and release the lock with one of the following:
Kernel code can also set a timeout to specify automatic release of the wakelock after a specific period, with:
The wakelock does not need to be held prior to calling this (it will automatically lock the wakelock and register the timeout).
Using a wakelock from user space
To release a suspend wake lock from user space, a process can write the lock name to: /sys/power/wake_unlock
Sample ‘cat /proc/wakelocks’ output
Here are some wakelocks from my ADP1 phone, running Donut (I think):
Note: I widened the columns and adjusted the title row to make the columns line up better.
Patch submission controversy
Arve Hjønnevå (of Google) sent patches to the linux-pm mailing list in of 2009, but they were rejected. See this thread for the submission and resulting discussion. This was the third version of the patches submitted for review by the kernel community.
The reasons for the rejection are described in the LWN.NET article Wakelocks and the embedded problem.
Wakelock documentation (from patch)
The 3rd version of the wakelock patch included the following /Documentation/power/wakelock.txt file
Motorola quickwakeup feature
Jocelyn Falempe of Motorola proposed (in November, 2009) a quickwakeup feature to make it possible to reduce the time for a periodic job to resume, do a small amount of work, and suspend again.
Earlysuspend
Arve’s patches also included something referred to as «earlysuspend», but I haven’t reviewed this yet to see what it is.
May 2010 patch submission — «Suspend blockers»
Arve refactored the patches and did a name change, and submitted them again in April and May of 2010. There was a LOT of discussion on the linux-pm mailing list, which many developers participated in. The discussion raised lots of questions, and lots of responses were given. People interested in Android power management may get more enlightenment by reading the thread.
Источник
Android для юниксоида. Используем смартфон в связке с Linux

Содержание статьи
Начнем с излюбленного инструмента всех продвинутых пользователей Android — ADB. Мы уже много раз писали о нем, однако здесь просто обязаны повториться. Итак, ADB расшифровывается как Android Debug Bridge, и по сути это нечто вроде системы управления смартфоном с компа. ADB позволяет устанавливать и запускать софт, перемещать файлы с устройства и на устройство и выполнять многие другие задачи.
Чтобы настроить ADB в Windows, пришлось бы устанавливать драйверы и перезагружать машину, в Linux он просто работает. Достаточно активировать ADB на смартфоне (Настройки → Для разработчиков → Отладка по USB) и установить пакет с утилитой adb в систему:
Далее необходимо подключить смартфон к компу и начать отдавать команды.
Получение списка подключенных устройств:
Установка на подключенное устройство APK:
Перемещение файла на устройство:
Скачивание файла с устройства:
Сделать скриншот и скачать его на комп:
Нажатие кнопки Power:
Ну и конечно же, ADB можно использовать для получения доступа к командной строке смартфона:
Важно отметить, что ADB может работать не только по USB, но и по Wi-Fi, однако для этого нужны права root на устройстве и приложение WiFi ADB. Запускаем приложение, включаем переключатель и подсоединяемся к смартфону с помощью adb connect и показанного приложением IP-адреса:
WARNING
В некоторых дистрибутивах ADB может не работать без прав root. Так происходит из-за отсутствия специальных правил Udev в дистрибутиве. Придется либо устанавливать их как отдельный пакет ( android-udev в Arch Linux), либо настраивать Udev самостоятельно.
Adb-sync
ADB можно использовать и для синхронизации файлов между устройствами (для этого даже есть опция sync ), однако удобнее воспользоваться скриптом adb-sync. Его достаточно скачать и запустить. Например, так можно синхронизировать музыку на устройстве и на ПК:
А так выполнить ту же синхронизацию, но с удалением файлов, которые были удалены на ПК:
Простой способ скачать файлы на комп (обратная синхронизация):
Adbfs
Еще один интересный способ получить доступ к файлам на устройстве с помощью ADB — использовать adbfs, псевдоФС, которая позволяет смонтировать устройство так, будто это флешка или любой другой накопитель.
Проще всего установить adbfs в Arch Linux. Здесь она есть в AUR, поэтому достаточно выполнить одну команду:
В Ubuntu и других системах adbfs придется собирать вручную:
Ну а дальше можно подключать файловую систему:
Go-mtpfs
Еще один вариант подключения устройства как файловой системы — go-mtpfs, файловая система, позволяющая передавать данные по протоколу MTP. Именно этот протокол используется в смартфонах без карты памяти.
В Arch Linux установить go-mtpfs очень просто:
В других дистрибутивах несколько сложнее:
Дальше все так же элементарно, как с adbfs:
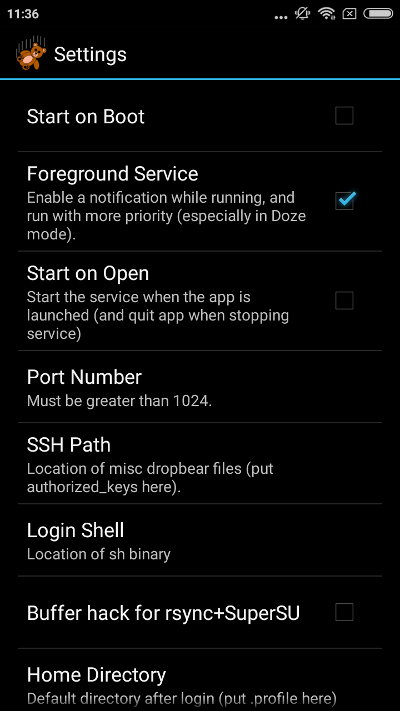
Идея использовать ADB для общения с устройством может показаться странной, если учитывать, что для Android существует сразу несколько различных SSH-серверов, не требующих права root. Так оно и есть, во многих случаях SSH будет удобнее и эффективнее. В качестве реализации сервера советую выбрать SimpleSSHD, простую бесплатную обертку для проверенного временем SSH-сервера DropBear для встраиваемых систем. Если у тебя есть root, то рекомендую также установить BusyBox On Rails, набор утилит командной строки, наиболее близкий к дистрибутивам Linux.
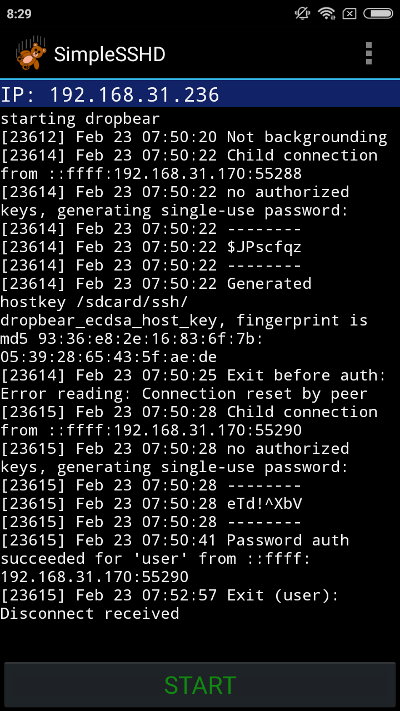
Использовать SimpleSSHD очень просто. Запускаешь, нажимаешь START и подключаешься к указанному IP-адресу (порт 2222):
В момент подключения на экране появится одноразовый пароль, который следует указать в клиенте. Это не очень удобный способ аутентификации, но ты можешь настроить аутентификацию по ключам. Просто переименуй свой открытый ключ (
/.ssh/id_rsa.pub ) в authorized_keys и положи в каталог ssh на карте памяти смартфона.
 |  |
| SimpleSSHD | |
Bash, tmux, mc
SSH-сервер на смартфоне сам по себе открывает широкие возможности, но еще шире их можно сделать, если установить на смартфон классические инструменты, такие как bash, tmux и mc. Последний позволит в том числе с удобством ходить по карте памяти и прибраться в случае необходимости.
О том, как установить на смартфон bash, tmux, mc и nano, я уже рассказывал в статье про сервер на базе смартфона, но позволю себе повториться. И сразу предупрежу, что тебе потребуются права root на смартфоне.
Итак, скачиваем Terminal IDE, переименовываем пакет APK в ZIP, распаковываем, находим файл assets/system-2.0.tar.gz.mp3 , переименовываем, убирая расширение mp3, и распаковываем. Внутри будет множество каталогов и файлов, из которых нас интересуют только system/bin и system/etc/terminfo . Первый содержит нужные нам утилиты; скопируй те, что тебе пригодятся, в отдельный каталог. Второй необходим для корректного функционирования утилит.
Выбранные утилиты и каталог terminfo скинь на карту памяти смартфона. Затем подключись к нему по SSH и введи следующие команды, чтобы получить возможность модификации системного каталога:
Далее скопируй все нужные утилиты в /system/xbin/ и установи на них бит исполнения (на примере bash):
Затем создай файл /sdcard/ssh/.bashrc , помести в него следующие строки:
Открой настройки SimpleSSHD на смартфоне и в опции Login Shell укажи /system/xbin/bash , останови и вновь запусти сервер. При следующем входе по SSH откроется bash и будут доступны скопированные тобой утилиты.
Чтобы добиться корректной работы Vim и mc, скопируй на карту памяти также каталоги etc/mc и etc/vim , а в файл /sdcard/ssh/.bashrc добавь строки:
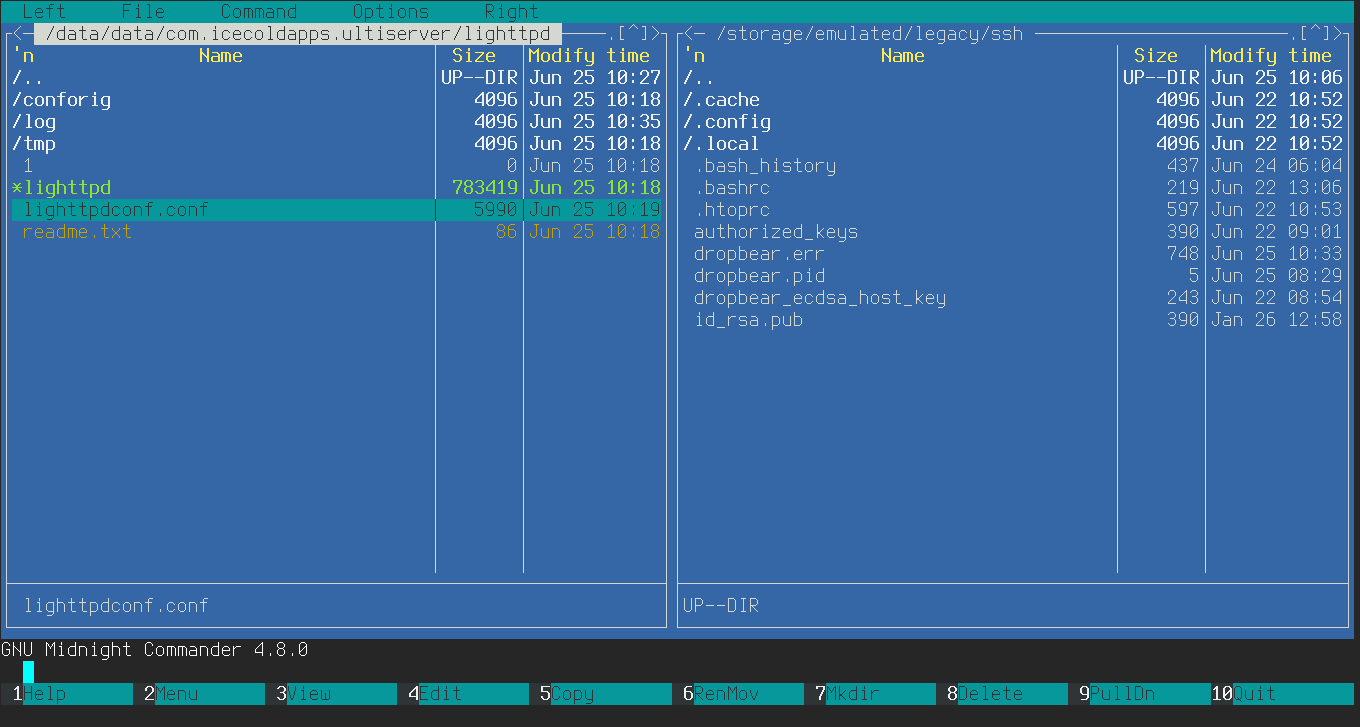 Midnight commander, запущенный в Android
Xakep #228. Как крадут ICO
Rsync
SSH-сервер дает нам возможность использовать rsync, мощную утилиту для синхронизации и бэкапа файлов. Rsync позволяет осуществлять быструю двунаправленную синхронизацию файлов между двумя машинами (или машиной и смартфоном, как в нашем случае) с выкачиванием только новых и измененных файлов и возможностью возобновления прерванной синхронизации.
Простейший пример использования rsync в связке со смартфоном:
Эта команда скопирует все фотографии со смартфона в каталог
/Photos , пропустив те, что уже есть в каталоге. Связка опций -azv в данном случае означает, что каталог необходимо передать как есть со всеми его подкаталогами и правами доступа (флаг -a ) плюс использовать сжатие (флаг -z ).
Обратная команда — копирование данных с машины на смартфон:
Здесь мы использовали флаг —delete , чтобы удалить файлы, которые были удалены из локального каталога
По умолчанию при обрыве соединения rsync будет удалять частично переданные файлы. Чтобы этого избежать, можно использовать флаг —partial , который заставит rsync сохранять недокачанные файлы и возобновить их загрузку при следующем запуске команды.
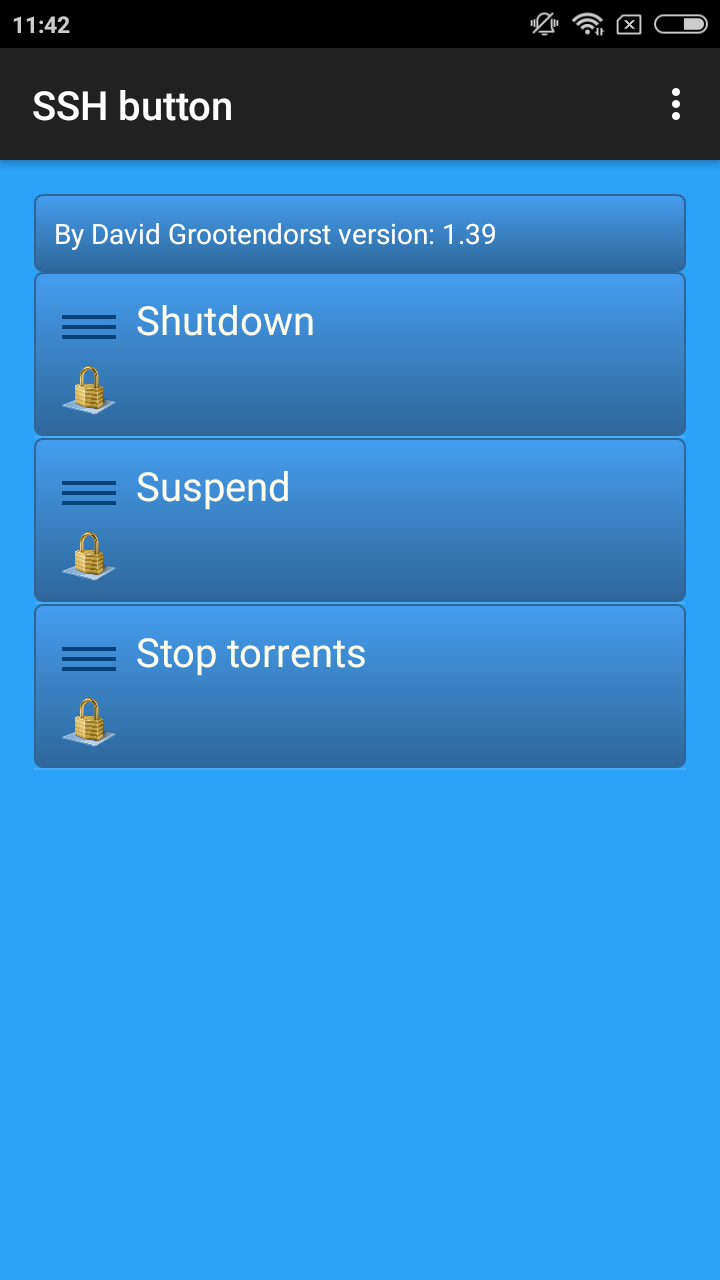
SSHButton
Ок, к смартфону мы подключились, файлы синхронизировали, но что, если нам нужно обратное SSH-подключение от смартфона к компу? В этом случае подойдет любой из десятков SSH-клиентов для Android (тот же ConnectBot, например), если, конечно, ты готов вводить команды на сенсорной клавиатуре маленького экрана.
Если не готов, твой выбор — приложение SSH button, позволяющее запускать нужную команду на нужной машине по нажатию кнопки. Интерфейс у SSH button страшный, но приложение отлично работает. Просто запусти SSH button, далее Меню → Add. и введи нужную команду, адрес SSH-сервера, логин и пароль.
SSH button удобно использовать для выключения или усыпления компа (команды systemctl suspend и halt ), запуска и остановки торрентов, контролирования музыки (например, плеер mocp, о котором я рассказывал в одной из прошлых статей, позволяет управлять собой через командную строку).
 |  |
| SSH button | |
Выводы
Использовать Android в связке с Linux действительно удобно. В отличие от Windows здесь не нужны дополнительные драйверы, специальные серверы и прочие странные вещи. В большинстве случаев можно обойтись стандартными для мира Linux SSH и rsync, но в Сети всегда можно найти более интересные инструменты.

Евгений Зобнин
Редактор рубрики X-Mobile. По совместительству сисадмин. Большой фанат Linux, Plan 9, гаджетов и древних видеоигр.
Источник
Ubuntu Wiki
PowerManagement
- Handling of hardware events
- Power state switching
- Letting disks idle (buffering disk writes, aka laptop-mode)
Though power management will deal with these, the objectives of the tasks do not solely lie in power management. It may be adviseable to rely on tools specialized for their tasks, instead of implementing an incomplete power management utility.
Planned work for Lucid
Created:
Contributors:
Packages affected:
Handling hardware events
The acpi-support package should be deprecated; however, new homes need to be found for its current contents.
power-related things to clean up:
/etc/acpi/start.d: these are currently launched by the init script, which has no equivalent in other packages currently
- 10-save-dmidecode: superseded by /sys interfaces
60-asus-wireless-led: should be moved to the kernel (cf. https://bugs.edge.launchpad.net/bugs/22795)
/etc/acpi/events/: mostly keypress handling, most of which is probably obsolete and should be dropped, but verification needed. Some keypress handling is not obsolete, and needs replacement handling implemented via hal or devicekit (e.g., /etc/acpi/events/asus-touchpad; /etc/acpi/events/ibm-wireless). And some events are not keypress events at all and need to be handled by hald-addon-acpi or a devicekit-based replacement.
DeviceKit-power quirks
Previously, hal had a suspend/resume quirks database that was used to construct a correct commandline for pm-suspend. devicekit-power doesn’t have this; it needs to be implemented.
Power management packages
Foremost there is the apm and acpi support in the linux kernel.
They make those kind of «hard» events like the end of battery power or the pressing of the suspend or other (laptop) buttons available to our software world.
Then there are event manager daemons apmd and acpid
They provide means to execute commands on these external events. They run the scripts they find in their config directory tree under /etc/acpi, or /etc/apm respectively.
The package acpi-support provides a set of such scripts under /etc/acpi that deal with handling special acpi buttons on laptops.
The package pm-utils provides the pm-action, pm-hibernate, pm-suspend and pm-suspend-hybrid commands. They allow to trigger hard power management events by software. The pm-tools also provide script directories to hook-in other software when switching power (saving) states.
The gnome-power-manager is a program with a graphical user interface that subscribes itself to power events and acts on them. It shows you the battery status on laptops and dims down the screen if on battery for example. It will also shutdown or hibernate the computer after some idle time or before the battery runs out, if a user is logged in.
Disk idling
A separate task is allowing harddisks to idle, so they can be parked and spun-down for long enough periods of time. This is done by a package that is a little bit misleadingly called laptop-mode-tools but not «disk-idle». Disk idling has to deal with things like reading ahead and postponing disk activity. The program got its name from a kernel feature that is called laptop_mode and allows Linux to chunk up writes to filesystems and not write in between. But to really let a disk idle one has to manage other parts of the system that are relevant to letting disks idle also, like drive parameters, mount options, filesystem settings, cache sizes, sync logging programs etc. «laptop_mode» will do all that.
Disk idling is commonly needed, thus laptop-mode enabled, when laptops operate on batteries to extend the battery times. But for example in vehicles with external power supply disk idling may be needed even on AC. Not necessarily to leave the disk spun down, but to leave the heads parked for shock protection.
Disk spin-down and head parking should not be activated without controlled disk idling. The regular uncoordinated logging or journaling activity may spin up the disks back up almost immediately after spinning down and lead to excessive load cycling.
Power (saving) states
The Common power (saving) states are awake, standby, suspend and hibernate.
During the awake state all components of the computer are running.
During standby the CPU keeps running your programs but some components like the monitor and harddisks may be turned off. When you touch the mouse or keyboard or a harddisk is accessed by software they quickly wake up again.
In both the awake and the standby state the speed of modern CPUs may be throttled down,though. For example if not in use.
During suspend however the CPU is always stopped. In modern PCs even all other components except the RAM memory can be turned off. The RAM will hold the state.
During hibernation the state is written to harddisk and the whole computer is turned off.
Architecture
This diagram shows how the kernel, hal, hal-info, pm-utils, and gnome-power-manager are plumbed together:
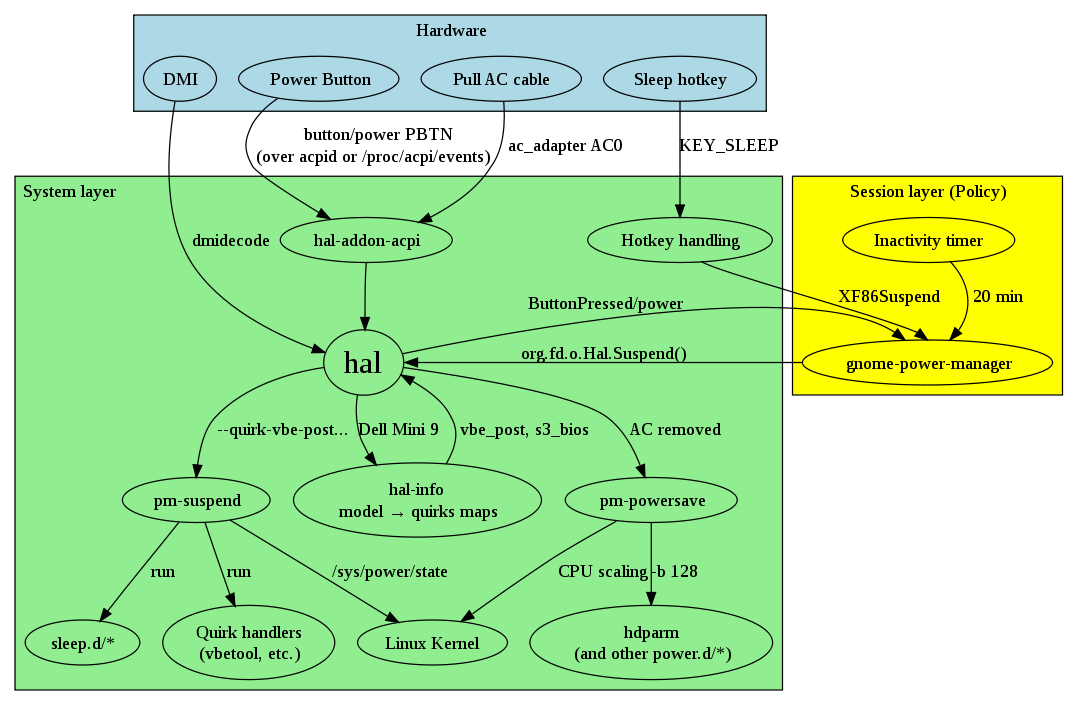
Please see Hotkeys/Architecture about the details of «Hotkey handling».
How to get disks to spin down and idle correctly (without excessive load cycling)
The laptop-mode-tools (disk idleing) package does not get installed by default any more, but just installing it should make disk idleing work (on battery) right away now.
8.10 to 9.10
Many of the previous issues have been addressed. All you need to do is:
«ENABLE_LAPTOP_MODE=true» in /etc/default/acpi-support (Bugs 244838497738)
8.04 (Hardy)
Unfortunately, ubuntu has mangled disk idling into event handling and power state switching in the past. And this did not deliver idle disks but break disk idling (laptop-mode) features by leaving undefined (factory default) apm settings in place.
To correct disk-idling in Ubuntu Hardy you need to adjust the following:
- Enable CONTROL_HD_POWERMGMT=1 in /etc/laptop-mode/laptop-mode.conf
(Bug 244832 missing hdparm -B setting during boot (fixed in intrepid 250935))
ENABLE_LAPTOP_MODE=true in /etc/default/acpi-support (another package’s conffile), even if you do not ENABLE_LAPTOP_MODE_ON_BATTERY or _ON_AC in laptop-mode.conf. So that laptop-mode-tools can control the harddisk power management settings.
(244838 laptop-mode needs to be activated in two places)
Delete or #comment the four $HDPARM blocks (for. done) in /etc/acpi/power.sh and change the two $LAPTOP_MODE start/stop lines to «$LAPTOP_MODE auto»
(244836 /etc/acpi/power.sh overrides user settings (fixed in intrepid 250938))
(244831 /etc/acpi/power.sh overrides user scripts (fixed in intrepid 250938))
(244844 Adapt laptop-mode-tools invocation to ubuntu’s acpi-support / pm-utils packages (fixed in intrepid 250935))
Create an empty «laptop-tools» file (touch /etc/pm/power.d/laptop-tools) to override /usr/lib/pm-utils/power.d/laptop-tools.
(239419 pm-utils has laptop-tools script which conflicts with laptop-mode-tools (not so in intrepid))
With the above changes hardy (ubuntu 8.04) will set the hdparm -B value to 254 when booting and thus override inadequately aggressive hardware defaults that cause load cycling. Not all harddisks will stop head parking with value 255 and some may even overheat. (hdparm -B255 turns off the disk’s apm feature, but this only turns off the spin down timer in many disks and doesn’t increase the head parking timer at all, which is the issue here.)
Other issues/adjustuments are related to have the hdparm -B value also reset after a suspend/resume cycle (fixed in intrepid 250935).
244833 missing hdparm -B setting during resume
244839 /etc/acpi/start.d and resume.d scripts are not run.
244844 Adapt laptop-mode-tools invocation to ubuntu’s acpi-support / pm-tools packages also:
238555 pm-utils doesn’t reload hdparm.conf after a suspend
Comments
Can someone maybe elaborate in the wiki why it’s not enabled by default? Without an explanation i’m wondering why, and if there maybe are good arguments against doing so.
I searched around and it seems I am not the only one with this problem and unfortunately, I could not find a good answer in the forums. Consequently, could someone explain in a little more detail how one would go about creating «a bogus /etc/pm/power.d/laptop-tools script to override /usr/lib/pm-utils/power.d/laptop-tools.» Does it entail just making a new file the in the directory or is there actual code that has to go in the file. Thanks — Ali
Ali, just copy /usr/lib/pm-utils/power.d/laptop-tools to /etc/pm/power.d/laptop-tools and insert the code near line 26 following guidelines in 239419
- Actually, to disabe this yet another «laptop-tools» script from pm-utils you just need to create an empty file (touch /etc/pm/power.d/laptop-tools). (Info also added above)
The issues described here are pointed out in the interesting bug 59695: «High frequency of load/unload cycles on some hard disks may shorten lifetime»
It would be helpful to have clear guidance on what changes should be made to a 7.10 (Gutsy) system. I expect the alarming click I hear periodically, especially on an idle system, is an the head reset being discussed.
- Gutsy will lose support at the end of April so I don’t think there is a point in adding that.
This opensuse wiki page might be useful for creating a proper solution for pm-utils — — AzraelNightwalker 2008-07-14 15:32:11
This page shows a simple script that successfully activates laptop-mode after resuming from suspend in Hardy. —AbtZ
PowerManagement (последним исправлял пользователь 62-2-76-204 2010-04-15 11:28:39)
Источник


