- How to get and use location data in your Android app
- Preparation
- Layout
- MainActivity
- Getting location updates
- LocationListener
- Android Developer Newsletter
- Conclusion
- Где приложения хранят свои данные
- Андрей Подкин
- Внутреннее хранилище данных
- Внешнее хранилище «личных» данных
- Общее внешнее хранилище
- Как можно удалить файлы, не удаляя приложения
- How to store data locally in an Android app
- Ways to store data
- Using Shared Preferences
- Using internal storage
- External Storage
- SQLite database
How to get and use location data in your Android app

Using Location in your app has incredible potential in making your app seem intelligent to end users. With location data, your app can predict a user’s potential actions, recommend actions, or perform actions in the background without user interaction.
For this article, we shall discuss integrating location updates into an Android app, with a focus on fetching the latitude and longitude of a given Location only. It is worth pointing out that Location can (and does) contain much more than just latitude and longitude values. It can also have values for the bearing, altitude and velocity of the device.
Preparation
Before your app can receive any location data, you must request location permissions. There are two location permissions, ACCESS_FINE_LOCATION and ACCESS_COARSE_LOCATION. We use ACCESS_FINE_LOCATION to indicate that we want to receive as precise a location as possible. To request this permission, add the following to your app manifest:
We also need to select which of the location providers we want to use to get the location data. There are currently three providers:
- GPS_PROVIDER: The most accurate method, which uses the built-in GPS receiver of the device. GPS is a system of satellites in orbit, that provides location information from almost anywhere on earth. It can sometimes take a while to get a GPS location fix (generally faster when the device is outdoors).
- NETWORK_PROVIDER: This method determines a device’s location using data collected from the surrounding cell towers and WiFi access points. While it is not as accurate as the GPS method, it provides a quite adequate representation of the device’s location.
- PASSIVE_PROVIDER: This provider is special, in that it indicates that your app doesn’t want to actually initiate a location fix, but uses the location updates received by other applications/services. In other words, the passive provider will use location data provided by either the GPS or NETWORK providers. You can find out what provider your passive provider actually used with the returned Location’s getProvider() method. This provides the greatest battery savings.
Layout
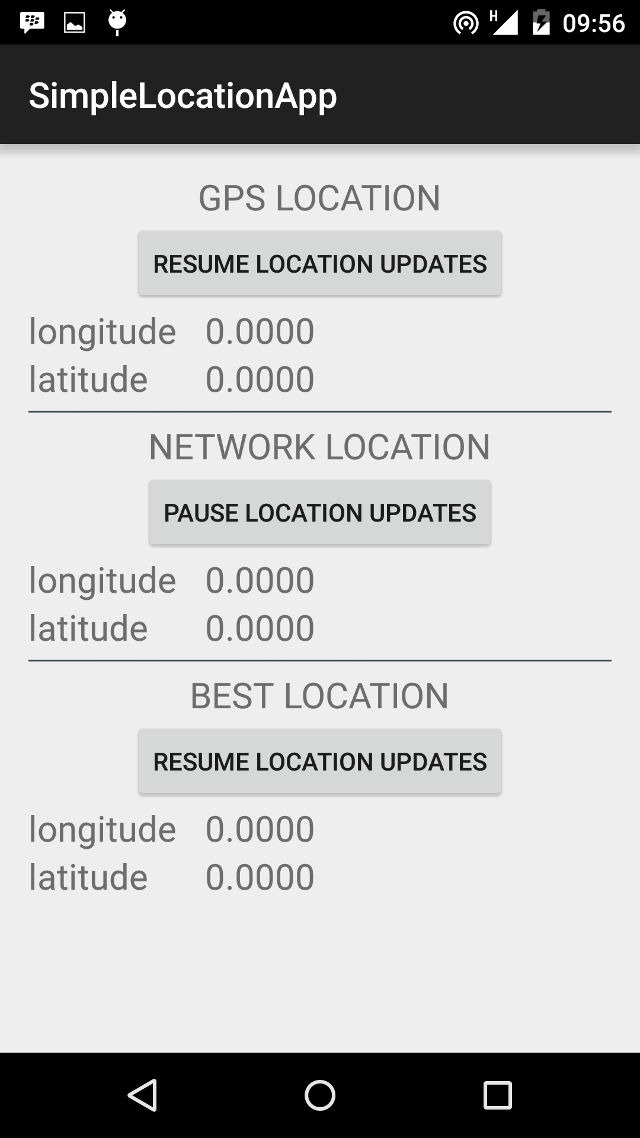
For our app, we are going to fetch location data using the GPS provider, the NETWORK provider, and also by asking the device to decide which is the best available provider that meets a given set of criteria. Our layout has three identical segments, each of which contains:
- A title for the section, such as GPS LOCATION
- A Button to resume and pause location updates for the section/provider
- Longitude Value
- Latitude Value
The code snippet for the GPS section, from our layout/activity_main.xml file is shown below
MainActivity
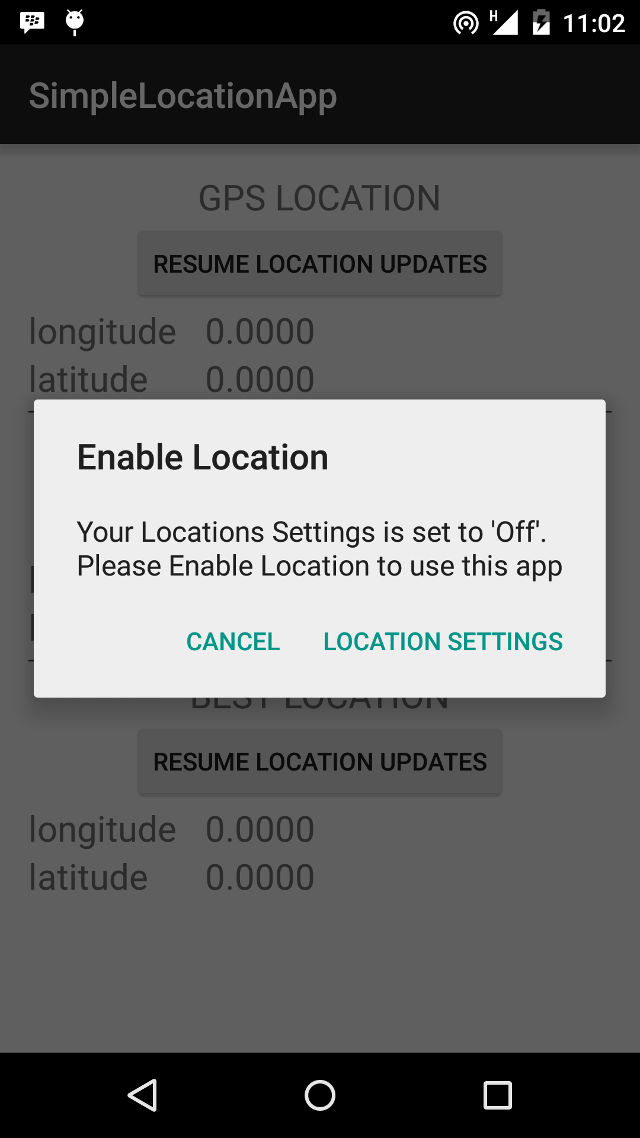
It is possible that the user has their device Location settings turned off. Before requesting location information, we should check that Location services are enabled. Polling for location data with the settings turned off will return null. To check if Location is enabled, we implement a method, called isLocationEnabled(), shown below:
We simply ask the LocationManager if either the GPS_PROVIDER or the NETWORK_PROVIDER is available. In the case where the user has Location turned off, we want to help them get to the Location screen as easily and quickly as possible to turn it on and get back into our app. To do this, we implement the showAlert() method.
The most interesting line in the snippet above is within the setPositiveButton() method. We start an activity using the Settings.ACTION_LOCATION_SOURCE_SETTINGS intent, so that when the user clicks on the button, they are taken to the Location Settings screen.
Getting location updates
To get GPS and Network location updates, we use one of the LocationManager’s requestLocationUpdates() methods. Our preferred is requestLocationUpdates(String provider, int updateTime, int updateDistance, LocationListener listener). updateTime refers to the frequency with which we require updates, while updateDistance refers to the distance covered before we require an update. Note that updateTime simply specifies the minimum time period before we require a new update. This means that the actual time between two updates can be more than updateTime, but won’t be less.
A very important point to consider is that Location polling uses more battery power. If your app doesn’t require location updates when in the background, consider stopping updates using one of the removeUpdates() methods. In the code snippet below, we stop/start location updates in response to clicking on the relevant Button.

For both NETWORK_PROVIDER and PASSIVE_PROVIDER, simply replace GPS_PROVIDER above with your desired provider.
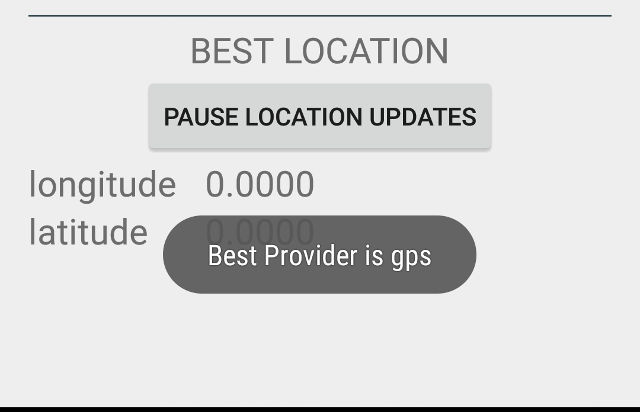
In the case where you just want to pick the best available provider, there is a LocationManager method, getBestProvider() that allows you do exactly that. You specify some Criteria to be used in selecting which provider is best, and the LocationManager provides you with whichever it determines is the best fit. Here is a sample code, and it’s what we use to select a provider:
Using the above code and Criteria, the best provider will be GPS_PROVIDER, where both GPS and NETWORK are available. However if the GPS is turned off, the NETWORK_PROVIDER will be chosen and returned as the best provider.
LocationListener
The LocationListener is an interface for receiving Location updates from the LocationManager. It has four methods
- onLocationChanged() – called whenever there is an update from the LocationManager.
- onStatusChanged() – called when the provider status changes, for example it becomes available after a period of inactivity
- onProviderDisabled() – called when the user disables the provider. You might want to alert the user in this case that your app functionality will be reduced
- onProviderEnabled() – called when the user enables the provider
We implement only the onLocationChanged() method for this sample, but in a production app, you will most likely want to perform an appropriate action for each situation.
Android Developer Newsletter
Conclusion
The complete source code is available on github, for use (or misuse) as you see fit. Just be mindful of the following:
- Integrating location tracking in your apps drains the battery.
- Google recommends apps request updates every 5 minutes (5 * 60 * 1000 milliseconds). You might need faster updates if your app is in the foreground (fitness/distance tracker).
- Users can have location turned off. You should have a plan for when location settings is turned off.
Have fun building Android apps, and watch out for our upcoming tutorial where we make use of Android device location data and web APIs to build something even more fun and challenging.
Источник
Где приложения хранят свои данные
Андрей Подкин
При использовании приложений под Android иногда появляются вопросы: «А где приложение хранит созданные файлы?», «Можно ли до них достучаться?» и «Удалятся ли файлы при удалении приложения?» Давайте попробуем посмотреть, где же приложение может хранить свои данные и какие последствия это имеет для пользователя.
Внутреннее хранилище данных
Смысл следует непосредственно из названия. Внутреннее хранилище (internal storage) располагается всегда в памяти смартфона вне зависимости от того, есть ли возможность установки карты памяти (и тем более того, вставлена ли она). Эта область памяти является защищенной. Находится в системном разделе /data. По умолчанию все файлы, которые там располагаются, доступны только тому приложению, которое их создало. Разумеется, можно сделать файлы доступными для других приложений, но это надо делать специально. Если приложение не открывает файлы для доступа извне, достучаться к ним можно будет только получив root.
Назначение хранилища понятно: внутренние защищенные данные, к которым не должно быть нерегламентированного доступа. Проблемы (с точки зрения пользователя) могут быть в следующих случаях:
- Неоправданно большой объем данных. Хочется вынести данные на карту памяти, чтобы сэкономить внутреннее пространство для других нужд, а приложение не дает.
- По мнению пользователя, регламент доступа к данным должен быть другим, не таким, как предлагает приложение.

Пример: приложение «Лекции по истории России». В приложении хороший контент (и по содержанию, и по качеству звука). Но сохраняется он во внутреннюю память. На бюджетных устройствах, где этой памяти мало, становится затруднительным закачать заранее много лекций, а потом, отключившись от интернета, слушать их. Второй проблемой становится собственно регламент доступа к данным. Даже если ограничиться тематикой истории, у меня есть аудиофайлы, полученные из трех источников: данное приложение, подкасты и аудиоверсии роликов с youtube. Хочется взять и объединить навек в их земной юдоли под владычеством всесильным Властелина Мордора их все в единый плейлист, и слушать его одним аудиоплеером. Но на смартфоне без root это сделать невозможно.

Внешнее хранилище «личных» данных
С точки зрения разработчика, кроме внутреннего хранилища данных, для персональных целей приложения есть еще внешнее хранилище. Оно необязательно размещается на карте памяти. Это может быть и внутренняя память смартфона, но весь раздел с такими данными размещается в общем доступе. В корне раздела есть папка Android/data, а в ней — подпапки с именами пакетов приложений.

Плюсы такого подхода очевидны: данные доступны извне для целей пользователя. А если это карта памяти, то и емкость может быть ограничена только вашими финансами (в продаже уже можно найти карты памяти на 400 гигабайт). Минусы тоже понятны: в любой момент любое приложение (конечно, имеющее разрешение на доступ к «внешним» данным) может взять и стереть чужие файлы. Также файлы будут удалены системой при удалении приложения (или при очистке его данных).
Пример приложения: подкаст-менеджер BeyondPod (более-менее свежей версии, раньше файлы хранились по-другому). Пользователь имеет доступ к скачанным подкастам и может легко удалять их (например, в целях экономии места) или слушать их во внешнем плеере.

Общее внешнее хранилище
Располагается в корне «внешнего» раздела на одном уровне с папкой «Android». Предназначается для хранения данных, разделяемых между разными приложениями. Обычно в документации Google в качестве примера приводят картинки (фото с камеры — папка DCIM). Основная проблема данных файлов: они никогда не удаляются автоматически. Даже если приложение вы удалили.

Пример: мессенджер Telegram. После того, как вы удалили приложение, загруженные файлы никуда не исчезают. Они продолжают спокойно лежать на накопителе данных, занимая драгоценное место.

Как можно удалить файлы, не удаляя приложения
Здесь важно ввести еще одну классификацию файлов приложений. Она справедлива для внутреннего хранилища и для внешнего хранилища личных данных. Все данные делятся на два типа: собственно данные и кэш.
Данные (папка data) — некие файлы, которые, по логике Google, нужны для постоянной работы с ними. Если полностью их удалить, то приложение поведет себя точно так же, как если бы его переустановили (удалили и заново установили). Частичное удаление файлов может не привести ни к каким неприятным последствиям. Но важно понимать, какие конкретно данные вы удаляете (например, очевидно, что скачанные файлы подкастов можно удалять совершенно свободно — это не повлияет на работоспособность подкаст-менеджера).
Кэш — временные данные, которые сформированы в ходе работы приложения и нужны для ускорения этой работы. Например, данные, которые часто нужны в интернете, загружаются и в дальнейшем вместо загрузки открываются локально (разумеется, кэш может обновляться, чтобы не показывать устаревшие данные). Удалять кэш любого приложения можно совершенно спокойно, это штатная операция.

Очистка памяти и кэша вызывается из настроек приложения. Кнопка «Очистить кэш» очищает только кэш, а кнопка «Очистить данные» — и кэш, и данные приложения.
Удаление файлов приложения из общего внешнего хранилища выполняется только вручную. Более того, даже оценка того, от какого приложения эти файлы остались, тоже выполняется вручную.
Источник
How to store data locally in an Android app

Almost every app we use or develop has to store data for one purpose or another. It’s not all the same data, either — some apps need access to settings, images, and much more. The big question is how to manage this data so that your device can grab only what it needs. Luckily for developers, Android is full of ways to store data, and we’re here to run you through how they work.
For this article, we’ll discuss the different data storage techniques available to Android developers, along with sample code to get you started or to refresh your memory.
Ways to store data
Using Shared Preferences

Shared Preferences is the way to go if you’re saving primitive data as key-value pairs. It requires a key, which is a String, and the corresponding value for the said key. The value can be any of the following: a boolean, float, int, long, or another string.
Your Android device stores each app’s Shared Preferences inside of an XML file in a private directory. Apps can also have more than one Shared Preferences file, and they’re ideally used to store app preferences.
Before you can store data with shared preferences, you must first get a SharedPreferences object. There are two Context methods that you can use to retrieve a SharedPreferences object.
For when your app will have a single preferences file, and
for when your app could have multiple preferences files, or if you prefer to name your SharedPreferences instance.
On getting the SharedPreferences object, you then access its Editor using the edit() method. To actually add a value, use the Editor’s putXXX() method, where XXX is one of Boolean, String, Float, Long, Int, or StringSet. You can also remove a key-value preference pair with remove().
Finally, make sure to call the Editor’s commit() method after putting or removing values. If you don’t call commit, your changes will not be persisted.
For our sample app, we allow the user to specify a SharedPreferences filename. If the user specifies a name, we request for the SharedPreferences with that name; if not, we request the default SharedPreference object.
Unfortunately, there is no way to get a single list of all SharedPreferences files stored by your app. Instead, you will need a static list or access to the SharedPreferences name if you’re storing more than one file.
You could also save your SharedPreferences names in the default file. If you need to store user preferences, you may want to use the PreferenceActivity or PreferenceFragment command. Just remember that they both use Shared Preferences, too.
Using internal storage

There are plenty of times where you may need to persist data, but you find Shared Preferences too limiting. For example, you may need to persist objects or images in Java. You might also need to persist your data logically with the file system hierarchy. This is where internal storage comes in. It is specifically for when you need to store data on the file system, but you don’t want other apps or users to have access.
This data storage is so private, in fact, that it’s deleted from the device as soon as you uninstall your app.
Using internal storage is similar to saving with any other file system. You can get references to File objects, and you can store data of virtually any type using a FileOutputStream. What sets it apart is the fact that its contents are only accessible by your app.
To get access to your internal file directory, use the Context getFilesDir() method. To create (or access) a directory within this internal file directory, use the getDir(directoryName, Context.MODE_XXX) method. The getDir() method returns a reference to a File object representing the specified directory, creating it first if it doesn’t exist.
In the sample above, if the user-specified filename is empty, we get the base internal storage directory. If the user specifies a name, we get the named directory, creating first if needed.
To read files, use your preferred file reading method. For our example, we read the complete file using a Scanner object. To read a file that’s directly within your internal storage directory (not in any subdirectory), you can use the openFileInput(fileName) method.
Similarly, to access a file for writing directly within the Internal Storage directory, use the openFileOutput(fileName) method. To save files, we use the FileOutputStream write.
As you can see in the image above, the file path is in a folder not accessible by the file manager or other apps. The only exception to this will be if you have a rooted device.
External Storage

Google has made a few key changes to external storage, beginning with Android 10 and continuing in Android 11. To give users better control over their files and cut down on clutter, apps now have scoped access to external storage by default. This means that they can tap into the specific directory on external storage and the media that the app creates.
For more information about requesting scoped directory access, check out this Android developer tutorial.
If your app tries to access a file that it did not create, you will have to permit it to do so every single time. Data you store outside of select folders will also disappear if you delete your app.
Apps are expected to store files in one of two app-specific locations designed for the app’s specific persistent files and cached files, respectively. To access these locations, the app must verify the storage is available (which is not guaranteed, as it is for internal storage). The volume’s state can be queried using:
If MEDIA_MOUNTED is returned, that means you can read and write files to external storage. You will find a number of predefined directories that should aid with logical storage and prevent clutter. These include the likes of DIRECTORY_DOCUMENTS and DIRECTORY_MOVIES.
You can read a full explanation of how to use scoped storage here.
SQLite database

Finally, Android provides support for apps to use SQLite databases for data storage. The databases you create remain specific to your app and can only be accessed inside your app. Of course, you should have at least some knowledge of SQL before you attempt to store data with an SQLite database.
We’ll discuss each of these in turn, and we use data binding techniques for our sample code. Android provides complete support for SQLite databases. The recommended way of creating SQLite databases is to subclass the SQLiteOpenHelper class and override the onCreate() method. For this sample, we create a single table.
Источник


