- Lock or unlock a screen with Remote Desktop
- Lock a screen
- Unlock a screen
- Display a custom lock picture
- How to lock notes on your iPhone, iPad, and iPod touch
- Before you begin
- Set up your notes password
- Create a password in Settings
- Create a password in Notes
- Use Notes password-protection
- Lock a note
- Open a locked note
- Remove a lock
- Change your Notes password
- If you forgot your notes password
Lock or unlock a screen with Remote Desktop
You can lock a client computer’s screen, and then unlock it again. When you lock a screen, you can continue to perform certain administrative functions with computers using Remote Desktop after you’ve locked their screens.
When locked, a computer doesn’t accept keyboard or mouse input. By default, Remote Desktop displays a picture of a padlock on locked screens, but you can display a custom picture.
Lock a screen
When you lock a computer screen, no local keyboard or mouse input is accepted, but you can continue to administer the computer using Remote Desktop.
In Remote Desktop  , select a computer list in the sidebar of the main window, select one or more computers, then choose Interact > Lock Screen.
Enter a message to be displayed on the locked screen, then click Lock Screen.
The client screen goes black, except for the administrator’s name, the lock screen, and any message text.
Unlock a screen
You must use Remote Desktop in order to unlock any computer screen locked by Remote Desktop.
When you unlock a computer screen, the desktop reappears, and the computer accepts keyboard and mouse input again.
In Remote Desktop , select a computer list in the sidebar of the main window, select one or more computers with a Locked Screen status, then choose Interact > Unlock Screen.
Click Unlock Screen.
Display a custom lock picture
You can display a picture on the locked client screen. Make sure the image size fits on the client computer’s screen. If you have clients with 1024 x 768 screens, a picture that is 1440 x 900 is automatically scaled down to fit the screen.
Create a picture, and save the picture in PICT, TIFF, GIF, JPEG, or any other QuickTime-compatible static image format.
QuickTime-compatible movies or QuickTime VR objects can’t be used.
Name the picture “Lock Screen Picture,” then copy the file to /Library/Preferences/ on the client computer.
Источник
How to lock notes on your iPhone, iPad, and iPod touch
You can secure notes that have your personal data, like financial details, medical information, or website logins — with a password, Face ID, or Touch ID.
Before you begin
- Update your iPhone, iPad, or iPod touch to the latest version of iOS or iPadOS.
- Turn on Notes in your iCloud Settings, or make sure that you use notes stored on your device. Notes accounts that sync from a third-party service, like Gmail or Yahoo, won’t include some Notes features and can’t be locked.
If you’re signed in to iCloud with a Managed Apple ID, you can’t lock your notes.

Set up your notes password
Before you can lock your notes, you need to create a password. Make sure to create a password that you can easily remember by giving yourself a password hint. If you access your iCloud notes on more than one Apple device, you’ll use the same notes password to lock and unlock all of them. If you forget your password, Apple can’t help you regain access to your locked notes, but you can create a new password to use for locking future notes.
You can create a password on your device in Settings or in the Notes app. After you lock a note, it’s automatically protected with your password on all your devices. If you use Face ID or Touch ID to unlock notes on your other devices, you must enter your password, then enable Face ID or Touch ID on the device you’re using.
Create a password in Settings
- Go to Settings > Notes, then tap Password.
- If you have multiple accounts, tap the account that you want to create a password for.
- Enter a password, then give yourself a password hint. If your device supports it, enable Face ID or Touch ID.
- Tap Done.
Create a password in Notes
- Open Notes and go to a note that you want to lock.
- Tap the More button , then tap Lock.
- Enter a password, then give yourself a password hint. If your device supports it, enable Face ID or Touch ID.
- Tap Done.
Use Notes password-protection
Whether your note has an image, scanned document, or a list of important information, it’s easy to keep it safe with password protection. You’ll see a Lock icon next to each note that’s locked. Until you enter your password, or use Face ID or Touch ID, you only see the title and the last date that the note was edited.
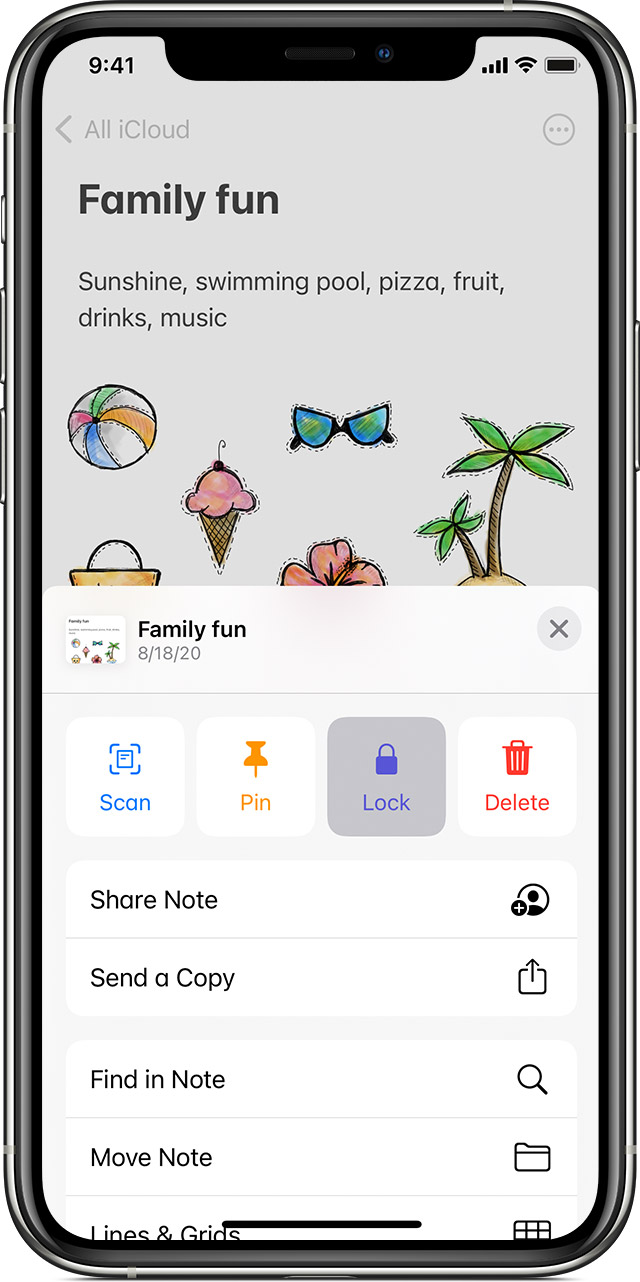
Lock a note
- Open the note that you want to lock.
- Tap the More button.
- Tap Lock.
After you lock your note, it stays open and you’ll see the Lock icon at the top of the screen. You can hide the note’s contents when you tap the Lock icon .
![]()
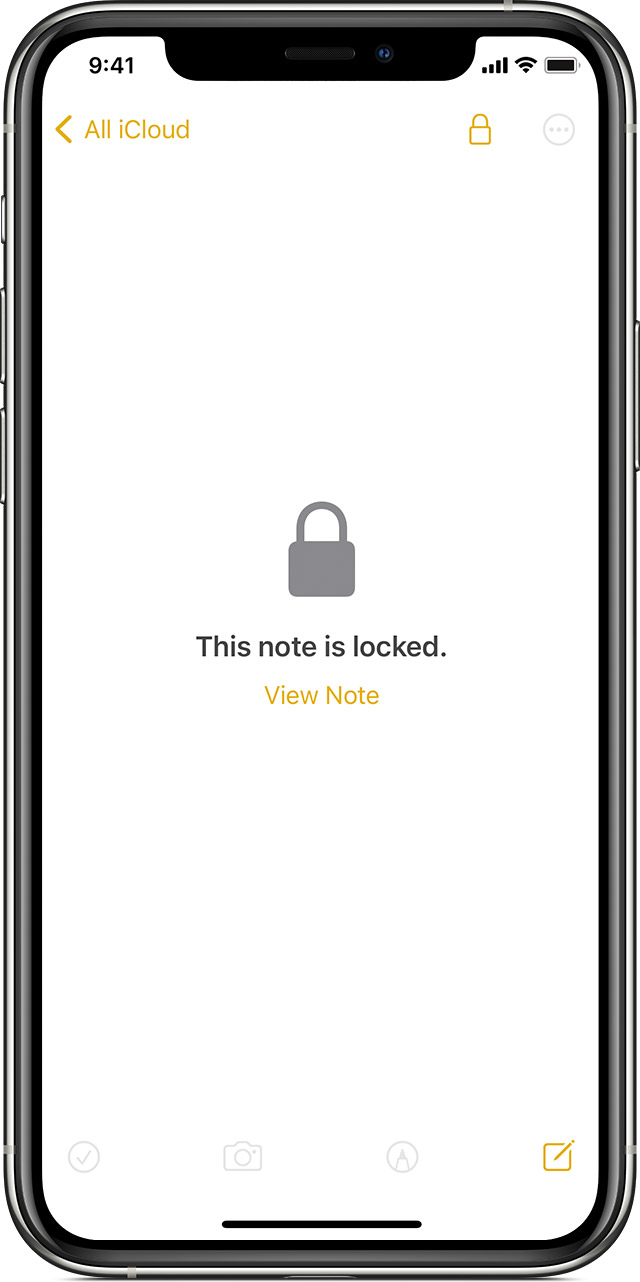
Open a locked note
- Tap the locked note.
- Tap View Note.
- Use Face ID or Touch ID, or enter your password.
Your locked notes stay open for several minutes, making it easy for you to jump to another note, copy and paste information from other apps, and more. If you close the Notes app or your device goes to sleep, the note locks again.
![]()
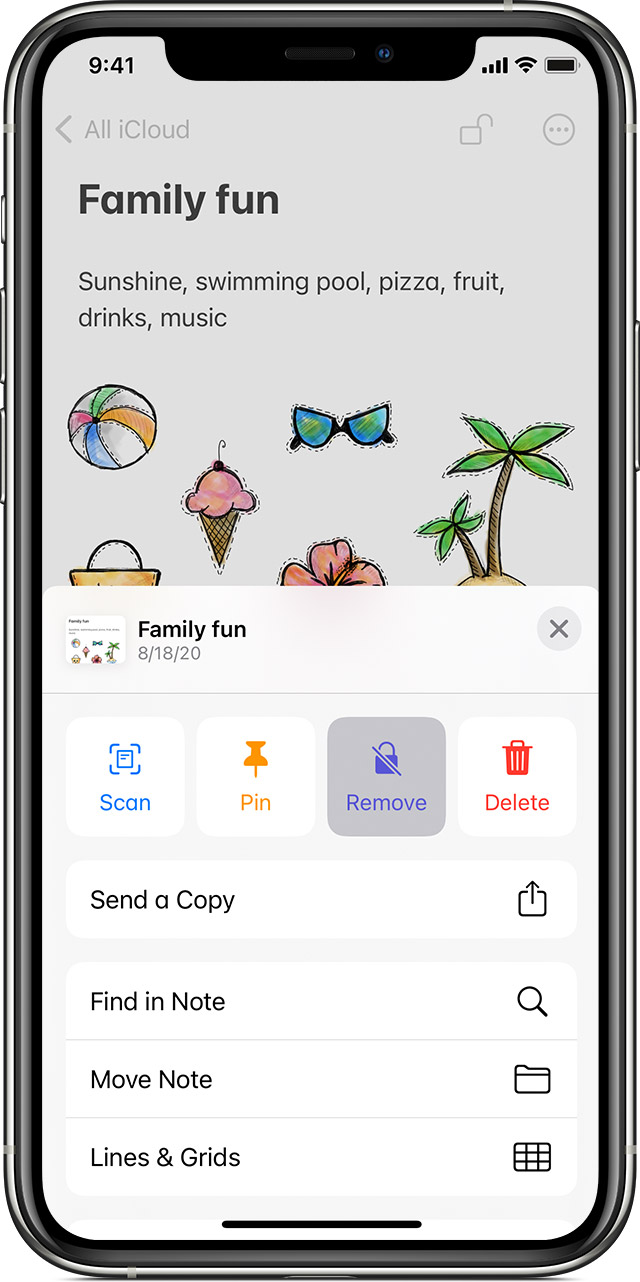
Remove a lock
- Tap the locked note, then tap View Note.
- Enter your password, use Face ID, or use Touch ID.
- Tap the More button .
- Choose Remove.
When you remove a lock from a note, it’s removed on all of the devices that you’re signed in to with the same Apple ID.
![]()
You can only lock notes on your device and notes in iCloud. You can’t lock notes that have PDFs, audio, video, Keynote, Pages, Numbers documents, or notes that use IMAP to sync with accounts, like Yahoo, Gmail, and Hotmail. You also can’t password protect notes that you share with someone else. If you want to stop sharing a note, open the note, tap the Add People button , then tap Stop Sharing.
Change your Notes password
You need your previous Notes password in order to change your Notes password. Here’s how:
- Go to Settings > Notes, then tap Password.
- Select the Notes account that you want to change, then tap Change Password.
- Enter your old password, then enter a new password and password hint.
If you don’t know your previous Notes password, you can reset it, but it won’t give you access to your old notes. A new password will let you password protect any notes that you create going forward with the new password.
If you forgot your notes password
To unlock a note, you need to enter the password that it’s locked with. If you forgot the password, Apple can’t help you regain access to your locked notes. You can create a new password, but this won’t give you access to your old notes. A new password will let you password protect any notes that you create going forward with the new password.
If you have multiple passwords, you won’t be able to tell which password you should use when you look at your Notes list. When you open a note locked by your old password but you enter your current password, you’ll see an alert that you entered the wrong password with a hint for your old password. If you enter the correct old password, you get the option to update that note’s password to your current one.
Here’s how to reset your Notes password:
- Go to Settings > Notes, then tap Password.
- Select the Notes account that you want to change, then tap Reset Password.
- Enter your Apple ID password, then tap OK.
- Tap Reset Password again.
- Enter your new password and password hint. Tap Done.
Источник


