- Block phone numbers, contacts, and emails on your iPhone, iPad, or iPod touch
- Block a phone number, contact, or email
- Phone
- FaceTime
- Messages
- Manage your blocked phone numbers, contacts, and emails
- Phone
- FaceTime
- Messages
- Filter messages from unknown senders
- Report spam or junk in the Messages app
- If your iPhone, iPad, or iPod touch is lost or stolen
- Look for your device on a map
- Mark as Lost
- Report your missing device to local law enforcement
- File a Theft and Loss claim
- Remotely erase your device
- Contact your wireless carrier
- Remove your missing device from your account
- How to unlock your iPhone for use with a different carrier
- Contact your carrier
- If you have a SIM card from a carrier other than your current carrier
- If you don’t have another SIM card to use
- Get help
- How to Lock Apps on Any iPhone
- The best ways to ensure privacy for your apps
- What to Know
- How to Lock First-Party Apps
- How to Lock First-Party Apps in iOS 11 and Earlier
- How to Lock Apps on iPhone Using Guided Access
- How to Use Touch ID to Lock Compatible Apps on iPhone 5S to iPhone 8
- How to Set Time Limits for Apps
- How to Lock Apps on iPhone Using a Third-Party App
Block phone numbers, contacts, and emails on your iPhone, iPad, or iPod touch
You can block phone numbers, contacts, and emails on your device. You can also filter iMessages from unknown senders and report iMessages that look like spam or junk.
Block a phone number, contact, or email
There are a few ways that you can block phone numbers, contacts, and emails.
Phone
From the Phone app, tap Recents, then tap the Info button next to the phone number or contact that you want to block. Scroll down, then tap Block this Caller.
FaceTime
From the FaceTime app, tap the Info button next to the phone number, contact, or email address that you want to block. Scroll down, then tap Block this Caller.
![]()
Messages
From the Messages app, open the conversation, tap the contact at the top of the conversation. Tap the info button, scroll down, then tap Block this Caller.
From the Mail app, open the email that has the contact that you want to block, then tap the contact at the top. Tap Block this Contact.
When you block a phone number or contact, they can still leave a voicemail, but you won’t get a notification. Messages that are sent or received won’t be delivered. Also, the contact won’t get a notification that the call or message was blocked. When you block an email address from Mail, it goes to the trash folder. Email blocking works across all your Apple devices.

Manage your blocked phone numbers, contacts, and emails
To see the phone numbers, contacts, and email addresses that you’ve blocked from Phone, FaceTime, Messages, or Mail:
Phone
Go to Settings > Phone and tap Blocked Contacts to see the list.
FaceTime
Go to Settings > FaceTime. Under Calls, tap Blocked Contacts.
![]()
Messages
Go to Settings > Messages. Under SMS/MMS, tap Blocked Contacts.
Go to Settings > Mail. Under Threading, tap Blocked.
Filter messages from unknown senders
You can filter messages from people who aren’t saved in your Contacts.
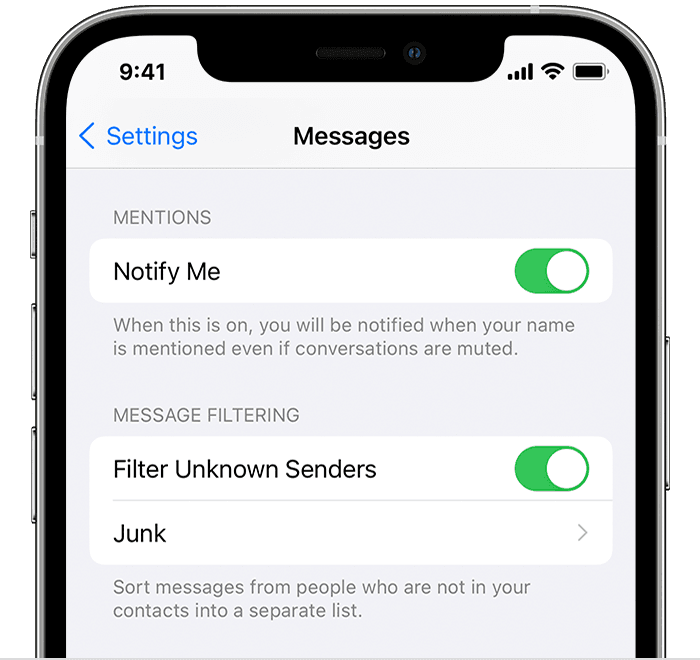
To filter messages, go to Settings > Messages, scroll down and turn on Filter Unknown Senders.
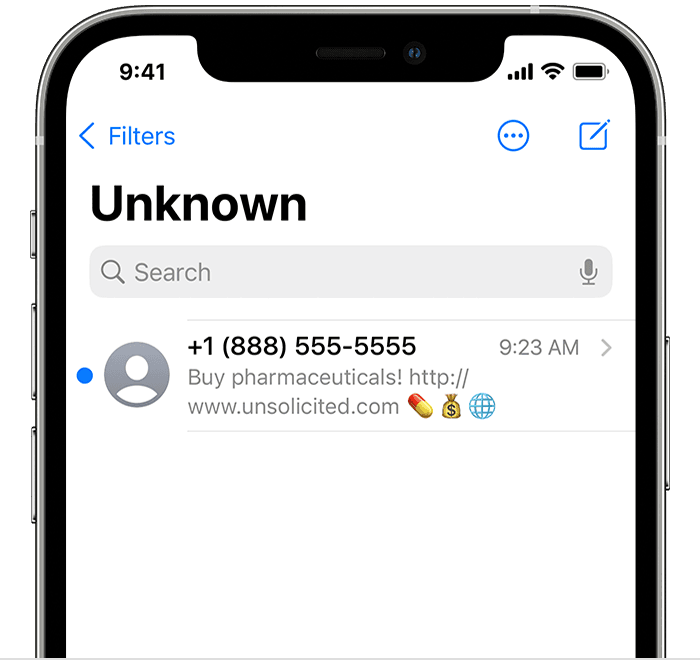
In Messages, tap Filters, then tap Unknown Senders. You won’t get notifications for these messages.
Report spam or junk in the Messages app
You can report iMessages that look like spam or junk from the Messages app. If you get an iMessage from someone who’s not saved in your Contacts, you’ll see a Report Junk link under the message.
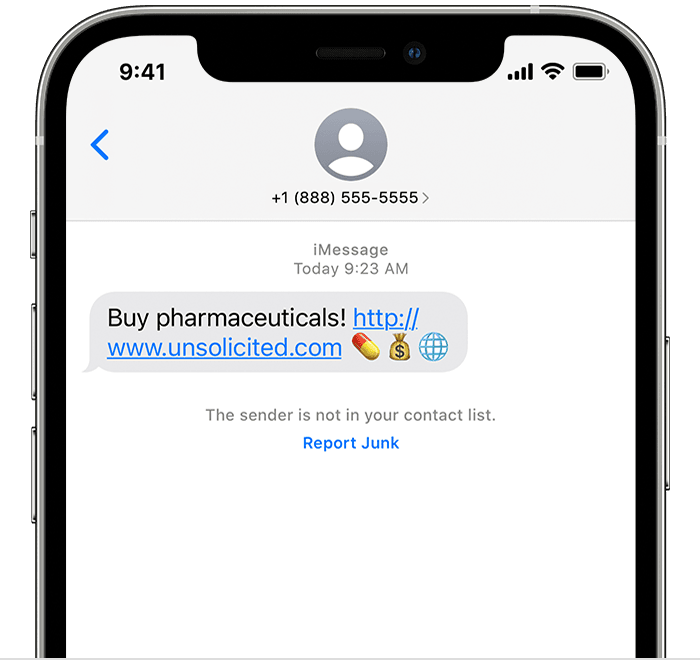
Tap Report Junk, then tap Delete and Report Junk. Messages will forward the sender’s information and the message to Apple, as well as delete the message from your device. You can’t undo deleting a message.
Reporting junk doesn’t block the sender from being able to send another message. If you don’t want to receive these messages, you need to block the contact.
To report SMS and MMS messages, contact your carrier.
Источник
If your iPhone, iPad, or iPod touch is lost or stolen
If you lose your iPhone, iPad, or iPod touch or think it might be stolen, use Find My and protect your data.
Look for your device on a map
To find your device, sign in to iCloud.com/find. Or use the Find My app on another Apple device that you own.
If your iPhone, iPad, or iPod touch doesn’t appear in the list of devices, Find My was not turned on. But you can still protect your account if Find My was not turned on.
Mark as Lost
When you mark your device as lost, you remotely lock it with a passcode, keeping your information secure. This also disables Apple Pay on the missing device. And you can display a custom message with your contact information on the missing device.
Report your missing device to local law enforcement
Law enforcement might request the serial number of your device.
File a Theft and Loss claim
If your missing iPhone is covered by AppleCare+ with Theft and Loss, file a claim for an iPhone replacement.
Remotely erase your device
After you erase a device, you can’t track its location, so make sure that you no longer need to search for the device. If you have AppleCare+ with Theft and Loss, do not erase your iPhone until your claim has been approved.
Contact your wireless carrier
If the missing device is an iPhone or an iPad with cellular, report your missing device to your wireless carrier. Ask the carrier to disable your account to prevent calls, texts, and data use. And if your device is covered under your wireless carrier plan, file a claim.
Remove your missing device from your account
If you have AppleCare+ with Theft and Loss, do not remove your lost iPhone from your account until your claim has been approved.
Go to appleid.apple.com to remove the missing device from your list of trusted devices.
AppleCare+ with Theft and Loss is not available in all countries and regions.
Information about products not manufactured by Apple, or independent websites not controlled or tested by Apple, is provided without recommendation or endorsement. Apple assumes no responsibility with regard to the selection, performance, or use of third-party websites or products. Apple makes no representations regarding third-party website accuracy or reliability. Contact the vendor for additional information.
Источник
How to unlock your iPhone for use with a different carrier
Unlocking your iPhone means that you can use it with different carriers.
Your iPhone might be locked to your carrier. Unlocking your iPhone means that you can use it with different carriers. To contact your carrier and unlock your iPhone, use these steps.
If you don’t want to switch carriers and your device is locked because you forgot the passcode, then you don’t need to use the steps in this article. Learn how to reset your passcode.
Apple can’t unlock your iPhone for use with a different carrier. Only your carrier can unlock your iPhone.
Contact your carrier
- Only your carrier can unlock your iPhone. Contact your carrier and request an unlock. Your account might need to meet requirements for unlocking. After you submit the request, it might take a few days to complete. Contact your carrier to check the status of your unlock request.
- After your carrier confirms that they unlocked your iPhone, follow the steps below.
If you have a SIM card from a carrier other than your current carrier
Use these steps to finish unlocking your iPhone:
- Remove your SIM card.
- Insert the new SIM card. Your device will activate.
If you don’t have another SIM card to use
Use these steps to finish unlocking your iPhone:
Get help
You might see this message on your computer or on your iPhone: «The SIM card inserted in this iPhone does not appear to be supported. Only compatible SIM cards from a supported carrier may be used to activate iPhone. Please insert the SIM card that came with your iPhone or visit a supported carrier store.»
If you see this message on your device with iOS 14, use these steps:
- Go to Settings > General, and tap About.
- Under Carrier Lock, you should see a message that says «No SIM restrictions.» If you don’t see that message, contact your carrier.
If your device is on iOS 13 or earlier, use these steps:
- Contact your carrier to make sure that they applied the unlock in their system.
- Restore your iPhone to factory settings.
- Restore your iPhone from a backup.
Источник
How to Lock Apps on Any iPhone
The best ways to ensure privacy for your apps
:max_bytes(150000):strip_icc()/SimonChandler-f142d22d063d46c18cdacc6077ecc4ea.jpg)
What to Know
- Current iPhones: Go to Settings >Screen Time >Content & Privacy Restrictions >Allowed Apps. Turn off an app’s switch to hide it.
- On iOS 11 or earlier: Go to Settings >General >Restrictions >Enable Restrictions. In the Allow section, turn off apps to lock them.
This article explains how to lock apps on an iPhone up to iOS 14. Information regarding workarounds is also included.
How to Lock First-Party Apps
In iOS 12 through iOS 14, you can lock first-party apps using Screen Time, a feature introduced in iOS 12. A first-party app is an app that Apple creates rather than an app from another software maker.
Open Settings.
Go to Screen Time > Content & Privacy Restrictions.
Tap Allowed Apps.
Turn off the toggle switches (tap them to turn the switch white) for apps you don’t want to use.
Tap the Back button or swipe up to go to the Home screen.
How to Lock First-Party Apps in iOS 11 and Earlier
One simple app lock method that works for most iPhones—but only for first-party Apple apps—involves the use of Restrictions. Go to Settings > General and then scroll down and navigate to Restrictions > Enable Restrictions. Once prompted, enter a new passcode (twice to confirm).
After you enable restrictions and enter a new passcode, you’re presented with a variety of options. In the Allow section, you have the option of disallowing a range of first-party apps, such as Safari, Siri, and FaceTime. This doesn’t include apps you downloaded. By swiping the green toggle icon to the off position, you can stop any disallowed apps from appearing on your Home screen.
How to Lock Apps on iPhone Using Guided Access
Guided Access is a nuclear app lock option in that it prevents you from leaving the app you’re currently using. Still, it could come in handy if your child wants to use a particular app on your phone, but you’re worried that they might venture elsewhere.
Guided Access requires iOS 11 or newer. Follow these steps to use it:
From Settings, go to General > Accessibility > Guided Access.
iOS 13 has this setting under: Setting > Accessibility.
Swipe the Guided Access toggle switch to the On/green position.
Go to Passcode Settings > Set Guided Access Passcode.
:max_bytes(150000):strip_icc()/004_lock-apps-on-iphone-4164864-5c75ac64c9e77c00011c8291.jpg)
Enter a new passcode and then enter it again to confirm.
After you enable Guided Access and set your passcode, use the feature by opening any app and pressing the side button three times or the Home button three times, depending on your phone, once the app has started.
This displays the Guided Access start screen, which lets you draw a circle around the areas of the screen to disable (set it to either cover the entire screen or none of it). Alternatively, choose Options in the lower-right corner of the screen, which can be used to disable everything from the volume buttons to the touch screen, as well as set a time limit on the Guided Access session (up to 24 hours).
If you own a Touch ID-enabled iPhone, use Touch ID instead of a passcode to end a Guided Access session.
How to Use Touch ID to Lock Compatible Apps on iPhone 5S to iPhone 8
With Touch ID, it’s possible to lock a limited number of compatible apps using the fingerprint-based security feature (available on the iPhone 5S through the iPhone 8 and 8 Plus).
This article assumes you are using a passcode to get into your iPhone. If you don’t, here’s how to turn Passcode on.
To lock Apple Pay, iTunes, and the App Store in this way, open Settings and go to Touch ID & Passcode to enter your passcode. Then, turn on the toggle switches (to the green/on position) for the apps you wish to lock using Touch ID.
:max_bytes(150000):strip_icc()/001-lock-apps-on-iphone-4164864-9a97fbeb9bad4eb08ba5a4ca6a35e126.jpg)
If you haven’t set up Touch ID, you’re prompted to do so when turning on any available option.
The above covers only Apple Pay, iTunes, and the App Store, however. Using Touch ID to lock apps you download from the App Store requires a different process, and many popular apps (such as Facebook, Twitter, and Snapchat) don’t enable this process, meaning that you can’t lock these apps individually.
There’s a growing number of apps that offer the option to lock apps using Touch ID, while a smaller number also offer the option to lock apps using a passcode.
Generally, doing this requires the following:
Open the Touch ID-compatible app.
Go into its settings.
Find the option that locks the app with a password or with your fingerprint. It might be in a Privacy or Preferences section and could be called Password, Passcode, Touch ID Lock, Lock, Screen Lock, or anything similar.
:max_bytes(150000):strip_icc()/002-lock-apps-on-iphone-4164864-586fdd14ebe64cd0bee64dddb567b17a.jpg)
If needed, follow any on-screen steps to complete the app lock procedure.
How to Set Time Limits for Apps
You can also set time limits for apps, which is similar to locking apps away from your own use.
Go to Settings > Screen Time > App Limits > Add Limit.
:max_bytes(150000):strip_icc()/001_lock-apps-on-iphone-4164864-5c7593c946e0fb00019b8ca0.jpg)
In the list of apps, make a decision on which to restrict access. Tap the check box button to the left of the app category you want to restrict, for example, Social Networking. You can restrict certain apps inside Social Networking (for example) by tapping through to the category.
Choose a time limit for the use of that app category (such as 1 hour). You can also customize the days you want this restriction in place. Tap the Add button to save the settings.
:max_bytes(150000):strip_icc()/002_lock-apps-on-iphone-4164864-5c7594eec9e77c00012f80d5.jpg)
How to Lock Apps on iPhone Using a Third-Party App
There is one last option if you want to lock apps directly, and it involves using a third-party app.
In one respect, this is the best option for locking apps since there are a number of apps available that, in one way or another, block access to every app on your iPhone using a passcode (or biometric ID). However, it’s also the worst app lock option for iPhone. To use these apps, your iPhone must be jailbroken (which may create security vulnerabilities and performance issues; it’s not recommended).
Some popular examples of third-party apps that lock other apps include BioProtect, Locktopus, and AppLocker. These can be downloaded and installed using the Cydia platform, which is home to apps specifically designed for jailbroken iPhones.
In the case of BioProtect, once the app has been downloaded, you can lock specific apps by going to Settings > Applications under the Protected Items section, and then toggling the apps you wish to lock into the green/on position.
Something else to consider for your app locking needs is to nix the idea completely. Depending on your needs, a third-party vault app might be all you need to hide things like images and notes, making them accessible only after the correct password has been entered.
If you don’t necessarily need to lock the whole app (such as Photos), but instead just specific things like private images, documents, or videos, you might have luck with one of those apps.
Источник


