Как я писал кастомный локер

Привет хабрастарожилам от хабрановичка. Ровно год назад я решил написать кастомный локер (экран блокировки) для моего старичка Samsung Galaxy Gio в стиле популярного тогда Samsung Galaxy s3. Какие причины заставили меня это сделать, писать не буду, но добавлю лишь то, что в Google Play я программу не собирался выкладывать и каким-либо другим способом заработать на ней не планировал. Данный пост посвящен последствиям моего решения.
Начну издалека. Многие хвалят Android за открытость и возможность заменить и настроить встроенные программы под свои нужды. Что тут сказать? В сравнении с другими популярными ОС, это, безусловно, так, но если копнуть глубже в архитектуру Android возникают трудности и вопросы. Локскрин (в Android это называется keyguard) как раз и вызывает вопросы: почему Google не поступили с ним, так как с лаунчерами, почему не сделали диалог со всеми доступными на устройстве локерами и с возможностью выбрать нужный по умолчанию? Где-то в глубине мозга тихим нерешительным голосом кто-то отвечает: может быть Google (Android Ink. если быть точнее) поступил так из соображений безопасности. Этот голос вероятно прав и многим разработчикам локеров и мне (скромность не позволила приписать себя к их числу) пришлось изобретать велосипед, и не один.
Изучаем исходники
Начал я с использования одного из плюсов Android – из изучения исходников. Я один из тех консерваторов, которые уже 2,5 года сидят на стоковой прошивке (2.3.6), поэтому и исходники изучал соответствующие. Классы, отвечающие за блокировку экрана, лежат в android.policy.jar, что в system/framework. Первоначальной целью было найти «точку входа», т.е. где и когда вызывается локер. Искал здесь.
В классе PhoneWindowManager.java есть метод screenTurnedOff(int why), который вызывает одноименный метод класса KeyguardViewMediator. Проследив, кто кого вызывает, я нашел метод в классе KeyguardViewManager, создающий непосредственно View стокового локера.
Что ж, все гениальное – просто. Решил повторить этот код для своего приложения и получил ошибку – нет нужного permission. Немного погуглив, добавил следующие разрешения: SYSTEM_ALERT_WINDOW и INTERNAL_SYSTEM_WINDOW. Это не помогло.
Вернулся к изучению класса PhoneWindowManager.java:
Для требуемого окна TYPE_KEYGUARD нужно второе из моих добавленных разрешений. Задней точкой тела начал ощущать, что не все так просто, как я себе представлял. Решено было посмотреть на описание этого permission. Вот выдержка из AndroidManifest.xml пакета framework-res.apk.
Вот она – черная полоса в жизни. Ведь я понимал, «signature» – это значит, что использовать этот пермишн может только пакет, подписанный тем же ключом, что и пакет, выдавший это разрешение (в нашем случае — framework-res.apk). Ладно, достаем инструменты для изготовления велосипедов.
Версия один
Первым решением было использовать activity в качестве локскрина. На stackoverflow советуют использовать следующий код:
Признаюсь, в первых версиях я использовал этот метод. У него есть существенные недостатки: статусбар не блокируется, начиная с версии API11 этот метод не работает.
Решение первого недостатка (переполнениестека опять помогло) следующее. Поверх статусбара с помощью WindowManager рисуется прозрачный View, который перехватывает все TouchEvent. Вот служба, реализующая это:
Второго недостатка для меня не существовало, на Gingerbread данный код работал превосходно. На 4pda, куда я опрометчиво выложил свое творение, пользователи жаловались, что на многих телефонах мой локер сворачивался как обычное приложение. Для них найдено такое решение. В качестве стандартного лаунчера устанавливается пустышка. При нажатии кнопки HOME система вызывает мой лаунчер-пустышку. Если кастомный локер активен, лаунчер сразу же закрывается в методе onCreate(), т.е. визуально нажатие кнопки HOME ни к чему не приводит. Если кастомный локер не активен, мой лаунчер тут же вызывает другой правильный лаунчер, который пользователь указал в настройках.
Вот код пустышки:
Выглядело это следующим образом:
Эти велосипеды ездили долго и хорошо, пока я не решил сделать «правильный» локскрин, и уже в стиле Samsung Galaxy S4.
Версия два
Когда системе необходимо запускать кастомный локер? Очевидно, что при выключении экрана. Создадим службу, регистрирующую BroadcastReceiver, т.к. из манифеста данный фильтр не работает.
Необходимо учесть две особенности:
1. Служба должна быть запущена в момент загрузки устройства. Создадим BroadcastReseiver с IntentFilter «android.intent.action.BOOT_COMPLETED». Есть одно НО: служба при запуске должна отключить стандартную блокировку экрана. Особенностью Android является то, что стандартное окно ввода PIN-кода является частью стокового экрана блокировки. Поэтому служба должна запускаться только когда PIN буден введен.
Максимум, на что хватило моей фантазии:
2. Проанализировав PhoneWindowManager видно, что в метод screenTurnedOff(int why) передается переменная why, принимающая 3 значения:
— экран выключился по истечению таймаута (в этом случае стоковый локер запускается с задержкой),
— экран выключился при срабатывании сенсора приближения (во время телефонного разговора),
— экран выключился при нажатии кнопки.
В моем случае такого разнообразия нет. Поэтому служба мониторит состояние телефона, и при входящем звонке или во время разговора экран не блокируется.
Вот основной код службы:
Идея не использовать activity, а использовать WindowManager была еще сильна. Из пяти типов окон, использующих разрешение SYSTEM_ALERT_WINDOW, мне подошел TYPE_SYSTEM_ALERT. Причем у него были очевидные достоинства: блокировался статусбар (по крайней мере, на Gingerbread) и перехватывалось нажатие кнопки HOME (работает даже на Jelly Bean).
Промежуточным звеном между службой и KeyguardView является класс KeyguardMediator:
Дальше история становится менее интересной, так сказать, будничной. На мой локер можно добавлять ярлыки приложений (здесь все стандартно и просто) и виджеты (а вот этот момент достоин отдельной статьи).
Теперь все стало выглядеть современней:
Источник
Lock screen android studio

Feel free to ask questions add issues. If I don’t respond to an issue or PR, feel free to ping me or send me DIRECT Message on twitter @thealeksandr. If you create issue it would be nice if you SUBSCRIBE FOR UPDATES. So we can discuss it.
Please support with a Star 😀
7 Update — Bug fixing (November 3, 2019)
- Added code validation for CREATE mode.
Min SDK Version — 15
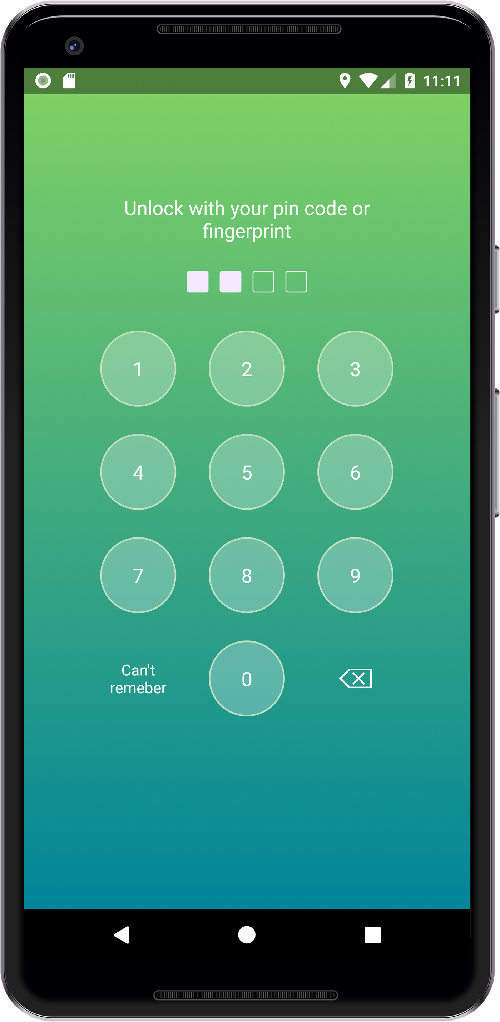
PFLockScreen — Lock Screen Library for Android Application. Library support pin code and fingerprint authorization for API level 23+.


Add library to your project
Create pin code
Creating lock screen fragment in create mode.
After user created pin code. The library will encode it using Android Key Store and return an encoded string in PFLockScreenFragment.OnPFLockScreenCodeCreateListener. All you have to do is save encoded string somewhere — database, SharedPreferences, Android Account etc.
Show authorization screen
Creating lock screen fragment in authorization mode is same as in creation mode, but instead of MODE_CREATE use MODE_AUTH.
setTitle(String) — set custom string on the top of the screen. setUseFingerprint(boolean) — by default fingerprint button will be shown for all device 23+ with a fingerprint sensor. If you don’t want use fingerprint at all set false. setMode(PFLockScreenMode) — MODE_CREATE or MODE_AUTH. See details above. setCodeLength(int) — set the length of the pin code. By default, length is 4. Minimum length is 4. setLeftButton(String, View.OnClickListener) — set string for the left button and ClickListener.
Check if pin code encryption key exist
An encryption key is needed to encode/decode pin code and stored in Android KeyStore.
Delete pin code encryption key.
You need to delete encryption key if you delete/reset pin code.
Don’t use PFFingerprintPinCodeHelper.getInstance().isPinCodeExist() directly.
Also you can use PFPinCodeViewModel() for the same methods. ViewModel wrapper around PinCodeHelper that returns LiveData objects.
Custom encryption. NEW! NEW! NEW!
Now you can create your custom encryption if for some reasons the one I have doesn’t meet your app requarements:
You need to override java IPFPinCodeHelper interface. That has four methods:
encodePin — method where you encode pin.
checkPin — to check if pin is valid.
delete — deletePinCode and all related stuff.
isPinCodeEncryptionKeyExist — if you have any encryprion keys or something else you’re using to encrpt your key here you check if all keys you need are exists. Haven’t beed deleted or anyting. This method is only for your own logic. Basically to check if you’re code can be decrypted.
All methods take callback as a parameter in case if you want implement something async like server side or whatever.
You can customize buttons, backgrounds, etc. To do that, use attributes in your activity theme:
pf_key_button — style object for key buttons (0-9) pf_lock_screen — style object for the background. Use it to set custom background. pf_fingerprint_button — style object for fingerprint button. You can set custom drawable, paddings, etc. pf_delete_button — style object for delete/backspace button. You can set custom drawable, paddings, etc. pf_code_view — style object to customize code view. (The view from the top of the screen). The view itself is set of check boxes. To customize it use a custom selector with checked states.
pf_title (NEW) — style object for title.
pf_next (NEW) — style object for next button.
pf_hint (NEW) — style object for hint button (Can’t remember).
If you want just a bit correct an existing styles you can override:
The only important thing you can’t change right now is the size of keys. But it’s coming.
Feel free to ask questions add issues. If I don’t respond to an issue or PR, feel free to ping me or send me DM on twitter @thealeksandr. If you create issue it would be nice if you subscribe for updates. So we can discuss it.
Источник
Locking Screen Orientation in Android
If there is a scenario where you need your entire application to be in portrait mode or landscape mode or one of the Activity should be in portrait mode and all the other activities should be set at auto screen orientation, then here this article makes you do that in simple steps. So in this article, we are going to learn the following two things.
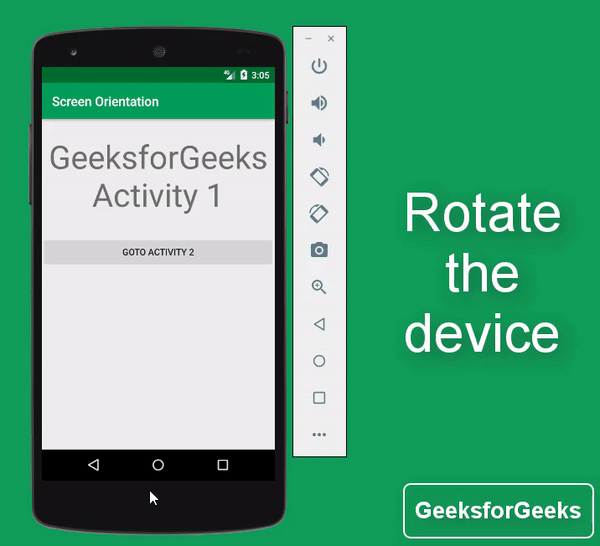
- How to make the entire application to be in portrait mode or landscape mode? Here is a preview of an entire application to be in portrait mode:

- And how to makeone of the Activity should be in portrait mode and all the other activities should be set at auto screen orientation? Here is a preview for the same:
Steps for Locking Screen Orientation
Step 1: Create a New Project
To create a new project in Android Studio please refer to How to Create/Start a New Project in Android Studio. Note that select Java as the programming language. Rename the MainActivity file as Activity1 and acticity_main as layout_activity_1 (renaming is done to avoid confusion between two activities).
Note: To rename the file click on the MainActivity -> Right-click -> Refactor -> Rename and similarly do for acticity_main file.
Step 2: Create another empty activity
Now create another empty activity by right click on app -> New -> Activity -> Empty Activity and rename the activity with Activity2 and also rename the layout name as layout_activity_2. Refer below images if you are unable to get the above steps.


Step 3: Working with the layout_activity_1.xml file
One needs to include text and button in the layout_activity_1. So open the layout_activity_1.xml and add widgets TextView and Button as these are been included so that we can differentiate the 2 activities.
layout_activity_1.xml
Output UI is produced as:

Step 4: Working with the Activity1.java file
Now you need to handle the above Goto Activity 2 button. So now open Activity1.java and handles the button as invoking the following code. Refer this for Explicit Intents: Android | Implicit and Explicit Intents with Examples and for handling click events of buttons in android you may refer to this: Handling Click events in Button | Android.
Activity1.java
Step 5: Working with the layout_activity_2.xml file
Now open the layout_activity_2.xml and add widgets TextView and Button.
layout_activity_2.xml
Output UI is produced as :

Step 6: Working with the Activity2.java file
We need to handle the above Goto Activity 1 button. To handle this button open Activity2.java and invoke the following code:
Activity2.java
Step 7: Now you are done with the interaction between two activities, you have created two activities and now your app should behave as follows.

Step 8: How to make the entire application to be in portrait mode or landscape mode?
Now we will discuss how to make the entire application to be in portrait mode (irrespective of the activities in the app will be in strictly portrait mode).
- Now open the AndroidManifest file by going to the app -> src -> main -> AndroidManifest.xml you can see the below image to get the file :

- In this project, we have only created two activities so there will be only two activity attributes visible.
- Now you need to invoke android:screenOrientation=”portrait” to be in the portrait mode. If you want the activity to be in landscape mode then one need invoke the android:screenOrientation=”landscape”.
- Now you will get the red line under the above screenOrientation attributes. So we need to invoke the other attribute tools:ignore=”LockedOrientationActivity” where the screenOrientation attribute is invoked, to ignore the locked screen orientation.
- Now The AndroidManifest.xml file should be like like the following:
Источник


