- XDA Basics: How to take logs on Android
- Kernel panic logs
- Driver messages
- System logs
- Android apps for collecting logs
- Logcat Extreme
- Логирование в Android приложениях
- Пытаемся навести порядок
- 3 Easy Ways on How to Print Call Log from Android Phone (Proven Tips)
- Way 1. How to Print Call Log from Android via Coolmuster Android Assistant
- Way 2. How Can I Print My Full Call History on Android Directly
- Way 3. How Do I Print My Call Logs via Call History Manager
- Wrapping Up
- Логирование в Android Studio без кода
- Полный список
- Логи приложения
- Всплывающие сообщения
XDA Basics: How to take logs on Android
Logs are very useful when a developer is diagnosing an error with a piece of software. So, as a user, when you complain to a developer about a problem with their Android app or an aftermarket firmware (custom ROM), they’ll ask you to submit a log to help them troubleshoot the issue. Android includes a number of logs that deal with different parts of the firmware, and there are a number of ways to collect those logs. In this guide, we’ll talk about the various common logs and how you can collect them on Android for bug reports.
Before we start, you should set up Android Debug Bridge on your computer as you might need ADB access for some of these logs. We have a great guide on how to set up ADB on any computer.

Kernel panic logs
Kernel panic logs are useful to figure out what happened during an unsuccessful boot. If you’re trying to run a custom ROM but your phone is stuck at the boot loop, you can collect kernel panic logs to help the ROM developer find out what went wrong.
A majority of Android manufacturers use upstream вЂpstore’ and вЂramoops’ drivers to store kernel logs after a panic. Ramoops writes its logs to the RAM before the system crashes. With root access, these logs can be retrieved from:
The file name could be slightly different but it’ll be in the pstore directory. You can get it using ADB pull or any other way you want. For example:
adb pull /sys/fs/pstore/console-ramoops C:\Users\Gaurav\Desktop\filename
Driver messages
The log from the driver messages buffer can be used to diagnose issues with system drivers and why something isn’t working. On Android, you can use the ‘dmesg’ output to get these logs. You’ll need root access to get these logs though. Use the following ADB command to export the complete log.
System logs
System logs are useful when something in the system throws an error. Android allows collecting system logs using Logcat. Log messages can be viewed in a Logcat window in Android Studio, or you can use the command line tool to pull them.
Several Android apps are also available in the Google Play store that allow easy access to these tools. We’ll talk about these apps later in this article. Moreover, several custom ROMs come with options in the Developers settings to collect the system logs.
To collect logs using ADB, use the following command. This command will export a continuous log, so use Ctrl + C to stop it.
You can use the -d parameter to export the complete log in one go.
If you want, you can also view or save the radio buffer using the following command.
If your device is rooted, you can use the Terminal app on the device itself to collect logs. To save a log using Terminal on your phone, type the following command so the log will be saved on your phone.
Android apps for collecting logs
Logcat Extreme


Logcat Extreme can help you read the logcat and dmesg outputs as well as record logs. It requires root access to show logs properly.
Источник
Логирование в Android приложениях
Уверен, что всем разработчикам приложений на платформе Android знаком класс Log, позволяющий логировать различные события. По различным причинам, формат записи логов для каждого проекта может отличаться достаточно сильно — начиная от «AAA», «111111» и «I was here» до более-менее внятных — «Opening HTTP connection to habrahabr.ru». Под катом вы найдете пример функции, которая поможет навести порядок в логах.
Данный топик не претендует на оригинальность и универсальность. И поэтому, если в вашем проекте уже существует некий стандарт логирования событий, то смело проходите мимо — топик скорее ориентирован на начинающих разработчиков.
Как правило, ценность логов начинаешь понимать только когда заказчик матерясь отсылает лог на почту и просит засабмитить фикс через 5 минут. И если лог состоит из сообщений невнятного характера, то как минимум, разбр данного лога займет куда больше времени, чем хотелось бы.
Пытаемся навести порядок
Логи существуют для того, чтобы разработчик мог понять что, где и когда произошло. Найти ответ на вопрос «когда произошло» достаточно просто — в логах Андройд записывает время события. Нахождение ответа на вопрос «что произошло» так же не вызывает больших трудностей, если сообщение в лог было написано со смыслом, например: «Opening file. ». Вопрос «где произошло» оказывается наиболее сложным. Если проект большой, то придеться потратить время на нахождение нужного места кода, даже, если лог был написан со смыслом.
Если событие логируется с указанием Throwable (чаще Exception), например, метод public static int d (String tag, String msg, Throwable tr) , то в консоле сообщений будет выведен стек, который поможет быстро идентифицировать место логирования. Но использование данного метода без особой необходимости до безобразия перегрузит лог ненужной информацией.
Если же логируется просто текст, то при логировании можно явно указывать место вызова. Например:
Однако, писать такое каждый раз — дело утомительное и неблагодарное.
Ниже приведен пример класса Log , который делает это автоматически.
Использование класса очень простое:
Результатом логирования данным способом будут примерно следующие строки:
Примечание:
По понятным причинам, данный способ мало пригоден для приложений «пропущенных» через обфускатор.
В общем-то все.
Прошу прощения, если эта статья показалась слишком тривиальной для хабра.
Источник
3 Easy Ways on How to Print Call Log from Android Phone (Proven Tips)

Like anything else on your phone, call logs are also very important data on Android device, since they record the activities and communications between you and other people. Besides, Android keeps the latest 500 incoming, outgoing and missed calls. Thus, people who want to back up call logs to keep beautiful memories in the past or who need to present evidence to court may need to print call log from Android phone.
But the question is: how to print call log from Android phone? Don’t panic. This article will tell you 3 simple and effective ways to print call log from Android phone.
Way 1. How to Print Call Log from Android via Coolmuster Android Assistant
Coolmuster Android Assistant is a rather professional call log export program, which allows you to view Android call log on PC and successfully perform call log export or call log download from PC. Besides, it also ensures you to print call logs from Android with detailed information, like contact name, phone number, date, country, address, type, duration, etc. In addition, it also has several output formats for you to choose before printing, such as CSV, HTML, XML, etc.
What’s more, it has other features. It supports to transfer contacts, SMS, call logs, music, videos, photos, etc. between PC and your Android device, and back up and restore overall Android phone data on PC in one click. Moreover, it also supports to add, delete and edit contacts on PC, delete, reply, forward, copy and send group messages on PC, install and uninstall apps, import, export and delete call logs, export contacts to Outlook and import contacts from Outlook.
Well, after you get to know its features, you may concern about the compatibility. Coolmuster Android Assistant is fully compatible with all Android devices running Android 4.0 and later versions, such as Samsung Galaxy S20/S20+/S20 Ultra/Z Flip/Z Flip Thom Browne/S10+/S10/S10e/S/S9+/S9/S8+/S8, Huawei, Motorola, Sony, ZTE, HTC, LG, Google, OPPO, etc.


How to print call log from Android phone?
1. Install and launch Coolmuster Android Assistant on your computer, and enter in Android Assistant module from the toolbox.
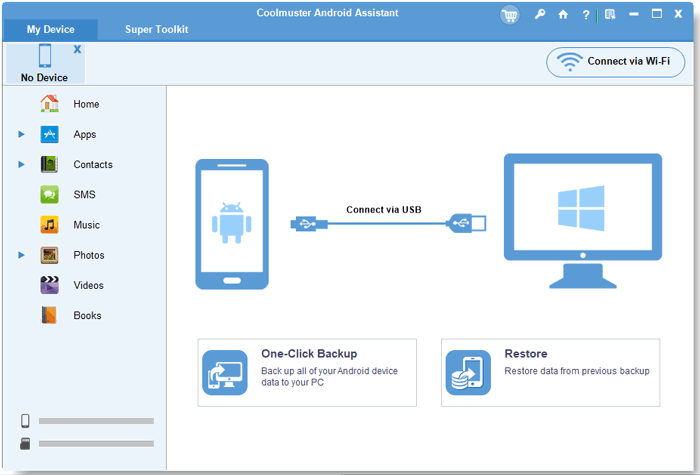
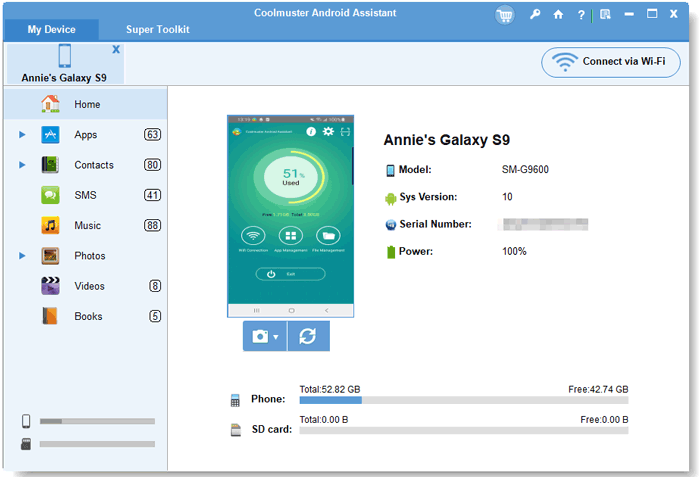
2. Connect your Android device to computer via a USB cable, and enable USB debugging and grant permission on your phone as prompted. After this program recognizes your phone, you will see the main interface of this program with Android device’s main information on it.
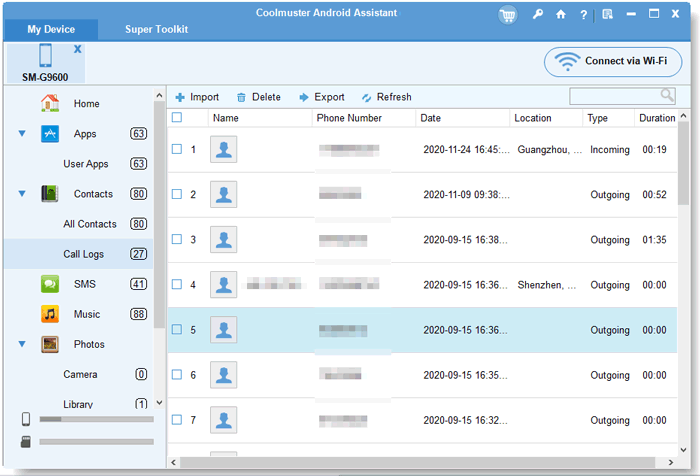
3. How to transfer call log from Android to PC. Select Call Logs folder from the left window, and you will be able to view Android call logs on PC. Then tick the call logs you want to print and tap Export on the top menu to begin call log download to PC. After that, you can send or copy the Android call log file to a printer to print out Android call logs.
Further reading: if you want to print text messages from Android as well, you can learn more about how to print text messages from Android here.
Way 2. How Can I Print My Full Call History on Android Directly
To view full call history on Android, you can directly go to the Phone app on your phone and print Android call logs.
How can I see my full call history on Android?
1. Unlock your Android phone and open the Phone app/Dialer app.
2. View call logs on Android. Tap Log (or Call Log/Call History/Recents/Call List in some Android phones), and you will see all call history: the missed calls in red, the answered calls in blue, the outgoing calls in green, etc. To view the date, duration, call type and more details, you can tap a single call history in the list or the exclamation mark behind a single call to view more.
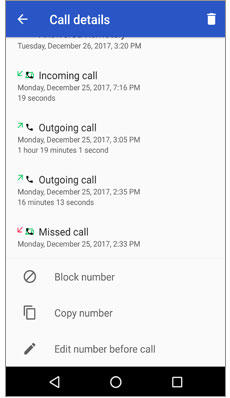
3. How to print call log from Android phone. you can take a screenshot or several screenshots of the call history, and send it to a printer or printing shop to print it out.
Way 3. How Do I Print My Call Logs via Call History Manager
Call History Manager is an easy-to-use app which allows you to export call logs to excel file, back up and restore Android call logs on the same phone or other device.
How do I download my call log on Android?
1. Install and launch Call History Manager from on your Android phone.
2. Click All option on the top menu and tap Export to excel.
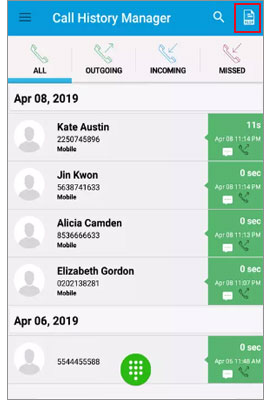
3. After that, a notice will pop up to inform you that call logs has been successfully exported. And you can also tap Mail at the lower left corner of the notice to share the call log excel file via Bluetooth, Gmail, Messenger, Google Drive, etc. and then send it to a printer to print Android call logs.
Wrapping Up
Android call log printing is not as difficult as you think. If you need to print call log from Android, you can refer to the three simple methods above to learn how to print call log from Android phone. And I highly recommend you to try the professional Coolmuster Android Assistant, which is easy to use, highly secure, printer-friendly and fast to export your selected call logs with detailed information and standard format. Of course, you can select the way you are interested in.
In addition, if you encounter any problem during use, feel free to leave a comment below.
Источник
Логирование в Android Studio без кода

Вам больше не нужно ставить Log.d() в каждой строке кода!
Когда мы отлаживаем приложения, мы иногда начинаем плодить логи по всему коду, чтобы разобраться с какой-либо проблемой.
Это прекрасно работает, но бывает так, что мы забываем удалить логи перед тем как закоммитаться, и они «благополучно» попадают в продакшн код.
Хорошая практика — не оставлять логи для отладки после её завершения, даже если вы используете ProGuard для их автоматического удаления в скомпилированном коде, так как они оказывают пагубное влияние на общую читабельность вашего кода. Как и комментарии, логи могут легко начать расходиться с окружающим их кодом, в лучшем случае становясь бесполезными, а в худшем вводящими в заблуждение.
Ситуация усложняется, когда выведение логов требует соблюдения определённых условий. Теперь это не просто бесполезное нагромождение if else , но ещё и потенциально дорогостоящий код.
Но, оказывается, есть очень простой способ решения этой проблемы. IntelliJ и Android Studio позволяют создавать точки прерывания (англ. breakpoints), не прерывающие исполнение кода (да, это законно).
Сначала создайте точку прерывания на любой строке, либо щелкнув в левой части редактора, либо с помощью сочетания клавиш Ctrl-F8 . Затем вы можете отредактировать точку прерывания, либо щелкнув по ней правой кнопкой мыши, либо используя комбинацию клавиш Ctrl-Shift-F8 . Вы увидите такое окно:

Затем снимите флажок Suspend (рус. приостановить), и вы увидите больше параметров в этом модальном окне:
Теперь добавьте любые логи в поле Evaluate and log следующим образом:
И после удаления всех логов из кода и добавления их в точки прерывания ваш код будет выглядеть чистым:
Гораздо лучше, правда? Теперь идите и используйте непрерывающиеся точки прерывания! Все, что вам нужно сделать, это запустить приложение в режиме отладки, и сообщения будут выводиться в консоль.
О других хитростях в Android Studio читайте здесь
Источник
Полный список
В этом уроке мы:
— рассмотрим логи приложения и всплывающие сообщения
Project name: P0121_LogAndMess
Build Target: Android 2.3.3
Application name: LogAndMess
Package name: ru.startandroid.develop.logandmess
Create Activity: MainActivity
Создадим в main.xml экран, знакомый нам по прошлым урокам про обработчики:
Алгоритм приложения будет тот же. По нажатию кнопок меняется текст. Обработчик — Activity.
Сохраним, запустим. Убедимся, что все работает.
Логи приложения
Когда вы тестируете работу приложения, вы можете видеть логи работы. Они отображаются в окне LogCat. Чтобы отобразить окно откройте меню Window > Show View > Other … В появившемся окне выберите Android > LogCat

Должна появится вкладка LogCat

Рассмотрим эту вкладку подробней. Логи имеют разные уровни важности: ERROR, WARN, INFO, DEBUG, VERBOSE (по убыванию). Кнопки V D I W E (в кружках) – это фильтры и соответствуют типам логов. Опробуйте их и обратите внимание, что фильтр показывает логи не только своего уровня, но и уровней более высокой важности. Также вы можете создавать, редактировать и удалять свои фильтры – это мы рассмотрим чуть дальше.
Давайте смотреть, как самим писать логи. Делается это совсем несложно с помощью класса Log и его методов Log.v() Log.d() Log.i() Log.w() and Log.e(). Названия методов соответствуют уровню логов, которые они запишут.
Изменим код MainActivity.java. Возьмем все каменты из кода и добавим в DEBUG-логи с помощью метода Log.d. Метод требует на вход тэг и текст сообщения. Тэг – это что-то типа метки, чтобы легче было потом в куче системных логов найти именно наше сообщение. Добавим описание тега (TAG) и запишем все тексты каментов в лог.
Eclipse ругнется, что не знает класс Log. Обновите импорт (CTRL+SHIFT+O) и, если спросит, выберите android.util.Log. Запустим приложение, понажимаем кнопки и посмотрим логи

Видно, что все отлично записалось. Чтобы сделать просмотр удобней, создадим свой фильтр. Жмем значок +

Имя фильтра произвольное, например, «My logs». Log Tag – это как раз значение константы TAG, которая описана в нашем коде и использовалась в методе Log.d, т.е. — «myLogs«. Pid оставляем пустым, это id процесса. Уровень поставим Debug

и жмем OK. Появилась новая вкладка My logs, на которой отображаются логи, соответствующие только что созданному фильтру.
Мы помещали в лог текст, но разумеется, вы можете писать, например, значения интересующих вас переменных (приведенные к типу String).
Иногда бывает, что логи не отображаются во вкладке LogCat, хотя AVD запущен, приложение работает без проблем. В таком случае должно помочь следующее: в Eclipse идем в меню Window > Open Perspective > Other > DDMS. Откроется немного другой набор окон чем обычно. Там найдите вкладку Devices и в ней должно быть видно ваше AVD-устройство, кликните на него и логи должны появиться. Чтобы вернуться в разработку: Window > Open Perspective > Java.
Всплывающие сообщения
Приложение может показывать всплывающие сообщения с помощью класса Toast. Давайте подредактируем метод onClick. Сделаем так, чтобы всплывало сообщение о том, какая кнопка была нажата.
Разберем синтаксис вызова. Статический метод makeText создает View-элемент Toast. Параметры метода:
— context – пока не будем вдаваться в подробности, что это такое и используем текущую Activity, т.е. this.
— text – текст, который надо показать
— duration – продолжительность показа ( Toast.LENGTH_LONG — длинная, Toast.LENGTH_SHORT — короткая )
Toast создан и чтобы он отобразился на экране, вызывается метод show(). Сохраняем, запускаем, проверяем.

Если у вас есть Андроид-смартфон, я думаю вы уже видели подобные сообщения. Теперь вы знаете, как это делается )
На следующем уроке:
— создаем пункты меню
Присоединяйтесь к нам в Telegram:
— в канале StartAndroid публикуются ссылки на новые статьи с сайта startandroid.ru и интересные материалы с хабра, medium.com и т.п.
— в чатах решаем возникающие вопросы и проблемы по различным темам: Android, Kotlin, RxJava, Dagger, Тестирование
— ну и если просто хочется поговорить с коллегами по разработке, то есть чат Флудильня
— новый чат Performance для обсуждения проблем производительности и для ваших пожеланий по содержанию курса по этой теме
Источник


