- Как настроить Android Studio на вашем Mac (и почему вы этого хотите)
- Зачем беспокоиться с Android?
- Затмение с ADT или Android Studio?
- Начало работы с Android Studio
- Добавление пакетов SDK
- Портирование приложений iOS на Android
- Android Studio and IntelliJ
- Installation and setup
- Updating the plugins
- Creating projects
- Creating a new project
- Setting the company domain
- Creating a new project from existing source code
- Editing code and viewing issues
- Running and debugging
- Selecting a target
- Run app without breakpoints
- Run app with breakpoints
- Fast edit and refresh development cycle
- Show performance data
- Editing tips for Flutter code
- Assists & quick fixes
- Wrap with new widget assist
- Wrap widget list with new widget assist
- Convert child to children assist
- Live templates
- Keyboard shortcuts
- Hot reload vs. hot restart
- Editing Android code in Android Studio with full IDE support
- Editing Android code in IntelliJ IDEA
- Tips and tricks
- Troubleshooting
- Known issues and feedback
Как настроить Android Studio на вашем Mac (и почему вы этого хотите)
Вам может понадобиться Mac, чтобы создавать свои собственные приложения для iOS
, но если вы больше похожи на зеленых пришельцев, Android IDE (интегрированная среда разработки) также доступна на OS X (среди других платформ).
Если вы готовы перейти от создания приложений для iPhone
или вам не терпится создать следующую большую вещь для Android, установка IDE — это первый шаг в этом путешествии. Или, если мы движемся слишком быстро, почему бы вам не начать с курса
Зачем беспокоиться с Android?
Если вы разбираетесь в разработке для OS X и iOS, вы можете спросить себя, зачем вообще беспокоиться об Android?
Многие разработчики iOS уклоняются от Android из-за фрагментации устройства и необходимости дальнейшего исправления / повторного создания приложений для разных версий ОС, которых много. Я не буду пытаться продать вам, какой из этих двух вариантов лучше, так как они оба предлагают многочисленные преимущества для разработчиков, но я скажу, что для создателей приложений, которые хотят зарабатывать на жизнь своими приложениями, найти какой-то баланс между устройствами никогда не бывает плохой идеей.

Кроме того, вы обнаружите, что общий опыт работы с Android гораздо менее строг. С одной стороны, Google Play (Android App Store) не имеет многих из тех же ограничений, что и Apple, и не требует от разработчиков ежегодной платы в 99 долларов (для Google — 25 долларов). Google предоставляет вам доступ к внутренним функциям Android (посредством модели с открытым исходным кодом), которая позволяет создавать такие вещи, как эмуляторы, загрузчики и настраиваемые доки, значки, стартовые экраны — как вы это называете — что просто невозможно в iOS ,
Если вы строго следите за показателями доходов, Apple App Store по-прежнему будет вашей основной целью. В то время как Google Play имеет на 60 процентов больше ежегодных загрузок, чем App Store, Apple App Store фактически приносит на 70 процентов больше годового дохода от приложений. Это не значит, что вы не можете быть прибыльным на Android или что вам следует избегать платформы в целом, на самом деле, наоборот.

В то время как приложения могут иметь более высокие показатели дохода в Apple App Store, показатели загрузки значительно выше в Google Play, что делает его интересной платформой для тестирования и настройки бесплатного приложения перед выпуском премиум-версии или бесплатной версии.
Затмение с ADT или Android Studio?
В прошлые дни у вас был постоянно запутывающийся выбор между пакетом, включающим Eclipse и плагином ADT (Android Developer Tools), или официальной Android Studio, основанной на платформе IntelliJ — IDE на основе Java.
К счастью, в последних итерациях процесс несколько упростили, выпустив всего одну версию Android Studio.
Фактически, хотя возможность использования Eclipse все еще существует, Google официально рекомендует начать процесс перехода на Android Studio, поскольку поддержка ADT заканчивается. Если вам нужна помощь в переносе ваших проектов, вам поможет эта статья в блоге разработчиков Android.
Теперь, если вы просто ищете эмуляторы, которые поставляются в комплекте с Android Studio, важно отметить, что есть и другие, более легкие способы
сделать это на вашем ПК с Windows, OS X или Linux без необходимости загружать и устанавливать Android Studio. На Mac попробуйте BlueStacks, или вы можете просто загрузить и запустить Android на вашем ПК с Windows. Если вы ищете сверхлегкую эмуляцию Android, попробуйте этот браузерный эмулятор для Chrome
Начало работы с Android Studio
Сначала мы должны загрузить и установить Android Studio, пакет, который состоит из:
- Android Studio IDE
- Android SDK (комплект разработки программного обеспечения)
- Платформа Android 5.0 (Lollipop)
- Образ системы эмулятора Android 5.0 с API Google
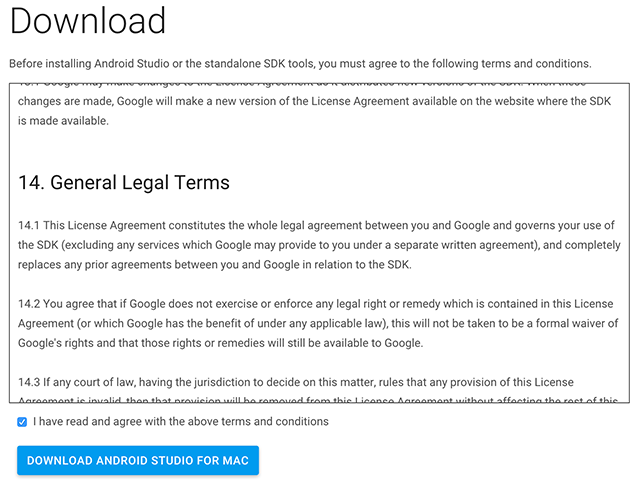
Запустите файл .dmg и перетащите Android Studio в папку «Приложения».

Откройте Android Studio и следуйте инструкциям мастера установки. Иногда вы сталкиваетесь с ошибкой, когда файл «поврежден» или ненадежен и должен быть перемещен в корзину. Если это произойдет, вам просто нужно настроить параметры безопасности и конфиденциальности, чтобы приложение могло работать, перейдя в Системные настройки> Безопасность Конфиденциальность > генеральный а затем выбрав В любом месте где написано «Разрешить загрузку приложений из:»

Если вам нужно использовать инструменты Android SDK из командной строки, вы можете получить к ним доступ, открыв Терминал (Приложения> Утилиты> Терминал) и используя следующее:
/ Users / имя пользователя / Library / Android / SDK /

Просто не забудьте добавить свое имя пользователя вместо имя пользователя .
Добавление пакетов SDK
Android SDK (комплект разработки программного обеспечения), который поставляется с пакетом Android Studio, не включает в себя все необходимое для разработки приложений для Android. Сам SDK — это утилита, используемая для разделения ваших инструментов, платформ и компонентов на пакеты с помощью Android SDK Manager.
Поэтому нам нужно добавить несколько пакетов, чтобы подготовить все к разработке. Не волнуйся, это простой процесс.
Сначала откройте менеджер SDK под Сервис> Конфигурировать> SDK Manager.

Замечания: С этого момента, чтобы быть кратким, мы будем предполагать, что если я не упомяну что-то конкретно, это означает одну из двух вещей:
- Он предварительно выбран и будет установлен автоматически, как только мы закончим.
- Вам это не нужно … по крайней мере, прямо сейчас.
Хорошо, давайте продолжим. Выберите следующее:
- Инструменты Android SDK
- Android SDK Платформа-инструменты
- Android SDK Build-tools (самая высокая версия)

Откройте папку для самой высокой версии Android в списке (5.1.1 на момент написания статьи) и выберите:
- Платформа SDK
- Изображение системы ARM EABI v7a

Открой Дополнительно каталог и загрузите следующие API для библиотеки поддержки Android:
- Репозиторий поддержки Android
- Библиотека поддержки Android

Откройте каталог Extras и загрузите пакет услуг Google Play, чтобы получить еще больше API. Добавлять:
- Google Repository
- Сервисы Google Play
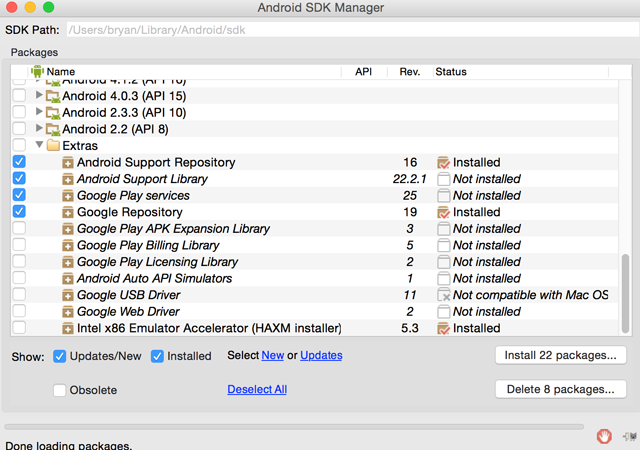
- Нажмите Установить 22 пакета (или сколько угодно отчетов менеджера SDK).
- Нажмите на название каждого пакета слева, чтобы принять условия лицензии для каждого.
- Нажмите Установить.
Замечания: Не выходите из SDK manager, пока установка не будет завершена!
После завершения установки вы можете сразу же приступить к разработке
и даже запускать приложения для Android
прямо с вашего верного Mac (или Hackintosh) под управлением OS X.
Портирование приложений iOS на Android
Из-за отсутствия сходства в двух операционных системах нет ничего, что предлагало бы решение «подключи и работай» для переноса приложений из другой ОС.
Тем не менее, есть программа под названием Apportable, которую я чувствовал, стоит отметить. Apportable по сути переводит Swift и Objective-C для запуска машинного кода ARM и x86, который способен понять Android. Вы также найдете дополнительные плагины для дальнейшего снижения нагрузки на разработку, такие как плагин SpriteBuilder. Тем не менее, не все API-интерфейсы Apple доступны в Apportable, поэтому, несмотря на то, что это лучшее, что у нас есть, оно по-прежнему не является решением «включай и работай».
Основные преимущества Apportable заключаются в более быстрой кросс-компиляции без необходимости в эмуляторах, виртуальных машинах или альтернативе на Java. В то время как Java обеспечивает отличную кросс-совместимость в мобильных приложениях, она оставляет версии для iOS и Android не очень нативными. На самом деле, большинство чувствуют себя как дешевые порты от других ОС.
Опять же, это не идеальное решение, но оно должно значительно облегчить вашу рабочую нагрузку, если вам придется перемещаться между Android и iOS.
Счастливого развития, и обязательно поделитесь тем, что вы нам придумали, здесь, на сайте Use Use Of.
Вы разработали приложение для iOS или Android? Какая платформа, на ваш взгляд, предлагает лучшие инструменты для разработчиков?
Источник
Android Studio and IntelliJ
Installation and setup
Follow the Set up an editor instructions to install the Dart and Flutter plugins.
Updating the plugins
Updates to the plugins are shipped on a regular basis. You should be prompted in the IDE when an update is available.
To check for updates manually:
- Open preferences (Android Studio > Check for Updates on macOS, Help > Check for Updates on Linux).
- If dart or flutter are listed, update them.
Creating projects
You can create a new project in one of several ways.
Creating a new project
To create a new Flutter project from the Flutter starter app template:
- In the IDE, click New Project from the Welcome window or File > New > Project from the main IDE window.
- Specify the Flutter SDK path and click Next.
- Enter your desired Project name, Description and Project location.
- If you might publish this app, set the company domain.
- Click Finish.
Setting the company domain
When creating a new app, some Flutter IDE plugins ask for an organization name in reverse domain order, something like com.example . Along with the name of the app, this is used as the package name for Android, and the Bundle ID for iOS when the app is released. If you think you might ever release this app, it is better to specify these now. They cannot be changed once the app is released. Your organization name should be unique.
Creating a new project from existing source code
To create a new Flutter project containing existing Flutter source code files:
In the IDE, click Create New Project from the Welcome window or File > New > Project from the main IDE window.
Important: Do not use the New > Project from existing sources option for Flutter projects.
Editing code and viewing issues
The Flutter plugin performs code analysis that enables the following:
- Syntax highlighting.
- Code completions based on rich type analysis.
- Navigating to type declarations (Navigate > Declaration), and finding type usages (Edit > Find > Find Usages).
- Viewing all current source code problems (View > Tool Windows > Dart Analysis). Any analysis issues are shown in the Dart Analysis pane:


Running and debugging
Note: You can debug your app in a few ways.
- Using DevTools, a suite of debugging and profiling tools that run in a browser and include the Flutter inspector. DevTools replaces the previous browser-based profiling tool, Observatory.
- Using Android Studio’s (or IntelliJ’s) built-in debugging features, such as the ability to set breakpoints.
- Using the Flutter inspector, directly available in Android Studio and IntelliJ.
The instructions below describe features available in Android Studio and IntelliJ. For information on launching DevTools, see Running DevTools from Android Studio in the DevTools docs.
Running and debugging are controlled from the main toolbar:
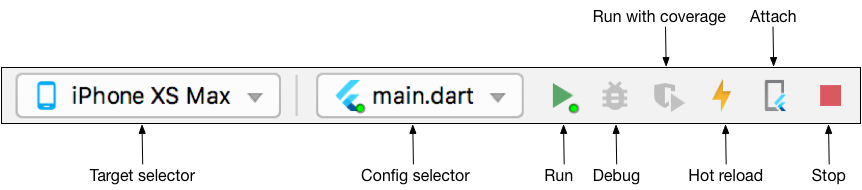
Selecting a target
When a Flutter project is open in the IDE, you should see a set of Flutter-specific buttons on the right-hand side of the toolbar.
Note: If the Run and Debug buttons are disabled, and no targets are listed, Flutter has not been able to discover any connected iOS or Android devices or simulators. You need to connect a device, or start a simulator, to proceed.
- Locate the Flutter Target Selector drop-down button. This shows a list of available targets.
- Select the target you want your app to be started on. When you connect devices, or start simulators, additional entries appear.
Run app without breakpoints
- Click the Play icon in the toolbar, or invoke Run > Run. The bottom Run pane shows logs output.
Run app with breakpoints
- If desired, set breakpoints in your source code.
- Click the Debug icon in the toolbar, or invoke Run > Debug.
- The bottom Debugger pane shows Stack Frames and Variables.
- The bottom Console pane shows detailed logs output.
- Debugging is based on a default launch configuration. To customize this, click the drop-down button to the right of the device selector, and select Edit configuration.
Fast edit and refresh development cycle
Flutter offers a best-in-class developer cycle enabling you to see the effect of your changes almost instantly with the Stateful Hot Reload feature. See Hot reload for details.
Show performance data
Note: To examine performance issues in Flutter, see the Timeline view.
To view the performance data, including the widget rebuild information, start the app in Debug mode, and then open the Performance tool window using View > Tool Windows > Flutter Performance.
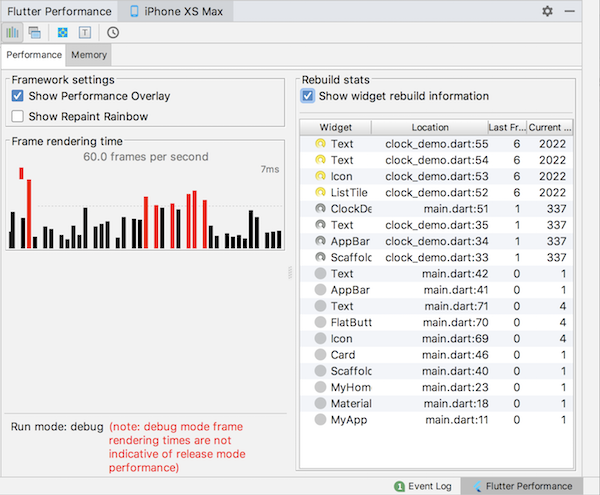
To see the stats about which widgets are being rebuilt, and how often, click Show widget rebuild information in the Performance pane. The exact count of the rebuilds for this frame displays in the second column from the right. For a high number of rebuilds, a yellow spinning circle displays. The column to the far right shows how many times a widget was rebuilt since entering the current screen. For widgets that aren’t rebuilt, a solid grey circle displays. Otherwise, a grey spinning circle displays.
The app shown in this screenshot has been designed to deliver poor performance, and the rebuild profiler gives you a clue about what is happening in the frame that might cause poor performance. The widget rebuild profiler is not a diagnostic tool, by itself, about poor performance.
The purpose of this feature is to make you aware when widgets are rebuilding—you might not realize that this is happening when just looking at the code. If widgets are rebuilding that you didn’t expect, it’s probably a sign that you should refactor your code by splitting up large build methods into multiple widgets.
This tool can help you debug at least four common performance issues:
The whole screen (or large pieces of it) are built by a single StatefulWidget, causing unnecessary UI building. Split up the UI into smaller widgets with smaller build() functions.
Offscreen widgets are being rebuilt. This can happen, for example, when a ListView is nested in a tall Column that extends offscreen. Or when the RepaintBoundary is not set for a list that extends offscreen, causing the whole list to be redrawn.
The build() function for an AnimatedBuilder draws a subtree that does not need to be animated, causing unnecessary rebuilds of static objects.
An Opacity widget is placed unnecessarily high in the widget tree. Or, an Opacity animation is created by directly manipulating the opacity property of the Opacity widget, causing the widget itself and its subtree to rebuild.
You can click on a line in the table to navigate to the line in the source where the widget is created. As the code runs, the spinning icons also display in the code pane to help you visualize which rebuilds are happening.
Note that numerous rebuilds doesn’t necessarily indicate a problem. Typically you should only worry about excessive rebuilds if you have already run the app in profile mode and verified that the performance is not what you want.
And remember, the widget rebuild information is only available in a debug build. Test the app’s performance on a real device in a profile build, but debug performance issues in a debug build.
Editing tips for Flutter code
If you have additional tips we should share, let us know!
Assists & quick fixes
Assists are code changes related to a certain code identifier. A number of these are available when the cursor is placed on a Flutter widget identifier, as indicated by the yellow lightbulb icon. The assist can be invoked by clicking the lightbulb, or by using the keyboard shortcut ( Alt + Enter on Linux and Windows, Option + Return on macOS), as illustrated here:
Quick Fixes are similar, only they are shown with a piece of code has an error and they can assist in correcting it. They are indicated with a red lightbulb.
Wrap with new widget assist
This can be used when you have a widget that you want to wrap in a surrounding widget, for example if you want to wrap a widget in a Row or Column .
Wrap widget list with new widget assist
Similar to the assist above, but for wrapping an existing list of widgets rather than an individual widget.
Convert child to children assist
Changes a child argument to a children argument, and wraps the argument value in a list.
Live templates
Live templates can be used to speed up entering typical code structures. They are invoked by typing their prefix, and then selecting it in the code completion window:
The Flutter plugin includes the following templates:
- Prefix stless : Create a new subclass of StatelessWidget .
- Prefix stful : Create a new subclass of StatefulWidget and its associated State subclass.
- Prefix stanim : Create a new subclass of StatefulWidget and its associated State subclass, including a field initialized with an AnimationController .
You can also define custom templates in Settings > Editor > Live Templates.
Keyboard shortcuts
Hot reload
On Linux (keymap Default for XWin) and Windows the keyboard shortcuts are Control + Alt + ; and Control + Backslash .
On macOS (keymap Mac OS X 10.5+ copy) the keyboard shortcuts are Command + Option and Command + Backslash .
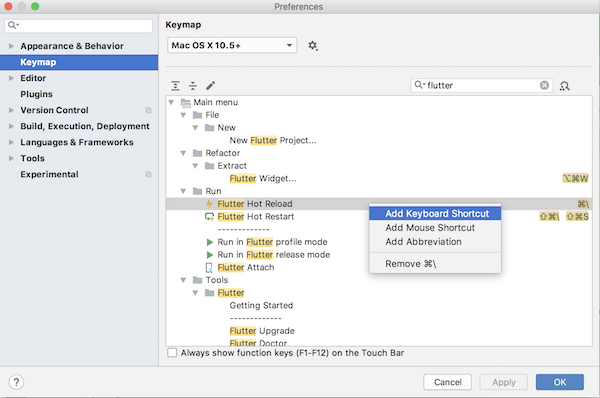
Keyboard mappings can be changed in the IDE Preferences/Settings: Select Keymap, then enter flutter into the search box in the upper right corner. Right click the binding you want to change and Add Keyboard Shortcut.
Hot reload vs. hot restart
Hot reload works by injecting updated source code files into the running Dart VM (Virtual Machine). This includes not only adding new classes, but also adding methods and fields to existing classes, and changing existing functions. A few types of code changes cannot be hot reloaded though:
- Global variable initializers
- Static field initializers
- The main() method of the app
For these changes you can fully restart your application, without having to end your debugging session. To perform a hot restart, don’t click the Stop button, simply re-click the Run button (if in a run session) or Debug button (if in a debug session), or shift-click the ‘hot reload’ button.
Editing Android code in Android Studio with full IDE support
Opening the root directory of a Flutter project doesn’t expose all the Android files to the IDE. Flutter apps contain a subdirectory named android . If you open this subdirectory as its own separate project in Android Studio, the IDE will be able to fully support editing and refactoring all Android files (like Gradle scripts).
If you already have the entire project opened as a Flutter app in Android Studio, there are two equivalent ways to open the Android files on their own for editing in the IDE. Before trying this, make sure that you’re on the latest version of Android Studio and the Flutter plugins.
- In the “project view”, you should see a subdirectory immediately under the root of your flutter app named android . Right click on it, then select Flutter > Open Android module in Android Studio.
- OR, you can open any of the files under the android subdirectory for editing. You should then see a “Flutter commands” banner at the top of the editor with a link labeled Open for Editing in Android Studio. Click that link.
For both options, Android Studio gives you the option to use separate windows or to replace the existing window with the new project when opening a second project. Either option is fine.
If you don’t already have the Flutter project opened in Android studio, you can open the Android files as their own project from the start:
- Click Open an existing Android Studio Project on the Welcome splash screen, or File > Open if Android Studio is already open.
- Open the android subdirectory immediately under the flutter app root. For example if the project is called flutter_app , open flutter_app/android .
If you haven’t run your Flutter app yet, you might see Android Studio report a build error when you open the android project. Run flutter pub get in the app’s root directory and rebuild the project by selecting Build > Make to fix it.
Editing Android code in IntelliJ IDEA
To enable editing of Android code in IntelliJ IDEA, you need to configure the location of the Android SDK:
- In Preferences > Plugins, enable Android Support if you haven’t already.
- Right-click the android folder in the Project view, and select Open Module Settings.
- In the Sources tab, locate the Language level field, and select level 8 or later.
- In the Dependencies tab, locate the Module SDK field, and select an Android SDK. If no SDK is listed, click New and specify the location of the Android SDK. Make sure to select an Android SDK matching the one used by Flutter (as reported by flutter doctor ).
- Click OK.
Tips and tricks
Troubleshooting
Known issues and feedback
Important known issues that might impact your experience are documented in the Flutter plugin README file.
All known bugs are tracked in the issue trackers:
We welcome feedback, both on bugs/issues and feature requests. Prior to filing new issues:
- Do a quick search in the issue trackers to see if the issue is already tracked.
- Make sure you have updated to the most recent version of the plugin.
When filing new issues, include the output of flutter doctor .
Except as otherwise noted, this work is licensed under a Creative Commons Attribution 4.0 International License, and code samples are licensed under the BSD License.
Источник


