- How to Add a New Email Account to iPhone or iPad
- How to Add & Setup an Email Account on iPhone and iPad
- Can I create a new email address for the iPhone or iPad?
- Managing multiple email inboxes on iPhone, iPad
- Add an email account to your iPhone, iPad, or iPod touch
- How to set up your email account automatically
- How to set up your email account manually
- Enter account settings manually
- Do more with Mail
- How can you change email account settings for iPhone and iPad
- How to set a default email account on your iPhone and iPad
- How to switch between email accounts on your iPhone and iPad
- How to disable an email account on your iPhone and iPad
- How to delete an email account on your iPhone and iPad
- Any questions?
- Sign in with your Apple ID
- Sign in on your iPhone, iPad, or iPod touch
- Sign in on your Mac
- Sign in on Apple TV
- Sign in on apps and other devices
- Sign in to use Apple Music, the Apple TV app, and more on your other devices
- Sign in to use iCloud on your other devices
- Use Sign in with Apple on third-party apps and websites
- Learn more
How to Add a New Email Account to iPhone or iPad

Most iPhone and iPad users already have one email account setup on their iOS device, but you can easily add a new email address to the iPhone or iPad, or even multiple new email addresses to the same device, all to be managed in the same Mail app of iOS. This is nice for those of us who juggle multiple email accounts for personal, work, and other purposes.
This tutorial will walk through adding and setting up new email accounts or additional email addresses on the iPhone or iPad. After a new email account is setup and configured in iOS, you can check emails, send, receive, reply, forward, and perform any other email functions from all of the addresses on the device.
How to Add & Setup an Email Account on iPhone and iPad
This will add a new email address of your choice to the iPhone or iPad. If you want to add multiple email accounts to the iPhone or iPad, repeat the process outlined below:
- Open the “Settings” app on the iPhone or iPad
Choose the “Passwords & Accounts” option in iOS 13 and later, choose “Mail” settings option in iOS 12 and earlier
Tap on “Accounts” at the top of the Mail settings
Choose “Add Account”
Enter your email account address and login information as instructed*
After the email account has been added to iOS, you can then open the Mail app to find the new email account available to access and use as normal.
You can check the email account for new messages, send, receive, reply, forward, and do all other email functionality from any email account added to an iPhone or iPad.
* Most of the time the appropriate mail servers and settings will be detected automatically, for some smaller email providers and for some ISP email accounts, you can adjust these settings manually using your own information for mail servers, ports, protocols, and other server-side adjustments if necessary.
If you’re like me and have multiple email accounts setup in iOS, you will likely want to set the default email address used on the iPhone or iPad to the desired email account. You can change the default email address at any time in the Mail settings, but you can also change what email address any specific message is sent from by adjusting the “From” section when you’re sending off a message or email.
Can I create a new email address for the iPhone or iPad?
Yes, you can add an existing email address to the iPhone or iPad, or you can create a brand new email address if you want to do that too. Any of the email services offered in the setup process make this easy: Gmail, Outlook / Hotmail, Yahoo, and if you use iCloud you can create an @ iCloud.com email address directly on the device too.
If you setup or add a new account and decided you don’t want it on your iPhone or iPad, don’t worry, because email accounts can be deleted from iOS at anytime.
Managing multiple email inboxes on iPhone, iPad
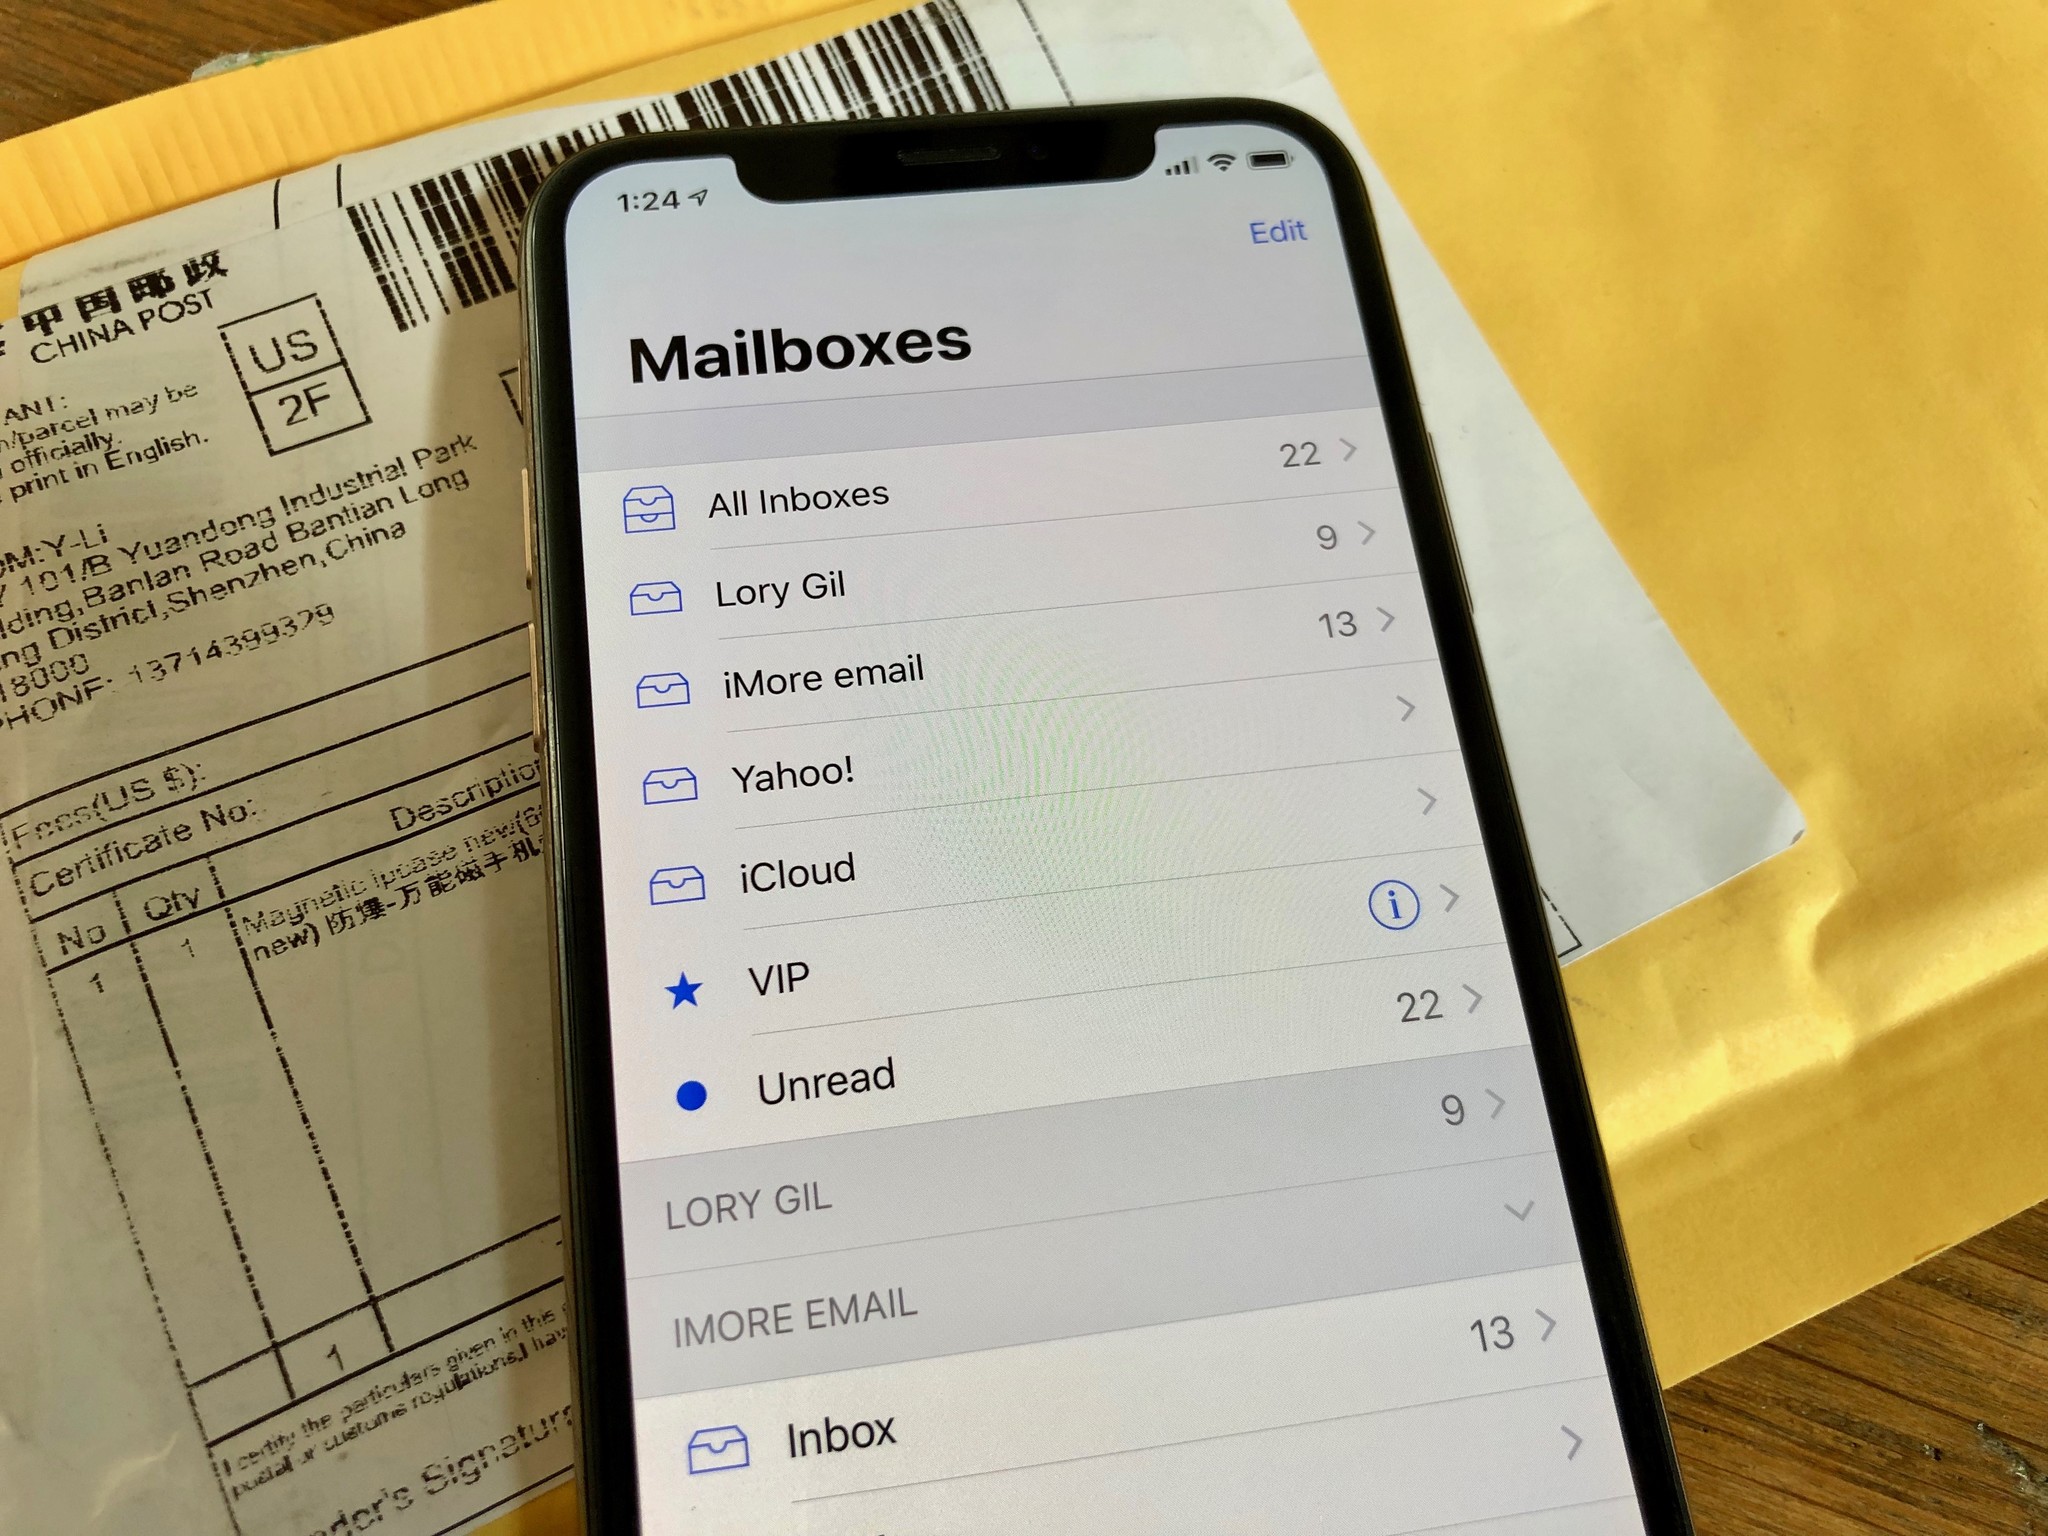
By default the Mail app will show all mail inboxes with the “All Inboxes” mailbox, and the email app will also automatically check for new emails from all setup accounts and email addresses. You can also choose to show only specific email inboxes or toggle into those individually if desired:
- Open the “Mail” app and tap the “Mailboxes” button in the upper left corner
- Choose the Email inbox to show email messages for, or choose “All Inboxes” to show emails for all email accounts setup on the device
Personally I prefer the universal all mail inbox approach so that all emails to all email accounts are visible on the same screen, but I use this iOS tip to quickly show only unread emails to filter and help manage multiple inboxes and email accounts.
This obviously focuses on iPhone and iPad, but for those with desktop computers you can also add new email accounts to the Mac just as easily.
Finally, it’s worth mentioning another strategy for managing multiple email accounts on iPhone and iPad: using different email apps. This is possible with Gmail, Yahoo, and many popular email services as well, which have their own individual email apps available from the App Store as third party downloads. The benefit to that approach is that each email address gets silo’d into it’s own app, which can make it easier for some users to manage.
Do you use multiple email accounts on your iPhone or iPad? Have any questions or comments about this? Want to see more mail tips? Let us know!
Источник
Add an email account to your iPhone, iPad, or iPod touch
There are two ways that you can set up an email account in the Mail app on your iOS device — automatically or manually. Learn which option is best for you.
How to set up your email account automatically
If you use an email provider like iCloud, Google, or Yahoo, Mail can automatically set up your email account with just your email address and password. Here’s how:
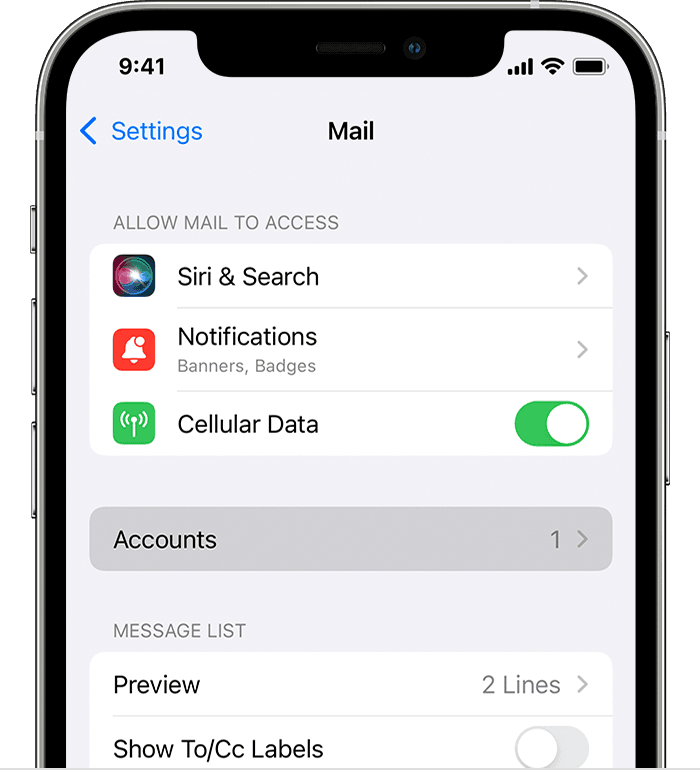
- Go to Settings > Mail, then tap Accounts.

- Tap Add Account, then select your email provider.
- Enter your email address and password.
- If you see Next, tap Next and wait for Mail to verify your account.
- If you see Save, tap Save.
If you don’t see your email provider, tap Other to add your account manually.

How to set up your email account manually
If you need to set up your email account manually, make sure that you know the email settings for your account. If you don’t know them, you can look them up or contact your email provider. Then follow these steps:
- Go to Settings > Mail, then tap Accounts.
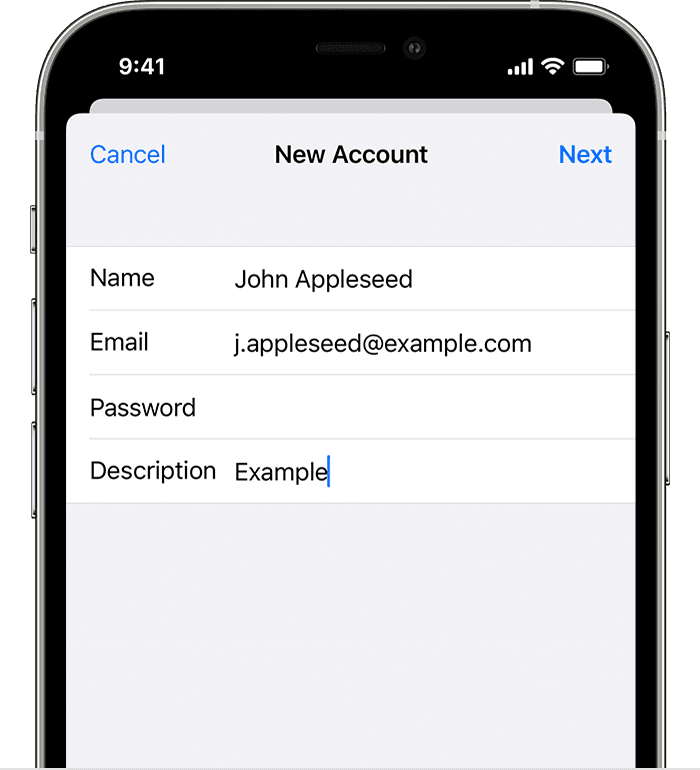
- Tap Add Account, tap Other, then tap Add Mail Account.
- Enter your name, email address, password, and a description for your account.
- Tap Next. Mail will try to find the email settings and finish your account setup. If Mail finds your email settings, tap Done to complete your account setup.
![]()
Enter account settings manually
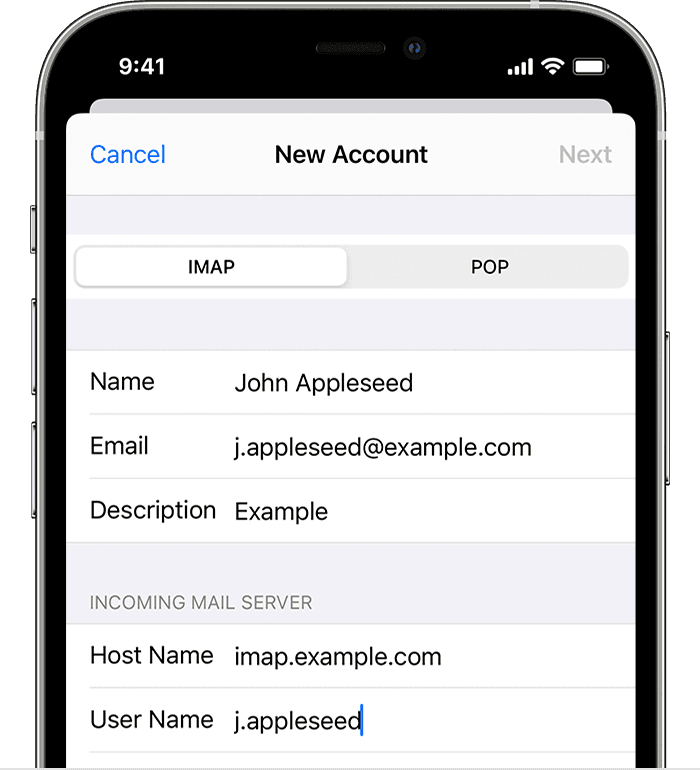
If Mail can’t find your email settings, then you need to enter them manually. Tap Next, then follow these steps:
- Choose IMAP or POP for your new account. If you aren’t sure which one to choose, contact your email provider.
- Enter the information for Incoming Mail Server and Outgoing Mail Server. Then tap Next. If you don’t have this information, try to look it up.
- If your email settings are correct, tap Save to finish. If the email settings are incorrect, you’ll be asked to edit them.
If you still can’t set up your email account or save your email settings, contact your email provider.
Do more with Mail
Information about products not manufactured by Apple, or independent websites not controlled or tested by Apple, is provided without recommendation or endorsement. Apple assumes no responsibility with regard to the selection, performance, or use of third-party websites or products. Apple makes no representations regarding third-party website accuracy or reliability. Contact the vendor for additional information.
Источник
How can you change email account settings for iPhone and iPad
 Source: iMore
Even after you’ve set your email account, there are still some changes you can make to get a handle of the Mail app. The best part is, you don’t need to use a Mac or a MacBook. You can change email acount settings for iPhone or iPad right on your devices. Here’s how!
How to set a default email account on your iPhone and iPad
One of the first things you’ll want to do when you start to change email account settings for iPhone or your iPad is to set an email account as the default one. This can help you with things like sending an email from the right email address. Here’s how you can do it.
- Launch Settings from your Home screen.
- Tap Mail.
- Scroll down and tap Default Account.
Tap the account you would like to use as your default mail account.
 Source: iMore
Even though this change is made in a Contacts menu, your iPhone or iPad will remember which account is the default for sending emails.
How to switch between email accounts on your iPhone and iPad
- Launch the Mail app from your Home screen.
- Tap the Compose button. It looks like a paper and pencil in the bottom right corner of your screen.
- Tap the From field.
Tap the account from the picker that you would like to use.
 Source: iMore
Go ahead and write your message in the Message field. Your email will now be sent from the account you selected.
How to disable an email account on your iPhone and iPad
- Launch Settings from your Home screen.
- Scroll down and tap on Mail.
Tap on Accounts.
Source: iMore
Select the email account you want to disable.
To enable this account again, you will simply toggle Mail back on.
How to delete an email account on your iPhone and iPad
- Launch Settings from your Home screen.
- Scroll down and tap on Mail.
Tap on Accounts.
Source: iMore
Select the email account you want to delete.
Tap Delete from My iPhone.
Source: iMore
Any questions?
Congratulations! You’ve now mastered the basics of how to change email account settings for iPhone and iPad. Do you have any questions? Let us know in the comments below!
Updated October 2020 The post is up to date with the latest version of iOS.
Источник
Sign in with your Apple ID
Your Apple ID is the account that you use to access all Apple services and make all of your devices work together seamlessly. After you log in, you can use the App Store, iCloud, iMessage, Apple Music, Apple TV+, and more.
Want to use Sign in with Apple on third-party apps or websites? Learn how to use Sign in with Apple.
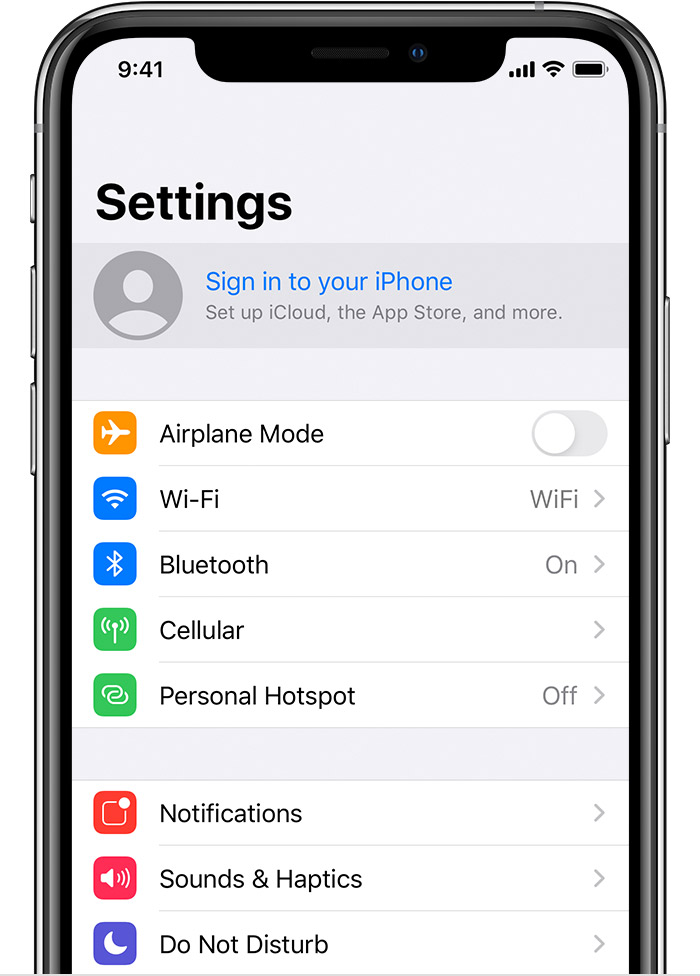
Sign in on your iPhone, iPad, or iPod touch
Sign in on your Mac
Sign in on your Apple TV
Sign in on apps and other devices
Sign in on your iPhone, iPad, or iPod touch
- Open the Settings app.
- Tap Sign in to your [device].
- Enter your Apple ID and password.
- If prompted, enter the six-digit verification code sent to your trusted device or phone number and complete sign in.
If you’re already signed in to iCloud on the iPhone paired with your Apple Watch, you will automatically be signed in to that Apple ID. Learn more about how to set up and sign in to your Apple Watch.
Sign in on your Mac
- Choose Apple menu > System Preferences.
- Click Sign In.
- Enter your Apple ID and password.
- If prompted, enter the six-digit verification code sent to your trusted device or phone number and complete sign in.
Sign in on Apple TV
- From the Home screen, choose Settings.
- Then choose Users and Accounts and select Add New User…
- Select Enter New…, then follow the on screen instructions.
If you use two-factor authentication on an Apple TV (2nd or 3rd generation), you might need to enter a verification code with your password. Learn how to get a verification code on your trusted device or sent to your trusted phone number.
Sign in on apps and other devices
You can use your Apple ID on some third-party devices to sign in to Apple services like Apple Music, the Apple TV app, and more.
Depending on your device, you might need to use an app-specific password.
Sign in to use Apple Music, the Apple TV app, and more on your other devices
You can sign in to Apple Music on Android, or sign in to the Apple TV app on your smart TV or streaming device.
On your Windows PC, you can sign in to iTunes for Windows to buy movies and TV shows, or listen to songs on Apple Music.
Sign in to use iCloud on your other devices
On your Windows PC, you can set up and sign in to iCloud for Windows to access photos, documents, and more.
You can also sign in to iCloud.com from your browser. Learn which iCloud.com features are available on your device.
Use Sign in with Apple on third-party apps and websites
If you see a Sign in with Apple button on a participating third-party app or website, you can use your existing Apple ID to quickly set up an account and sign in. Learn how to use Sign in with Apple.
When you sign in to the App Store and other media services for the first time, you might need to add a credit card or other payment information. You can’t sign in to the App Store and other media services with more than one Apple ID at the same time, or update the content you buy with a different Apple ID. Depending on how you created your Apple ID, you might be prompted to upgrade to two-factor authentication on an eligible device.
Learn more
- To view and manage your Apple ID account details on the web, sign in to appleid.apple.com.
- Learn more about where you can use your Apple ID.
- Learn how to manage your subscriptions to services like Apple Music or Apple TV+.
- If you have multiple Apple IDs, you can’t merge them.
Information about products not manufactured by Apple, or independent websites not controlled or tested by Apple, is provided without recommendation or endorsement. Apple assumes no responsibility with regard to the selection, performance, or use of third-party websites or products. Apple makes no representations regarding third-party website accuracy or reliability. Contact the vendor for additional information.
Источник


