- Sign or encrypt emails in Mail on Mac
- Send digitally signed and encrypted emails
- Receive digitally signed and encrypted emails
- Use rules to manage emails you receive in Mail on Mac
- Add email accounts in Mail on Mac
- Add an email account to Mail on your Mac
- Add an email account
- Use the Inbox for each account
- Optional: Turn on other account features
- If Mail on your Mac keeps asking for your password
- Why is Mail asking for your password?
- Check your password in Internet Accounts preferences
- Test using webmail
- Remove your account, then add it back
Sign or encrypt emails in Mail on Mac
Email messages that are digitally signed or encrypted can offer enhanced security when sending or receiving email.
Send digitally signed and encrypted emails
A digitally signed message lets your recipients verify your identity as the sender; an encrypted message offers an even higher level of security. To send signed messages, you must have a personal certificate in your keychain. To send encrypted messages, the recipient’s certificate must be in your keychain.
In the Mail app  on your Mac, choose File > New Message.
Move the pointer over the From field, click the pop-up menu that appears, then choose the account for which you have a personal certificate in your keychain.
A signed icon (containing a checkmark) is shown in the message header and indicates your message will be signed when you send it.
Address the message to recipients.
An encrypted icon (containing a closed lock) is shown if your keychain contains a personal certificate for every recipient. If you don’t have a certificate for every recipient, click the encrypted icon in your message; an open lock replaces the closed lock, indicating the message will be sent unencrypted.
Some mailing lists reject digitally signed messages because the signature is treated as an attachment. If this happens, click the signed icon in your message; an x replaces the checkmark, indicating the message will be sent unsigned.
Note: If for some reason your certificate isn’t associated with your email address, or if you want to use your certificate with a different email address, Control-click the certificate in Keychain Access, choose New Identity Preference, and provide the requested information.
Receive digitally signed and encrypted emails
In the Mail app on your Mac, a Security field in the header area indicates whether a message is signed or encrypted.
If a message is signed, a signed icon (containing a checkmark) is shown. To view the certificate details, click the icon.
If the message was altered after it was signed, Mail displays a warning that it can’t verify the message signature.
If a message is encrypted, an encrypted icon (containing a closed lock) is shown. If you have your private key in your keychain, the message is decrypted for viewing. Otherwise, Mail indicates it can’t decrypt the message. See If Mail can’t decrypt emails.
If you want to include encrypted messages when you search for messages in Mail, set the option in the General pane of Mail preferences. The option enables Mail to search individual words, even though the message is stored encrypted.
Источник
Use rules to manage emails you receive in Mail on Mac
You can create rules that help you manage incoming email messages and automate tasks, such as replying to or deleting messages. For example, you can create a rule that highlights messages from a specific person, or that automatically moves messages from your inbox to other mailboxes.
In the Mail app on your Mac, choose Mail > Preferences, then click Rules.
To review an example of a rule, select a provided rule, then click Edit. To close the rule, click Cancel.
Click Add Rule, then type a name for the rule.
Indicate whether any or all of the conditions must be true for the rule to be applied to a message.
Specify the conditions.
To use different header fields in conditions, choose “Edit header list” from the bottom of the first pop-up menu. To add your own header, click the Add button  in the Message Headers window.
Choose actions to perform on messages that meet the conditions. To specify multiple actions, click the Add button  .
.
When you’re done, click OK, then decide to apply rules to existing messages already in mailboxes or to new messages.
You can apply rules to existing messages later by choosing Message > Apply Rules.
If you have multiple rules, they’re applied in the order in which they appear in the list of rules; drag a rule up or down to change the order.
Mail stops applying rules to a message when it encounters the Stop Evaluating Rules action, or when a message is transferred to another mailbox by rules used on a mail server or computer or device synced to your computer.
If you use iCloud Drive, your rules are available on your other Mac computers that have iCloud Drive turned on and Mail selected in in iCloud Drive options. Files attached to rules, such as sound files or scripts, aren’t available. See Use iCloud Drive to store documents.
Источник
Add email accounts in Mail on Mac
Use the Mail app on your Mac to send, receive, and manage email for all of your email accounts in one location on your Mac. Simply add your existing accounts—such as iCloud, Exchange, Google, school, work, or other—in Mail.
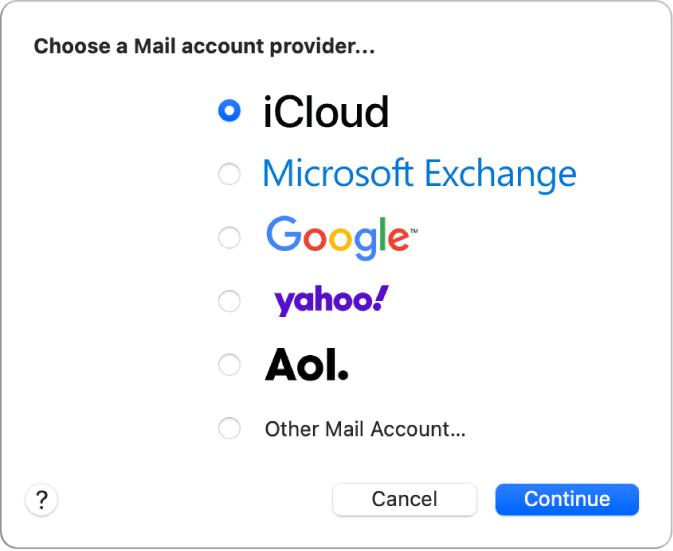
The first time you open Mail, you may be asked to add an account. Select an account type or Other Mail Account, then enter your account information.
If you already added an email account, you can still add more. In Mail, choose Mail > Add Account, select an account type, then enter your account information. Make sure the Mail checkbox is selected for the account.
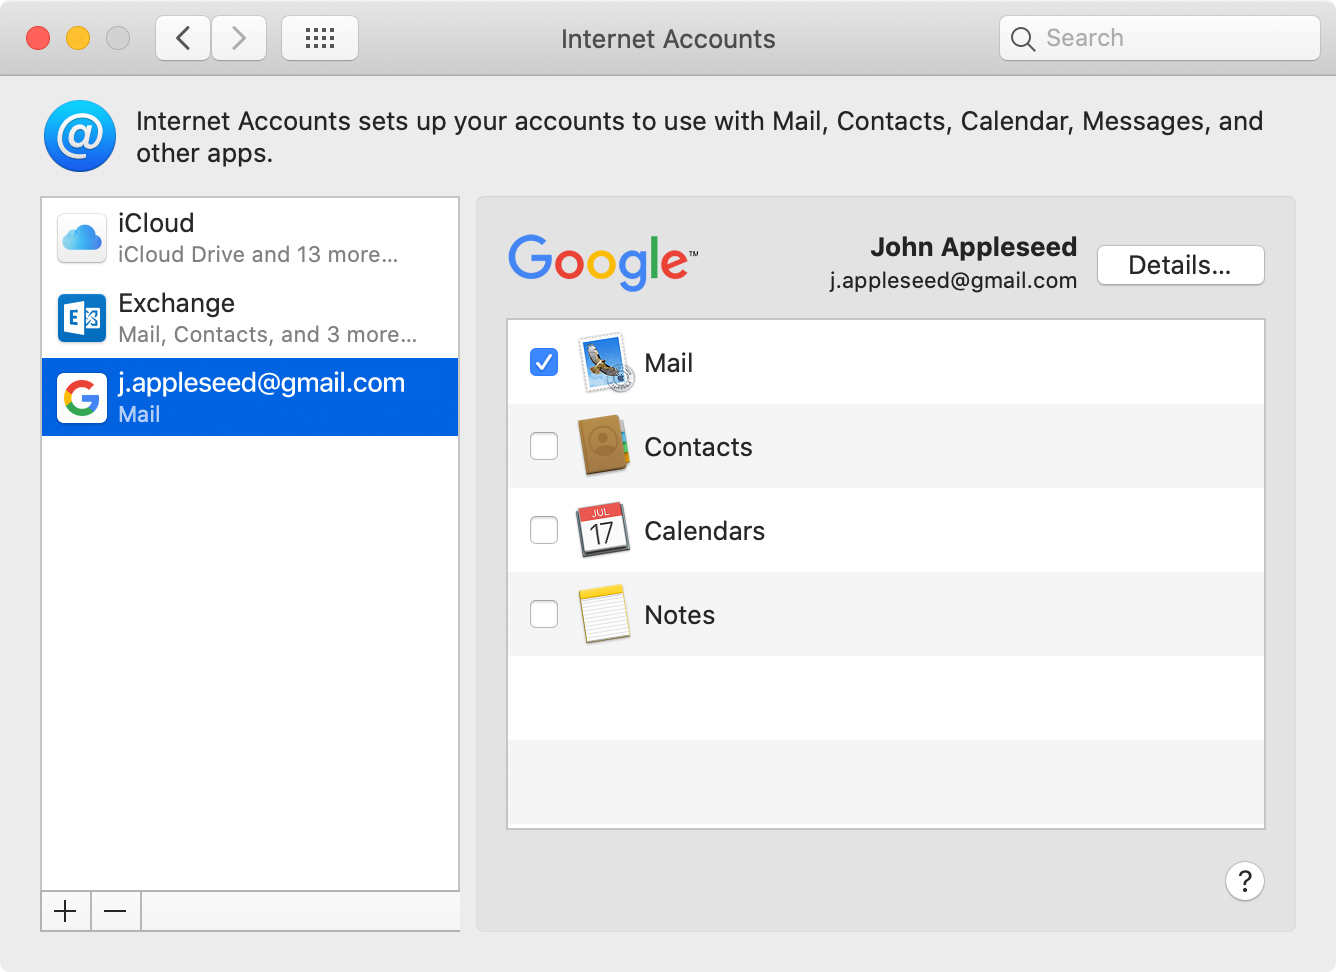
If you’re using an account on your Mac with other apps, such as Contacts or Messages, you can also use that account with Mail. In Mail, choose Mail > Accounts to open Internet Accounts preferences, select the account on the left, then select the Mail checkbox on the right.
Tip: If you subscribe to iCloud+, your iCloud account includes additional features to help you manage email, such as Hide My Email. To learn more about these features, see the iCloud User Guide.
Источник
Add an email account to Mail on your Mac
How to set up an email account for the first time, or add another email account.
Add an email account
If you haven’t already set up an email account in Mail, you might be prompted to add one when you open the app. If you’re not prompted, or you just want to add another account, follow these steps:
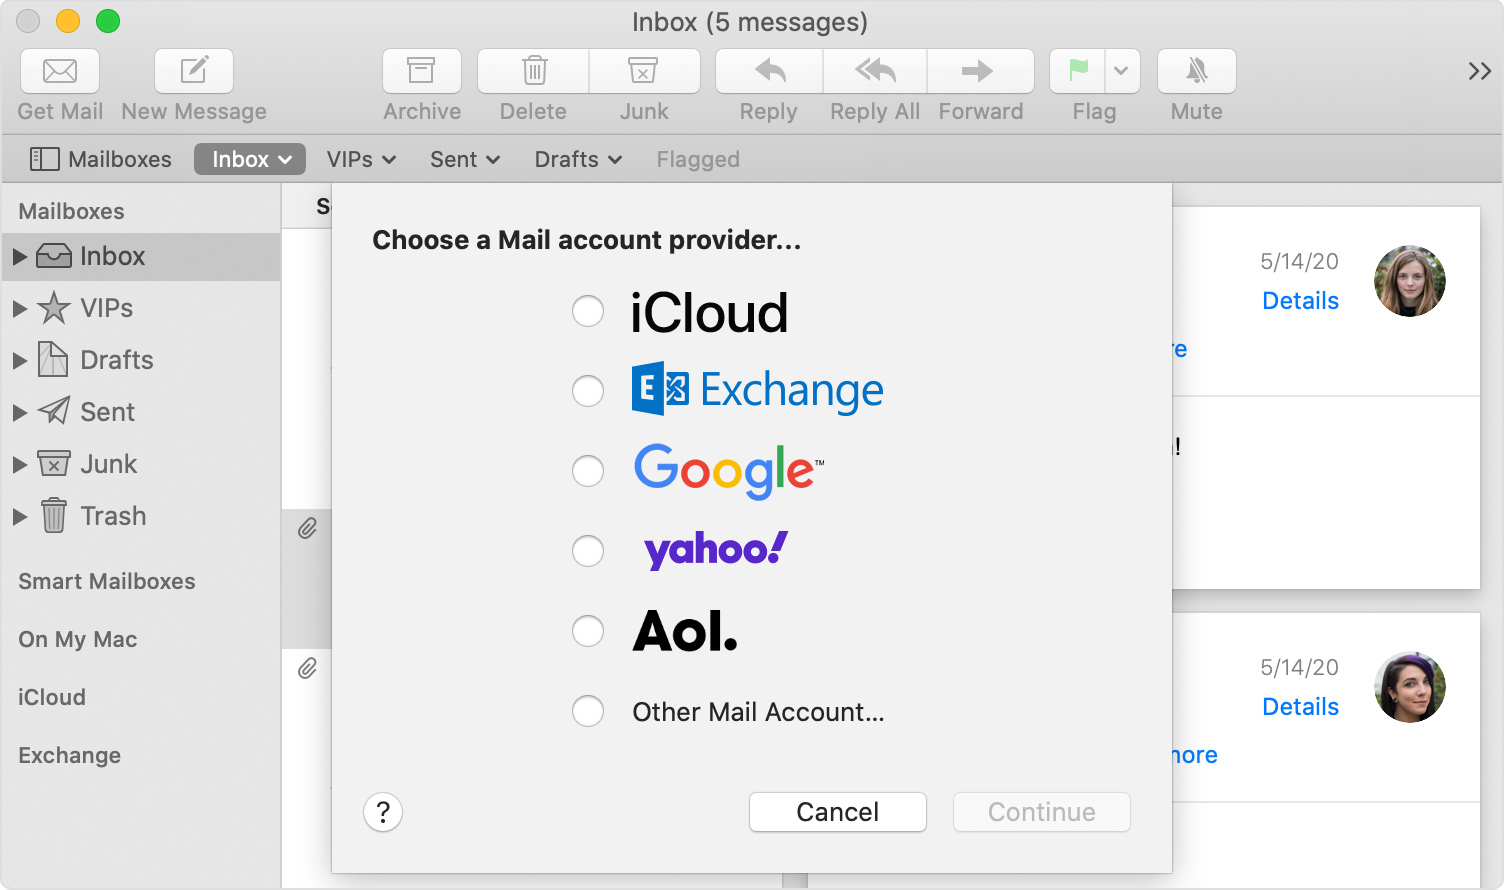
- From the menu bar in Mail, choose Mail > Add Account.
- Select your email provider from the list, then click Continue.

- Some accounts, such as Google, might ask that you click Open Browser to complete authentication in your web browser.
- Follow the onscreen instructions to enter account details, such as your name, email address, and password. If you’re not sure what information to enter, please contact your email provider for help.
Use the Inbox for each account
The Inbox gathers together the messages for every email account you added. If you added more than one account, you can click the disclosure triangle next to Inbox in the sidebar, then select a mailbox to see only the messages for that account.

Optional: Turn on other account features
If your account includes support for contacts, calendars, notes, or other features in addition to email, you can turn those features on or off:
- Choose Apple menu > System Preferences, then click Internet Accounts.
- Select your account in the sidebar.
- Select the features you want to use with your account.
Information about products not manufactured by Apple, or independent websites not controlled or tested by Apple, is provided without recommendation or endorsement. Apple assumes no responsibility with regard to the selection, performance, or use of third-party websites or products. Apple makes no representations regarding third-party website accuracy or reliability. Contact the vendor for additional information.
Источник
If Mail on your Mac keeps asking for your password
Mail might say that it can’t connect to your email account, and repeatedly ask you to enter the password for it.
If your Mac is connected to the Internet but suddenly starts asking for your password, you should generally try again later, and if necessary work with your email provider to resolve. If you’re using Apple’s iCloud Mail, learn how to resolve issues with iCloud Mail.
Why is Mail asking for your password?
Mail asks for your password when it is connecting to your email provider, but can’t connect to your email account because your email provider isn’t accepting your email password.
Your email provider may reject your password for several reasons, including:
- You’re not using your current email password. If you updated the password on another device, make sure that you’re using the same password on your Mac.
- Your email provider needs you to update or reset your password for security reasons. For example, if you’re using Google’s two-step verification, your Gmail account in Mail requires the appropriate app-specific password.
- Your email provider deactivated or suspended your account. Contact your email provider for help.
Check your password in Internet Accounts preferences
Depending on the type of email account you’re using, you might be able to correct the password as follows:
- Quit Mail. If it doesn’t quit, you can force it to quit.
- Choose Apple menu > System Preferences, then click Internet Accounts.
- Select your mail account in the sidebar.
- If you see a password field for your account, delete the password and type the correct password.
- Close System Preferences, then open Mail and try using your account again.
If Mail still asks for your password, the password is probably incorrect. Your email provider can help you verify your email settings and make sure that you’re using the correct password.
Test using webmail
Many email providers offer webmail, which is a way to use email with a web browser such as Safari, instead of with an email app such as Mail. For example, if you’re using an iCloud Mail account, you can use iCloud.com to send and receive email.
Because the password that you use with Mail is usually the same password that you use with webmail, try signing in to webmail with that password. If it doesn’t work there either, your password is probably incorrect. Your email provider can help you verify your email settings and make sure that you’re using the correct password for the Mail app.
Remove your account, then add it back
If no other solutions work, try setting up your email account again. To do that, first remove your email account, then add the account back.
Источник


