- If you can’t send email on your iPhone, iPad, or iPod touch
- Before you begin
- Check the Outbox for unsent email
- Check your email address and password
- Contact your email provider or system administrator
- Remove your email account and set it up again
- Add an email account to your iPhone, iPad, or iPod touch
- How to set up your email account automatically
- How to set up your email account manually
- Enter account settings manually
- Do more with Mail
- If iCloud Mail isn’t working
- Things to check first
- If you need help sending or receiving mail on your iPhone, iPad, or iPod touch
- If you can’t access iCloud Mail at iCloud.com
- If you can’t send mail from the Mail app on your Mac
- If you receive an alert when you send a message from your @icloud.com email address using Mail on your Mac
- If you’re attaching a large file
- If your recipient doesn’t receive your message
- If you can receive messages but can’t send them
- If you can’t receive mail in the Mail app on your Mac
- If you want to remove a suggested recent contact in iCloud Mail
- If you need help using iCloud for Windows
- Get more help
If you can’t send email on your iPhone, iPad, or iPod touch
If you can’t send email from the Mail app on your iPhone, iPad, or iPod touch, there are a few things you can try.
Before you begin
There are a few things to keep in mind and check:
- When you make an iOS or iPadOS backup in iCloud or iTunes, it backs up your mail settings, but not your email. If you delete or change your email account settings, previously downloaded email might be removed from your device.
- Make sure that your device is connected to the internet.
- Check with your email service provider to find out if there’s a service outage.
- If you can’t access your email, or you can’t send and receive messages with your @icloud.com email address, learn what to do.
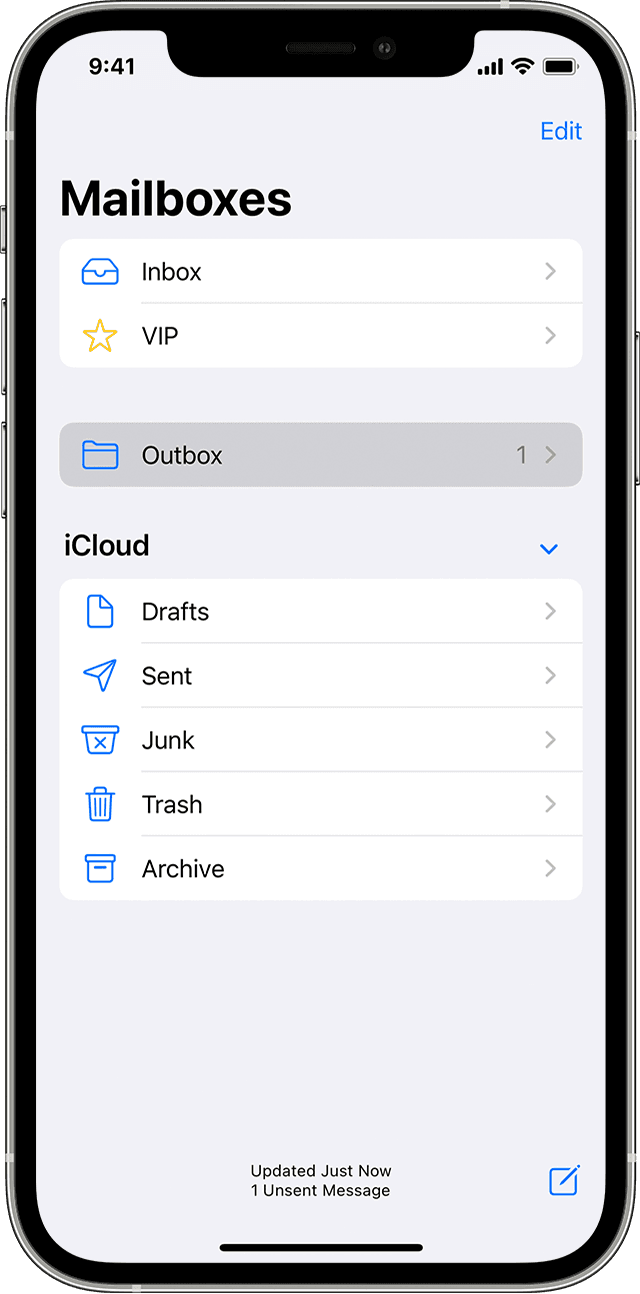
Check the Outbox for unsent email
If you get a message that says your email wasn’t sent, then that email goes to your Outbox. Check your Outbox and try to send the email again with these steps:
- In Mail, go to your list of mailboxes.
- Tap Outbox. If you don’t see an Outbox, then your email was sent.

- Tap an email in the Outbox. Make sure that the recipient’s email address is correct.
- Tap Send.
Check your email address and password
If Mail asks you to enter a password for your email account, make sure that your password is correct. To check your email address and password, sign in to your email provider’s website.
If you still get a user name or password error, contact your email provider or system administrator.
Contact your email provider or system administrator
- Contact your email provider or check their status webpage to see if there’s a service outage.
- Ask your email provider or system administrator if you turned on any security features or restrictions, like two-step verification, for your email account. You might need a special password or might need to request authorization from your email provider to send and receive email on your device.
- Check your email account settings with your email provider or system administrator to make sure that they’re correct.
Remove your email account and set it up again
- On your computer, sign in to your email provider’s website. Make sure that all of your email is there or make sure that your email is saved somewhere other than on your iOS or iPadOS device.
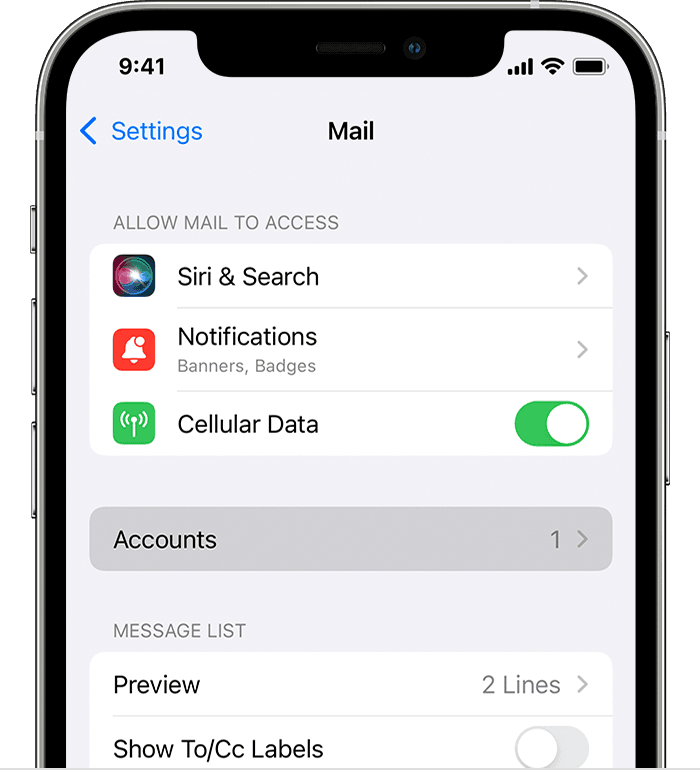
- On your device, go to Settings > Mail, then tap Accounts.
- Tap the email account that you want to remove.
- Tap Delete Account.
- Add your account again.
If the steps in this article don’t help, contact your email service provider for more information.
Источник
Add an email account to your iPhone, iPad, or iPod touch
There are two ways that you can set up an email account in the Mail app on your iOS device — automatically or manually. Learn which option is best for you.
How to set up your email account automatically
If you use an email provider like iCloud, Google, or Yahoo, Mail can automatically set up your email account with just your email address and password. Here’s how:
- Go to Settings > Mail, then tap Accounts.
- Tap Add Account, then select your email provider.
- Enter your email address and password.
- If you see Next, tap Next and wait for Mail to verify your account.
- If you see Save, tap Save.
If you don’t see your email provider, tap Other to add your account manually.

How to set up your email account manually
If you need to set up your email account manually, make sure that you know the email settings for your account. If you don’t know them, you can look them up or contact your email provider. Then follow these steps:
- Go to Settings > Mail, then tap Accounts.
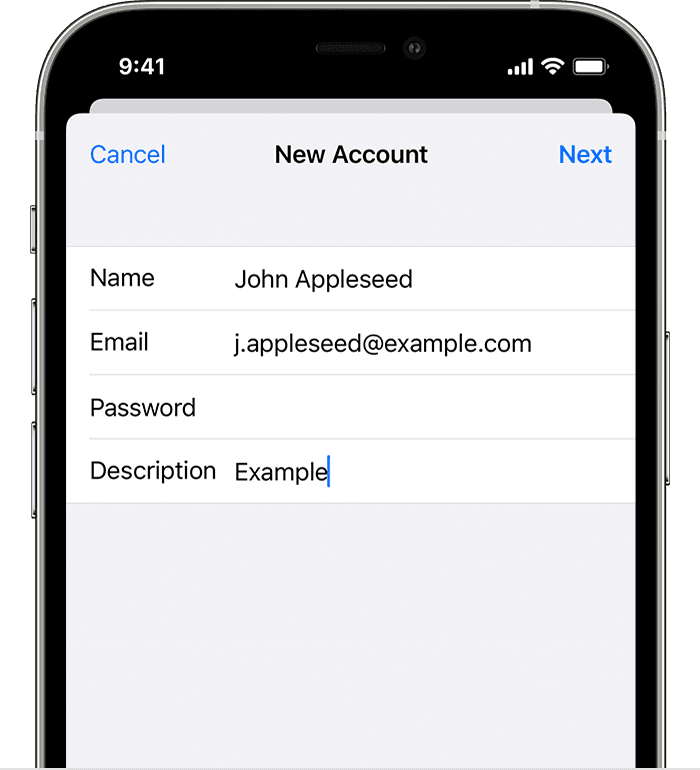
- Tap Add Account, tap Other, then tap Add Mail Account.
- Enter your name, email address, password, and a description for your account.
- Tap Next. Mail will try to find the email settings and finish your account setup. If Mail finds your email settings, tap Done to complete your account setup.
![]()
Enter account settings manually
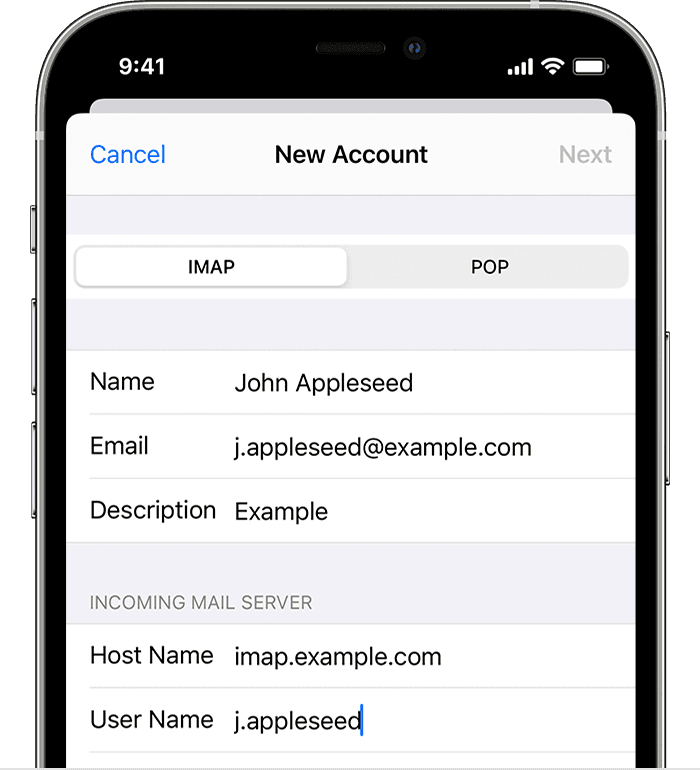
If Mail can’t find your email settings, then you need to enter them manually. Tap Next, then follow these steps:
- Choose IMAP or POP for your new account. If you aren’t sure which one to choose, contact your email provider.
- Enter the information for Incoming Mail Server and Outgoing Mail Server. Then tap Next. If you don’t have this information, try to look it up.
- If your email settings are correct, tap Save to finish. If the email settings are incorrect, you’ll be asked to edit them.
If you still can’t set up your email account or save your email settings, contact your email provider.
Do more with Mail
Information about products not manufactured by Apple, or independent websites not controlled or tested by Apple, is provided without recommendation or endorsement. Apple assumes no responsibility with regard to the selection, performance, or use of third-party websites or products. Apple makes no representations regarding third-party website accuracy or reliability. Contact the vendor for additional information.
Источник
If iCloud Mail isn’t working
You can use iCloud Mail in the Mail app on your iPhone, iPad, iPod touch, or Mac, or on iCloud.com on your iPad, Mac, or PC. If you can’t access your email, or you can’t send and receive messages with your @icloud.com email address, follow these steps.
Things to check first
- Check the system status of iCloud Mail.
- Check that you turned on iCloud Mail:
- On your Mac, open the Mail app then choose Mail >Preferences. Click Accounts, then select your iCloud account in the sidebar. Under Account Information, make sure that the account is turned on and the status is online.
- On your iPhone, iPad, or iPod touch, go to Settings > [your name] > iCloud and check that Mail is turned on.
- Make sure you that haven’t exceeded your iCloud storage limit. If you exceed your iCloud storage limit, learn how to make more space available in iCloud.
- Make sure that you’re using the latest version of software on your device.
If you need help sending or receiving mail on your iPhone, iPad, or iPod touch
- Check your Internet connection. Open apple.com in Safari on your iPhone, iPad, or iPod touch.
- To see if you can receive mail for your iCloud email on another device, go to iCloud.com on a Mac or PC.
- Make sure that you turned on Mail in Settings on your iPhone, iPad, or iPod touch. Tap Settings > [your name] > iCloud and turn on Mail.
- Make sure that new data is pushed to your device automatically. In iOS 14 or later, tap Settings > Mail > Accounts > Fetch New Data, then turn on Push. In iOS 13 or earlier, tap Settings > Passwords & Accounts > Fetch New Data, then turn on Push.
- Send an email to your account to see if Push is working.
- In Fetch New Data, tap your iCloud account and turn on Push. You can only use Push with one account at a time.
- Turn your device off and back on.
- If you still can’t send or receive mail, turn off the settings in steps 3 and 4, restart your device, then turn them back on.
If you can’t access iCloud Mail at iCloud.com
On your iPad, Mac, and PC, you can use iCloud Mail on iCloud.com. On an iPhone, use the Mail app instead.
- Make sure your browser is up to date. If you’re using Safari, update Safari to its latest version.
- Clear your browser’s cache. In Safari, choose Safari > Preferences. Click the Advanced tab. Select «Show Develop menu in menu bar», then close Preferences. Click the Develop menu, then select «Empty Caches.» If you’re using a different browser, check its help menu for steps.
- If you can access iCloud Mail from a different location or Internet connection, contact your Internet service provider (ISP) or network administrator. Some Internet configurations intentionally or unintentionally prevent access to certain websites or services, such as iCloud Mail.
If you can’t send mail from the Mail app on your Mac
Use these steps if your message can’t be delivered, you’re attaching a large file, or the recipient didn’t get your message.
If you receive an alert when you send a message from your @icloud.com email address using Mail on your Mac
If you see an alert that says “This message could not be sent. It will remain in your Outbox until it can be sent.», make sure that iCloud is your Outgoing Mail Account.
- Open Mail and choose Mail > Preferences.
- Click the Accounts tab.
- Select your iCloud email account.
- Click the Server Settings tab. If iCloud isn’t listed as the Outgoing Mail Account, select iCloud.
If you choose Edit SMTP Server List, you won’t see your iCloud account listed as an option.
If you’re attaching a large file
Message attachments can’t exceed the maximum size allowed by your email service provider or the recipient’s email service provider. The maximum size varies by service provider. Try using Mail Drop, compressing the file before sending it, or sending your message without the attachment.
If your recipient doesn’t receive your message
- If an “unknown address” or “undelivered mail returned” message appears in your Inbox after you send a message, go to your Sent mailbox and make sure that the recipient’s email address is correct.
- If you use macOS Mail or access your iCloud Mail using Safari or another supported web browser, check your Drafts, Sent, and Outbox mailboxes:
- If you see an unsent copy of the message in Drafts, try to send it again.
- If you see the message in your Outbox, make sure that you’re connected to the Internet and use the steps above to select iCloud as the outgoing mail account.*
- Ask the recipient to check their Junk mail folders or mailboxes.
- If your recipient still doesn’t receive your message, but your message was sent without any alerts or “undelivered mail” messages, your message might be blocked or filtered by the iCloud Mail servers or the recipient’s mail server. To find out, contact iCloud Support. You should also ask your recipient to contact their email administrator.
* If you use a non-iCloud SMTP server, don’t use your iCloud email address as a «Send From» address. Otherwise, your email might not get delivered or it might get sent to the recipient’s Junk folder.
If you can receive messages but can’t send them
Your ISP might be blocking the protocol used to send email (SMTP) across their network. Contact your service provider and ask about SMTP traffic that crosses their network to an external service, such as iCloud. If your service provider blocks SMTP traffic, ask them how you can be exempted from SMTP blocking.
If your ISP isn’t blocking SMTP traffic and you still can’t send messages, contact Apple Support for help.
If you can’t receive mail in the Mail app on your Mac
- On the left side of the main Mail window, find the name of your iCloud email account. If your account name is dimmed and has a lightning-bolt symbol next to it, your account is offline.
- To take your account online, connect to the Internet.
- Choose Mailbox. If Take All Accounts Online is dimmed, your accounts are already online.
If you still can’t receive email, contact Apple Support to get more help.
If you want to remove a suggested recent contact in iCloud Mail
When you’re signed in to iCloud, you might see your recent email addresses as suggested contacts across your devices. To stop a contact from appearing as a suggestion, here’s what you can do:
- On iCloud.com, click to start an email.
- In the «To:» field, start typing the email address that you want to hide.
- Hover over the address and click .
- Click Remove from Recents.
If you need help using iCloud for Windows
Get more help
If you still need help, contact Apple Support.
Information about products not manufactured by Apple, or independent websites not controlled or tested by Apple, is provided without recommendation or endorsement. Apple assumes no responsibility with regard to the selection, performance, or use of third-party websites or products. Apple makes no representations regarding third-party website accuracy or reliability. Contact the vendor for additional information.
Источник


