- Make c programs on android
- Getting started with C++ and Android Native Activities
- Introduction
- Why C++
- What I won’t Cover
- Setup your IDE
- C Compiler for Android – Run C/C++ Programs on Android
- Best C Compiler for Android
- C4Droid – C Compiler for Android
- Создание нативных Android-приложений с использованием компилятора Intel C++ Compiler в Android Studio 1.0.1
- Требуемые программные инструменты
- Использование компилятора Intel C++ Compiler в Android Studio 1.0.1
- 1. Создание нового проекта Android с нативным интерфейсом:
- 2. Добавление нативного исходного кода: main.c
- 3. Добавление make-файла: Android.mk
- 4. Добавление make-файла: Application.mk
- 5. Сконфигурируйте свое приложение для выполнения ndk-build с помощью make-файлов
- 6. Добавьте ID «hello_textview» в виджет textview
- 7. Обновите «MainActivity.java», чтобы UI textview вызов нативной библиотеки:
- 8. Запустите виртуальную машину Android Virtual Machine «Intel-Nexus 7 x64» и выполните приложение, щёлкнув кнопку «Run».
Make c programs on android

Краткое описание:
Среда разработки и GCC компилятор C/C++ для Андроид
Описание:
## Features
— Offline C compiler
— Offline C++ compiler
— Native activity, SDL2 support for GUI
— Build executables file, export your program
— Make 4.0, makefile support, you can build as on your PC
— Static code analysis, it helps you to fix «difficult» bugs:
* memory leaks
* mismatching allocation and deallocation
* uninitialized variables usage
* array index out of bounds errors
— C/C++ code formatter
— Terminal emulator: full-featured terminal
— Git, svn support (Install by use Intall plugin features)
— Diagnostic utility: auto jump to error position
— Compiler output: See stdout, stderr
— Syntax highlighting: C/C++ language and very more language (only highlight without compile)
— C/C++ examples from https://www.programiz.…p-programming/examples
— File manager
— Multi Tab: you can open different files in different tabs to manage editing multiple files simultaneously with ease.
— Easy toolbar: you can quickly create a new file, open, save, save as, undo/redo, insert some commonly used symbols, go back to last edit location, etc.
— List of recently opened files
— Regular search, replace or replace all
— Change the typeface and font size
— Show line numbers
— Show whitespace characters (tabs, line breaks)
— Regular search, replace or replace all
— «Word wrap» switch
— Lock the screen orientation in auto, horizontal or vertical
— Remember the last opened file
— Hide the soft keyboard, long press the edit area can be turn on
— Convert selected text to uppercase or lowercase by long pressing the «edit area»
— Automatic indentation
— Keep the screen awaken
— Dark/Light Themes
## How to use SDL, NativeActivity?
You need install SDL Plugin for CPP N-IDE and open it once time to install libraries.
The application will be auto detect linker flags (LDFLAGS) for your source file
## How to use makefile?
1. Write your makefile
2. Open terminal and type «make»
## How to install libraries
1. Open drawer then click «Install libraries/Plugin»
2. Find your prebuilt libraries your need
Currently, I supported commom libraries such as curl, CLooG, dropbear, expat, fontconfig, freetype, glib, gmp, isl, conv, pcre, png, uuid, mpc, mpfr, ncurses, openssl, ppl
Если программа не собирается, смотрите в настройки стандарта языка. (Последний скрин. По умолчанию там пусто, вы должны настроить сами !)
Требуется Android: 4.0+
Русский интерфейс: Нет
Скачать:
версия: 1.2.4-armeabi-v7a CPP N-IDE 1.2.4-armeabi-v7a.apk ( 39.65 МБ )
версия: 1.2.4-armeabi-v7a Premium
Откуда она взялась и чем отличается, никто не знает
CPP N-IDE (C/C++ Compiler on Android) (Пост Alex0047 #76945618)
Сообщение отредактировал gar_alex — 12.09.18, 13:59
Источник
Getting started with C++ and Android Native Activities

Introduction
I would like to walk you through setting up a simple Android Native Activity. I will walk through the basic setup, and try to give you the tools you need to move forward.
Although my focus is on games, I will not be telling you how to write an OpenGL application or how to architect your own game engine. That is a discussion that literally fills up books.
Why C++
On Android, the OS and its supporting infrastructure are designed to support applications written in the Java or Kotlin programming languages. Applications written in these languages benefit from tooling embedded deep into the system’s underlying architecture. Many core Android system features, such as the Android UI and Intent handling, are only exposed through Java interfaces.
By choosing to use C++, you are not being “more native” to Android than using a managed language such as Kotlin or Java. Counter intuitively, you are in some ways writing a foreign application with only a subset of Android features available. For most applications, you’re better off with languages like Kotlin.
There are a few exceptions to this rule. Near and dear to my own heart is game development. Since games typically use custom rendering logic, often written in OpenGL or Vulkan, it’s expected that a game looks different from a standard Android application. When you also consider that C and C++ are near universal to every computing platform, and the relative wealth of C libraries to support games development, it may become reasonable to set off down the path of native development.
If you want to make a game from scratch or port over an existing game, Android’s Native Development Kit (or NDK) and its supporting tooling are ready and waiting. In fact, the native activity I’ll be showing you provides an easy one-stop shop in which you can set up an OpenGL canvas and start gathering user input. You may find that despite C’s cognitive overhead, some common code challenges like building vertex attribute arrays from game data become easier in C++ than higher level languages.
What I won’t Cover
I will stop short of showing you how to initialize a Vulkan or OpenGL context. I recommend reading through the samples Google provides, although I will provide some tips to make your life easier. You may opt instead to use a library like SDL or even Google’s FPLBase instead.
Setup your IDE
First we need to make sure that you have everything installed for native development. For this, we need the Android NDK. Launch Android Studio:
Источник
C Compiler for Android – Run C/C++ Programs on Android
A smartphone is the best tool we daily use in our life. It helps us to browse the internet, listen to our favourite music, talk to friends and families, watch movies, play games and many more things. But, have you ever wonder it can be the very helpful tool for programmers and able to Execute C/C++ Programs. Yes, there are a few best C Compilers for Android available, which are capable of compiling your code and run C/C++ Programs on Android.
Best C Compiler for Android
Practising programming is the best way to improve your programming skills . This is true that you have to keep on coding to maintain your programming quality and skills. But, it is not always possible to sit in the front of a monitor or laptop screen. So, In this article, I’ll be sharing the mostly used C Compiler for Android which is able to Run C/C++ Programs on Android mobile.
C4Droid – C Compiler for Android
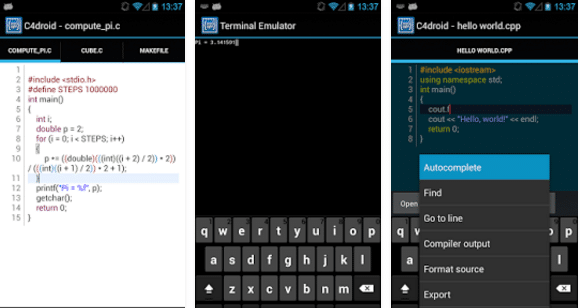
1.Offline C compiler: create your own applications on Android device and run them even without Internet access
2. Source code editor with syntax highlighting, tabs, code completion, code formatting, file association and undo/redo
3.Export&share your programs as APKs or native executables (for terminal apps)
4. No root required (but C4droid can use it for your programs if you want)
5. Full ANSI C and ISO C99 support with TCC (Tiny C Compiler) + uClibc
6. Git integration
7. Customizable GUI, choose where to place tabs and buttons by yourself, themes are also supported.
You can download here
This is basically an android app with full functionality of a C compiler. If you are not good with typing on a touchscreen, you can buy any small USB keyboard and enjoy programming in your phone like the way you do on your PC.
Источник
Создание нативных Android-приложений с использованием компилятора Intel C++ Compiler в Android Studio 1.0.1
 На момент написания этого текста текущей версией Android Studio была версия 1.0.1. Компилятор Intel C++ Compiler for Android, будучи частью Intel Integrated Native Developer Experience (Intel INDE), поддерживает Android Studio 1.0.1 в Intel INDE 2015 Update 1. Поскольку Android Studio 1.0.1 не поддерживает Android NDK, в этой статье описаны шаги для создания нативного Android-приложения с использованием Android NDK r10d и компилятора Intel C++ Compiler for Android. Поехали!
Android Studio в качестве системы сборки использует Gradle. На момент написания статьи Gradle в процессе сборки вызывала систему NDK. В Android NDK r10 и более поздней версии после инсталляции Intel INDE компилятор Intel C++ Compiler for Android (ICC) не является более используемым по умолчанию компилятором в системе сборки NDK.
Представленные ниже шаги дают общее описание подготовки, сборки и выполнения нативного приложения в Android Studio 1.0.1.
Если вы используете Android Studio 0.8.6, почитайте статью «Сборка нативных Android-приложений с использованием компилятора Intel C++ Compiler в Android Studio», где рассказывается о применении Intel C++ Compiler.
Требуемые программные инструменты
Успешная инсталляция INDE 2015 Update 1 с Android Studio Integration гарантирует, что вы располагаете всем необходимым программным обеспечением. Детальные требования к программному обеспечению и системе описаны в документе Intel C++ Compiler Release Notes for Intel Integrated Native Developer Experience 2015.
Приведенные в данной статье инструкции предполагают использование следующего ПО для архитектуры IA-32 и Intel-64:
- Oracle JDK 7 (нативный Intel-64 JDK для систем Windows x64)
- Android SDK 20 или старше
- NDK r10d (предполагается инсталляция в [ndk-dir] )
- Android Studio 1.0.1
Убедитесь, что в переменную среды PATH добавлены следующие директории Android NDK (если они отсутствуют, добавьте):
Использование компилятора Intel C++ Compiler в Android Studio 1.0.1
После инсталляции Intel C++ Compiler 15.0 for Android в папку «[ndk-dir]\toolchains» (директория по умолчанию – «C:\Intel\INDE\IDEintegration\android-ndk-r10d\toolchains») устанавливаются следующие элементы:
- x86-icc
- x86-icc15.0.X.YYY
- x86_64-icc (если NDK поддерживает 64-разрядные цели)
- x86_64-icc15.0.X.YYY (если NDK поддерживает 64-разрядные цели)
Для NDK до r9d: после инсталляции нативным компилятором C/C++ будет Intel C++ Compiler. Дополнительных шагов для использования Intel C++ Compiler с Android Studio не требуется. Ели вы хотите для построения нативного кода использовать GNU gc, следуйте инструкциям в «Замена компилятора по умолчанию с Intel C++ Compiler на GCC для целевых приложений x86».
Для NDK r10 — r10d: компилятор Intel C++ после инсталляции не является компилятором по умолчанию. Чтобы использовать Intel C++ Compiler из Android Studio, следуйте шагам 3, 4, 5 ниже.
Если у вас установлено несколько Android NDK, следуйте инструкциям в статье «Интеграция Intel C++ Compiler for Android с несколькими Android NDK».
Теперь создадим новый проект Android для Intel-64 с нативным вызовом функции, продемонстрировав тем самым использование компилятора Intel C++ Compiler:
1. Создание нового проекта Android с нативным интерфейсом:
1. Откройте Android Studio, создайте новый Android-проект «nativeDemo» с параметрами по умолчанию, например:
2. Откройте «app\src\main\java\MainActivity.java» и добавьте в конец класса «MainActivity» нативную функцию как показано ниже:
Должно получиться примерно так:
3. Чтобы создать проект «nativeDemo», выберите: «Build > Make Project», после чего можно будет использовать «javah».
4. В «View > Tools Windows > Terminal» откройте терминальное окно и выполните указанные ниже шаги для запуска «javah» и создания заголовка jni:
a) В терминальном окне перейдите в подпапку «src\main»:
b) Чтобы создать «com_example_nativedemo_app_MainActivit.h» в папке src\main\jni, выполните следующую команду «javah» cmd:
5. В окне Project измените вид на Project, щелкните правой кнопкой мыши на папке «src» и выберите «Synchronize ‘src». Теперь в папке «src\main\jni» можно видеть файл заголовка «com_example_mydemo_nativedemo_MainActivity.h».
2. Добавление нативного исходного кода: main.c
1. Создайте «main.c»: выделите файл «com_example_mydemo_nativedemo_MainActivity.h», используйте волшебные клавиши copy/paste для создания нового «main.c» со следующим кодом:
2. Сохраните изменения
3. Теперь в папке «jni» у вас два файла: com_example_mydemo_nativedemo_MainActivity.h и main.c
3. Добавление make-файла: Android.mk
1. Щелкните правой кнопкой на папке «jni», выберите «New > File»
2. Наберите «Android.mk» и щёлкните на «OK»
3. Добавьте в этот файл следующие строки (обратите внимание, что строка LOCAL_SRC_FILES должна содержать исходные файлы, которые находятся в папке «jni»):
4. Добавление make-файла: Application.mk
1. Щелкните правой кнопкой на папке «jni», выберите «New > File»
2. Наберите «Application.mk» и щёлкните на «OK»
3. Добавьте в этот файл следующие строки:
4. [Опционально] Для изменения параметров компилятора используйте следующее:
5. Сконфигурируйте свое приложение для выполнения ndk-build с помощью make-файлов
1. Откройте файл «app\build.gradle»
2. Добавьте в начало файла следующий импорт:
3. И эти строки после секции «defaultConfig»:
4. А следующие строки – в конец файла:
5. Сохраните изменения
6. Теперь создадим проект: выберите [Build > Make Project]. Вы увидите все выходные папки и файлы «libmain.so» в папках «main\libs» и «main\obj\local».
6. Добавьте ID «hello_textview» в виджет textview
Откройте «res\layout\activity_main.xml» и измените виджет «textview» как показано ниже:
7. Обновите «MainActivity.java», чтобы UI textview вызов нативной библиотеки:
Для импорта виджета TextView и сохранения изменений нажмите ALT+Enter.
8. Запустите виртуальную машину Android Virtual Machine «Intel-Nexus 7 x64» и выполните приложение, щёлкнув кнопку «Run».
Это означает, что был использован компилятор Intel C++ Compiler for Android.
Источник


