- Делаем экран загрузки Android приложения правильно
- Что рекомендует Google
- Правильный Splash Screen
- Реализация Splash Screen
- Делаем это правильно
- Making loading data lifecycle aware
- What’s so special about Loaders?
- I don’t believe you
- Not good enough — what if my data changes?
- Working with the rest of your app: the LoaderManager
- LoaderCallbacks
- Cool, but I don’t need a background thread
- Loaders: for data only
Делаем экран загрузки Android приложения правильно
Splash Screen (прим.: тут и далее — экран загрузки) просто отнимает ваше время, верно? Как Android разработчик, когда я вижу экран загрузки, я тут же представляю как некоторые плохие разработчики добавляют трехсекундную задержку в коде.
Я должен смотреть на какое-то изображение в течении нескольких секунд, и до тех пор я не могу использовать приложение. И я должен это делать каждый раз после запуска приложения. Я знаю какое приложение я запустил. Я знаю что оно делает. Просто позвольте мне использовать его!
Что рекомендует Google
Вы будете удивлены, узнав что сторонники Google используют Splash Screen. Это описано прямо вот тут, в спецификации к Material Design.
Так было не всегда. Google был против Splash Screen, и даже назвал его анти-паттерном.

Правильный Splash Screen
Я считаю, что Google не противоречит сам себе. Старый совет и новые рекомендации хорошо сочетаются. (Тем не менее, все-таки не очень хорошая идея использовать экран загрузки который отнимает время пользователя. Пожалуйста, не делайте так)
Однако, Android приложениям требуется некоторое количество времени для запуска, особенно при холодном запуске. Существует задержка которую вы не можете избежать. Вместо того чтобы показывать пустой экран, почему бы не показать пользователю что-то хорошее? Именно за этот подход Google и выступает. Не стоит тратить время пользователя, но не показывайте ему пустой, ненастроенный раздел приложения, когда он запускает его впервые.
Если вы посмотрите на последние обновления Google приложений, вы увидите подобный способ использования экрана загрузки. Например, взгляните на приложение YouTube:
Количество времени, которые вы тратите на просмотр Splash Screen, точно соответствует количеству времени, которое требуется приложению для запуска. При холодном запуске, это означает что Splash Screen будет виден дольше. А если приложение уже закэшировано, заставка исчезнет почти сразу.
Реализация Splash Screen
Реализация Splash Screen правильным способом немного отличается от того что вы можете себе приставить. Представление Splash Screen, который вы видите, должно быть готово немедленно, даже прежде чем вы можете раздуть (прим.: inflate) файл макета в вашей Splash Activity (прим.: Activity — активность, деятельность).
Поэтому мы не будем использовать файл макета. Вместо этого мы укажем фон нашего Splash Screen в фоне темы своей Activity. Для этого, сначала необходимо создать XML drawable в res/drawable.
Здесь я задал цвет фона и изображение.
Дальше, вы должны установить этот drawable в качестве фона для темы вашего Splash Screen Activity. Перейдите в файл styles.xml и добавьте новую тему для Splash Screen Activity:
В вашей новой SplashTheme установите в качестве фона ваш XML drawable. И установите эту тему в своей Splash Screen Activity в вашем AndroidManifest.xml:
И, наконец, ваш класс SplashActivity должен перенаправить вас в ваше основное Activity:
Обратите внимание, что вы не настраивает вид для SplashActivity. Представление берется непосредственно из темы. Когда вы задаете вид вашей Splash Screen Activity через тему, он доступен немедленно.
Если у вас есть файл макета для вашей Splash Activity, он будет показан только после того как ваше приложение будет полностью инициализировано, а это что очень поздно. Ведь мы хотим чтобы Splash Screen отображался только небольшой промежуток времени, до того как приложение будет инициализировано.
Делаем это правильно
Как только шаги выше завершены, вы получите Splash Screen реализованный правильным путем:
Вооруженные этим знанием, заставьте ваш Splash Screen работать правильно. Не тратьте время пользователей попусту, но дайте им то, на что им будет приятно смотреть пока они ждут.
Источник
Making loading data lifecycle aware

Note: if you’re looking for a modern, flexible solution to this problem that doesn’t rely on Loaders (the chosen solution here), check out the Lifecycle Aware Data Loading with Architecture Components blog post.
Building a dynamic Android app requires dynamic data. But I hope we’ve all moved beyond loading data on the UI thread (#perfmatters or something like that). That discussion can go on for seasons and seasons, but let’s focus in on one case: loading data specifically for display in your Activity or Fragment with Loaders.
Much of the talk on Loaders is around CursorLoader, but Loaders are much more versatile than only working with Cursors.
While Loaders exist as part of the framework on API 11 and higher, they’re also part of the Support v4 Library and bring the latest features (and bugfixes!) to every API 4 and higher devices.
What’s so special about Loaders?
By default, device configuration changes such as rotating your screen involve restarting your whole Activity (one of the many reasons it is so critical not to keep a reference to your Activity or any Views). The best part about Loaders is that Loaders survive configuration changes. That expensive data you just retrieved? Still there for immediate retrieval when the activity comes back up. Data is queued up for delivery so you aren’t going to lose data during device configurations either.
But even better: Loaders don’t stay around forever. They’ll be automatically cleaned up when the requesting Activity or Fragment is permanently destroyed. That means no lingering, unnecessary loads.
These two facts together mean that they perfectly match the lifecycle you actually care about: when you have data to show.
I don’t believe you
Perhaps an example will be enlightening. Let’s say you are converting a regular AsyncTask to the loader equivalent, aptly named AsyncTaskLoader:
Looks pretty similar to an AsyncTask, but we can now hold onto results in a member variable and immediately return them back after configuration changes by immediately calling deliverResult() in our onStartLoading() method. Note how we don’t call forceLoad() if we have cached data — this is how we save ourselves from constantly reloading the data!
You might have noticed the static keyword when declaring the JsonAsyncTaskLoader. It is incredibly important that your Loader does not contain any reference to any containing Activity or Fragment and that includes the implicit reference created by non-static inner classes. Obviously, if you’re not declaring your Loader as an inner class, you won’t need the static keyword.
Not good enough — what if my data changes?
What the simple example fails to get at is that you aren’t limited to just loading a single time — your Loader is also the perfect place to put in broadcast receivers, a ContentObserver (something CursorLoader does for you), a FileObserver, or a OnSharedPreferenceChangeListener. All of a sudden your Loader can react to changes elsewhere and reload its data. Let’s augment our previous Loader with a FileObserver:
So by hooking into the onStartLoading() callback to start our processing and the final onReset(), we can stay perfectly in sync with the underlying data. We could have used onStopLoading() as the ending callback, but onReset() ensures that we have continuous coverage (even mid-configuration change).
You’ll note the usage of takeContentChanged() in onStartLoading() — this is how your Loader knows that something has changed (i.e.,someone called onContentChanged()) while the Loader was stopped so even if there were cached results, a data load still needs to be done.
Note: we still deliver the old, cached data before loading the new — make sure that’s the right behavior for your app and change onStartLoading() as necessary. For example, you might check for takeContentChanged() and immediately throw away cached results, rather than redeliver them.
Working with the rest of your app: the LoaderManager
Of course, even the best Loader would be nothing if it wasn’t connected to something. That connection point for activities and fragments comes in the form of LoaderManager. You’ll call FragmentActivity’s getSupportLoaderManager() or a Fragment’s getLoaderManager() to get your instance.
In almost every case, there’s only one method you’ll need to call: )» target=»_blank» rel=»noopener ugc nofollow»> initLoader() . This is generally called in onCreate() or onActivityCreated() — basically as soon as you know you’ll need to load some data. You’ll pass in a unique id (only within that Activity/ Fragment though — not globally unique), pass an optional Bundle, and an instance of LoaderCallbacks.
Note: make sure to upgrade to version 24.0.0 or higher of the Android Support Library if you want to call initLoader() within a Fragment’s onCreate() — there were issues in previous versions of the Support Library (and all framework fragments this Lint request and this related Google+ post.
You might notice there’s a )» target=»_blank» rel=»noopener ugc nofollow»> restartLoader() method in LoaderManager which gives you the ability to force a reload. In most cases, this shouldn’t be necessary if the Loader is managing its own listeners, but it is useful in cases where you want to pass in a different Bundle — you’ll find your existing Loader is destroyed and a new call to onCreateLoader() is done.
We mentioned using onReset() instead of onStopLoading() for our FileObserver example above — here we can see where this interacts with the normal lifecycle. Just by calling initLoader(), we’ve hooked into the Activity/ Fragment lifecycle and onStopLoading() will be called when the corresponding onStop() is called. However, onReset() is only called when you specifically call destroyLoader() or automatically when the Activity/ Fragment is completely destroyed.
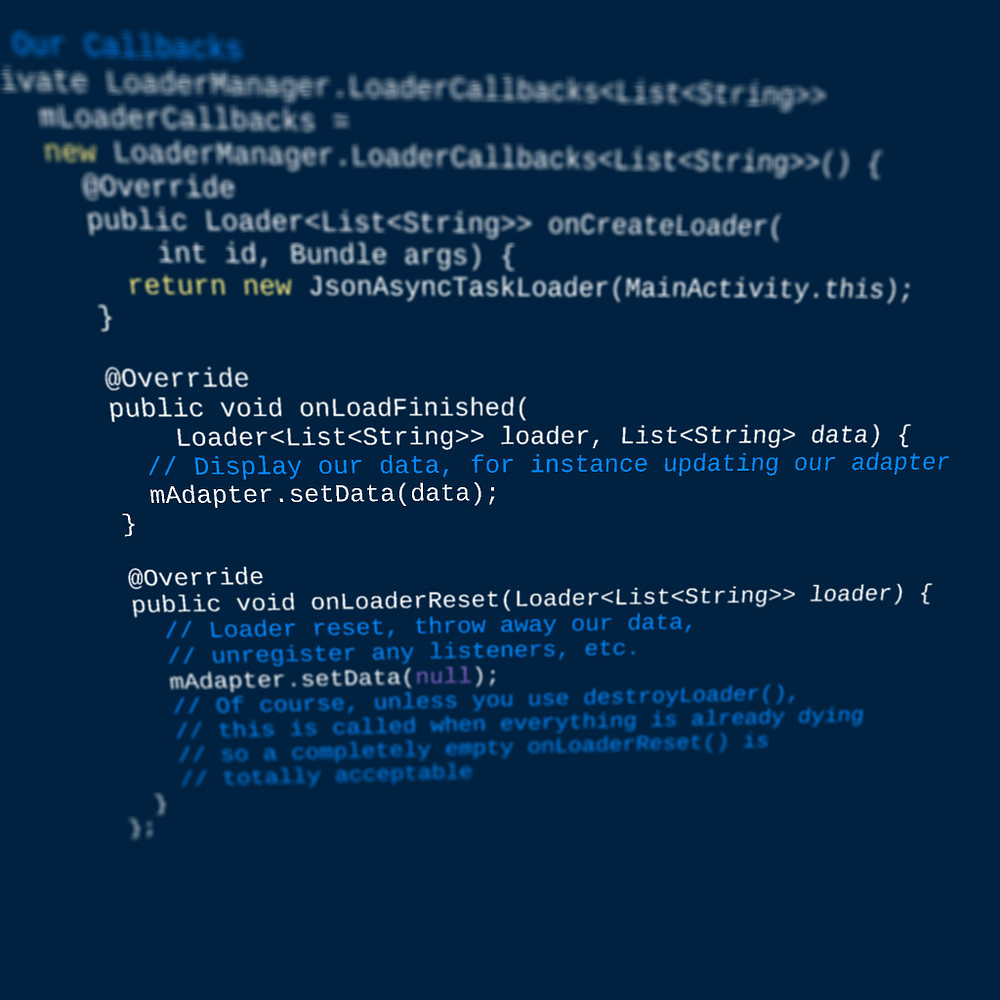
LoaderCallbacks
LoaderCallbacks is where everything actually happens. And by ‘everything’, we mean three callbacks:
So our previous example might look like:
Of course, there’s no hard requirement to use LoaderManager, although you’ll find life much easier if you do. Feel free to look at the FragmentActivity source and the LoaderManager source for a detailed look into everything it is giving you.
Cool, but I don’t need a background thread
AsyncTaskLoader tries to make it easy to get off the background thread, but if you’ve already done your own background threading or rely on event bus / subscription models, AsyncTaskLoader is overkill. Let’s take an example of loading location changes without throwing all that code into your Activity/ Fragment:
So here we can see the three main components:
- onStartLoading() kicks off the subscription process (in this case, by connecting to Google Play services)
- onStopLoading() is when we’re put into the background (either temporarily on rotation or when the Home button is pressed and the loader is put into the background) so we reduce battery/processor usage
- As we get results we call deliverResult()
- Finally, we disconnect and clean up in onReset()
Here the Loader framework knew nothing about Google Play services, but we can still encapsulate that logic in one place and rely on a single onLoadFinished() with an updated location. This type of encapsulation also helps with switching out location providers — the rest of your code does not care how or where the Location objects come from.
Note: in this case, failures are reported by sending a null Location. This signals the listening Activity/ Fragment to call getConnectionResult() and handle the failure. Remember that the onLoadFinished() includes a reference to the Loader so any status you have can be retrieved at that point.
Loaders: for data only
So a Loader has one goal in life: give you up-to-date information. It does that by surviving device configuration changes and containing its own data observers. This means that the rest of your Activity/ Fragment doesn’t need to know those details. (Nor should your Loader know anything about how the data is being used!)
If you’ve been using retained Fragments (those that call setRetainInstance(true)) to store data across configuration changes, strongly consider switching from a retained Fragment to a Loader. Retained fragments, while aware of the overall Activity lifecycle, should be viewed as completely independent entities, while Loaders are tied directly into an Activity or Fragment lifecycle (even child fragments!) and therefore much more appropriate for retrieving exactly the data needed for display. Take for example a case where you are dynamically adding or removing a fragment — Loaders allow you to tie the loading process to that lifecycle and still avoid configuration changes destroying the loaded data.
That single focus also means that you can test the loading separately from the UI. The examples here just passed in a Context, but you can certainly pass in any required classes (or mocks thereof!) to ease testing. Being entirely event driven, it is also possible to determine exactly what state the Loader is in at any time as well as expose additional state solely for testing.
Note: while there’s a LoaderTestCase designed for framework classes, you’ll need to make a Support Library equivalent from the LoaderTestCase source code if you want to do something similar with the Support v4 Loader (something Nicholas Pike already has done!). This also gives you a good idea of how to interact with a Loader without a LoaderManager.
Now, it is important to mention that Loaders are reactive, recipients of data. They’re not responsible for changing the underlying data. But for what they do, they do fill a needed gap of lifecycle aware components that survive configuration changes and get your data to your UI.
Join the discussion on the Google+ post and follow the Android Development Patterns Collection for more!
Источник


