- How to Create User Interface Login & Register with Android Studio
- Adjustment of several layouts :
- Connect fragments with viewpager
- Pilanites
- Android Account Manager: Introduction and Basic Implementation
- Authentication system
- Creating account on the phone via the Android Account Manager
- Wait, what’s AccountManager? And why should we use it?
- Things we need to support
- Flow and important terms
- Building our Authenticator
- Building the Authentication Activity
- Building the Authentication Service
- Making an android account
- Identify Language of Text with Firebase API Android Example
- Organize Photos by Content Android Example
- Android Barcode Scanning Example
- Extracting Text from Images Android
- Google Places SDK for Android Tutorial
- Android Widget Example
- Android MotionLayout Examples
- Android Fragments Transition Animation Example
- Model View ViewModel MVVM Android Example
- Android Model View Presenter MVP Pattern Example
- Android Kotlin ListView Example
- About
How to Create User Interface Login & Register with Android Studio
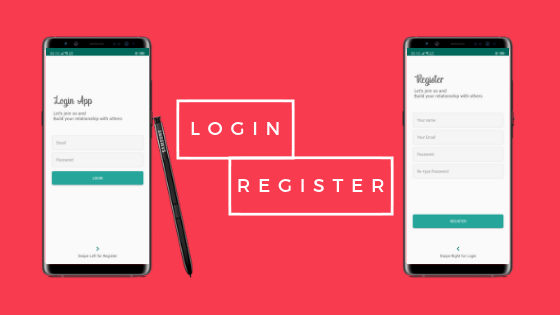
ok, this is my first article in Medium. In this section, I want to share with you about the User Interface on Android and we will create a Login page and a Register page. Some components that I will use:
1. Viewpager
2. Fragment
3. Edittext
4. Button
5. Textview
6. Imageview
What about the results? let’s coding (follow step by step)
- Of course we must already have an Android Studio. if not, you can download it first on the official Android Studio website. If you already have one, please open your Android studio.
2. We create a new project by clicking “Start a new Android Studio project”. Fill in the application name column with “LoginApp”, then click next.

3. Select the minimum SDK you need or want, then click next.


4. Select “Empty Activity” and click next. After that, the “Activity Name” and “Layout Name” columns will appear, in this section just leave it like that, then click finish.

After you click finish, Android Studio will make you an Application with the name “LoginApp”.
After the application is successfully built, you can simply make adjustments to the following sections:
Open the colors.xml file in app/res/values/colors.xml, and change it like this:
Create a folder with the name “font” in the res folder, by right clicking on the res directory, select new / directory and name it “font”. After that, copy this font into font directory. (download the font 1 and font 2).
Create some Drawable Resource File in the drawable directory, by right-clicking on the drawable directory, select new / Drawable Resource File.
After that open file styles.xml and change like this :
Add the theme property in the Main Activity in the manifest, in the app / manifests / AndroidManifest.xml folder
So the AndroidManifest.xml file will be as follows:
After all the steps above are done, then make 2 fragments with the name fragment_login and fragment_register in the layout directory, by right-clicking on the layout directory, New/Fragment/Fragment (Blank)

Uncheck:
include fragment factory methods? and include interface methods?

Adjustment of several layouts :
change the activity_main.xml layout, fragment_login.xml and fragment_register.xml so that it will be as below
Open the strings.xml file in the res / values / strings.xml directory and change it to something like the following :
So that the overall structure of the project will be as follows :

Connect fragments with viewpager
Create an inner class in the MainActivity.java class with the name AuthenticationPapterAdapter. This class is a derivative of the FragmentPagerAdapter class and serves to connect Fragments with ViewPager,
Then call the class in the onCreate() method in MainActivity.java and connect with viewpager
So the MainActivity.java class will be like this
The display of the final application will be like this
Источник
Pilanites
Business of Online Products
- Home
- /
- streaks
- /
- Android Account Manager: Introduction and Basic Implementation
Android Account Manager: Introduction and Basic Implementation
Recently I had to implement an online sync facility for my habit tracker app. As it goes with every online service, you needed an account to take it’s advantage. Enter the Android Account Manager.
Now, if you are an advanced user of Android phones (and since you’re reading this, you most certainly are), you must have seen an “Accounts” section in phone Settings.
Upon clicking that, you’ll find your accounts related to apps on your phone.
I wanted to utilize this built-in AccountManager functionality to store and authenticate user’s credentials because it works like a charm with the built-in sync mechanism (using the SyncAdapter ).
But we are getting ahead of ourselves here. Let’s start with the authentication system for server.
Authentication system
Our system authenticates users based on email and password combo. If the combo is correct, server returns an auth_token which are valid until the user logs out. This is your normal token based authentication where the token lives forever and has all the permissions as the user itself.
 A small overview of implementation
Every device creates a new auth_token for itself because it makes it easy to log the device, limit the number of clients for an account.
This was fairly easy to implement on the server side by adding fields for auth_token in Device model. Simply create a new Device whenever user logs in or registers, populating that auth_token field to a random value.
Creating account on the phone via the Android Account Manager
Till now, we had discussed the how to create account on server, and how it interacts with the client. Let’s move on to the meat of this post, creating account using AccountManager .
Wait, what’s AccountManager? And why should we use it?
More specifically, why not store the credentials using SharedPreference and have full control without wasting time on this?
The great thing with AccountManager is that it solves the corner cases, and little small details with ease, which you might forget to account for. It really shines well when you’re using OAuth2 and need to fetch a new token when the current one expires.
There are many more benefits to using AccountManager but going through all of them is a little too much. I’ll add the links in comments if you ask for them. 🙂
A more in-depth look at AccountManager can be found here.
We’ll be using it to store the user credentials and auth_token .
Things we need to support
- Users can add an account
- They can sync their data
- They can log out of their account
Pretty simple and straightforward.
Flow and important terms
Before we look at the code, let’s talk about the workflow.
When the app tries to access an account, and it’s auth_token , this is how it goes :-
- The app asks the AccountManager for an auth_token .
- The AccountManager asks the AccountAuthenticator whether it has a token
- If it has none, it shows the user an AccountsActivity through which the user logs in
- The user logs in after which the app obtains the auth_token from server
- The auth_token is stored by the AccountManager for any future use which it returns the next time app asks for it
The good thing about using AccountManager is that system will start the correct activities and handle most of the corner cases we as developers get lazy about.
This assures us that we’ll have a valid auth_token while syncing, so we can avoid defensive programming.
Building our Authenticator
Authenticator is the class which AccountManager uses to handle our account related tasks like storing the auth_token or account password.
The first thing you need to do is extend the AbstractAccountAuthenticator and implement its methods to create our Authenticator.
You may decide to implement all the methods, or just leave out some by having them throw an UnsupportedOperationException . You will, however need to implement the addAccount method to allow users to add an account in the system.
Another method you should implement is getAuthToken . This method allows your SyncAdapter , and really your whole app, to acquire the auth_token for making network calls.
This is how I’ve implemented it.
@Override public Bundle getAuthToken(AccountAuthenticatorResponse response, Account account, String authTokenType, Bundle bundle) throws NetworkErrorException < AccountManager am = AccountManager.get(mContext); String authToken = am.peekAuthToken(account, authTokenType); if (TextUtils.isEmpty(authToken)) < authToken = HTTPNetwork.login(account.name, am.getPassword(account)); >if (!TextUtils.isEmpty(authToken)) < final Bundle result = new Bundle(); result.putString(AccountManager.KEY_ACCOUNT_NAME, account.name); result.putString(AccountManager.KEY_ACCOUNT_TYPE, account.type); result.putString(AccountManager.KEY_AUTHTOKEN, authToken); return result; >// If you reach here, person needs to login again. or sign up // If we get here, then we couldn’t access the user’s password — so we // need to re-prompt them for their credentials. We do that by creating // an intent to display our AuthenticatorActivity which is the AccountsActivity in my case. final Intent intent = new Intent(mContext, AccountsActivity.class); intent.putExtra(AccountManager.KEY_ACCOUNT_AUTHENTICATOR_RESPONSE, response); intent.putExtra(«YOUR ACCOUNT TYPE», account.type); intent.putExtra(«full_access», authTokenType); Bundle retBundle = new Bundle(); retBundle.putParcelable(AccountManager.KEY_INTENT, intent); return retBundle; >
This kind of completes the Authenticator, at least for our purposes. You can have a look at the entire file by visiting this gist for Authenticator.java.
Building the Authentication Activity
Now, you must have noticed that there is an AccountsActivity here. This is a special activity which is shown to the user whenever they have to login for Authenticator to get token.
Create the activity as you normally would, making network calls, validations and everything else normally. When you wish to add the credentials to Accounts, use a method like the one below.
public void createAccount(String email, String password, String authToken)
This will create the account for you to use.
Building the Authentication Service
At this point, the Activity will be ready but we haven’t registered our Authenticator with the system.
To do that, we’ll have to define an AuthenticatorService and register it in the Manifest file with special filter and meta-data.
The service is pretty simple (link) and looks like:-
After making this we need to declare this service in Manifest with appropriate tags.
If you notice the meta-data tag there, you’ll find android:resource ‘s value something which hasn’t been defined before. This xml file is important because it lets the system know how to represent your app in the settings.
Create a folder named xml in the res folder. In that folder, make a new file named authenticator.xml (name can be anything, as long as you specify it in the Manifest file). The contents of that file for my project looks like this:-
Most of these values would have been already defined by you, except the account_type which needs to be the same as the one your provided earlier (we have used «YOUR ACCOUNT TYPE» as placeholder).
This will let you create a very basic version of app supporting the accounts in your system. Look how good our app’s name looks in Account’s screen 😛
 Look at Streaks sitting there with other apps
To access your user’s account, all you will need to do is
AccountManager accountManager = AccountManager.get(context); Account[] accounts = accountManager.getAccountsByType(AccountConstants.ACCOUNT_TYPE); // Use accounts[0] (or whatever number of account) after checking that accounts.length > 1
That wraps up our introduction to creating an account in system. If you want a detailed information about what other things are possible, check out udinic’s post which is an excellent but overwhelming resource.
I urge you to leave a comment here if you have any questions or tweet them to me, @shobhitic.
Next week, I’ll be creating a SyncAdapter which uses this Account for communication. If you’d like to hear about that, sign up for my email list.
Источник
Making an android account
This post shows how to translate text between languages with an example.
Identify Language of Text with Firebase API Android Example
This post explains how to build a feature in android app that identifies the language of given text.
Organize Photos by Content Android Example
This post explains how to create in android a feature that lets user organize photos by its content.
Android Barcode Scanning Example
This post explains how to develop barcode scanning feature in android app using Firebase machine learning kit which provides barcode scanning API.
Extracting Text from Images Android
To recognize and extract text from images, Firebase ML kit can be used. Firebase ML kit offers machine learning features and is based on Google ML technologies.
Google Places SDK for Android Tutorial
Using Google places SDK for Android, current places, place details, nearby places and photos associated with a place can be displayed in apps and place search capability can be developed.
Android Widget Example
One of the excellent features of Android is that app’s information and features can be displayed as mini apps on home screens. These mini apps are called widgets.
Android MotionLayout Examples
MotionLayout is a subclass of ConstraintLayout. It allows you to animate property changes of UI elements which are part of a layout.
Android Fragments Transition Animation Example
To minimize the number of un-installations of your app, you need to build it in such way that it performs well, works on all devices and is user friendly.
Model View ViewModel MVVM Android Example
Model View ViewModel (MVVM) is an architectural pattern applied in applications to separate user interface code from data and business logic.
Android Model View Presenter MVP Pattern Example
If you want to build android apps which can be tested and modified easily, you need to implement user interface architectural pattern in your app.
Android Kotlin ListView Example
It is very common in most of the applications that a list of data items is displayed in UI. In android applications, list of data items can be shown to users using ListView.
About
Android app development tutorials and web app development tutorials with programming examples and code samples.
Источник


