- Steps to create a Android Menu
- Step 1: Open an Activity Class
- Step 2: Create a Resources Folder
- Step 3: Create a Menu XML File
- Step 4: Add Items to Your Menu
- Step 5: Create Icons for Your Menu Items
- Step 6: Inflate Your Menu Resource
- Step 7: Detect User Interaction
- Step 8: Respond to Menu Item Selection
- Material Menus — Material Component For Android
- Progress Indicators — Material Components For Android
- Progress indicators express an unspecified wait time or display the length of a process. Material design provides an…
- Sliders — Material Component For Android
- Sliders used to view and select a value or range from the given slider bar.They’re mainly used for adjusting settings…
- Android Chips — Material Component For Android
- Android Chips is one the component in Material Design library. A Material Chip is a component that can represent input…
- Types of menus
- Dropdown Menus
- Overflow menus
- Context menus
- Popup menus
- Adding icons on popup menus
- List popup window menus
- Exposed dropdown menus
- Non-editable variation
- Setting a default value
- Creating custom menu in android (Part-2/3 : The Action Bar)
- The BaseActivity — For consistent toolbar and menu across the app
- Extending the BaseActivity and adding our design to it.
- Summary
- Build Menus in Android with Java and XML: Introduction
- Creating a Menu Using XML
- Menu in Android
- Option Menu
- Context Menu
- PopUp Menu
- How to create a Menu?
- Why to use a separate menu resource?
- How to create a menu_file.xml file in menu directory?
Steps to create a Android Menu

Apr 16, 2017 · 3 min read
This tutorial will teach you how to implement an options menu in any of your Android SDK applications.
In Android apps, you can make use of three standard menus supported within the platform: the context menu, the options menu, and submenus.This is a common feature in almost all apps, so your users will be used to the menu appearing in this way
To implement an options menu for an Activity in an Android app, a few fairly straightforward steps are required.
Step 1: Open an Activity Class
Select your applica t ion package and choose “File”, “New”, then “Class” and enter a name of your choice. Remember to make your class extend the Activity class and add it to the application Manifest.
Step 2: Create a Resources Folder
The “res” folder holds all of your application resources. To create a menu, you need a menu folder, so create one inside the “res” folder by selecting it and choosing “File”, “New”, then “Folder” and entering “menu” as the name.

Your new folder will appear within the “res” directory:

Step 3: Create a Menu XML File
Choose the folder and create a new file by selecting “File”, “New”, then “File” and entering a name.You can choose any filename you like, for example “my_options_menu.xml”.
Step 4: Add Items to Your Menu
You can add one or more items to your options menu depending on the needs of your own project. Add an item for each menu option using the following syntax:
Step 5: Create Icons for Your Menu Items
Once you have your icons in their folders, you can alter your menu item XML to include them as follows:
Step 6: Inflate Your Menu Resource
Add the following method to your Java code, inside the class declaration and after the “onCreate” method:
public boolean onCreateOptionsMenu(Menu menu) <
MenuInflater inflater = getMenuInflater();

Step 7: Detect User Interaction
Add the following method outline after the “onCreateOptionsMenu” method:
public boolean onOptionsItemSelected(MenuItem item) <
//respond to menu item selection
Step 8: Respond to Menu Item Selection
Add a switch statement to your method using the following sample syntax:
Источник
Material Menus — Material Component For Android

A menu displays a list of choices on a temporary surface. They appear when users interact with a button, action, or other control.
Before getting into details. Checkout my other post on material design,
Progress Indicators — Material Components For Android
Progress indicators express an unspecified wait time or display the length of a process. Material design provides an…
Sliders — Material Component For Android
Sliders used to view and select a value or range from the given slider bar.They’re mainly used for adjusting settings…
Android Chips — Material Component For Android
Android Chips is one the component in Material Design library. A Material Chip is a component that can represent input…
To work with material design, First we need to add material design dependency.
Types of menus
- Dropdown menus
- Exposed dropdown menus

Dropdown Menus
Dropdown menus display a list of options, triggered by an icon, button, or action. Their placement varies based on the element that opens them.
Based on the usage and design, dropdown menus are used in four different ways.
- Overflow menus
- Context menus
- Popup menus
- List popup window menus
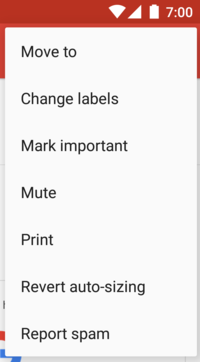
Overflow menus

The menu which appears after tapping these 3 dots located in the action bar.
To create the overflow menu, First create a menu XML file.
Then, inflate the menu XML layout on onCreateOptionsMenu.
in your MainActivity.kt:
Context menus

The context menu that appears when a TextView is long pressed.
First, create Textview in your activity_main.xml layout,
In your code, inflate the context menu layout in onCreateContextMenu.
Also, you can override the onContextItemSelected to handle context menu item click.
Popup menus
The popup menu shows when a button is clicked.

Create a button in activity_main.xml,
With the click of the button, we need to create a PopupMenu() and inflate the menu layout into the popup menu.
Also, you can add click listener for the popup menu by setting setOnMenuItemClickListener into the popup menu.
Adding icons on popup menus
Currently, there is no public API to add icons on popup menus. The following workaround is for API 21+, and uses library-only APIs, and is not guaranteed to work in future versions.

create a menu layout with icon,
List popup window menus
We can show the list items in popup menu using the ListPopupWindow() .

In code, First create a listPopupWindow with list of menu items.
Then, show the list popup menu on by clicking of the button.
Exposed dropdown menus
Exposed dropdown menus display the currently selected menu item above the list of options. the exposed dropdown menus behavior same as a spinner. So, this will be the best alternative for the spinners.
The exposed dropdown menu is implemented through the TextInputLayout.

in code, set the arrayAdapter into autoCompleteTextView.
In the item layout ( list_item.xml):
To have an outlined variation of the exposed dropdown menu, set the style to @style/Widget.MaterialComponents.TextInputLayout.OutlinedBox.ExposedDropdownMenu:

Non-editable variation
Disable the user input in the AutoCompleteTextView to have a non editable variation of the menu by setting android:inputType=”none” on the AutoCompleteTextView.
Setting a default value
In order to have a pre-selected value displayed, you can call setText(CharSequence text, boolean filter) on the AutoCompleteTextView with the filter set to false.
Источник
Creating custom menu in android (Part-2/3 : The Action Bar)

Jul 4, 2017 · 4 min read
Continuing from the Part 1 of this tutorial which shows how make a custom menu in android, we will see how to design and integrate a toolbar (Action bar) in the project.
Let’s see how our toolbar looks :

We have only two components in the ToolBar
- An ImageView for the hamburger menu icon
- A TextView for the title
But by default the android studio provides us a ActionBar. So let’s remove it. for that go to values > styles.xml and change the AppTheme parent to NoActionbar:
now let’s design the toolbar
So the l ayout is pretty straight. A RelativeLayout with Icon on left and a title in the centre. We put the Relative inside a AppBarLayout. So the layout looks like this :
The BaseActivity — For consistent toolbar and menu across the app
We’ll create a BaseActivity which will extend AppCompatActivity. So in our other Activities, instead of extending AppCompatActivity, we will extend this BaseActivity. Why? Because we are already extending AppCompatActivity in BaseActivity as well as we will be add some custom functionality in it. So extending our BaseActivity, all other activities can access all those functionalities.
So in BaseActivity, we will add the toolbar we just designed and add the code for the hamburger menu click events.
Let’s see how it is made. Create an empty activity BaseActivity which will create an activity_base.xml for layout:
In the layout file, we’ll add the toolbar that we designed and below that we’ll leave empty space for the rest of the screen. So when we extend this BaseActivity, the other screens will get this toolbar on top and the corresponding xml design below it in empty space.
So the code looks like :
The above written code results in a structure which looks like this:

Now we will initialize the icon and toolbar in BaseActivity.java and write a method where the empty space will be covered by the screen specific designs.
So our complete BaseActivity.java code looks like
Extending the BaseActivity and adding our design to it.
Lets say we have a MainActivity and we are extending BaseActivity in it. we will also see how to show the activity_main.xml design in it.
Let’s break the above written code.
Remember we had empty space in activity_base.xml. In this empty space we will add the activity_main.xml
We have a function names initAddLayout already in the BaseActivity.java.
Then we took reference of the TextView and ImageView of the toolbar
Now once we have the reference, we can use them as we want. So we changed the label and the menu button click event according to every activity
Summary
So, now we have a MainActivity which extends our BaseActivity, so it has the common toolbar and the rest of the content of the screen is also added. So in all the Activities, we’ll have our BaseActivity extended so we get a common toolbar.
So assume you need a toolbar with some icons and fixed events on those icons on some 20 screens of your app. You need not to create a menu xml and define the events in onMenuItemSelected in all 20 activities. Instead, you simply design a toolbar, include it the BaseActivity, write the functionality only once in the BaseActivity and extend this BaseActivity in every other Activity
Источник
Build Menus in Android with Java and XML: Introduction
App users love powerful options and features, but if they’re not well organized within your app’s interface, they might as well not even exist. Depending on what you’ve built, these options and features could affect the way that the app behaves, they could offer extensive customization options, or they could even tie into APIs, other apps, hardware capabilities, or other external technologies. But, they’ll have to be intuitive and organized to be at their best. That’s where proper menu design comes in.
When you are designing an app it is very important to design a sensible order and structure for the many options, features and settings that you plan to build. Obviously, your interface plays a pivotal role in your app’s performance; without it, your app would be nothing more than a disorganized collection of functions.
Menu items are a very old and famous user interface entity. Almost all users are comfortable using menus in their apps. Android provides an easy and flexible infrastructure to add menus in your app. It lets you create menus through XML resources or directly via code. Based on the menu item clicked, a certain action can be performed by your app. In this article, we are going to see how we can easily create menus and respond to menus using the Android API.
Creating a Menu Using XML
Let’s start by creating an Android project called MenuOptionsDemoProject, in which we are going to demonstrate menu creation via XML. Once we have created a project and created an activity in MenuOptionsDemoProject, we are ready to add a menu to it.
One way to create an options menu in Android is using the menu.xml resource file. To create menus using this method, you must create a menu directory in your resource directory. Create a file called my_menu.xml. Your directory structure should look as follows:
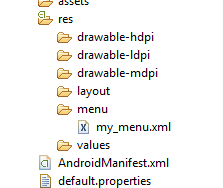
Once you have created the file structure above, you can add the following code into your my_menu.xml file:
To create a menu resource, you have to employ the tag. You must create this XML item tag for each menu item that you want to show in your menu. There are a lot of attributes that you can specify within XML tag. Some of the most important ones are the id for the item and the title tag, which determines the text shown on the menu item. You can also specify the icon for the item to determine the graphic that’s visually associated with it’s respective menu option.
In the above XML, we have created two menu items: one for opening a file, and one for saving the file. We have given both of the items titles, and we’ve also given each an icon.
Once the menu resource file (my_menu.xml) is ready and has all the items you intend to add, you can use MenuInflater to override the function onCreateOptionsMenu. This function is supposed to fill the menu object with the desired menu items, but Android’s MenuInflater class helps you create menu items from the XML resource mentioned above. The code of our activity will be as follows:
public class MenuOptionsDemoProject extends Activity <
Источник
Menu in Android
Have you ever encountered with any of the following menu style in Android?


There are 3 types of menus in Android:
- Option Menu
- Context Menu
- Pop-up Menu
Option Menu

The options menu is the primary collection of menu items for an activity. It’s where you should place actions that have a overall impact on the app, such as Search, Compose Email and Settings.
Context Menu

A context menu is a floating menu that appears when the user performs a long-click on an element. It provides actions that affect the selected content or context frame.
PopUp Menu

A popup menu displays a list of items in a vertical list that is anchored(sticked) to the view that invoked the menu. It’s good for providing an overflow of actions that relate to specific content or to provide options for a second part of a command.
Note: Actions in a popup menu should not directly affect the corresponding content—that’s what contextual actions are for. Rather, the popup menu is for extended actions that relate to regions of content in your activity.
How to create a Menu?
For all menu types mentioned above, Android provides a standard XML format to define menu items. Instead of building a menu in your activity’s code, you should define a menu and all its items in an XML menu resource. You can then inflate the menu resource i.e load the XML files as a Menu object in your activity.
Why to use a separate menu resource?
Using a menu resource is a good practice for a few reasons:
- It’s easier to visualize the menu structure in XML.
- It separates the content for the menu from your application’s behavioral code.
- It allows you to create alternative menu configurations for different platform versions, screen sizes, and other configurations by leveraging the app resources framework.
How to create a menu_file.xml file in menu directory?
To define the menu_file.xml file, first create a menu directory under res folder. This is done by right clicking on res —> new —> Android resource directory.

Then a new window will appear. Type menu in the directory name and choose menu in the Resource type. Then, click on OK.

A new menu directory would be made under res directory. Add menu_file.xml file in menu directory by right clicking on menu —> New —> Menu resource file.

Give the name as menu_file.xml and click on Ok. The menu_file.xml file contains the following tags:
It defines a Menu, which is a container for menu items. A element must be the root node for the file and can hold one or more and elements.
It creates a MenuItem, which represents a single item in a menu. This element may contain a nested element in order to create a submenu.
It is an optional, invisible container for elements. It allows you to categorize menu items so they share properties such as active state and visibility.
The element supports several attributes you can use to define an item’s appearance and behavior. The items in the above menu include the following attributes:
A resource ID that’s unique to the item, which allows the application to recognize the item when the user selects it.
A reference to a drawable to use as the item’s icon.
A reference to a string to use as the item’s title.
Now, we have understood how to create a menu.xml and what does it contain. Let’s learn how to use it in our Activity.
Making an Option Menu
To make an option menu, we need to Override onCreateOptionsMenu() method as follows:
- MenuInflater inflater = getMenuInflater();
This gives a MenuInflater object that will be used to inflate(convert our XML file into Java Object) the menu_file.xml file.
inflate() method is used to inflate the menu_file.xml file.
Handling Click Events
When the user selects an item from the options menu, the system calls your activity’s onOptionsItemSelected() method. This method passes the MenuItem selected. You can identify the item by calling getItemId() method, which returns the unique ID for the menu item (defined by the android:id attribute in the menu resource). You can match this ID against known menu items to perform the appropriate action.
Note: When you successfully handle a menu item, return true. If you don’t handle the menu item, you should call the superclass implementation of onOptionsItemSelected() (The default implementation returns false).
Making Contextual Menu
To make a floating context menu, you need to follow the following steps:
- Register the View to which the context menu should be associated by calling registerForContextMenu() and pass it the View.
If your activity uses a ListView or GridView and you want each item to provide the same context menu, you can register yout all items for a context menu by passing the ListView or GridView object to registerForContextMenu() method.
Implement the onCreateContextMenu() method in your Activity.
When the registered view receives a long-click event, the system calls your onCreateContextMenu() method. This is where you define the menu items, usually by inflating a menu resource. For example:
MenuInflater allows you to inflate the menu_file.xml file from a menu resource. The method parameters include the View that the user selected and aContextMenu. ContextMenuInfo object provides additional information about the item selected. If your activity has several views such that each provide a different context menu, you might use these parameters to determine which context menu to inflate.
Handling Click Events
When the user selects a menu item, the system calls onContextItemSelected() method so that you can perform the appropriate action. For example:
Making Popup Menu
If you have define your menu_file.xml file in XML, here’s how you can show the popup menu:
- Make an object of PopupMenu, whose constuctor takes the current application Context and the View to which the menu should be anchored.
- Use MenuInflater to inflate your menu resource into the Menu object returned by PopupMenu.getMenu()
- Call PopupMenu.show()
For example, here’s a button that shows a popup menu when clicked on it:
The activity can then show the popup menu like this:
Источник


