- Manifest Merging
- In this document
- See also
- Merge Conflict Rules
- Merge Conflict Markers and Selectors
- Merge Conflict Markers
- Marker attributes
- Merge conflict marker for imported libraries
- Marker Selectors
- Injecting Build Values into a Manifest
- Manifest Merging Across Product Flavor Groups
- Implicit Permissions
- Handling Manifest Merge Build Errors
- Публикация приложения
- Создание подписанного apk
- Установка требований
- Подпись приложения
Manifest Merging
In this document
See also
With Android Studio and Gradle-based builds, each app can contain manifest files in multiple locations, such as the src/main/ folder for the productFlavor , libraries, Android ARchive (AAR) bundles of Android Library projects, and dependencies. During the build process, manifest merging combines the settings from the various AndroidManifest.xml files included in your app into a single, generated APK manifest file for app packaging and distribution. Manifest settings are merged based on the manifest priority, determined by the manifest’s file location. Building your app merges the manifest elements, attributes, and sub-elements from these manifests for the specified build variant.
Merge Conflict Rules
Merge conflicts occur when merged manifests contain the same manifest element but with a different attribute value that does not resolve based on the default merge conflict rules. Conflict markers and selectors can also define custom merge rules, such as allowing an imported library to have a minSdkVersion higher than the version defined in the other higher priority manifests.
The manifest merge priority determines which manifest settings are retained in merge conflicts, with the settings in higher priority manifest overwriting those in lower priority manifests. The following list details which manifest settings are are the highest priority during the merge process:
- Highest priority: buildType manifest settings
- Higher priority: productFlavor manifest settings
- Medium priority: Manifests in the src/main/ directory of an app project
- Low priority: Dependency and library manifest settings
Manifest merge conflicts are resolved at the XML node and attribute levels based on the following merge rules.
| High Priority Element | Low Priority Element | Manifest Merge Result |
|---|---|---|
| no attribute | no attribute | no attribute |
| attribute set to default | default attribute | |
| attribute set to non-default | low priority attribute | |
| attribute set to default | no attribute | default attribute |
| attribute set to non-default | high priority attribute | |
| attribute set to default | attribute set to default | default attribute |
| attribute set to default | attribute set to non-default | low priority attribute |
| attribute set to non-default | attribute set to default | high priority attribute |
| attribute set to non-default | attribute set to non-default | Merge if settings match, otherwise causes conflict error. |
Exceptions to the manifest merge rules:
- The uses-feature android:required; and uses-library android:required elements default to true and use an OR merge so that any required feature or library is included in the generated APK.
- If not declared, the elements, minSdkVersion and targetSdkVersion , default to a value of 1. When merge conflicts occur, the value in the higher priority manifest version is used.
- Importing a library with a minSdkVersion value higher than the app’s src/main/ manifest manifest generates an error unless the overrideLibrary conflict marker is used.
Note: If not explicitly declared, the targetSdkVersion defaults to the minSdkVersion value. When no element is present in any manifest or the build.gradle file, the minSdkVersion defaults to 1.
Important: After the manifests are merged, the build process overrides the final manifest settings with any settings that are also in the build.gradle file. For more details, see Configuring Gradle Builds.
Merge Conflict Markers and Selectors
Manifest markers and selectors override the default merge rules through specific conflict resolutions. For example, use a conflict marker to merge a library manifest with a higher minSdkVersion value than the higher priority manifest, or to merge manifests with the same activity but different android:theme values.
Merge Conflict Markers
A merge conflict marker is a special attribute in the Android tools namespace that defines a specific merge conflict resolution. Create a conflict marker to avoid a merge conflict error for conflicts not resolved by the default merge rules. Supported merge conflict markers include:
merge Merges attributes when there are no conflicts with the merge rules. The default merge action. replace Replaces attributes in the lower priority manifest with those from the higher priority manifest. strict Sets the merge policy level so that merged elements with same attributes, but different values generate a build failure, unless resolved through the conflict rules. merge-only Allows merge actions for only lower priority attributes. remove Removes the specified lower priority element from the merged manifest. remove-All Removes all lower priority elements of the same node type from the merged manifest.
By default, the manifest merge process applies the merge conflict marker to the node level. All declared manifest attributes default to a strict merging policy.
To set a merge conflict marker, first declare the namespace in the AndroidManifest.xml file. Then, enter the merge conflict marker in the manifest to specify a custom merge conflict action. This example inserts the replace marker to set a replace action to resolve conflicts between the android:icon and android:label manifest elements.
Marker attributes
Conflict markers use tools:node and tools:attr attributes to restrict merge actions at the XML node or attribute level.
The tools:attr markers use only the restrict , remove , and replace merge actions. Multiple tools:attr marker values can be applied to a specific element. For example, use tools:replace=»icon, label, theme» to replace lower priority icon , label , and theme attributes.
Merge conflict marker for imported libraries
The overrideLibrary conflict marker applies to the manifest declaration and is used to import a library even though the library’s values, such as minSdkVersion are set to different values than those in the other higher priority manifests.
Without this marker, library manifest merge conflicts from the values cause the merge process to fail.
This example applies the overrideLibrary conflict marker to resolve the merge conflict between minSdkVersion values in the src/main/ manifest and an imported library manifest.
Note: The default merge process does not allow importing a library with a higher minSdkVersion than the app’s src/main/ manifest unless the overrideLibrary conflict marker is used.
Marker Selectors
Marker selectors limit a merge action to a specific lower priority manifest. For example, a marker selector can be used to remove a permission from only one library, while allowing the same permission from other libraries.
This example uses the tools:node marker to remove the permisionOne attribute, while the tools:selector selector specifies the specific library as com.example.lib1. The permisionOne permission is filtered from only the lib1 library manifests.
Injecting Build Values into a Manifest
Manifest merging can also be configured to use manifest placeholders to inject property values from the build.gradle file into the manifest attributes.
Manifest placeholders use the syntax $
Note: Unresolved placeholder names in apps cause build failures. Unresolved placeholder names in libraries generate warnings and need to be resolved when importing the library into an app.
This example shows the manifest placeholder $
Note: Android Studio provides a default $
Gradle build file:
Merged manifest value:
The manifest placeholder syntax and build file manifestPlaceholders property can be used to inject other manifest values. For properties other than the applicationId , the manifestPlaceholders property is explicitly declared in the build.gradle file. This example shows the manifest placeholder for injecting activityLabel values.
Gradle build file:
Placeholder in the manifest file:
Note: The placeholder value supports partial value injection, for example android:authority=»com.acme.$
Manifest Merging Across Product Flavor Groups
When using the GroupableProductFlavor property, the manifest merge priority of any manifests in the product flavor groups follows the order in which the product flavor groups are listed in the build file. The manifest merge process creates a single merged manifest for the product flavor groups based on the configured build variant.
For example, if a build variant references the product flavors x86 , mdpi , 21 , and paid from the respective product flavor groups ABI , Density , API , and Prod , listed in this order in the build.gradle file, then the manifest merge process merges the manifests in this priority order, which follows how the product flavors are listed in the build file.
To illustrate this example, the following table shows how the product flavors are listed for each product flavor group. This combination of product flavors and groups defines the build variant.
| Product Flavor Group | Product Flavor |
|---|---|
| ABI | x86 |
| density | mdpi |
| API | 22 |
| prod | paid |
Manifest merge order:
- prod-paid AndroidManifest.xml (lowest priority) merges into API-22 AndroidManifest.xml
- API-22 AndroidManifest.xml merges into density-mpi AndroidManifest.xml
- density-mpi AndroidManifest.xml merges into ABI-x86 AndroidManifest.xml (highest priority)
Implicit Permissions
Importing a library that targets an Android runtime with implicitly granted permissions may automatically add the permissions to the resulting merged manifest. For example, if an application with a targetSdkVersion of 16 imports a library with a targetSdkVersion of 2, Android Studio adds the WRITE_EXTERNAL_STORAGE permission to ensure permission compatibility across the SDK versions.
Note: More recent Android releases replace implicit permissions with permission declarations.
This table lists the importing library versions and the declared permissions.
| Importing this library version | Declares this permission in the manifest |
|---|---|
| targetSdkVersion WRITE_EXTERNAL_STORAGE | |
| targetSdkVersion WRITE_EXTERNAL_STORAGE , READ_PHONE_STATE | |
| Declared WRITE_EXTERNAL_STORAGE | READ_EXTERNAL_STORAGE |
| targetSdkVersion READ_CONTACTS permission | READ_CALL_LOG |
| targetSdkVersion WRITE_CONTACTS permission | WRITE_CALL_LOG |
Handling Manifest Merge Build Errors
During the build process, the manifest merge process stores a record of each merge transaction in the manifest-merger-
-report.txt file in the module build/outputs/logs folder. A different log file is generated for each of the module’s build variants.
When a manifest merge build error occurs, the merge process records the error message describing the merge conflict in the log file. For example, the android:screenOrientation merge conflict between the following manifests causes a build error.
Источник
Публикация приложения
Создание подписанного apk
После создания приложения, его тестирования и отладки мы можем приступить к его публикации. Суть публикации заключается в создании файла с расширением .apk, которое будет представлять приложение, и его последующее размещение в Google Play Market или на других внешних сайтах. По умолчанию в процессе отладки и создания приложения файл apk уже создается, и мы можем его найти в папке проекта по пути Название_проекта\app\build\outputs\apk. По умолчанию файл называется app-debug.apk и представляет debug-версию.
Но для полноценно публикации данного файла может оказаться недостаточно. И нам еще дополнительно надо произвести некоторую подготовку проекта к релизу. Для это следует указать в файле манифеста у элемента установлены атрибуты android:versionCode и android:versionName . Также в файле манифеста элемент не должен содержать атрибута android:debuggable
Кроме того, на этом этапе можно установить иконку для приложения, которая будет отображаться на рабочем экране гаджета, название приложения (атрибут android:label у элемента), а также можно задать лицензионное соглашение.
В файле манифеста также следует определить название пакета (атрибут package элемента ), которое будет использоваться для приложения в дальнейшем. По умолчанию при разработке в Android Studio пакеты приложений начинаются с com.example. Не стоит оставлять данное название, так как название пакета будет служить уникальным идентификатором вашего приложения. Например, ниже в моем случае названием пакета служит «com.maverics.eugene.telephonelist»:
При этом если в файлах кода java название пакета в начале файла также должно соответствовать пакету приложения.
Установка требований
На этапе подготовки к релизу также можно установить требования к API. Например, наше приложение имеет определеную минимальную версию ОС Android, поэтому мы можем установить в файле манифеста соответствующие атрибуты у элемента
android:minSdkVersion — минимальная версия Android
android:targetSdkVersion — оптимальная версия API
android:maxSdkVersion — максимальная версия системы
Например, пусть минимальная версия Jelly Beans 4.1.2, а оптимальная KitKat 4.4.4:
Подпись приложения
Когда все уже готово, приложение для Android должно быть подписано сертификатом, благодаря которому можно идентифицировать автора приложения. Когда мы тестируем приложение, устанавливая его через Android Studio на устройство, то оно подписывается автоматически. Но для создания релиз-версии нам надо произвести дополнительно ряд действий.
При создании сертификата следует помнить, что при обновлении приложения система будет сравнивать сертификаты старой и новой версии. И обновление будет происходить, если сертификаты обоих версий совпадут. Но если новая версия будет подписана новым сертификатом, то приложение будет расцениваться как совершенно новое, никак не связанное со старой версией и представляющее совершенно другое приложение. В этом случае чтобы его установить, новая версия должна будет иметь другой название пакета, нежели старая.
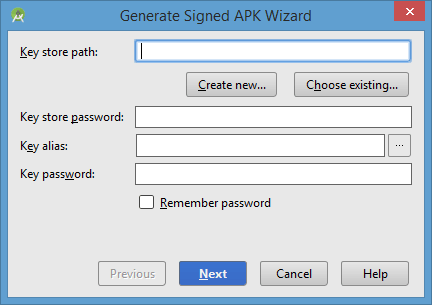
Во-первых, в Android Studio выберем в меню пункт Build -> Generate Signed APK . После этого нам откроется окно мастера:
Нажмем на кнопку Create new. . После этого нам откроется окно создания ключа:
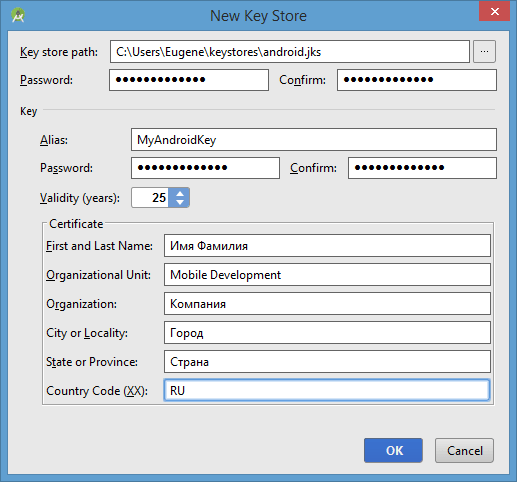
Введем в поле Key store path путь к файлу сетификата, который будет создан. Если указанной папки не существует, то ее надо создать или определить существующую папку.
В поле Password/Confirm указываем пароль.
В поле Alias указываем псевдоним. Можно поставить произвольное название.
В поле First and Last Name вписываем имя и фамилию. И далее пишим подразделение, организацию, город, страну и код страны.
В конце нажимаем OK.
После этого автоматически обновится первое окошко:
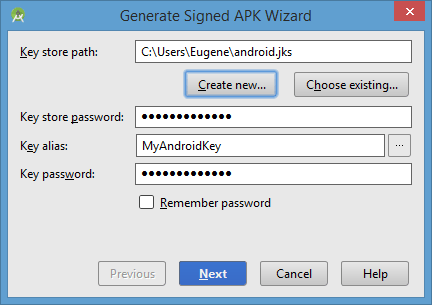
Далее нажмем на кнопку Next:
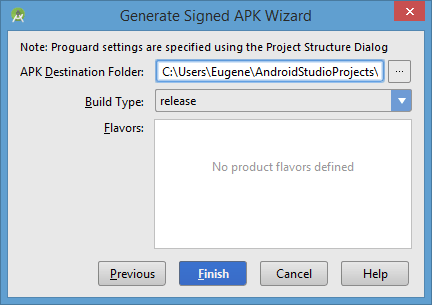
Финальное окно покажет нам путь к каталогу, где будет находиться подписанное приложение apk в release-версии. Нажмем на Finish.
Теперь по указанному пути можно будет найти подписанный apk, который будет иметь название app-release.apk:
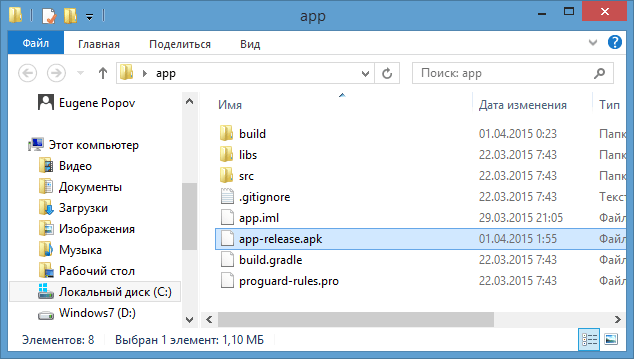
Мы можем переименовать файл, сохранив его расширение и выложить в Play Market или на любой сайт или сразу загрузить на мобильное устройство. После загрузки на телефон/планшет достоточно нажать на него, и с помощью стандартного установщика пакетов приложение будет установлено. Правда, здесь также надо учитывать, что если мы устанавливаем приложение не из Play Market, то в настройках надо разрешить установку из других источниках — Безопасность->Неизвестные источники (Разрешить установку приложений из других источников)
Источник


