- Material design android maven
- Создание Android-проектов с использованием Maven
- Что вы создадите
- Что вам потребуется
- Как проходить этот урок
- Настройка проекта
- Создание структуры каталогов
- Создание Android манифеста
- Установка Maven
- Настройка простой Maven сборки
- Сборка Android кода
- Описание записимостей
- Пересборка Android кода с зависимостями
- Migrating to Material Components for Android
- From Design Support Library 👉 MDC 1.0.0 👉 MDC 1.1.0 and beyond
- A simplified theming example
- Migrating from the Support Library to Jetpack
- Updating to MDC 1.0.0
- Changing your theme(s)
- Example updates
- Button changes
- MDC widgets and auto-inflation
- Updating to MDC 1.1.0
- Some unexpected changes and common issues
- Text field changes
- Prefer MDC styles and widgets
- Example updates
- Color
- New attributes
- Example updates
- Typography
- New TextAppearance styles/attributes
- Example updates
- Shape
- ShapeAppearance styles/attributes
- Widget backgrounds
- Example updates
Material design android maven
Copy raw contents
Getting started with Material Components for Android
1. Migration guidance
Take a look at our guide and codelab to help you migrate your codebase using Material Components for Android to the new Material 3 system.
Additionally, if you are still using the legacy Design Support Library, take a look at our legacy guide to help you migrate your codebase to Material Components for Android.
2. Maven library dependency
Material Components for Android is available through Google’s Maven Repository. To use it:
Open the build.gradle file for your application.
Make sure that the repositories section includes Google’s Maven Repository google() . For example:
Add the library to the dependencies section:
Visit Google’s Maven Repository or MVN Repository to find the latest version of the library.
Note: In order to use the new Material3 themes and component styles, you must depend on version 1.5.0-alpha04 or later.
New Namespace and AndroidX
If your app currently depends on the original Design Support Library, you can make use of the Refactor to AndroidX… option provided by Android Studio. Doing so will update your app’s dependencies and code to use the newly packaged androidx and com.google.android.material libraries.
If you don’t want to switch over to the new androidx and com.google.android.material packages yet, you can use Material Components via the com.android.support:design:28.0.0 dependency.
Note: You should not use the com.android.support and com.google.android.material dependencies in your app at the same time.
3. Android 12 compilation
In order to use the latest versions of Material Components for Android and the AndroidX Jetpack libraries, you will have to install the latest version of Android Studio and update your app’s compileSdkVersion to 31 .
As part of migrating to Android 12, you’ll need to add android:exported to any activities, services, or broadcast receivers in your manifest that use intent filters (see the documentation). Consider reading through the Android 12 app migration guide and behavior changes for more tips and information.
4. Java 8 compilation
The latest AndroidX Jetpack libraries now require your app to be compiled with Java 8. See the Java 8 language features and APIs documentation for more information on Java 8 support and how to enable it for your app.
Use AppCompatActivity to ensure that all the components work correctly. If you are unable to extend from AppCompatActivity , update your activities to use AppCompatDelegate . This will enable the AppCompat or Material versions of components to be inflated (depending on your theme), among other important things.
6. Material3 theme inheritance
We recommend you perform an app-wide migration by changing your app theme to inherit from a Material3 theme. Be sure to test thoroughly afterwards, since this may change the appearance and behavior of existing layout components.
Check out the new Material Theme Builder which can be used to generate your Material3 app theme, with all of the Material Color System roles filled out based on your brand colors.
Note: If you can’t change your theme, you can continue to inherit from an AppCompat or MaterialComponents theme and add some new theme attributes to your theme. See the AppCompat or MaterialComponents themes section for more details.
Material3 themes
Here are the Material3 themes you can use to get the latest component styles and theme-level attributes, as well as their MaterialComponents equivalents when applicable.
| Material3 | MaterialComponents |
|---|---|
| Theme.Material3.Light | Theme.MaterialComponents.Light |
| Theme.Material3.Light.NoActionBar | Theme.MaterialComponents.Light.NoActionBar |
| Theme.Material3.Dark | Theme.MaterialComponents |
| Theme.Material3.Dark.NoActionBar | Theme.MaterialComponents.NoActionBar |
| Theme.Material3.DayNight | Theme.MaterialComponents.DayNight |
| Theme.Material3.DayNight.NoActionBar | Theme.MaterialComponents.DayNight.NoActionBar |
| N/A | Theme.MaterialComponents.Light.DarkActionBar |
| N/A | Theme.MaterialComponents.DayNight.DarkActionBar |
Update your app theme to inherit from one of these themes:
For more information on how to set up theme-level attributes for your app, take a look at our Theming guide, as well as our Dark Theme guide for why it’s important to inherit from the DayNight theme.
Material3 themes enable a custom view inflater, which replaces default components with their Material counterparts. Currently, this replaces the following XML components:
AppCompat or MaterialComponents Themes
You can incrementally test new Material components without changing your app theme. This allows you to keep your existing layouts looking and behaving the same, while introducing new components to your layout one at a time.
However, you must add the following new theme attributes to your existing app theme, or you will encounter ThemeEnforcement errors:
7. Add Material components
Take a look at our documentation for the full list of available Material components. Each component’s page has specific instructions on how to implement it in your app.
Let’s use text fields as an example.
Implementing a text field via XML
The default outlined text field XML is defined as:
Note: If you are not using a theme that inherits from a Material3 theme, you will have to specify the text field style as well, via style=»@style/Widget.Material3.TextInputLayout.OutlinedBox»
Other text field styles are also provided. For example, if you want a filled text field in your layout, you can apply the Material3 filled style to the text field in XML:
Material Components for Android welcomes contributions from the community. Check out our contributing guidelines as well as an overview of the directory structure before getting started.
Источник
Создание Android-проектов с использованием Maven
Этот урок освещает создание простого Android проекта с Maven.
Что вы создадите
Вы создадите Android приложение, которое отображает время дня, а потом соберете его Maven’ом.
Что вам потребуется
- Примерно 15 минут свободного времени
- Любимый текстовый редактор или IDE
- JDK 6 и выше
- Android SDK
- Android устройство или эмулятор
Как проходить этот урок
Как и большинство уроков по Spring, вы можете начать с нуля и выполнять каждый шаг, либо пропустить базовые шаги, которые вам уже знакомы. В любом случае, вы в конечном итоге получите рабочий код.
Чтобы начать с нуля, перейдите в Настройка проекта.
Чтобы пропустить базовые шаги, выполните следующее:
- Загрузите и распакуйте архив с кодом этого урока, либо кнонируйте из репозитория с помощью Git: git clone https://github.com/spring-guides/gs-maven-android.git
- Перейдите в каталог gs-maven-android/initial
- Забегая вперед, установите Maven
Когда вы закончите, можете сравнить получившийся результат с образцом в gs-maven-android/complete .
Настройка проекта
Для начала, вам необходимо настроить Android проект для сборки Maven. Т.к. основное внимание данного урока уделено Maven, сделайте проект настолько простым, насколько это возможно. Если вы впервые работаете с Android проектами, установите и настройте ADT.
Создание структуры каталогов
В выбранном вами каталоге проекта создайте следующую структуру каталогов; к примеру, командой mkdir -p src/main/java/org/hello для *nix систем:
Создание Android манифеста
Android Manifest содержит всю информацию, необходимую для запуска Android приложения и оно не будет собираться без него.
Добавьте текстовую строку. Текстовые строки могут ссылаться на файлы приложения или другие источники.
Теперь определите визуальную структуру пользовательского интерфейса вашего приложения.
В директории src/main/java/org/hello вы можете создать любой Java класс, какой захотите. В соответствии с задачей урока, создайте следующий класс:
Установка Maven
Теперь у вас есть проект, который вы можете собрать с помощью Maven. Следующим шагом будет установка Maven.
Загрузите Maven как zip-файл с http://maven.apache.org/download.cgi. Достаточно только бинарники, поэтому смотрите ссылку на apache-maven-
Загрузите и распакуйте файл, затем добавьте bin каталог в переменную окружения PATH.
Чтобы протестировать устаноку Maven, запустите mvn из командной строки:
Если все хорошо, то вы должны увидеть информацию об установке, похожую на эту:
Теперь у вас есть установленный Maven.
Настройка простой Maven сборки
Теперь, когда Maven установлен, вам необходимо создать определение Maven проекта через XML-файл pom.xml. Помимо всего остального, этот файл содержит имя проекта, версию и зависимости, которые он имеет от внешних библиотек.
Создайте файл с названием pom.xml в корне проекта и поместите в него следующее содержимое:
Это простейший pom.xml файл, который необходим для сборки Android проекта. Он состоит из следующих настроек проекта:
— Как проект будет собран, в данном случае как Android APK
Секция dependencies определяет список зависимостей проекта. В частности, она определяет единственную зависимость от Android библиотеки. В элементе dependency зависимость определяется деревом дочерних элементов:
В данном случае элемент имеет значение provided . Зависимости этого типа необходимы для компиляции кода проекта, но будут доступны и во время выполнения кода. К примеру, Android API всегда доступен, когда Android приложение запущено.
Секция определяет дополнительную конфигурацию для сборки приложения. В этой секции есть секция
, которая содержит список плагинов, которые добавляют функциональность процессу сборки. Здесь определена конфигурация для Android Maven Plugin. Для этой зависимости также имеются элементы , и . Плагин также содержит следующие элементы:
- — Конфигурация плагина. Здесь вы определяете, с каким Android Platform SDK будет собираться проект
- — Комбинация указания значений true и apk для
передает управление [Android Maven Plugin] в процессе сборки.
На текущий момент вы определили пока минимальный Maven проект.
Сборка Android кода
Сейчас Maven готов к сборке. Вы можете выполнить выполнить несколько задач сборки уже сейчас, включая компиляцию кода проекта, создание библиотеки пакета(JAR файл) и установить библиотеку в локальный репозиторий Maven зависимостей.
Эта команда запускает Maven, говоря ему выполнить задачу compile. Когда он завершит её, вы должны найти скомпилированные .class файлы в каталоге target/classes.
Т.к. вы вряд ли захотите работать или распостранять .class файлы непосредственно, взамен этого возможно запустить package задачу:
Эта задача компилирует ваш Java код, запускает тесты и упаковывает код в JAR файл каталоге target. Имя JAR файла состоит из значений и проекта. К примеру, исходя из содержимого pom.xml файла, отображенного ранее, JAR файл будет называться gs-maven-android-0.1.0.jar.
Т.к. вы установили значение элемента
в «apk», результатом будет АРК файл в target каталоге в дополнение к JAR файлу. Этот АРК файл является упакованным Android приложением, готовым к развертыванию на устройстве или эмуляторе.
Android Maven плагин предоставляет несколько Maven задач, которые вы можете использовать в различных фазах процесса сборки или взаимодействия с устройством и эмулятором. Список доступных задач вы можете увидеть, выполнив команду:
Описание записимостей
Простой Hello World пример полностью самодостаточен и не зависит от каких-либо дополнительных библиотек. Однако, большинство приложений, зависят от внешних библиотек, предоставляющих некоторую функциональность.
К примеру, предположим, что вы хотите, чтобы приложение отображало текущие дату и время. Несмотря на то, что вы фактически можете использовать дату и время из нативных Java библиотек, возможно использовать более интересные для этого вещи, которые предоставляют Joda Time библиотеки.
Для этого, измените HelloActivity.java как показано ниже:
В этом примере используемый Joda Time LocalTime класс возвращает и отображает текущее время.
Если вы запустите mvn package сейчас, то сборка завершится с ошибкой, потому что вы не описали Joda Time как компилируемую зависимость в сборке. Для исправления этой ошибки, просто добавьте следующие строки в секцию файла pom.xml.
Пересборка Android кода с зависимостями
Теперь, если вы выполните mvn compile или mvn package , то Maven должен разрешить Joda Time зависимость из Maven Central репозитория и успешно собрать проект.
Ниже приведена полная версия pom.xml файла:
Поздравляем! Вы только что создали простой, но эффективный Maven проект с целью сборки Android проектов.
Источник
Migrating to Material Components for Android
From Design Support Library 👉 MDC 1.0.0 👉 MDC 1.1.0 and beyond

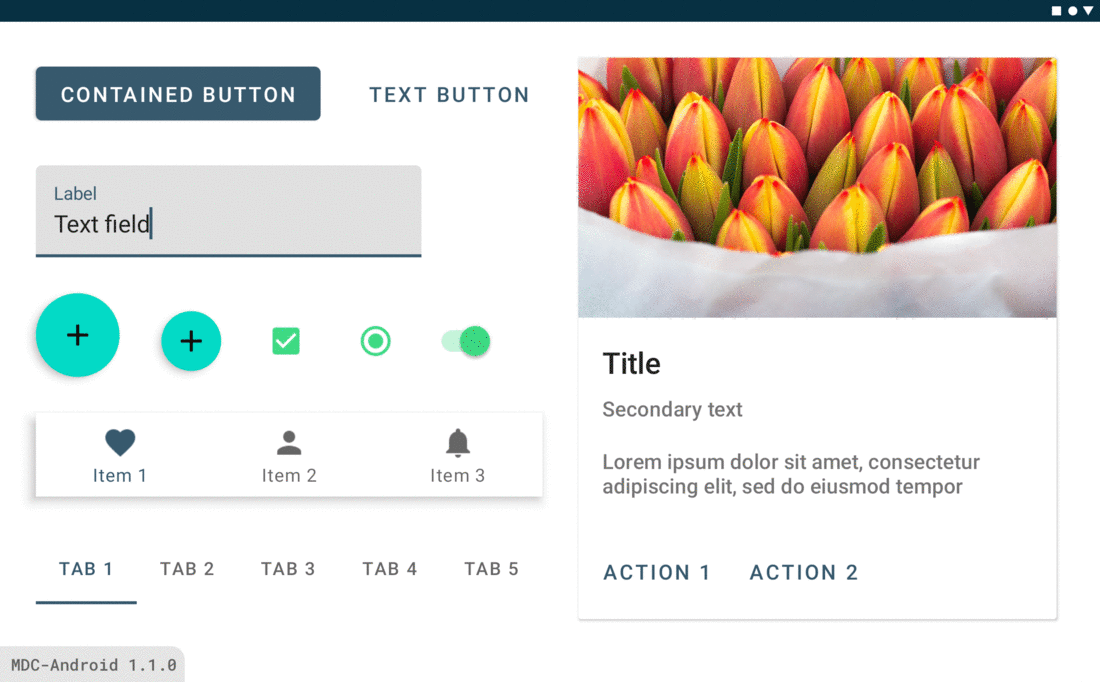
We recently announced Material Design Components (MDC) 1.1.0 — a library update that brings Material Theming, new widgets, dark theme support and other exciting features to your Android app.
MDC replaces the Design Support Library. This guide will show you how to migrate your codebase so you can make use of the new attributes, styles, and widgets. If you’re on MDC 1.0.0 this also provides the necessary migration steps to 1.1.0 . Be sure to check out our corresponding video guide as well!
A simplified theming example
This guide uses a simplified app to demonstrate the migration process. It uses an AppCompat theme, widgets from the Design Support Library (including a button with a custom background), and various other elements that require migration. We’ll start with an app theme which uses the traditional AppCompat template:

Migrating from the Support Library to Jetpack

Before you can use MDC, you need to migrate from the Support Library to Android Jetpack. Jetpack uses the new androidx.* namespace and splits the previous Support Library packages into separately maintained, semantically versioned libraries, providing feature parity as well as new libraries. MDC is built with AndroidX libraries so migration is mandatory.
To migrate to AndroidX, we recommend following the official developer documentation or watching the “Migrating to AndroidX: The time is right” talk from Android Dev Summit ’19. The ‘Refactor > Migrate to AndroidX’ tool in Android Studio will refactor your Design Support Library dependency to MDC.
Note: Jetpack and MDC artifacts with version 1.0.0 are binary compatible with the Support Library 28.0.0 artifacts. If you’re not on version 28 then we recommend upgrading to this first and then migrating.
Updating to MDC 1.0.0

If you used the Android Studio ‘Refactor > Migrate to AndroidX’ tool during Jetpack migration, your Design Support Library dependency should have mapped to MDC 1.0.0 and you can skip this section.
If not, you will need to manually update your dependency:
You will also need to change the package namespace of any usages of the Design Support Library classes (in XML layouts and in code) from android.support.design.* to com.google.android.material.* . To do so, take a look at the class mapping table.
Changing your theme(s)
You need to ensure that your app theme inherits from a Material Components theme. The same applies to any additional themes and theme overlays you may have in your project.
If you were previously using an AppCompat theme variant, the MDC-Android theme variants map one-to-one with these. In most cases, simply swap out the AppCompat portion of the parent with MaterialComponents .
See the full theme and theme overlay mapping tables below:
Example updates

Button changes
Having changed our dependency to MDC 1.0.0 and our app theme to inherit from Theme.MaterialComponents.* , we can observe some unexpected changes to buttons in our example app. We have lost our custom background! They now mostly make use of the green accent color and have wider letter spacing in their text labels.

To understand why this has happened, we need to start by taking a look at how we’ve added these buttons in our layout (as framework s):
So, what’s going on? 🤔
MDC widgets and auto-inflation
Like AppCompat, MDC will replace some framework widgets with MDC equivalents at inflation time. This makes it possible to ship new features and bugfixes without having to swap all your declarations for a new type. This is done via MaterialComponentsViewInflater , an extension of AppCompatViewInflater .
See the full widget auto-inflation mapping table below:
Note: In MDC 1.0.0 only Button s were replaced. The other widgets above were added in subsequent versions of the library.
Unlike AppCompatButton , MaterialButton did not support custom backgrounds until release 1.2.0-alpha06 of MDC-Android. This is covered in more detail, along with a workaround, in the “Shape” section below.
We will keep this as is for now.
Updating to MDC 1.1.0
A lot has changed in MDC between 1.0.0 and 1.1.0 ! The new features include:
- Full Material Theming support for color, typography, and shape
- Dark theme support
- Android 10 gesture navigation insets in widgets
- New widgets like the extended FAB, date picker, badges, and toggle buttons
- Accessibility improvements, bug fixes, and more
We’re now ready to bump our MDC dependency version to 1.1.0 :
Note: Some AndroidX dependencies, such as AppCompat, may also need updating at this time. While not strictly required, we recommend updating to the latest stable versions if possible.
Some unexpected changes and common issues
MDC 1.1.0 changes some default widget styling to better comply with the Material Design guidelines. After upgrading you may, however, notice some unexpected changes to certain widget colors and other attributes.

In our example above, buttons have changed once again, the colors of text and icons have changed, FABs are now a shade of teal, and the text field looks entirely different. Oh dear! Don’t worry, your theme is likely missing some of the important MDC attributes while also having some AppCompat or framework attributes you no longer need. Let’s understand these issues by going through some common migration scenarios.
Text field changes
The default style for text fields has changed in MDC to a new, improved version backed by user research.

We recommend sticking with this version for improved usability and configurability. However, we realize that this may not immediately fit with your brand and design system.
To revert back to the legacy text field, adjust the style in your layout to use the Design Support Library version:
Alternatively, you can make this the default style for all text fields in your theme(s):

Prefer MDC styles and widgets
As we’ve seen above, widgets previously in the Design Support Library have since become part of MDC. In most cases there are new Widget.MaterialComponents.* styles that replace Widget.Design.* styles, along with new attributes that enable additional features. While opting out is possible, we recommend adopting the new MDC styles.
For components that were not part of the Design Support Library, in some cases there is now a Material version of the class. We saw this above with AppCompatButton and MaterialButton . We recommend using MDC classes over AppCompat or framework equivalents, if available. These widgets use updated Material Design design guidelines by default and support the full set of MDC attributes, which enable Material Theming and other features.
There are a few scenarios you should consider:
- Widgets used directly in layouts should change to MDC versions (see the “MDC widgets and auto-inflation” section above to see which widgets can be kept as framework tags)
- Any styles, default styles and default style attributes should change to MDC versions
- Any widgets used programmatically or as parents for custom classes should change to MDC versions
See the full widget and style mapping tables below:
Be sure to also check out the full list of Android components for widgets new to MDC as well as usage documentation.
Example updates
Replace widgets with MDC versions
In our example, we need to change some of the widgets in our layout to use MDC versions:
Color
New attributes
The MDC color palette draws directly from the Material Design color system.
As a result of the shared history between MDC-Android, AppCompat and the framework, the resulting set of color attributes comprises the following:
- Existing attributes from the framework that are appropriately named (eg. android:colorBackground )
- Existing attributes from AppCompat that are appropriately named (eg. colorPrimary and colorError )
- New attributes introduced by MDC (eg. colorSurface , colorOnPrimary , etc.)


These attributes are used by MDC widgets to tint their backgrounds, text, icons and more. Knowing which widgets use which colors requires inspecting the default widget styles in the source code.
There are also colors from AppCompat and the framework that still exist but no longer apply to this new system. The Theme.MaterialComponents.* themes do their best to backport these old attributes for widgets that still rely on them, eg.
However, you should consider these attributes deprecated; either use a more appropriate MDC attribute or phase them out.
See the full color attribute mapping table below:
Example updates
Update to new color attributes
In our example, we need to update our app theme to override the preferred color attributes:
Note: We have not overridden all of the color attributes and are relying on the defaults for colorSurface , colorError , etc, which is perfectly acceptable. We have also not specified a dark theme palette.
Use “on” color attributes where appropriate
We should also switch from using an @color to one of the new “on” color attributes for our contained button text color:
Typography
New TextAppearance styles/attributes
The MDC type scales draw directly from the Material Design type system.
A new set of TextAppearance.MaterialComponents.* styles and corresponding textAppearance* theme attributes have been introduced, which replace existing AppCompat / framework styles.

These attributes are used by MDC widgets to style text. Knowing which widgets use which type scales requires inspecting the default widget styles in the source code.
See the full type style and attribute mapping table below:
Example updates
Update to new type attributes
In our example, we need to update the TextView s within the card in the layout to use the preferred type attributes:
Customize type scales with font family
We can also optionally override type scales in our app theme to use a custom font family, with XML or downloadable fonts via Android Studio:
Note: For this example, we have only overridden some of the type scales. If you’re using a custom font, we recommend overriding all of the type scales for brand consistency.

Shape
ShapeAppearance styles/attributes
The Material Design shape system is a way to apply treatments to the corners of MDC widgets, split into small, medium and large component categories.
This takes the form of Android ShapeAppearance.* styles with corresponding theme attributes. They include a cornerFamily — rounded or cut — and cornerSize* as a dimension.

These attributes are used by MDC widgets to style their backgrounds. Knowing which widgets apply to which shape categories requires inspecting the default widget styles in the source code.
Widget backgrounds
The class that implements this functionality is MaterialShapeDrawable . All MDC widgets use this drawable as their background by default and you can also consider using it for custom views. It handles shape theming, backported shadow rendering, dark theme elevation overlays and more.
As a result, we advise against using android:background with custom XML drawables on MDC widgets as this will override the MaterialShapeDrawable . You may notice that the default styles for most MDC widgets specify
to specifically avoid this. Rather, prefer using shapeAppearance / shapeAppearanceOverlay and backgroundTint attributes to adjust background shape and color.
However, there are exceptions:
- As mentioned above, MaterialButton ignoredandroid:background until release1.2.0-alpha06of MDC-Android. If you require this functionality while using earlier versions of the library, we advise explicitly using AppCompatButton in your layout(s).
- MaterialShapeDrawable doesn’t support gradients. If your brand requires this, using android:background with a GradientDrawable is your best bet.
Example updates
Remove background attrs that do not work with shape theming
In our example, we can remove some widget attributes that are now handled by shape theming:
Customize shape with corner family and size
We can also optionally override shape styles in our app theme to express our brand:
Источник


