- Revive or restore a Mac with Apple silicon using Apple Configurator 2
- What does a revive do to your Mac?
- What does a restore do to your Mac?
- Before you begin
- How the revive and restore processes work
- Step 1: Connect the Mac computers
- Step 2: Prepare the Mac you want to revive or restore
- Step 3: Revive the firmware and install the latest recoveryOS
- Step 4: Restore the firmware, erase all data and reinstall the latest version of recoveryOS and macOS
- If your computer doesn’t recognize your iPhone, iPad, or iPod
- Additional steps for Mac
- See your Apple Pay transaction history
- See your Apple Pay transaction history on your iPhone
- See your Apple Pay transaction history on your Apple Watch
- See your Apple Pay transaction history on your Mac with Touch ID or iPad
- Dispute a credit or debit card charge made using Apple Pay
- May saw the apple
- New MacBook Pro
- Which Mac is right for you?
- MacBook Air
- 8-core
- 8-core
- 2.8 lb.
- MacBook Pro 13”
- 8-core
- 8-core
- 3.0 lb.
- MacBook Pro 14” and 16”
- 10-core
- 32-core
- 14.2” or 16.2”
- 3.5 lb. or 4.7 lb.
- iMac 24”
- 8-core
- 8-core
- iMac 27”
- 10-core
- Mac Pro
- 28-core
- Mac mini
- 8-core
- 8-core
- Let the holidays be filled with great gifts.
- Get 3%
- Accessories
- Explore Mac accessories.
- Apple Trade In
- Get credit toward a new Mac.
- Just trade in your eligible computer for credit or recycle it for free. It’s good for you and the planet. 9
- Free delivery
- Get 3% Daily Cash back with Apple Card
- Get help buying
- What makes a Mac a Mac?
- Why Mac
- Incredible power. Incredibly simple.
- Continuity
- All your devices. One seamless experience.
- macOS Monterey
- High powered meets “Hi everyone.”
- Built-in Apps
- Pro Apps
- Get more out of Mac
- Today at Apple
- Virtual Sessions
- Learn the basics of using Mac live with Apple Creatives.
- Apple One
- Apple TV Plus
- Apple Pay
Revive or restore a Mac with Apple silicon using Apple Configurator 2
In very rare circumstances, such as a power failure during a macOS update or upgrade, a Mac may become unresponsive and so the firmware must be revived or restored.
Important: First try reviving the computer. If that fails or if you can’t start the Mac from the startup volume or the recoveryOS, you must restore the firmware and erase the internal flash storage.
What does a revive do to your Mac?
A revive updates the firmware and updates recoveryOS to the latest version. A revive is designed to not make any changes to the startup volume, the user’s data volume, or any other volumes. User data may be retained if recoverable.
What does a restore do to your Mac?
A restore updates the firmware, updates recoveryOS to the latest version, and erases and installs the latest version of macOS on your internal storage. When this process is complete, any data on any internal volumes is unrecoverable.
You must restore the firmware and erase the internal flash storage if:
Reviving the firmware is unsuccessful
You can’t start the Mac from the startup volume or the recoveryOS
Before you begin
These revive and restore instructions cover the following Mac computers with Apple silicon:
MacBook Pro (16-inch, 2021)
MacBook Pro (14-inch, 2021)
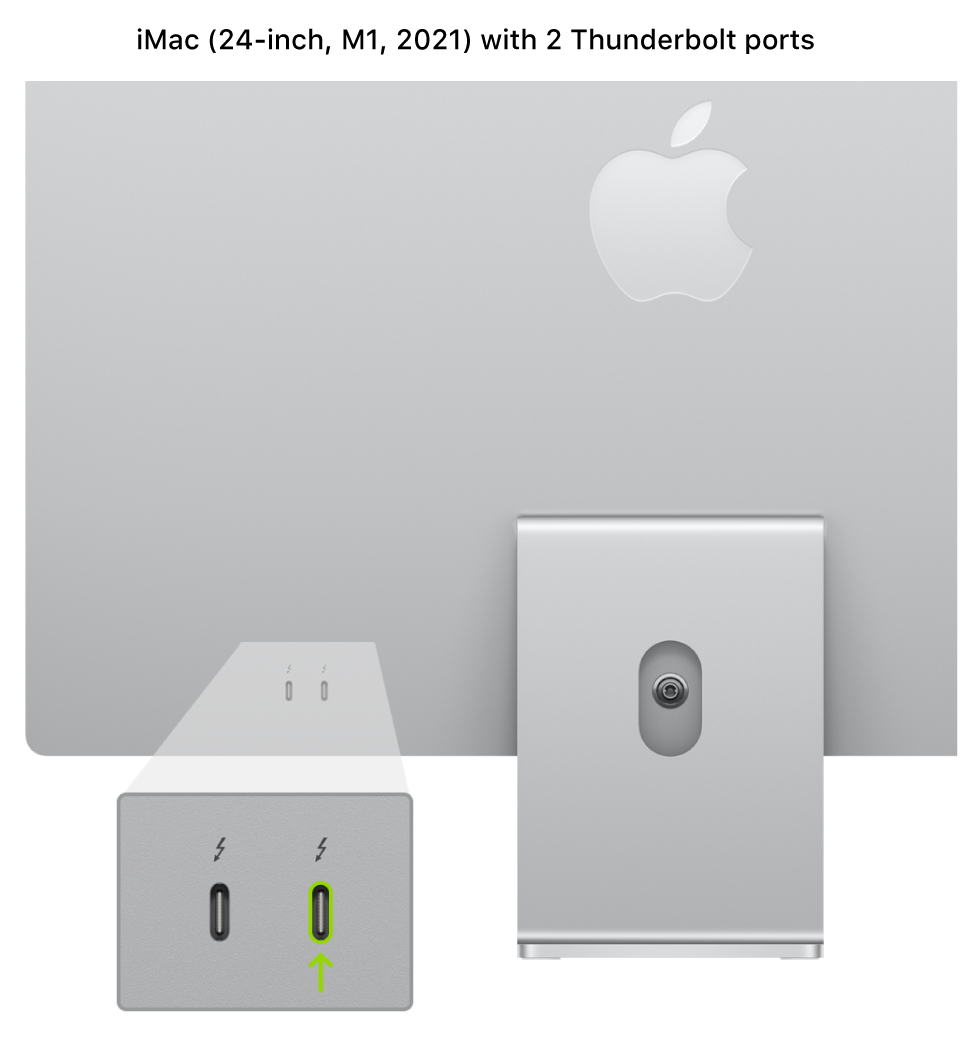
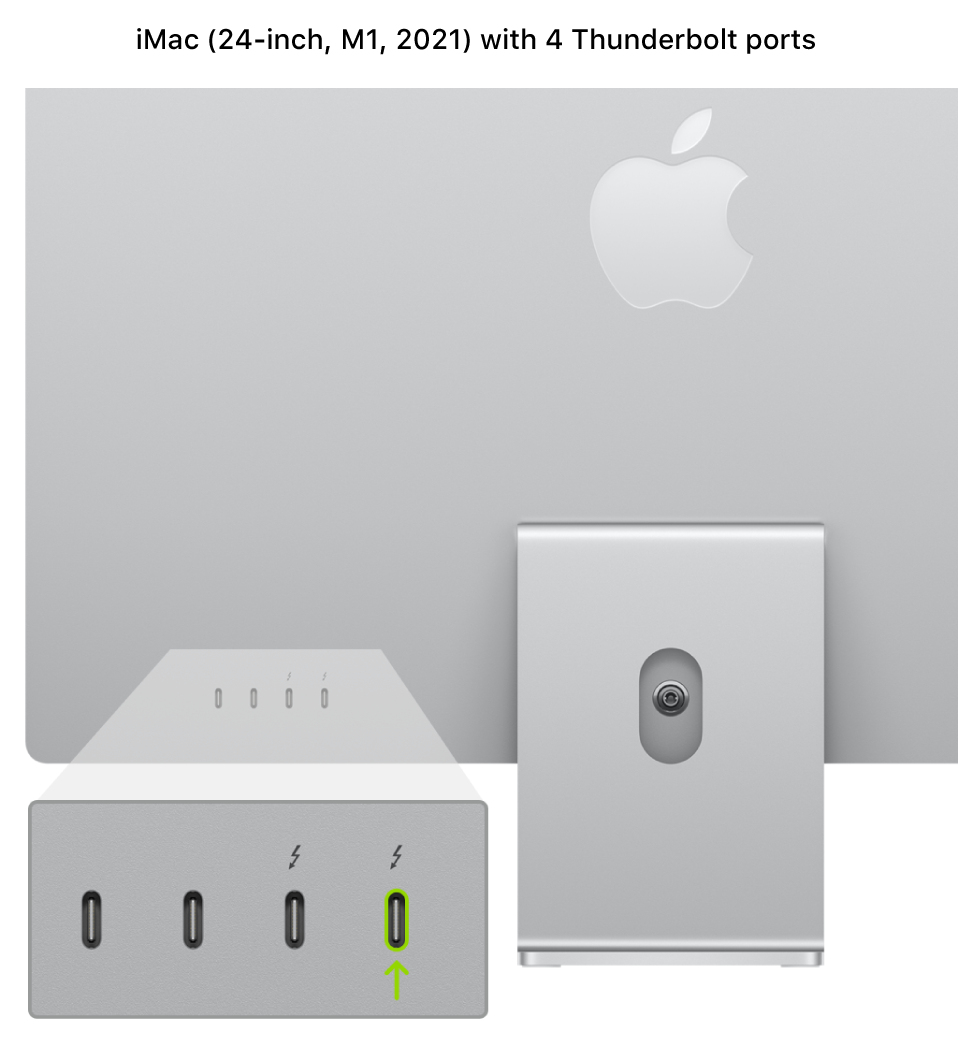
iMac (24-inch, M1, 2021)
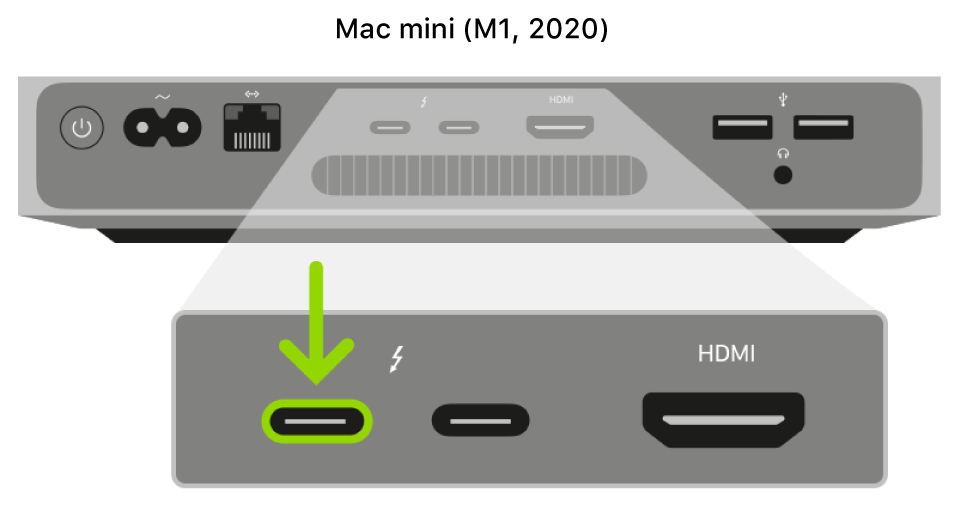
Mac mini (M1, 2020)
MacBook Pro (13-inch, M1, 2020)
MacBook Air (M1, 2020)
Make sure you have:
The latest version of Apple Configurator 2 installed on a Mac running macOS 10.15.6 or later
You may need to configure your web proxy or firewall ports to allow all network traffic from Apple devices to Apple’s network 17.0.0.0/8. For more information on the ports used by Apple products, see the Apple Support article Use Apple products on enterprise networks. For more information on whether your network uses a web proxy or firewall, consult your router manual or your internet provider.
A supported USB-C to USB-C charge cable, such as the one sold by Apple (may not be available in all countries or regions) or a supported USB-A to USB-C cable
The USB-C cable must support both power and data. Thunderbolt 3 cables aren’t supported.
How the revive and restore processes work
The revive and restore processes involve the following steps:
Step 1. Plug the Mac computers together with a supported USB-C cable, locate Apple Configurator 2 in the Applications folder or in Launchpad, then launch Apple Configurator 2 on the first Mac.
Step 2. Restart the second Mac using a special key sequence. The key sequence varies according to the type of Mac you want to revive or restore.
Step 3. Use Apple Configurator 2 to revive the Mac.
Step 4. If a revive is unsuccessful, you can use Apple Configurator 2 to restore the Mac.
Step 1: Connect the Mac computers
Make sure your first Mac is plugged into a power source and started.
Plug in the USB-C cable (along with any adapters needed) and connect the two Mac computers.

Launch Apple Configurator 2  .
.
Step 2: Prepare the Mac you want to revive or restore
If reviving or restoring an iMac (24-inch, M1, 2021)
1. Disconnect the iMac from power.
2. Plug the USB-C cable into the Thunderbolt port closest to the stand.
3. While holding down the power button, connect the iMac to power and continue to hold the power button for about 3 seconds.
Note: You won’t see any screen activity from the iMac you want to revive or restore.
If reviving or restoring a Mac mini
1. Connect a monitor to your Mac mini (so you can see when the process is complete).
2. Disconnect the Mac mini from power for at least 10 seconds.
3. Press and hold the power button.
4. Reconnect power while still holding the power button.
5. Release the power button.
The status indicator light should turn amber, and a DFU icon should appear in Apple Configurator 2 on the Mac mini .
Note: You won’t see any screen activity from the Mac mini you are trying to revive or restore.
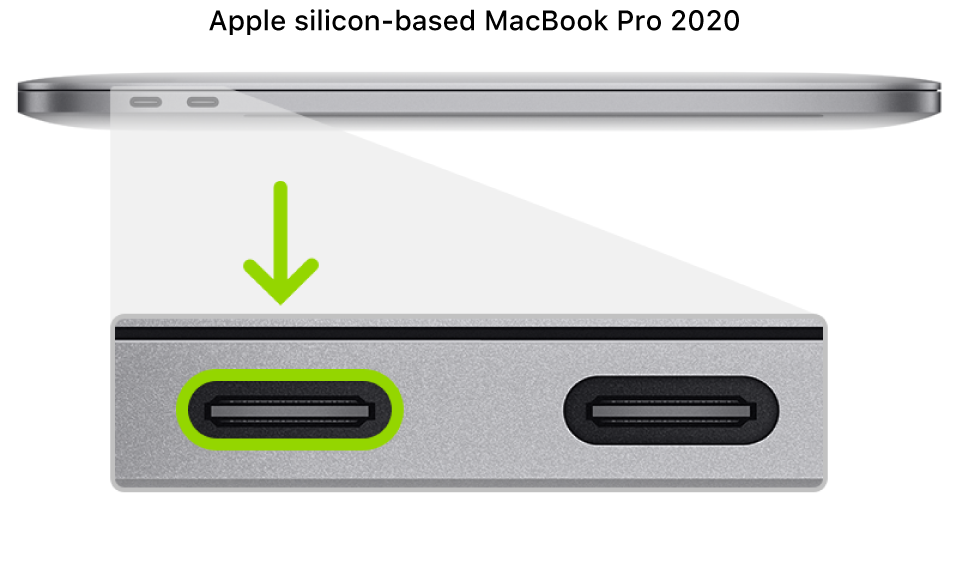
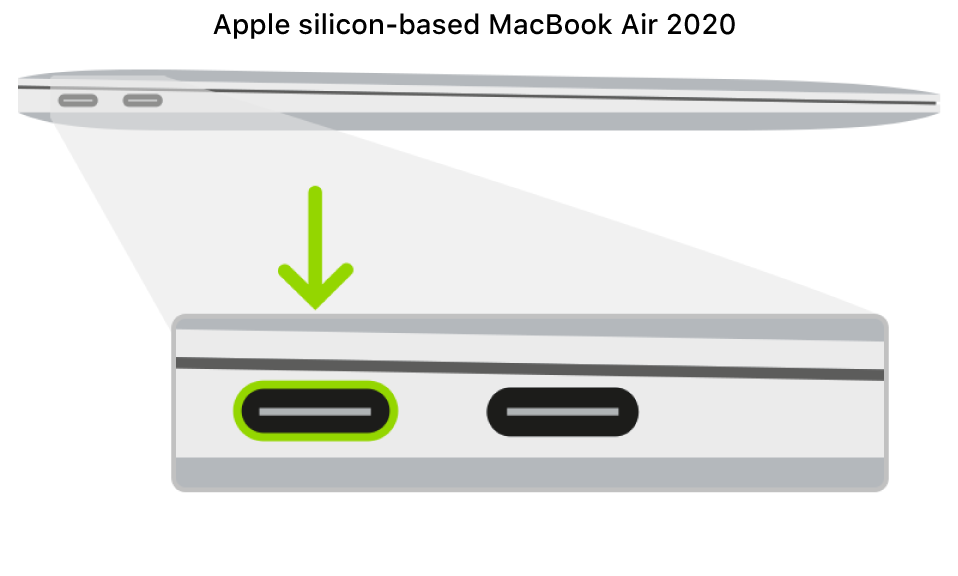
If reviving or restoring an Apple notebook computer
1. Press the power button.
2. While holding down the power button, at the same time press all three of the following keys for about 10 seconds:
The right Shift key
The left Option key
The left Control key
3. After 10 seconds, immediately release the three keys but continue to hold down the power button until a DFU icon appears in Apple Configurator 2 on the first Mac.
Note: You won’t see any screen activity from the MacBook Air or MacBook Pro you’re trying to revive or restore. If the MacBook Pro uses a MagSafe connector, you won’t see the LED charging light.
Step 3: Revive the firmware and install the latest recoveryOS
In the Apple Configurator 2 window on the first Mac, select the DFU icon of the Mac whose chip firmware you want to revive and whose recoveryOS you want updated to the latest version.
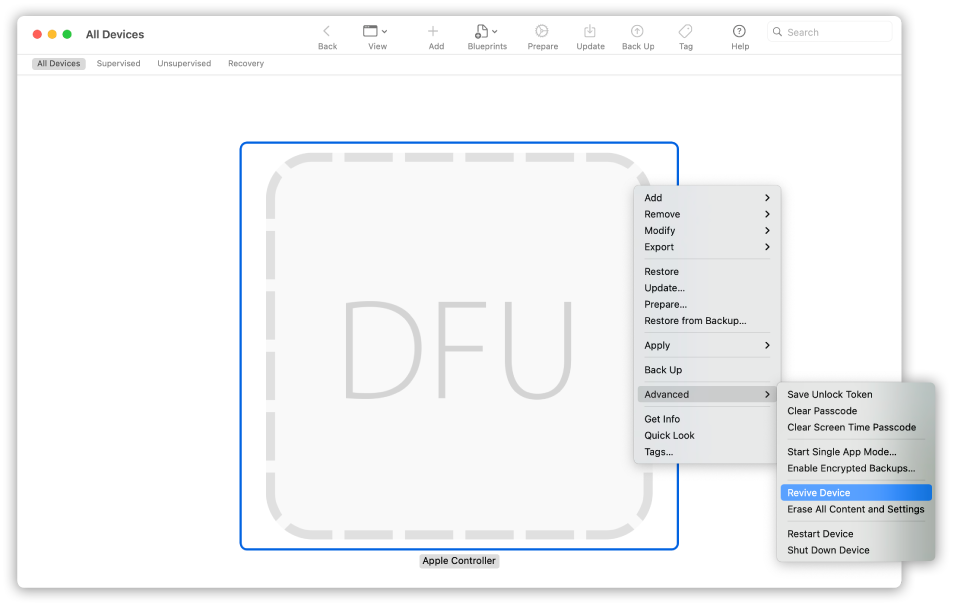
Do one of the following:
Choose Actions > Advanced > Revive Device, then click Revive.
Control-click the selected DFU icon, then choose Advanced > Revive Device, then click Revive.
Note: If you lose power to either Mac during this process, begin the revive process again.
Wait for the process to complete. During this process, an Apple logo will appear and disappear on the second Mac.
After the process successfully completes, your Mac will reboot.
Note: If the revive was unsuccessful, proceed to Step 4 below.
Quit Apple Configurator 2 on the first Mac, then unplug any cables and adapters.
Step 4: Restore the firmware, erase all data and reinstall the latest version of recoveryOS and macOS
In the Apple Configurator 2 window on the first Mac, select the DFU icon of the Mac to be restored.
Do one of the following:
Choose Actions > Restore, then click Restore.
Control-click the selected DFU icon, then choose Actions > Restore, then click Restore.
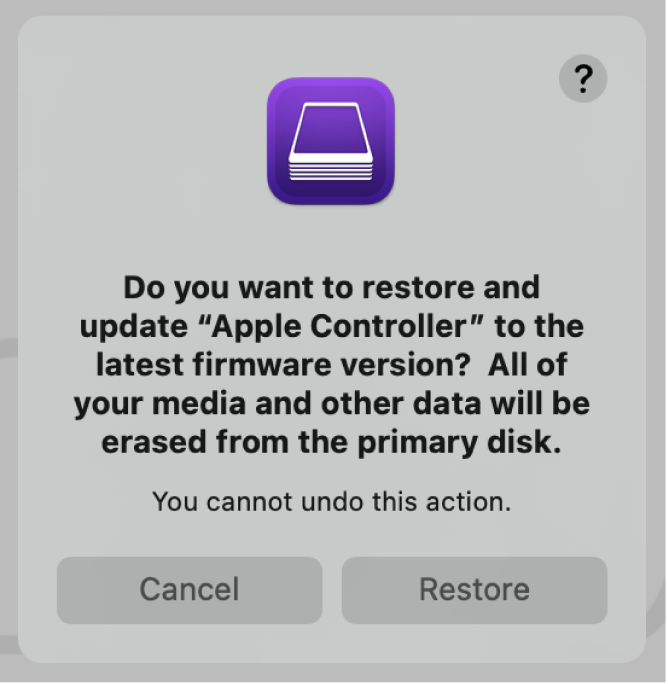 The restore confirmation dialog.
Note: If you lose power to either Mac during this process, begin the restore process again.
Wait for the process to complete. During this process, an Apple logo will appear and disappear on the second Mac.
After the process completes, your Mac will restart.
If the process was successful, you’re presented with the macOS Setup Assistant on the second Mac. If the macOS Setup Assistant doesn’t appear, repeat the restore process.
Quit Apple Configurator 2 on the first Mac, then unplug any cables and adapters.
Источник
If your computer doesn’t recognize your iPhone, iPad, or iPod
If you connect your device to your computer with a USB cable and your computer doesn’t recognize your iPhone, iPad, or iPod, learn what to do.
If your computer doesn’t recognize your connected device, you might see an unknown error or a «0xE» error. Follow these steps and try to connect your device again after each step.
- Make sure that your iOS or iPadOS device is turned on, unlocked, and on the Home screen.
- Check that you have the latest software on your Mac or Windows PC. If you’re using iTunes, make sure you have the latest version.
- If you see a Trust this Computer alert, unlock your device and tap Trust. If you can’t unlock your device because you forgot your passcode, find out what to do.
- Unplug all USB accessories from your computer except for your device. Try each USB port to see if one works. Then try a different Apple USB cable.*
- Restart your computer.
- Restart your iPhone, iPad, or iPod touch.
- Follow these additional steps for your Mac or Windows PC.
- Try connecting your device to another computer. If you have the same issue on another computer, contact Apple Support.
Additional steps for Mac
- Connect your iOS or iPadOS device and make sure that it’s unlocked and on the Home screen.
- On your Mac, choose Finder > Preferences from the Finder menu bar, then click Sidebar at the top of the preferences window. Make sure that «CDs, DVDs and iOS Devices» is checked.
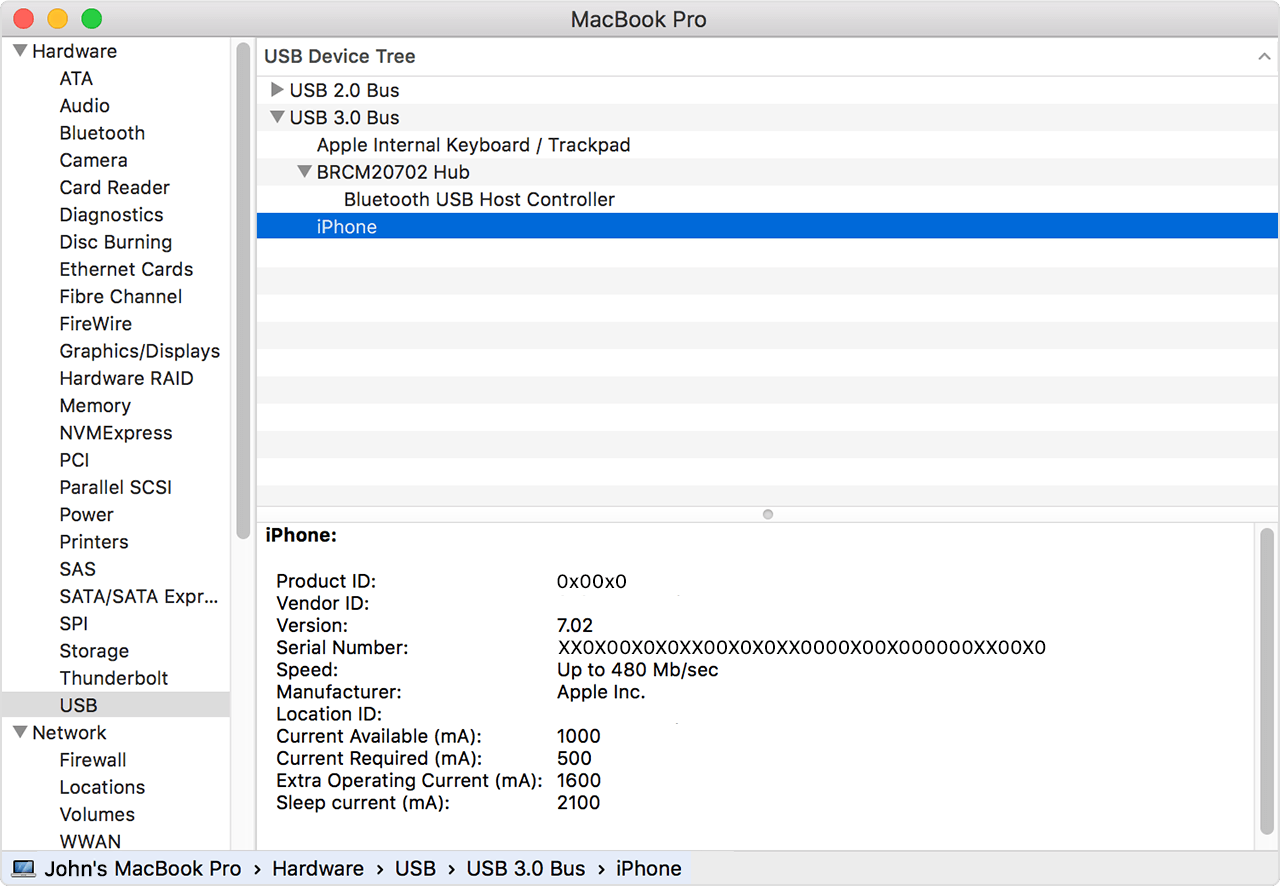
- Press and hold the Option key, then choose System Information from the Apple menu . From the list on the left, select USB.
- If you see your iPhone, iPad, or iPod under USB Device Tree, get the latest macOS or install the latest updates. If you don’t see your device or still need help, contact Apple Support.


Information about products not manufactured by Apple, or independent websites not controlled or tested by Apple, is provided without recommendation or endorsement. Apple assumes no responsibility with regard to the selection, performance, or use of third-party websites or products. Apple makes no representations regarding third-party website accuracy or reliability. Contact the vendor for additional information.
Источник
See your Apple Pay transaction history
Check the latest transactions for the cards that you use with Apple Pay, directly on the device that you used to make the purchases.
Depending on your bank or card issuer, you might see only transactions made on the device that you’re using. Or you might see any transactions made from your credit or debit card account, including from all devices that you use with Apple Pay and your physical card.
See your Apple Pay transaction history on your iPhone
- On your iPhone, open the Wallet app.
- Tap a card to see a list of your latest transactions.
- Tap a transaction to see more details or report an issue.
See your Apple Pay transaction history on your Apple Watch
- On your Apple Watch, open the Wallet app.
- Tap a card to see a list of your latest transactions.
- Tap a transaction to see more details.
See your Apple Pay transaction history on your Mac with Touch ID or iPad
- On you device, open your Wallet settings.
- On your Mac with Touch ID, go to System Preferences > Wallet & Apple Pay.
- On your iPad, go to Settings > Wallet & Apple Pay.
- Select a card.
- Select the Transactions tab.
- Select a transaction to see more details.
Some transactions might look different than the final charge. Depending on your bank or card issuer, you might see only initial authorization amounts, or you might see different transaction amounts from locations such as restaurants, gas stations, hotels, and rental car companies.
For the most accurate record of your transactions, refer to the credit or debit statement from your bank or card issuer.
Dispute a credit or debit card charge made using Apple Pay
If you need to dispute a charge made using Apple Pay, contact your bank or card issuer.
Источник
May saw the apple
Get your holiday gifts on time. See when to order
New MacBook Pro
Supercharged for pros.
Which Mac is
right for you?
MacBook Air
8-core
8-core
Up to 16GB
unified memory
Maximum configurable storage 1
Up to 18 hours battery life 3
720p FaceTime HD camera
2.8 lb.
MacBook Pro 13”
8-core
8-core
Up to 16GB
unified memory
Maximum configurable storage 1
Up to 20 hours battery life 4
720p FaceTime HD camera
3.0 lb.
Touch Bar and Touch ID
MacBook Pro 14” and 16”
Apple M1 Pro chip or
Apple M1 Max chip
10-core
32-core
Up to 64GB
unified memory
Maximum configurable storage 1
14.2” or 16.2”
Liquid Retina XDR display 2
Up to 21 hours battery life 5
1080p FaceTime HD camera
3.5 lb. or 4.7 lb.
iMac 24”
8-core
8-core
Up to 16GB unified memory
Maximum configurable storage 1
1080p FaceTime HD camera
Configurable with Magic Keyboard with Touch ID and Numeric Keypad
iMac 27”
Up to Intel Core i9
10-core
Radeon Pro 5700 XT GPU
Up to 128GB memory
Maximum configurable storage 1
1080p FaceTime HD camera
Configurable with Magic Keyboard with Numeric Keypad
Mac Pro
Intel Xeon W processor
28-core
Radeon Pro W6800X Duo GPU
Up to 1.5TB memory
Maximum configurable storage 1
Magic Keyboard with Numeric Keypad
Mac mini
Also available with Intel Core i5 or i7 processor
8-core
8-core
Up to 16GB unified memory 8
Maximum configurable storage 1
Let the holidays be filled with great gifts.
Get 3%
Daily Cash
back
with Apple Card.
And pay for your new Mac over 12 months,
interest‑free when you choose to check out
with Apple Card Monthly Installments. †
Accessories
Explore Mac accessories.
Apple Trade In
Get credit toward a new Mac.
Just trade in your eligible computer for credit or recycle it for free. It’s good for you and the planet. 9
Free delivery
And free returns. See checkout
for delivery dates.
Get 3% Daily Cash back with Apple Card
And pay over time, interest‑free when you choose to check out with Apple Card Monthly Installments. †
Get help buying
Have a question? Call a Specialist or chat online.
Call 1‑800-MY‑APPLE.
What makes
a Mac a Mac?
Why Mac
Incredible power.
Incredibly simple.
Continuity
All your devices.
One seamless
experience.
macOS Monterey
High powered meets
“Hi everyone.”
Built-in Apps
Powerful creativity and productivity tools live inside every Mac — apps that help you explore, connect, and work more efficiently.
Safari has innovative features that let you enjoy more of the web. In even more ways. Built-in privacy features help protect your information and keep your Mac secure. An updated start page helps you easily and quickly save, find, and share your favorite sites. And Siri suggestions surface bookmarks, links from your reading list, iCloud Tabs, links you receive in Messages, and more.
Keep your growing library organized and accessible. Perfect your images and create beautiful gifts for sharing. And with iCloud Photos, you can store a lifetime’s worth of photos and videos in the cloud.
Tell stories like never before. A simple design and intuitive editing features make it easy to create beautiful 4K movies and Hollywood-style trailers.
The easiest way to create great-sounding songs on your Mac. With an intuitive interface and access to a complete sound library, it’s never been easier to learn, play, record, and share music like a pro.
This powerful word processor gives you everything you need to create documents that look beautiful. And read beautifully. It lets you work seamlessly between Mac, iOS, and iPadOS devices. And work effortlessly with people who use Microsoft Word.
Create sophisticated spreadsheets with dramatic interactive charts, tables, and images that paint a revealing picture of your data. Work seamlessly between Mac, iOS, and iPadOS devices. And work effortlessly with people who use Microsoft Excel.
Bring your ideas to life with beautiful presentations. Employ powerful tools and dazzling effects that keep your audience engaged. Work seamlessly between Mac, iOS, and iPadOS devices. And work effortlessly with people who use Microsoft PowerPoint.
Pro Apps
For professionals ready to push their creativity, these industry-leading apps offer maximum control over editing, processing, and output of music and film.
Logic Pro puts a complete recording and MIDI production studio on your Mac, with everything you need to write, record, edit, and mix like never before. And with a huge collection of full-featured plug-ins along with thousands of sounds and loops, you’ll have everything you need to go from first inspiration to final master, no matter what kind of music you want to create.
Take your Mac to the stage with a full-screen interface optimized for live performance, flexible hardware control, and a massive collection of plug-ins and sounds that are fully compatible with Logic Pro.
Built to meet the needs of today’s creative editors, Final Cut Pro offers revolutionary video editing, powerful media organization, and incredible performance optimized for Mac computers and macOS Monterey.
Motion is a powerful motion graphics tool that makes it easy to create cinematic 2D and 3D titles, fluid transitions, and realistic effects in real time.
Add power and flexibility for exporting projects from Final Cut Pro. Customize output settings, work faster with distributed encoding, and easily package your film for the iTunes Store.
The Mac App Store features rich editorial content and great apps for Mac. Explore the Mac App Store
Get more out of Mac
Today at Apple
Virtual Sessions
Learn the basics of using Mac
live with Apple Creatives.
Apple One
Bundle up to six Apple services.
And enjoy more for less.
Apple TV Plus
Get 3 months of Apple TV+ free
when you buy a Mac.
Apple Pay
The safer way to make
secure,
contactless purchases
in stores and online.
Источник


