- Media Transfer Protocol
- Contents
- Connecting
- FUSE filesystems
- Android File Transfer
- MTPfs
- jmtpfs
- SIMPLE-MTPFS
- go-mtpfs
- libmtp
- Frontends
- Media players
- File manager integration
- gvfs-mtp
- Troubleshooting
- libmtp (gvfs-mtp): filemanager (nautilus, pcmanfm, vifm and etc) hangs on accessing DCIM/Camera of Android device
- jmtpfs: Input/output error upon first access
- kio-mtp: cannot use «Open with File Manager» action
- kio-mtp being called simultaneously by different services
- Android File Transfer: connect failed: no MTP device found
- 5 best media center apps for Android
- Google Home
- Jellyfin
- LocalCast
- Media Storage on Android: Can You Disable Data in Media Storage
- What Is Media Storage on Android
- Frequently Asked Questions About Media Storage on Android
- 1. Can You Disable Media Storage?
- 2. How to Enable Media Storage on Android?
- 3. Will Clear Data Remove Your Media Files?
- How to Recover Deleted Media Storage Data on Android?
- Method 1: Restart Your Android Device
- Method 2: Sync Lost Data from Your Google Account
- Method 3: Find Cleared data in lost.dir folder
- Method 4: Download Android data recovery software
- The Bottom Line
Media Transfer Protocol
The Media Transfer Protocol (MTP) can be used to transfer media files to and from many mobile phones (all Windows Phone 7/8/10 devices, most newer Android devices) and media players (e.g. Creative Zen).
Contents
Connecting
To connect your computer to a device via MTP:
- the device needs to be connected to your computer via USB
- MTP needs to be enabled on the device
- the device’s screen needs to be unlocked (for security reasons)
FUSE filesystems
The following programs let you access MTP devices via a FUSE filesystem.
For the FUSE-based file systems, you might need to create the mount-point directory first. The directory
/mnt is used in the examples below.
FUSE mounts can generally be unmounted using fusermount -u mountpoint .
Android File Transfer
Android File Transfer — MTP client with CLI, Qt UI, and FUSE wrapper which uses a custom MTP implementation
Mount your device on
If you want album art to be displayed, it must be named albumart.xxx and placed first in the destination folder. Then copy other files. Also, note that fuse could be 7-8 times slower than ui/cli file transfer.
If you want to interact with it via the command line interface, run the command:
Type help in order to list all the commands available, exit to quit.
If you want to interact with it via the graphical user interface, start the android-file-transfer application, choose a destination folder and click any button on the toolbar. Available options are: Upload Album, Upload Directory and Upload Files. The latter two are self-explanatory. Upload album searches the source directory for album covers, and sets the best available cover.
MTPfs
MTPfs — based on libmtp, it is a FUSE filesystem that supports reading and writing from any MTP device
First edit your /etc/fuse.conf and uncomment the following line:
Mount your device on
jmtpfs
jmtpfs — based on libmtp for accessing MTP (Media Transfer Protocol) devices
Mount device on
Make this cohere to the rest of Linux (use regular mount/umount commands) by doing two steps
add this line to /etc/fstab ;
Now mount the device and see if the options «took»
SIMPLE-MTPFS
SIMPLE-MTPFS — based on libmtp Simple Media Transfer Protocol FileSystem is a file system capable of operating on files on MTP devices attached via USB to local machine
Run simple-mtpfs -l to list detected devices.
To mount the first device in the list to
/mnt , run simple-mtpfs —device 1
go-mtpfs
go-mtpfs — FUSE filesystem with custom MTP implementation, written in Go
Install android-udev , which will allow you to edit /etc/udev/rules.d/51-android.rules and apply to your idVendor and idProduct , which you can see after running mtp-detect. To the end of the line, add your user OWNER=» » .
Mount device on
libmtp
libmtp is a library MTP implementation, which also comes with some example command-line tools (which you can list using pacman -Ql libmtp ).
Run mtp-detect to detect your device.
If an error is returned, make sure your user is in the uucp user group.
You can transfer files using the mtp-connect command.
Frontends
gMTP — A graphical frontend for libmtp. It lets you connect to Android devices and manage files using a desktop agnostic GUI.
Media players
You can also use your MTP device in music players such as Amarok. To achieve this, you might have to edit /etc/udev/rules.d/51-android.rules (the MTP device used in the following example is a Galaxy Nexus). Run:
Search for your device. It should be something like that:
And entry to /etc/udev/rules.d/51-android.rules will be this:
Also reload udev rules:
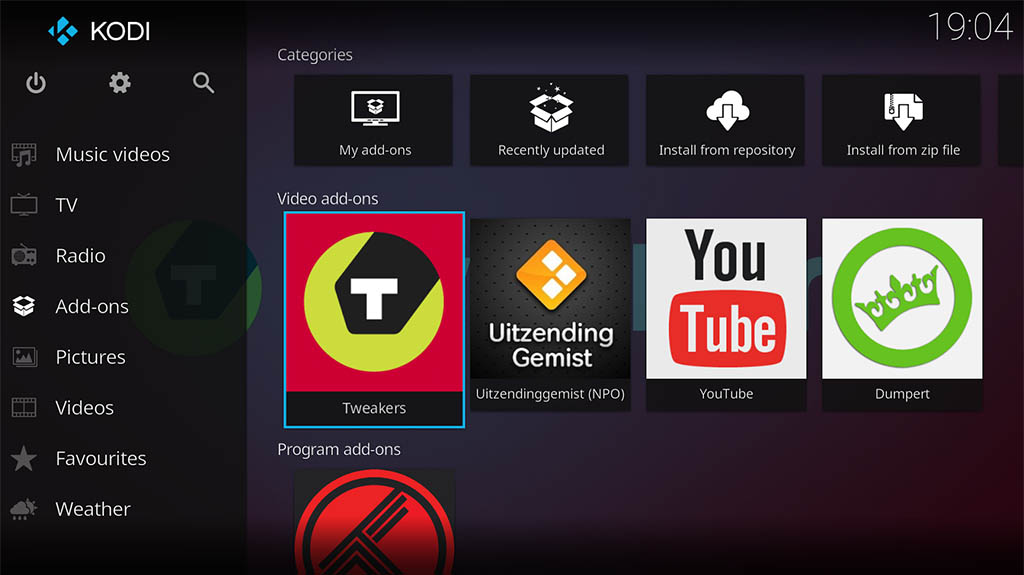
File manager integration
To view the contents of your Android device’s storage via MTP in your file manager, install the corresponding plugin:
- For file managers that use GVFS (GNOME Files), install gvfs-mtp for MTP or gvfs-gphoto2 for PTP support.
- For file managers that use KIO (KDE’s Dolphin), MTP support is included in kio-extras (dependency of dolphin).
After installing the required package, the device should show up in the file manager automatically and be accessible via an URL, for example mtp://[usb:002,013]/ .
gvfs-mtp
 This article or section is a candidate for merging with udev.
The gvfs-mtp is available in the official repositories.
With lsusb you can get information about your device where Bus and Device numbers can be used with gvfs-mtp and device ID for creating of an udev rule.
To see detected device with enabled MTP
To mount all available connected MTP devices use inline script
To mount or dismount from a command with gvfs-mtp use Bus and Device numbers, e.g. to mount gio mount mtp://[usb:001,007]/ and to unmount gio mount -u mtp://[usb:001,007]/ . The mounted device will be available in a directory that begins with mtp:host= and is located under /run/user/$UID/gvfs/.
Disable automount of MTP devices with gvfs you will need to change value true to false for variable AutoMount that is located in /usr/share/gvfs/mounts/mtp.mount .
If your device is not showing up in the file manager then #libmtp is missing a native support and is not currently available in the list of the supported devices. If you will try to mount by using command line you may also get an error
The workaround to make it shown in the file manager is to write an udev rule for the device but it is no guaranty that you will be able to mount it with by using MTP connection.
Use ID number that represents by pattern vendorId:productID,e.g. 04b7:88a9, and make an udev rule by creating a configuration file
Reload the udev rules.
The file managers with support for gvfs will be able to show MTP devices and mount them if supported by #libmtp but if has no support and cannot be opened then change settings in the phone to PTP and install gvfs-gphoto2 for having access at least to the photos, command line mounting of PTP is a little similar to mounting of the MTP devices: gio mount gphoto2://[usb:002,019]/ .
Troubleshooting
libmtp (gvfs-mtp): filemanager (nautilus, pcmanfm, vifm and etc) hangs on accessing DCIM/Camera of Android device
Symptoms: everything works fine till moment of entering DCIM/Camera directory. In this case filemanager freezes and even in command line you cannot run even ls on that directory.
Possible and very probable reason is the bug of libmtp.
It seems that it is caused by file with name like 20180915_180351(0).jpg . Samsung phones for example like to create files with such names.
There are several tickets (one, two and etc) and questions (one, two) about it.
So possible workaround is to use different mtp option from #FUSE filesystems like go-mtpfs for such directories or somehow change file naming policy of your phone camera (or switch to another camera app like Open Camera for example).
jmtpfs: Input/output error upon first access
Symptoms: jmtpfs successfully mounts, but as soon as one attempts to access files on the device (e.g. via ls ), an error is reported:
This appears to be a security feature: MTP does not work when the phone is locked by the lockscreen. Unlock the phone and it should work again as long as the cord remains connected.
kio-mtp: cannot use «Open with File Manager» action
If you are not able to use the action «Open with File Manager», you may work around this problem by editing the file /usr/share/solid/actions/solid_mtp.desktop .
Change the line Exec=kioclient exec mtp:udi=%i/ to Exec=dolphin «mtp:/» .
kio-mtp being called simultaneously by different services
Parallel usage of mtpfs and kio-mtp, as well as conflicting services using kio-mtp -music players included- should be avoided, as mentioned in this forum.
Amarok’s plugin for MTP services, for example, might be preventing Dolphin (plasma) to access different phone model’s files. Switching it off was a solution for at least one user.
Android File Transfer: connect failed: no MTP device found
After installing android-file-transfer , while trying to mount any MTP device if you get the following error:
then install the package: android-udev . This package contains per manufacturer/device udev rules for MTP devices, making it easier to use ADB or MTP.
Источник
5 best media center apps for Android
Read more:
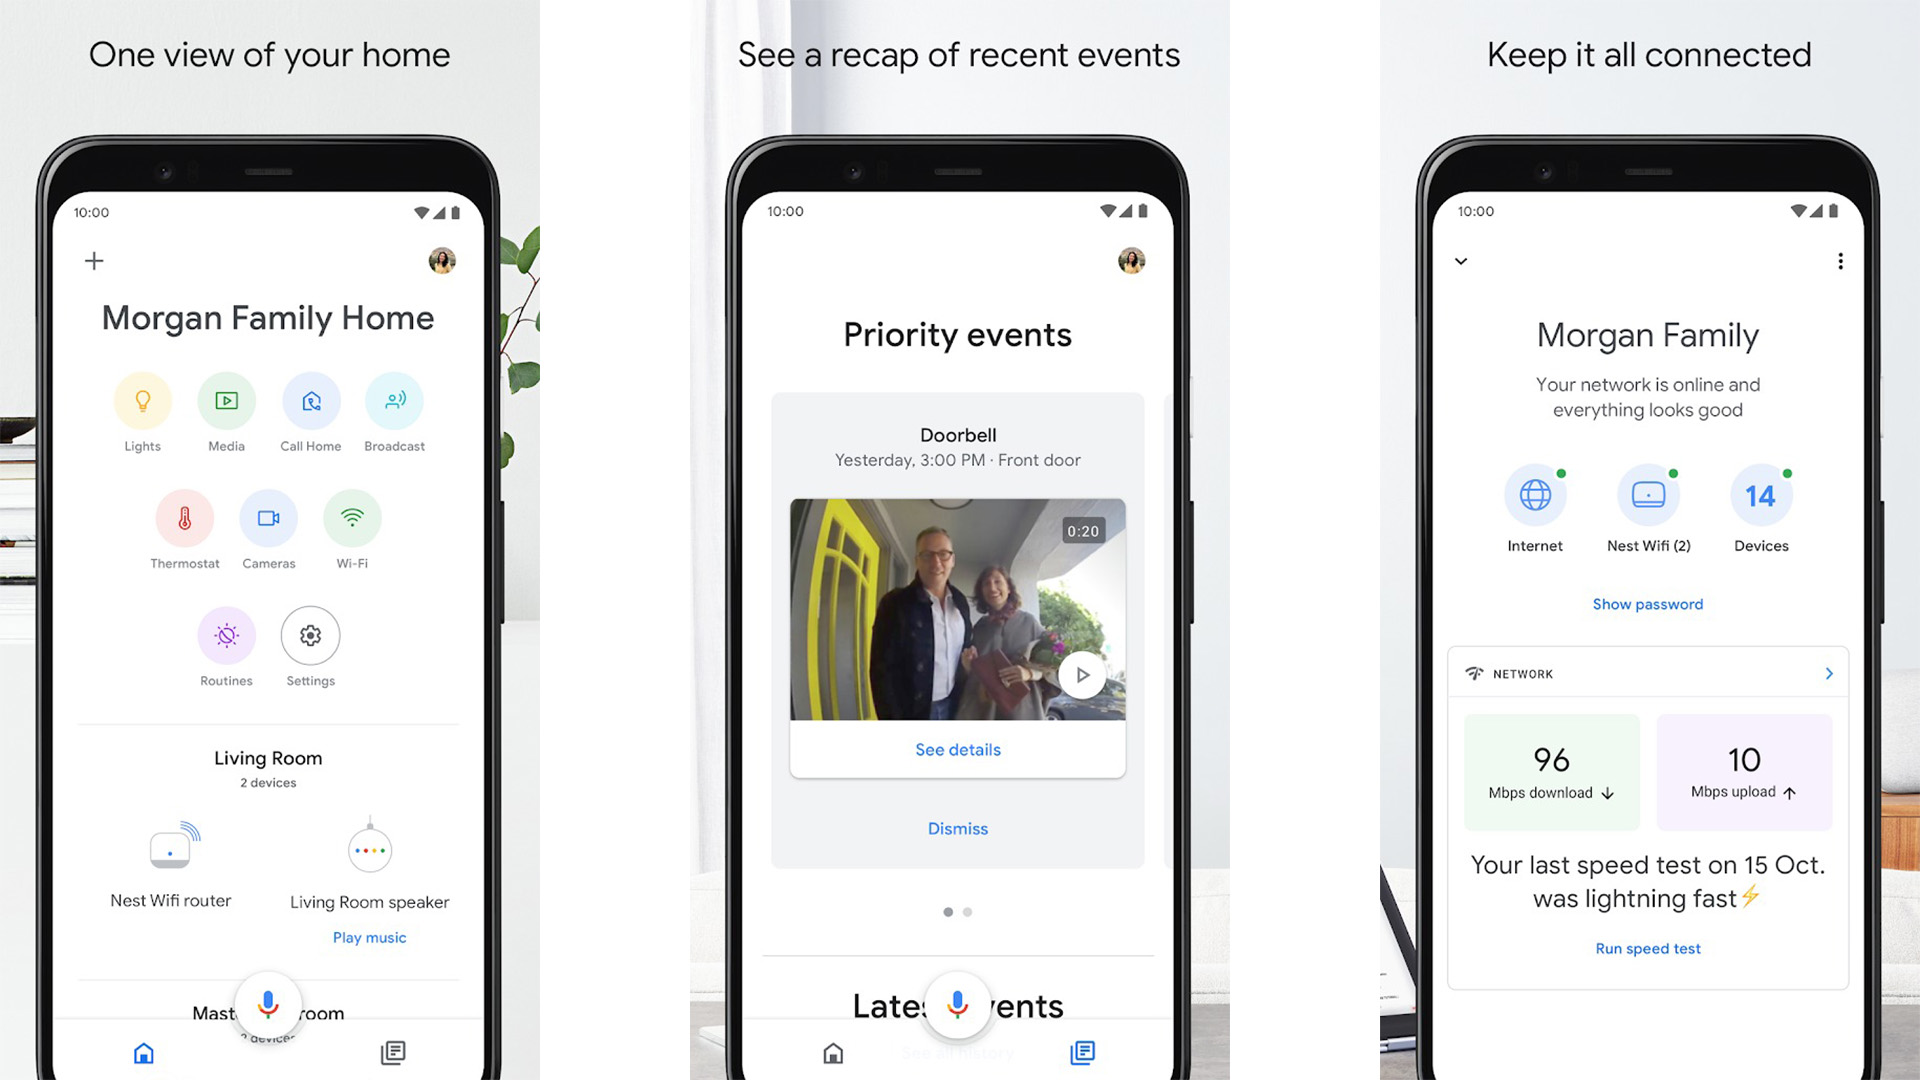
Google Home
Price: Free
Google Home is an excellent series of home devices. It sits on your countertop and plugs into your TV. It then streams whatever you want. The basic setup requires a Chromecast and your phone. However, you can build out with Google Home devices if you want to. The app keeps everything connected and shows you content on Chromecast-ready video and music apps. It’s a bit expensive to get into with the hardware. However, this is currently the best solution for a smart home style media setup and it’s the one we would recommend first if you plan on going that route. The Google Home app is free. The Chromecast and Google Home devices will cost you some money.
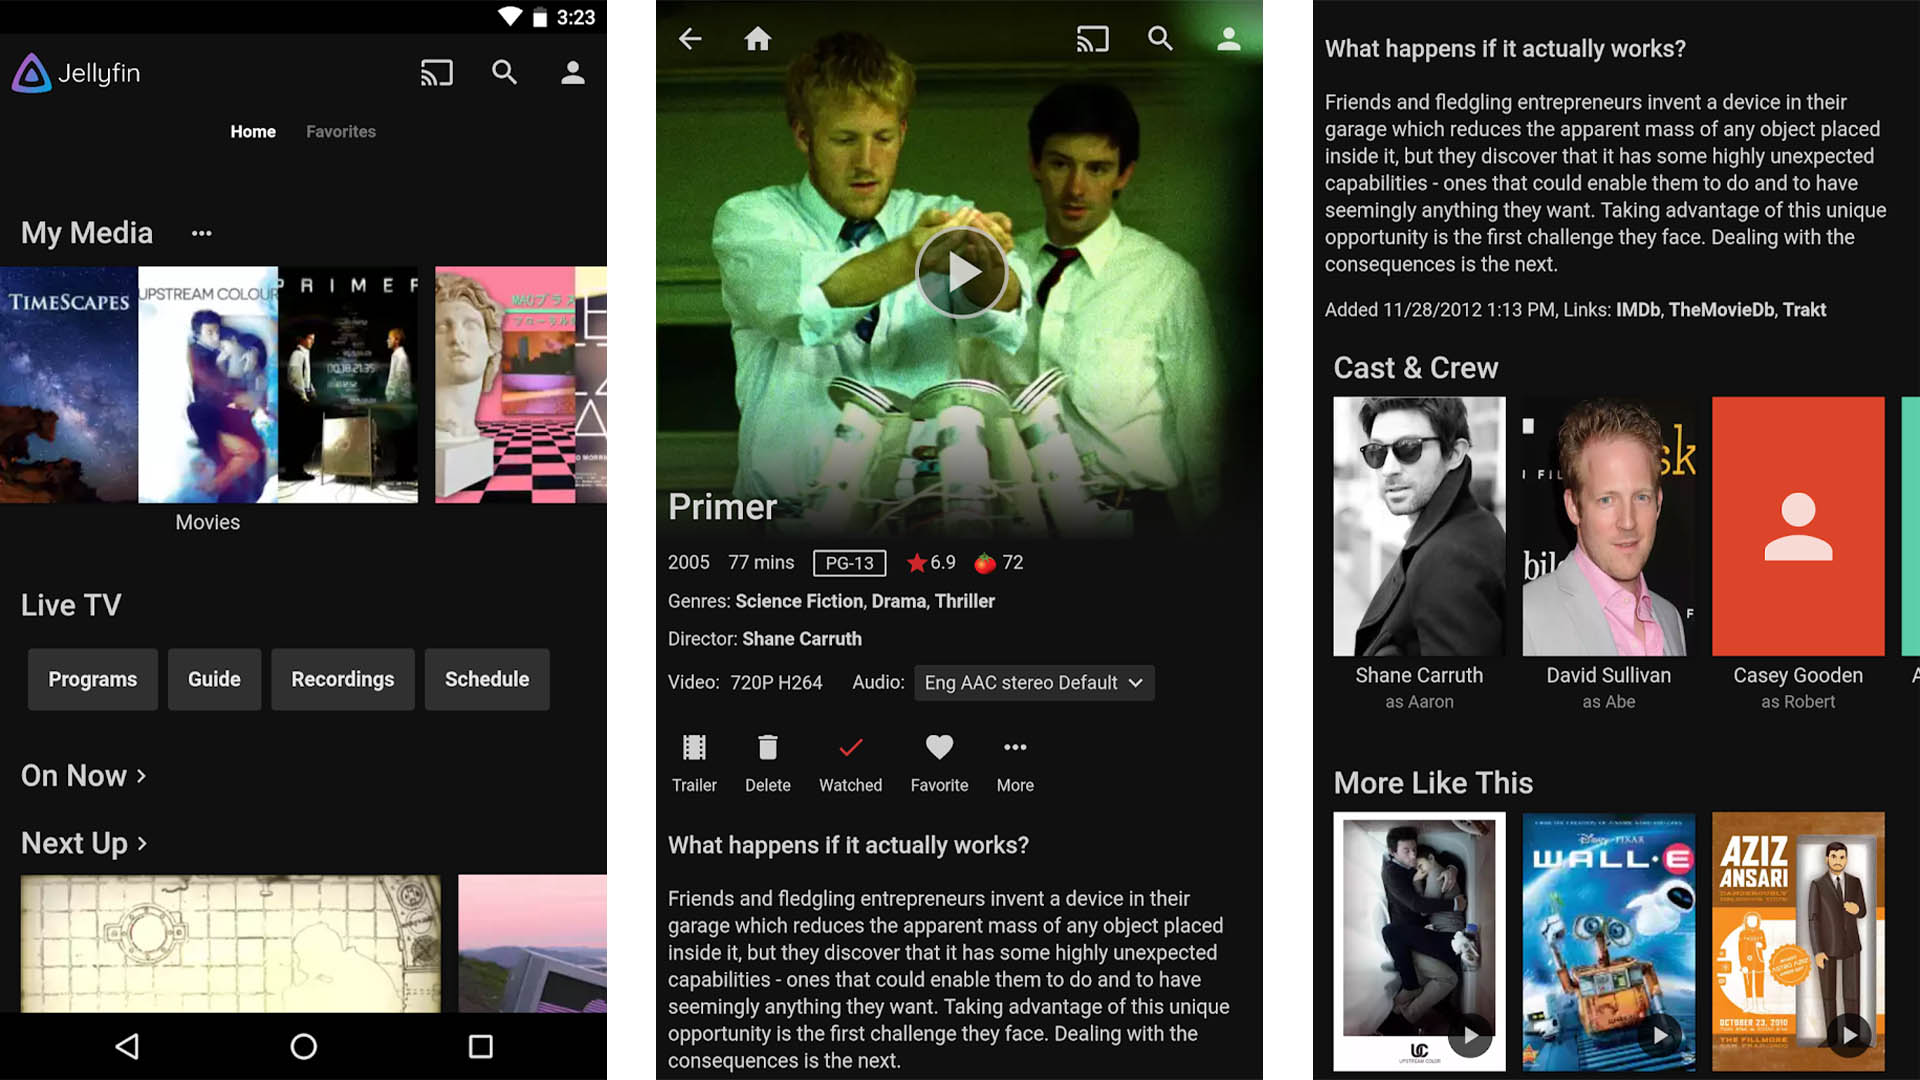
Jellyfin
Price: Free
Jellyfin is a newer competitor to apps like Plex. It’s a media server app that connects your phone to your home PC. Basically, you store all of your media on your computer and this app lets you access that data on your phone. This one is free, open source, and doesn’t track anything you do. That gives it a leg up on many competitors. The app supports Chromecast as well as native viewing on your Android phone. Additionally, the server isn’t difficult to setup on your home PC.
Price: Free
Kodi (formerly XBMC) is one of the few true media center apps in Google Play. It gives the entire home screen a new interface that makes it easier to access video, music, and photos. There are also plugins that you can use to find additional content. You’ll likely want to use this on a larger screen like a tablet or perhaps an Android device that is plugged into your TV via HDMI-out. It’s completely free to download and use. Additionally, it’s open source. That means there are some variants of Kodi out there by other developers that do slightly different things. You can search Google Play for Kodi to see all of the unofficial branches and variants available, such as SBMC.
LocalCast
Price: Free with in-app purchases
LocalCast is an app that was originally intended as a streaming app for Chromecasts. It also supports streaming to any DLNA devices that are running on your network. It can stream almost any file, but whether or not it works on your Chromecast depends on its compatibility. Additional features include SMB support, the ability to cast PDFs onto the screen, and some types of subtitles will work as well. It’s a bit more simple than other media center apps, but it’s not a bad way to go if you need something simple. There are both subscription and single price purchases available. Go with the one you want. BubbleUPnP is another decent app that does mostly the same kind of stuff if this one just isn’t doing it.
Price: Free / $4.99 / $4.99 per month / $149.99
Plex is one of the most popular media center apps out there. The app lets you to access your Plex server on your Android device. That means you’ll have to install the Plex server on your own computer so that you can stream from it. Don’t worry, it’s not difficult. You can also subscribe to Plex Pass for additional streaming features. It’s a rock solid app that includes modern features like Android TV support. It even supports VR headsets via a separate app. It’s pretty decent and a good place to start. You will have to either subscribe to Plex Pass or make a one-time purchase to unlock all the features. Thankfully, you have some options there, including both single purchases or recurring subscriptions.
Источник
Media Storage on Android: Can You Disable Data in Media Storage
Media Storage is an important system process on Android phones. It makes other operations on your device possible by using the service. If you disable Media Storage on your Android phone, you will surely find yourself in trouble. Read on to learn everything about Media Storage and learn how to recover data from your device using EaseUS data recovery software if there is data loss.
Table of Contents
About the Author
Reviews and Awards
What Is Media Storage on Android
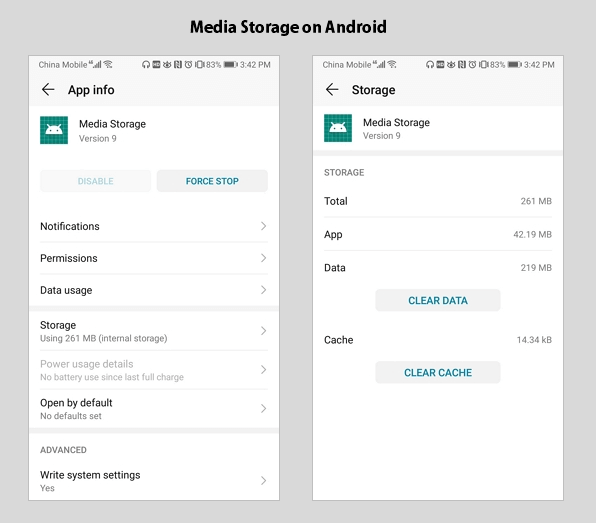
Media Storage is a system process that is needed when you view, download, play, and stream images, videos, audio files, and other media files. As a system service, it is not available from your phone desktop. Then where is Media Storage in Android? You can access it from your phone:
Step 1. Go to «Settings» > «Apps».
Step 2.В Click the «More (three dots)» button and choose «Show system processes». (the options may be slightly different on different phone models).
Step 3. After you open «Media Storage», there are always several options shown, like Disable and Force Stop (when ‘unfortunately app has stopped’ error occurs, you can try to force stop it). If you click «Storage», you will see another two options: Clear Data and Clear Cache.В
Without knowing the details about these options, some users attempt to disable Media Storage or clear data in Media Storage, aiming to free up space on Android or save battery, only to find that their device cannot work properly or some files are missing. Can you disable Media Storage? Will clear data delete your photos, videos, or audio files? Read on to get the answer.
Frequently Asked Questions About Media Storage on Android
Many users feel confused about the options in Media Storage, here we will explain some of them in detail.
1. Can You Disable Media Storage?
No, you can’t. As mentioned, this system process is needed when you download, play, or stream media like videos and audio files. If you disable the options, you won’t be able to do things like viewing photos/videos, playing videos/music, and taking photos. Therefore, you cannot disable Media Storage with the purpose of extending the battery life of your device.
2. How to Enable Media Storage on Android?
If you have disabled Media Storage on your Android phone, you should re-enable it to make sure you can use your device as normal.
To enable Media Storage on Android:
Step 1: Go to «Settings» > «Apps» (> «Apps»).
Step 2: Click the three dots in the top-right corner and choose «Show system processes».
Step 3: You can search for «Media Storage» and click the option.
Step 4: Click «Enable» to re-enable the service.
3. Will Clear Data Remove Your Media Files?
No, it won’t. When you click «Clear Data» in Media Storage, all the app’s data, including the files produced during the using of the service, settings, accounts, database, and more will be deleted permanently (if you want to recover the deleted files, you can use the Android data recovery software — EaseUS MobiSaver to have a try). It WON’T remove the media files stored on your device like your photos, videos, and audio files. If the media files are gone or missing after you choose «Clear data», it’s probably because you have accidentally disabled Media Storage. Have a check on the option and make sure Media Storage is enabled.
How to Recover Deleted Media Storage Data on Android?
If you are sure that your media files are lost after your misoperation under Media Storage, don’t worry. You still have the chance to recover them. Here we’ve listed 4 methods, try them one by one to recover your deleted Android data.
Method 1: Restart Your Android Device
If you’re trying to get back all the sounds, simply restart your phone and this will bring all ringtones and gallery pictures back. It’s a matter of the Android OS restoring metadata during the restart.
Method 2: Sync Lost Data from Your Google Account
Tap on «settings» > «Applications» > «Accounts» > «Google account», uncheck the boxes for sync and check the boxes again. In this way, the cleared data is synced again and will reappear in Media Storage.
Method 3: Find Cleared data in lost.dir folder
If reboot your Android device does not help you find lost data files back, you can try to locate lost.dir folder and look for the lost files there.
Method 4: Download Android data recovery software
Still, none of the methods above finds your lost media files? It’s time to apply the best Android data recovery software to recover deleted files from media storage.
Option 1: Recover Lost Files from Android SD Card
If the files lost are saved on your Android SD card, you can apply the hard drive recovery software — EaseUS Data Recovery Wizard to recover them.
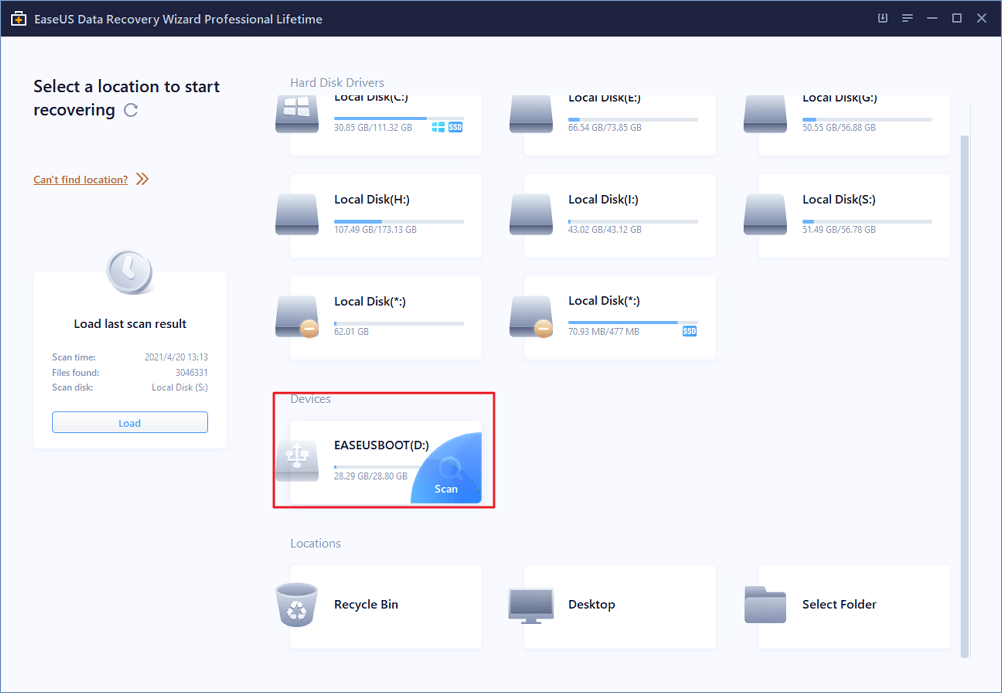
Step 1.В Download EaseUS Data Recovery Wizard — the dependable SD card recovery software for Windows on your PC. Connect the SD card to your computer with either a card reader or by attaching the device that contains it. Launch the software so you can see the SD card from the disk list presented on the interface. Select the SD card and click «Scan».
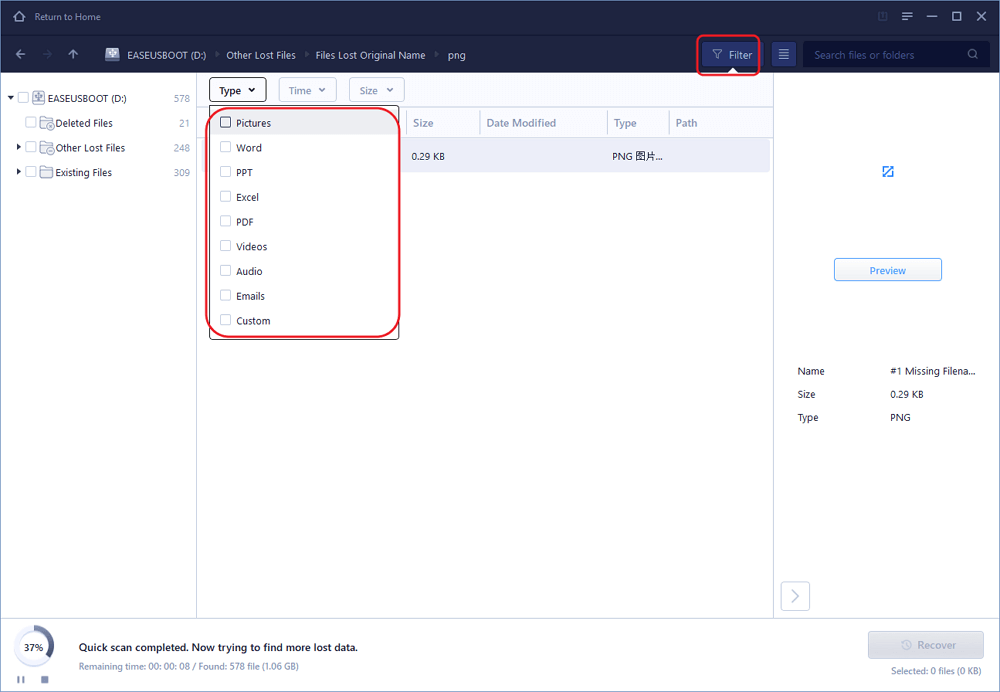
Step 2. The scan process shouldВ runВ quickly to find the files that were recently deleted,В items emptied from the Recycle Bin, andВ files thatВ lostВ file names. During the course of scanning the SD card, you can start checking the results from the leftside tree-view pane, or simply use the Filter function to show up only the pictures, doucments, videos, emails and so on.
Step 3. Double-click on a file will allow you to preivew its content. At last, select the desired files you wish to recover and click the Recover button to get them all back. When you’re asked to choose a location to save the recovered files, do not use the SD card but another drive, to avoid data overwriting.

Option 2: Recover Lost Files from Android Internal Storage
To recover your lost photos, videos, or songs from the internal storage of your Android phone, you will need the Android data recovery software — EaseUS MobiSaver. (The prerequisite to recovering data from your Android device is that the phone has been rooted.)
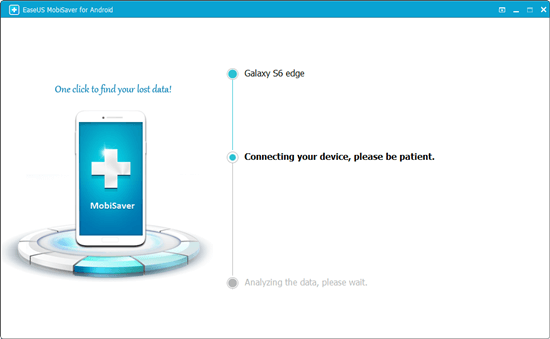
Step 1:В Download and install EaseUS MobiSaver for Android on a Windows PC.
Step 2: Connect your Android device to the computer with a USB cable.
Step 3: Run EaseUS MobiSaver for Android and click «Start» button.
Step 4: Scan Android to find all lost data files.
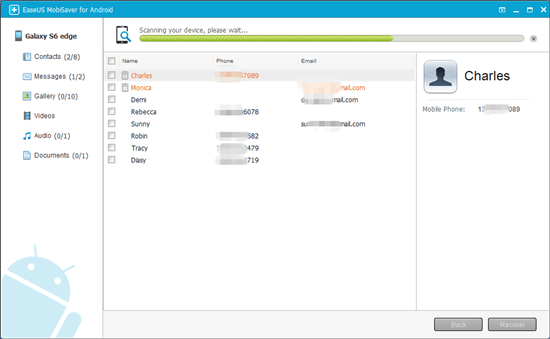
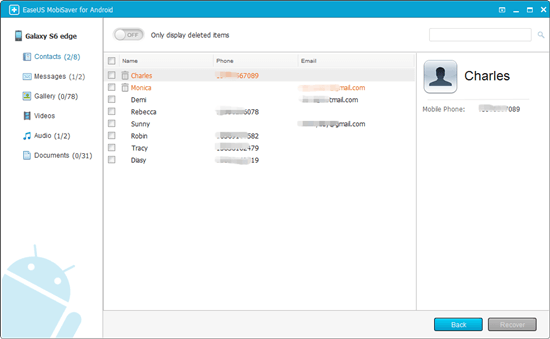
Step 5:В Browse the files in the categories of Gallery, videos, audio and more, and click «Recover» button to get them all back.
The Bottom Line
Knowing the importance of Media Storage, you won’t easily disable this system process next time you want to clean up your Android phone or save battery on your device. To prevent yourself from disabling needed system processes, you can hide the system processes via Settings. Hope the information presented in this article is useful to you.
Was This Page Helpful?
Author Jean has been writing tech articles since she was graduated from university. She has been part of the EaseUS team for over 5 years. Her special focuses are data recovery, disk partitioning, data space optimization, data backup and Mac OS. By the way, she’s an aviation fan!
EaseUS Data Recovery Wizard is a powerful system recovery software, designed to enable you to recover files you’ve deleted accidentally, potentially lost to malware or an entire hard drive partition.
EaseUS Data Recovery Wizard is the best we have seen. It’s far from perfect, partly because today’s advanced disk technology makes data-recovery more difficult than it was with the simpler technology of the past.
EaseUS Data Recovery Wizard Pro has a reputation as one of the best data recovery software programs on the market. It comes with a selection of advanced features, including partition recovery, formatted drive restoration, and corrupted file repair.
Источник


