- Как импортировать все заметки из приложения Memo Samsung Devices —
- Как экспортировать и получать доступ к файлам заметок со своего телефона Samsung?
- Android: Memo Application
- Related Posts
- 14 comments
- How to write text data to files in Android: Build a ScratchPad (memo) App
- Building the interface of the scratchpad app in Android
- Widgets Required
- Creating the layout using XML
- Changing the colours of the App
- Coding the actual functionality of our Scratchpad app
- Adding widgets to the code
- How to handle file input and output operations in Android
- Writing to a private .txt file in Android
- Reading from a private .txt file in Android
- Code explanation
- Implementing the save functionality
- Testing the Scratchpad App
- How to view the contents of a private .txt file in Android?
- Complete Code for the Scratchpad App
- activity_main.xml
- colors.xml
- Java File
- Leave a Reply Cancel reply
Как импортировать все заметки из приложения Memo Samsung Devices —
Samsung поставил свой собственный пользовательский интерфейс поверх стандартного Android, который включает в себя множество дополнительных функций и предустановленных приложений. Одним из таких приложений является приложение S Memo, которое позволяет пользователям записывать заметки, которые могут помочь запомнить полезную информацию, а также сохранить их. Тем не менее, в устройстве также есть приложение Stock Android Memo. Смарт-переключатель Samsung, который используется для резервного копирования пользовательских данных, распознает только «S Memos», а не те, которые записаны в приложении по умолчанию.
 Приложение S Memo для Android
Поэтому, если пользователям необходимо перенести много записок, которые были написаны в приложении по умолчанию, для них это может быть затруднено, поскольку каждое из них должно передаваться по отдельности. В этой статье мы научим вас, как быстро передавать эти файлы через приложение.
Как экспортировать и получать доступ к файлам заметок со своего телефона Samsung?
Мы исследовали и разработали метод быстрого и простого экспорта файлов заметок, и он указан ниже:
- грейфер держаться за ПК а также соединять ваш мобильный на ПК с USBкабель.
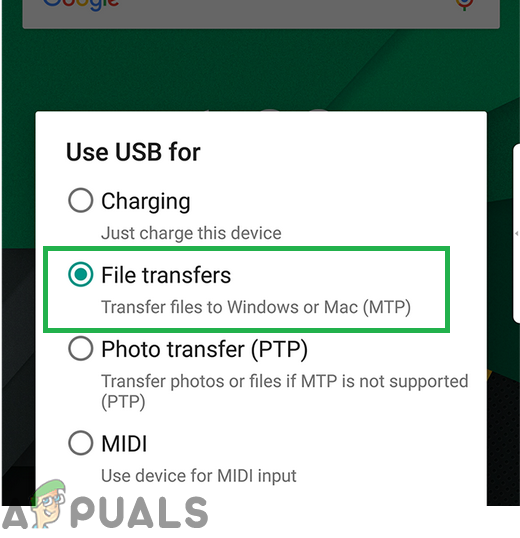
- На вашем телефоне вы увидит подсказкуИспользуйте соединение для«, нажмите «Перечислитьфайлы» на ваше Телефон.
 Выбор «Передача файлов» на телефоне
 - Имя телефона будет отображаться внутри файлПроводник,двойнойщелчок в теме.
- Внутри телефона, таккаталог, нажмите на «ПоискБар на Топправобоковая сторона. Панель поиска в углу
- Тип «.Memo» внутри поискбар и папка появится
- Скопируйте все «.меморандумФайлы и вставить их внутри компьютера. Копирование файлов из папки
- Правильно—щелчок файлы и выберите «открытоСВариант. Щелкните правой кнопкой мыши по файлам заметок и выберите «Открыть с помощью».
- Выбрать любой считыватель файлов, чтобы связать.меморандумФайлы с ним.
- Ваш «.меморандумТеперь файлы могут быть доступ к с вашего компьютера.
 Выбор «Передача файлов» на телефоне
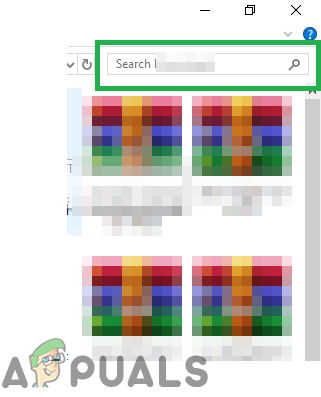 Панель поиска в углу
 Копирование файлов из папки
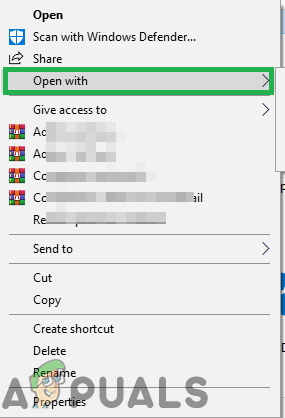 Щелкните правой кнопкой мыши по файлам заметок и выберите «Открыть с помощью».
Источник
Android: Memo Application
Create a new Android project “Memo” with a package name “com.javahelps.memo”


- Tumblr
Related Posts
14 comments
great tutorial. may i ask if what theme of android studio are you using.
![]()
Thanks.
I think you are asking about the Color Scheme. I cannot remember exactly but I think it is the default color scheme customized by removing bold fonts.
![]()
Hello, I got some errors below :
Error:(48, 69) error: cannot find symbol variable txtMemo
Error:(104, 74) error: cannot find symbol variable btnEdit
Error:(105, 76) error: cannot find symbol variable btnDelete
Error:(106, 72) error: cannot find symbol variable txtDate
Error:(107, 72) error: cannot find symbol variable txtMemo
Note: Some input files use or override a deprecated API.
Note: Recompile with -Xlint:deprecation for details.
Note: Some input files use unchecked or unsafe operations.
Note: Recompile with -Xlint:unchecked for details.
:app:compileDebugJavaWithJavac FAILED
Error:Execution failed for task ‘:app:compileDebugJavaWithJavac’.
> Compilation failed; see the compiler error output for details.
how to solve them.
I did copy & paste as you showed above steps.
![]()
Hi, whenever I click save, only the delete button shows up, nothing else on the main activity.
![]()
Nice tutorial helped me alot. But sir when i use the edit button it goes to the edit activity but doesn’t update the memo it only creates new one
Please help as soon as possible
![]()
Hi,
I couldn’t reproduce this in my system. If there are any error messages, could you please share the logcat error message.
![]()
Hi,
I couldn’t reproduce this in my system. Please make sure that you call the update method when editing the memo. Check the onSaveClicked method:
public void onSaveClicked() <
DatabaseAccess databaseAccess = DatabaseAccess.getInstance(this);
databaseAccess.open();
if(memo == null) <
// Add new memo
Memo temp = new Memo();
temp.setText(etText.getText().toString());
databaseAccess.save(temp);
> else <
// Update the memo
memo.setText(etText.getText().toString());
databaseAccess.update(memo);
>
databaseAccess.close();
this.finish();
>
![]()
How to works with cloud database?
![]()
I have same too
Error:(34, 53) error: cannot find symbol variable listView
Note: Some input files use or override a deprecated API.
Note: Recompile with -Xlint:deprecation for details.
Note: Some input files use unchecked or unsafe operations.
Note: Recompile with -Xlint:unchecked for details.
:app:compileDebugJavaWithJavac FAILED
Error:Execution failed for task ‘:app:compileDebugJavaWithJavac’.
> Compilation failed; see the compiler error output for details.
![]()
Is there version of app with MySQL db system?
![]()
How to implement Share button in every memo that I have to share via email if I prefer??
![]()
How to add Title?
![]()
To add title, you need to modify the database schema with another column ‘title’ and modify UI elements to edit and display title.
Источник
How to write text data to files in Android: Build a ScratchPad (memo) App
What will you learn?
In this simple app, you will learn how to enter a string of text into a file and save it using a button. Next time you open the app, it will still be there.
You will also learn the concept of file handling in Android. File Handling is one of the methods to make your data ‘persist’. This saves your data to a file so that it exists even after the app is closed.
The classes and methods you will learn in this are:
- OutputStreamWriter
- InputStreamReader
- openFileInput()
- openFileOutput()
Note: Find the full code of this scratchpad project towards the end of the post. Read the entire post for further clarification and explanations.
Building the interface of the scratchpad app in Android
In this app, we’ll be working with a single activity. Let’s move forward to the designing part. As you might have observed earlier, the designing part of an activity is done using XML. Don’t worry if you don’t know XML. Android Studio provides an intuitive drag and drop interface to design app visuals. I’ll be illustrating the code part of it since it is easy to explain in a textual tutorial.
Widgets Required
This is a pretty straightforward app that allows the user to write something down and save it. So we just require two widgets:
- EditText
- Button
- The EditText allows the user to enter text input.
- The Button will be used to save the text in a txt file. If the txt file doesn’t exist, then we will create it.
Creating the layout using XML
Open up the activity_main.xml file, and head over to the Text tab (bottom left corner).
You’ll see the following default code:
Now we’ll add the widgets in between the android tag.
First, the EditText. Ideally, it should be big and have lots of space since it is the main part of our app. Write down the following:
Now, for the Button, add the following code right after the EditText code.:
We’ve added two widgets: EditText and Button. EditText allows the user to enter text input; it could be anything – email, password, numeric input etc.
Button provides a clickable interface for performing certain actions.
You’ll observe a lot of attributes here, here is a description of what they do:
- constraintBottom, constraintTop etc. : These attributes are specific to elements in a ConstraintLayout. Basically, they are used to set the constraints (boundaries), positioning of elements relative to each other. If you don’t remember the layouts, then it is highly recommended that you read about the different layouts in Android.
- marginLeft, marginRight, etc.: They are used to set the margins for the element.
- layout_width, layout_height: They are used to set the size (height and width) of the element. wrap_content is used to indicate that the size should be adjusted as per the content (text, image, etc.) of the element.
- hint: The hint attribute is used in EditText to add a placeholder. It lets the user know that that’s a clickable field.
- ID: This is used to give a unique identifier to the widget; this is important as it is used to reference these widgets in the Java code. Remember, the Java code has no knowledge of this XML code by default; we need to set it up so that it can recognize elements.
- inputType: Specifies the type of input (email, password, numeric, etc.) in the EditText. We have set the inputType attribute of the EditText to ‘textMultiLine’; this will allow the user to input multiple lines of text.
The end result of the above few lines of code will look like this:  This is what the app would look like
Changing the colours of the App
Additionally, let’s change the colours to the app, these will be visible on the title bar when we run the app, and when the EditText is selected. Head over to res/values/colors.xml.  Location of the colors.xml file
Replace the default code with the following:
Coding the actual functionality of our Scratchpad app
Now we’ll get down to the actual coding part. Open up the MainActivity.java file.
Adding widgets to the code
Let’s start adding our widgets to the code. Write the following code inside the main function before the onCreate() function. If you gave it a name other than MainActivity, that will be the main function:
Now we’ll reference the actual widgets from the XML file. Write this below setContentView(R.layout.activity_main); inside onCreate() function.
Remember the IDs we had assigned to the widgets in the XML file? They are used here, to connect the Java code to the XML code components. This will set up our widgets.
How to handle file input and output operations in Android
Now, we’ll define two methods to read and write data to files: readFromFile() and writeToFile().
As the name suggests, readFromFile() will be used to read the data from the file, and writeToFile() will be used to write to the file. If the file doesn’t exist, writeToFile() also creates the file in the memory.
The File that we have been talking about will be a .txt file in private mode so that only this App can access it. The code is as follows:
Writing to a private .txt file in Android
We create a new function and assign it a name. In this particular tutorial, we have given it the name writeToFile(). The code for this goes right after the onCreate() function is closed.
Reading from a private .txt file in Android
After we have written code for writing to a file, we will write the code to read from the .txt file. This is how it goes down:
Code explanation
- The file that we are reading from and writing to is ‘todolist.txt’. The methods openFileInput() and openFileOutput() are used to open the file for reading and writing, respectively.
- The method openFileOutput() has the following signature: public abstract FileOutputStream openFileOutput (String name, int mode), where name is a String indicating the file name and mode is an Integer flag that indicates how the file should be opened. This method opens a file for writing and creates a new file if it doesn’t exist. The different modes are as follows:
MODE_PRIVATE: The default mode, where the created file can only be accessed by the calling application (or all applications sharing the same user ID).
MODE_WORLD_READABLE: (Deprecated) Allows all other applications to have read access to the created file.
MODE_WORLD_WRITEABLE: (Deprecated) Allows all other applications to have write access to the created file.
MODE_APPEND: If the file already exists then write data to the end of the existing file instead of erasing it.
- In these methods, we use OutputStreamWriter and InputStreamReader classes, which are used for File I/O. These are predefined classes in Android, and that’s why we first create an object of that class. From documentation:
“An OutputStreamWriter is a bridge from character streams to byte streams: Characters written to it are encoded into bytes using a specified charset. The charset that it uses may be specified by name or maybe given explicitly, or the platform’s default charset may be accepted.
Each invocation of a write() method causes the encoding converter to be invoked on the given character(s). The resulting bytes are accumulated in a buffer before being written to the underlying output stream. The size of this buffer may be specified, but by default, it is large enough for most purposes. Note that the characters passed to the write() methods are not buffered.”
“An InputStreamReader is a bridge from byte streams to character streams: It reads bytes and decodes them into characters using a specified charset. The charset that it uses may be specified by name or maybe given explicitly, or the platform’s default charset may be accepted.
Each invocation of one of an InputStreamReader’s read() methods may cause one or more bytes to be read from the underlying byte-input stream. To enable the efficient conversion of bytes to characters, more bytes may be read ahead from the underlying stream than are necessary to satisfy the current read operation.”
Link: https://developer.android.com/reference/java/io/InputStreamReader
- These are the classes used to read from and write to files. To read from files, we use the BufferedReader class to read from files easily, without getting conversion issues.
- The write() method of OutputStreamWriter is used to write to files.
- The readLine() method of BufferedReader is used to read a line of text from the file.
- It is very important to close the Input or Output stream after I/O operations. Hence, the close() button is used to do that.
Implementing the save functionality
Now we’ll implement the saving of text written in the EditText, by clicking the save button.
We’ll also add a Toast message to let the user know that their text has been saved.
A Toast is a small popup that appears at the bottom of the screen for a short duration. Write the following in the onCreate() function in MainActivity.java:
setOnClickListener() is used to set up click events. Here, we have used it to call the method for saving the text into the file, whenever the button is clicked.
We need to read from the file as well, whenever the app opens. Write the following in the onCreate() function of MainActivity.java:
The coding part ends here. Now let us test our app.
Testing the Scratchpad App
Let’s now move forward and run the app. Hit the run icon (Green Play button on top). The app will build, and you should see the following:  Final Look of the App
Type in some text, and hit the save button.
Hit the back button to close the app.  After Typing Text and Hitting the Save Button
Now, reopen the app (Find the app icon in the app menu on the phone).  After Reopening the App
Voila! It’s still there.
We have built a fully functional scratchpad app. Go ahead and use it to jot down some notes!
How to view the contents of a private .txt file in Android?
Since we have created the file in Private mode, it cannot be accessed directly. It will not be visible to any other application other than this App. However, if we want to view the contents of this file, we can do that in the command line. The steps are as follows:
- Run the emulator. This is very important since the commands won’t run without a running emulator instance.
- Navigate to the [android-sdk]/platform-tools folder and run the following commands (Replace your-package-name with the package name of your app, it is the first line in MainActivity.java file):
You should now see the contents of the file in your command line window.  Viewing the Contents of the File using Command Line
Complete Code for the Scratchpad App
activity_main.xml
colors.xml
Java File
Don’t forget to replace the package name with your package name if you are going to copy this entire code!
Android Studio auto-generates most of the code in the beginning. So, you only need to add the additional code. No need to change the already present code.
About the author

Undergraduate student pursuing B.Tech in Information Technology from MSIT, Delhi. An aspiring Android Developer who loves to stay up to date about the latest trends in technology.
Back to course page
Share and Support

Leave a Reply Cancel reply
This site uses Akismet to reduce spam. Learn how your comment data is processed.
Источник


