- Метанит android studio калькулятор
- Как создать калькулятор на Java — полное руководство с кодом
- Создание проекта
- Включение привязки данных в проекте
- Разработка макета калькулятора
- Общие принципы создания виджетов макета
- Создание макета калькулятора
- Внутренние компоненты калькулятора
- Обработка нажатий на цифры
- Обработка кликов по кнопкам операторов
- Заключение
- How to Create Simple Calculator Android App Using Android Studio
- Let’s get started with our calculator android App:
- Step-1
- Step-2
- Step-3
- Step-4
- Step-5
- Here we have 1 EditText. It defines the type of content.
- Building a Simple Calculator in Kotlin Using Android Studio
- Description
- Step 1: Create an “Empty Activity” on Android Studio.
- Codenames, Tags, and Build Numbers | Android Open Source Project
- Android development releases are organized into families with alphabetical codenames that are inspired by tasty treats…
- Step 2: Adding colors to the colors.xml file
- Step 3: Modifying the styles.xml file
- Step 4: Configuring the “activity_main.xml” file
- Step 5: Placing the expression builder library inside the Gradle.
- Step 6: Actual Kotlin coding for the calculator
- Step 7: Run the app using the emulator
- User Interaction
- Known Issues and Limitations
Метанит android studio калькулятор
Пришло время заняться чем то полезным. В этот уроке мы попробуем сотворить небольшую, но полезную Android программу — калькулятор.
Запускаем Android Studio, создаем новый проект. Названия компонентов я оставлю по умолчанию: имя Activity — MainActivity, layout файла — activity_main.
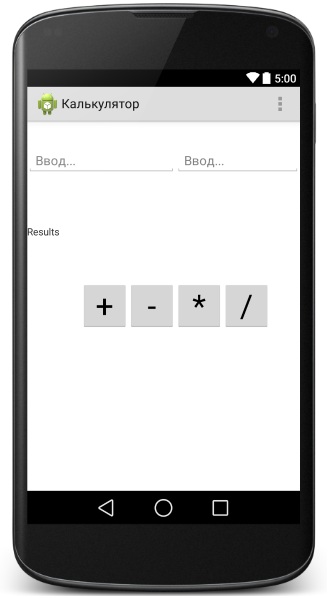
Нам нужно создать на экране 2 — поля для ввода чисел с которыми будут проводиться операции, 4 кнопки: плюс, минус, умножить, разделить, и текстовое поле
для вывода результатов вычислений. Чтобы сделать это, редактируем наш activity_main.xml файл в режиме Text следующим образом:
Заметьте, для элементов я создал подпись hint и привязал к ней строковой ресурс. Для этого, откройте файл values — strings и создайте там строку, на которую потом будете ссылаться в подписи (здесь в коде — строка «Ввод. «):
После создания всех элементов перейдите в режим работы Design и с помощью перетаскивания разместите созданные элементы, как вам нравиться (хотя не нужно очень себя к такому приучать, позволим себе это только сегодня). Например, вот как сделал я (ну не особо, согласен):
После создания всех нужных нам элементов, отправляемся писать саму программу в файл MainActivity.java. Нам нужно: 1) огласить используемые объекты, 2) привязать эти объекты к созданным нами элементам, 3) указать, что наши 4 кнопки будут нажиматься, 4) описать, что будет происходить в процессе нажатия на каждую из 4 кнопок.
Готовый код рабочего приложения выглядит так (все объяснения ко всем блокам приложения даны тут же, с пометкой // ) :
Все готово, если что то не понятно, перечитывайте все сначала до тех пор, пока не поймете:). Запускаем приложение и пользуемся своим творением.
Стоит отметить, что с RelativeLayout довольно сложно совладать в том плане, чтобы на выходе на всех экранах ваше приложение смотрелось так, как вы задумывали, поэтому, если у вас возникли проблемы с отображением вашего творения (все очень не красиво и разъехалось во все стороны), то по-экспериментируйте, например с LinearLayout . Удачи!
Статья написана по мотивам этого оригинала.
Источник
Как создать калькулятор на Java — полное руководство с кодом
В этом руководстве мы расскажем, как создать калькулятор на Java для Android. Если вы новичок в программировании и никогда раньше не создавали приложения, ознакомьтесь с нашим предыдущим руководством по написанию первого приложения для Android:

Предполагается, что у вас есть хотя бы минимальный базовый опыт создания Android – приложений .
Полный исходный код калькулятора, описанного ниже, доступен для использования и изменения на github .
Создание проекта
Первое, что нужно сделать — это создать в Android Studio новый проект: Start a new Android Studio project или File — New — New Project :

Для этого руководства мы выбрали в панели « Add an Activity to Mobile » опцию « EmptyActivity », для « MainActivity » мы оставили имя по умолчанию – « Activity ». На этом этапе структура должна выглядеть, как показано на рисунке ниже. У вас есть MainActivity внутри пакета проекта и файл activity_main.xml в папке layout :

Включение привязки данных в проекте
Перед тем, как создать приложение для Андроид с нуля, нужно уяснить, что использование привязки данных помогает напрямую обращаться к виджетам ( Buttons , EditText и TextView ), а не находить их с помощью методов findViewById() . Чтобы включить привязку данных, добавить следующую строку кода в файл build.gradle .

Разработка макета калькулятора
Для включения привязки данных в файле activity_main.xml требуется еще одно изменение. Оберните сгенерированный корневой тег ( RelativeLayout ) в layout , таким образом сделав его новым корневым тегом.
Как научиться создавать приложения для Андроид? Читайте наше руководство дальше.
Тег layout — это предупреждает систему построения приложения, что этот файл макета будет использовать привязку данных. Затем система генерирует для этого файла макета класс Binding . Поскольку целевой XML-файл называется activity_main.xml , система построения приложения создаст класс ActivityMainBinding , который можно использовать в приложении, как и любой другой класс Java . Имя класса составляется из имени файла макета, в котором каждое слово через подчеркивание будет начинаться с заглавной буквы, а сами подчеркивания убираются, и к имени добавляется слово « Binding ».
Теперь перейдите к файлу MainActivity.java . Создайте закрытый экземпляр ActivityMainBinding внутри вашего класса, а в методе onCreate() удалите строку setContentView () и вместо нее добавьте DataBindingUtil.setContentView() , как показано ниже.
Общие принципы создания виджетов макета
В приложении калькулятора есть четыре основных элемента:
RelativeLayout — определяет, как другие элементы будут укладываться или отображаться на экране. RelativeLayout используется для позиционирования дочерних элементов по отношению друг к другу или к самим себе.
TextView — элемент используется для отображения текста. Пользователи не должны взаимодействовать с этим элементом. С помощью TextView отображается результат вычислений.
EditText — похож на элемент TextView, с той лишь разницей, что пользователи могут взаимодействовать с ним и редактировать текст. Но поскольку калькулятор допускает только фиксированный набор вводимых данных, мы устанавливаем для него статус « не редактируемый ». Когда пользователь нажимает на цифры, мы выводим их в EditText .
Button — реагирует на клики пользователя. При создании простого приложения для Андроид мы используем кнопки для цифр и операторов действий в калькуляторе.
Создание макета калькулятора

Код макета калькулятора объемный. Это связано с тем, что мы должны явно определять и тщательно позиционировать каждую из кнопок интерфейса. Ниже представлен фрагмент сокращенной версии файла макета activity_main :
Внутренние компоненты калькулятора
Перед тем, как создать приложение на телефон Android , отметим, что valueOne и valueTwo содержат цифры, которые будут использоваться. Обе переменные имеют тип double , поэтому могут содержать числа с десятичными знаками и без них. Мы устанавливаем для valueOne специальное значение NaN ( не число ) — подробнее это будет пояснено ниже.
Этот простой калькулятор сможет выполнять только операции сложения, вычитания, умножения и деления. Поэтому мы определяем четыре статических символа для представления этих операций и переменную CURRENT_ACTION , содержащую следующую операцию, которую мы намереваемся выполнить.
Затем мы используем класс DecimalFormat для форматирования результата. Конструктор десятичного формата позволяет отображать до десяти знаков после запятой.
Обработка нажатий на цифры
В нашем создаваемом простом приложении для Андроид всякий раз, когда пользователь нажимает на цифру или точку, нам нужно добавить эту цифру в editText . Пример кода ниже иллюстрирует, как это делается для цифры ноль ( 0 ).
Обработка кликов по кнопкам операторов

Обработка нажатия кнопок операторов ( действий ) выполняется по-другому. Сначала нужно выполнить все ожидающие в очереди вычисления. Поэтому мы определяем метод computeCalculation . В computeCalculation , если valueOne является допустимым числом, мы считываем valueTwo из editText и выполняем текущие операции в очереди. Если же valueOne является NaN , для valueOne присваивается цифра в editText .
Продолжаем создавать копию приложения на Андроид . Для каждого оператора мы сначала вызываем computeCalculation() , а затем устанавливаем для выбранного оператора CURRENT_ACTION . Для оператора равно (=) мы вызываем computeCalculation() , а затем очищаем содержимое valueOne и CURRENT_ACTION .
Поздравляю! Мы завершили создание простого калькулятора. Теперь вы сможете создать приложение для Андроид сами.
Заключение
Если вы запустите и протестируете данное приложение, то увидите некоторые моменты, которые можно улучшить: 1) возможность нажимать на кнопку оператора, когда editText очищен ( т. е. без необходимости ввода первой цифры ), 2) возможность продолжать вычисления после нажатия кнопки « Равно ».
Полный код примера доступен на github .
Пожалуйста, опубликуйте свои отзывы по текущей теме статьи. За комментарии, подписки, лайки, дизлайки, отклики низкий вам поклон!
Дайте знать, что вы думаете по данной теме в комментариях. Мы крайне благодарны вам за ваши комментарии, дизлайки, отклики, лайки, подписки!
Источник
How to Create Simple Calculator Android App Using Android Studio
Last Updated on August 20th, 2017 by Kuldeep 20 comments

In my previous article I wrote detailed steps on How to create a simple android application. In that particular app I also explained concepts of android button and basic concepts of android.
You can find all my other articles in Android section.
In this article we will create a calculator android app . This is a simple calculator with limited functionality.
Before we go forward it would be nice to go over complete HelloWorld Tutorial. Here is a link again: My first HelloWorld Android App
- How to build a simple calculator app – full tutorial
- Building a Simple Calculator using Android Studio
- Android Development: Creating a Basic Calculator
- Create Simple Calculator Android App
- How to create a Calculator App for Android
Let’s get started with our calculator android App:
Step-1
- Open your Android Studio
- Click on Start a New Android Studio Project.
- Give your Application Name CrunchifyCalculator and leave other fields blank as it is, then click NEXT.

Step-2
- Select the Minimum SDK API 15: Android 4.0.3(IceCreamSandwich) . I selected API 15 (IceCreamSandwich) because it covers almost 94% device and it has almost all the features. If you want to cover 100% device then you can select API 8: Android 2.2(Froyo).

Step-3
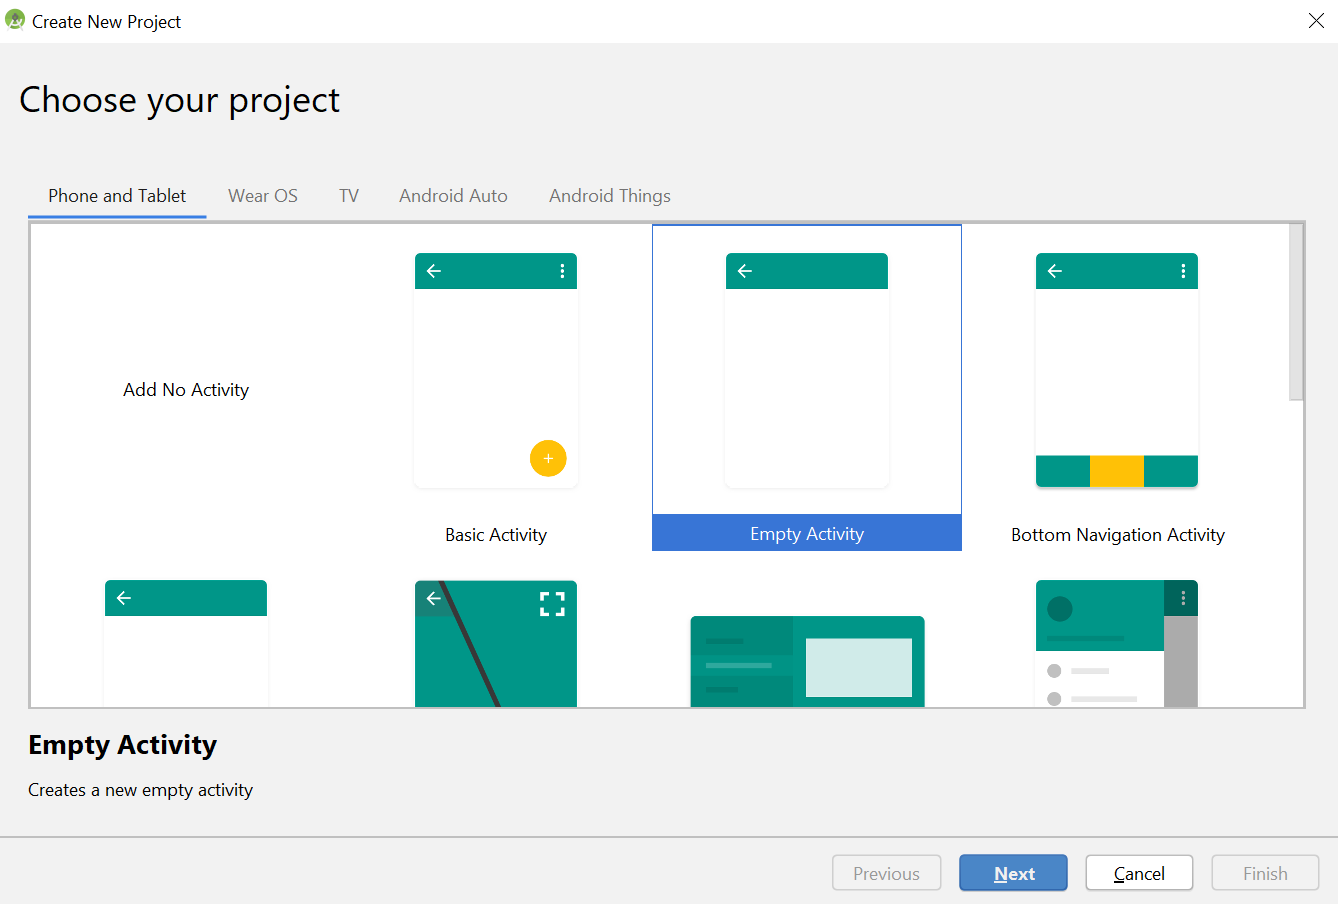
- Select the Empty Activity and click NEXT.
- Leave the activity name MainActivity as it is and leave everything as it is. Click Finish.
![]()
Step-4
- After clicking Finish, it takes around around
2 minutes to build Activity and files.

Step-5
- Now we have to add our Java code in our MainActivity.java file.
- So open you MainActivity.java file from left side of IDE (app -> java -> com.crunchify.tutorials.crunchifycalculator -> MainActivity.java)
You can find the explanation of highlighted line below the code.
Here we have 1 EditText. It defines the type of content.
Let’s understand code little-bit more.
- Line 11 – 14: Here we created the reference of Buttons and EditText.
- Line 16: Here we created two float variable for as value1 and value2.
- Line 21: We override the method onCreate() which is the method of Activity class.
- Line 45 – 50: We set onClickListener on Button1. If we click on Button1, EditText will display.
- We have implemented the same logic for every button.
- Line 115 – 127: Here we have set the click listener on Add button.
- Here we put the condition as, if we EditText is Null then we set EditText as empty value. Else we add the two value which are clicked before add button clicked and after add button clicked.
- We also set the crunchifyAddition Boolean value to True. This true represent that add button is clicked and this will be used when user click “=” button.
- We implement the same logic for other buttons also like buttonSub, ButtonMul, buttonDivision.
- Line 156 – 183: Here we set clickListener on “=” button. Here we put condition like if user click Add button the crunchifyAddition value is set True on the click listener of Add button.
- According to that, corresponding action will be performed respective to button clicked.
- After the action performed, we set the crunchifyAddition value to false, so that we can perform Add action again.
Below is the layout file, with help to design front end for the calculator:
Источник
Building a Simple Calculator in Kotlin Using Android Studio

In this tutorial, we will learn how to build a simple calculator in Kotlin using Android Studio.

Description
In this tutorial, we will develop a “ 10-key” calculator on Android Studio using Kotlin. The buttons included should be:
- Number Keys: “ 1”, “ 2”, “ 3”, “ 4”, “ 5”, “ 6”, “ 7”, “ 8”, “ 9”, “ 0”.
- Operation Keys: “ +”, “ —”, “ *”, “ /”
- Other Keys: “ =”, “ CLEAR”. Here the “ CLEAR” key should clear out the screen and everything in the memory. The “ =” key should apply the operation and give the result.
- Additional the calculator will have a “ DEL” key which is the same as the “backspace” and will remove the last character on the screen.
- A “ .” key should show a decimal.
Now we know how our calculator should look and work like, let’s get started. I will try to provide all the essential steps, in order for you to understand.
Step 1: Create an “Empty Activity” on Android Studio.
Let us create a new project. Since our calculator comprises only one activity (we need only one activity Kotlin file and one XML layout file) we need to select an “ empty activity”. This can be done as shown below:
New → New Project → Empty Activity
After you create an empty activity, configure your projects such as name, package name, location, language, and API level. Follow the screenshot below to configure your project for consistency. Make sure you select the language as Kotlin (obviously I’m coding in Kotlin). And then click on finish, then your project would be loaded.

To know more about the API level you can refer to google’s official documentation given below, it’s not mandatory to select API 15 as shown in the above screenshot. Just select it for consistency for the tutorial’s sake.
Codenames, Tags, and Build Numbers | Android Open Source Project
Android development releases are organized into families with alphabetical codenames that are inspired by tasty treats…
Step 2: Adding colors to the colors.xml file
As the name suggests in the color files, we can specify the colors for all the buttons of the calculator. The colors.xml file can be found in:
app →res →values →colors.xml
Step 3: Modifying the styles.xml file
The style file is used to define the format or the look for a UI. A style can be applied to an individual View (from within a layout file) or to an entire Activity or application (from within the manifest file).
The styles.xml can be found in
app →res →values →styles.xml
All the above are just style properties for the calculator defined in the styles.xml file. To brief out
NumberButtonStyle: Keys → 1, 2, 3, 4, 5, 6, 7, 8, 9, 0
Step 4: Configuring the “activity_main.xml” file
This is the main layout file here you need not use the UI editor, rather you can code the entire layout using XML. Here we can use the text view layout rather than buttons for the keys. I’m placing all the text view inside a linear layout. It is a mechanical process because of multiple text views. So just follow along with me right now.
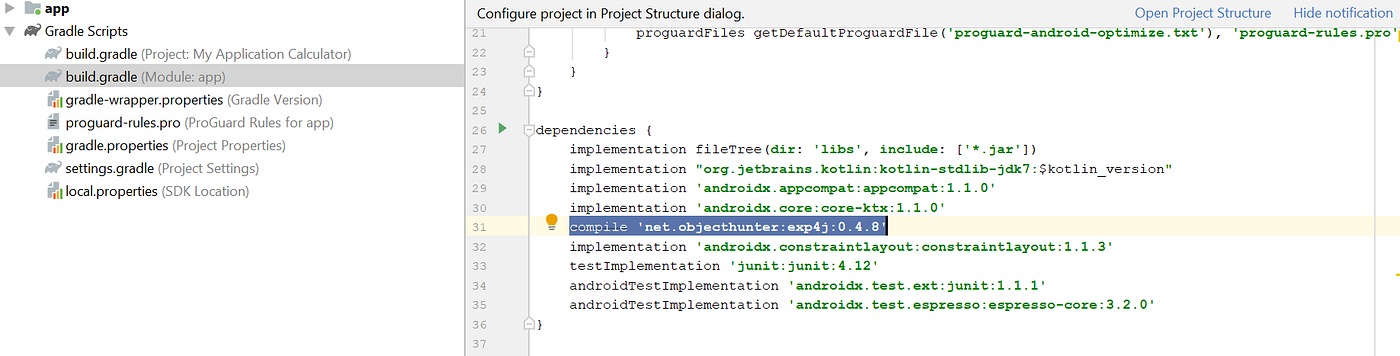
Step 5: Placing the expression builder library inside the Gradle.
I have used the Expression Builder library to calculate the expressions. With the help of a GitHub repository, I learned how to do this. I was struggling to use the equals button for generating the result. So now just place the expression builder library inside the Gradle.
app →Gradle Scripts→build.gradle
Step 6: Actual Kotlin coding for the calculator
First, I’m appending 1, 2, 3,…..0 when the users press the keys to the text view, respectively. To do this, I have created a function called evaluateExpression() which does the appending job to the text view. Then in the Equals function, I am using the Expression Builder library and calling its method Expression Builder to do the calculations. The code is pretty much self-explanatory. The main_activity.kt can be found in:
app → java →com.example.myapplicationcalculator →MainActivity.kt
In my case, the package name is com.example.myapplicationcalculator, it might vary in your case.
Step 7: Run the app using the emulator
This is the last step, now that you have written all the Kotlin code, XML file now let’s test the result. To do this, we can use the androids built-in emulator. Click the Green button which looks like a play button at the top right side or just press Shift + F10. If you don’t know how to configure and use the android built-in emulator. Please check the video down below:
Alternatively, If you are having a problem using the emulator or if your laptop is heating a lot. Don’t worry there is always a second option. Use Genymotion as an external emulator. You can video how to set up Genymotion below:
Now all set and done when you run the emulator you will get a beautiful simple calculator if not then double-check your code.

User Interaction
This android application requires user interaction to operate. The user interacts with the application by performing the rudimentary task of pressing buttons on the keypad of the calculator. By entering numbers, the user can complete basic mathematical operations such as addition, subtraction, multiplication, and division. Using this calculator is trivial; a user only needs to feed the inputs into the calculator using the keypad and then specify what operations they want to perform by clicking on one out of the four operation buttons (+, -, *, /). This calculator can recognize both positive and negative numbers. Also, it recognizes the order of operations; a collection of rules that show which operations to perform first to evaluate the expression. Often the rules are denoted as PEMDAS, where P- Parenthesis, E–Exponents, M- Multiplication, D-Division, A–Addition and S–Subtraction. For example, if the user enters 2+9*5 then the calculator prompts the result as 47, rather than 55. This calculator does not support parenthesis and exponents so the order of operations according to PEMDAS, in this case, is “*” i.e. 9*5 followed by “+” i.e. 45+2 and the result is 47.

The above table 1 shows the buttons and functions of the basic calculator. These operations resemble the basic calculator that everybody knows of these days. This calculator displays up to 18 characters on the screen for example (1/3 = 0.3333333333333333). This calculator has good user experience and design it looks and feels slightly like advanced calculators that we often use in our android phones. In fact, I intended to design it based on my current android smartphone.
Known Issues and Limitations
By using this calculator, we cannot use the keyboard shortcuts to enter the inputs. We can only use the buttons provided in the calculator itself to enter the inputs. This is not a big thing to worry about because this is an android application. Everybody runs this application on their smartphone you don’t need a keyboard to enter the numbers.
Also, this calculator does not provide any error messages if someone tries to divide by 0. If someone enters two operations simultaneously, then the calculator does not display any error messages. For example, by entering the expression 5**+9, the calculator does not freeze or crash, rather it waits for the user to change the operations and make it a valid mathematical expression.
Other than these two limitations, the application meets all the criteria that are listed in the description section above. I have used the text view layout as buttons because I found this as an easy way of organizing buttons next to one another. I had some problems while I was manually laying the buttons next to another. Every-time when I executed the application using an emulator the buttons were scattered all across the screen, even though I constrained the layout. With the help of the text view layout, I could solve this issue.
Hence we have knowingly or unknowingly built a beautiful simple calculator using Kotlin on Android Studio. This is just a simple calculator we can add some more features also build a scientific one. But this is more than enough for a good start to get hands-on Kotlin and Android Studio Coding. I would recommend you guys to type the code rather than copy-pasting, sometimes when you copy-paste you end up getting errors because of package mismatch. Everybody has different packages in the android studio, so type and learn. If you guys have any doubts regarding this tutorial, then post a response or comment down below. I will respond quickly. Until then see you, Good Bye.
Источник


