- Статьи
- Измерение пропускной способности с помощью Bandwidth test
- Manual:Tools/Bandwidth Test
- Contents
- Summary
- Bandwidth Test Server
- Example
- Bandwidth Test Client
- Example
- Manual:Troubleshooting tools
- Contents
- Troubleshooting tools
- Check network connectivity
- Using the ping command
- Using the traceroute command
- Log Files
- Torch (/tool torch)
- Winbox
- Packet Sniffer (/tool sniffer)
- Bandwidth test
- Profiler
Статьи
Измерение пропускной способности с помощью Bandwidth test
Часто задаются вопросы: «Какая возможна максимальная скорость передачи данных через wi-fi на моем оборудовании Mikrotik и как ее можно проверить, как проверить мою скорость подключения к Точке Доступа или Базовой Станции, и наконец, как проверить скорость в канале точка-точка?».
Ответы можно получить с помощью специальной утилиты от Mikrotik «Bandwidth test» .
Скачать утилиту Bandwidth test можно на сайте mikrotik.com
Для тестирования канала между Точкой доступа и Вашим компьютером запускаем утилиту и делаем простые настройки.
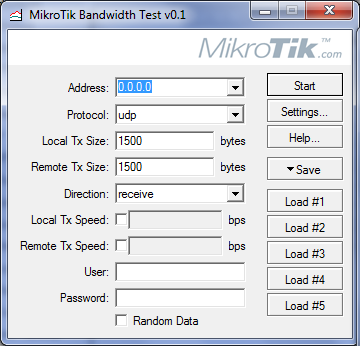
Заходим на Точку доступа через winbox и настраиваем утилиту на Mikrotik Routerboard.
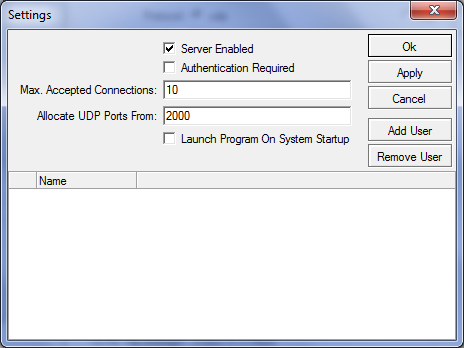
Настройки находятся в разделе Tools/BTestServer
Сама утилита запускается в разделе Tools/Bandwidth test.
Для начала тестирования необходимо ввести ip-адрес удаленной стороны, выбрать протокол, по которому будет производиться тест и вид трафика. Если используется авторизация, ввести имя пользователя и пароль и нажать «start». Если все настроено правильно мы увидим результаты тестирования.
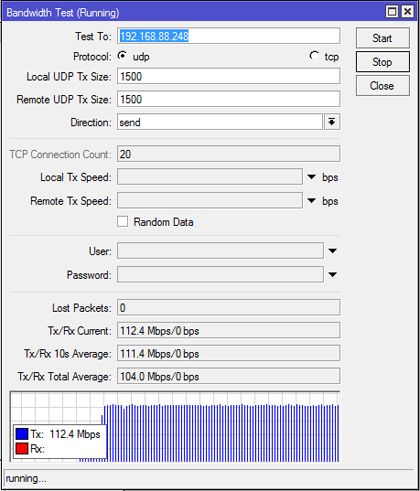
В данном случае мы видим результаты тестирования при подключении к Mikrotik Routerboard 751U-2HnD ноутбука HP ProBook4530s, как видим достижима скорость в 112 мбс.
Основные настройки RB751 по умолчанию (при первом включении выполняется скрипт, который на Lan1 включает dhcp-client, порты со 2-го по 5-й и wi-fi интерфейс объединяет в бридж-группу и включает на них dhcp-server).
Остается только сделать настройки безопасности для беспроводной сети и поставить пароль для входа на Mikrotik (стоит отметить. что для протокола 802.11n не работает тип шифрования TKIP).
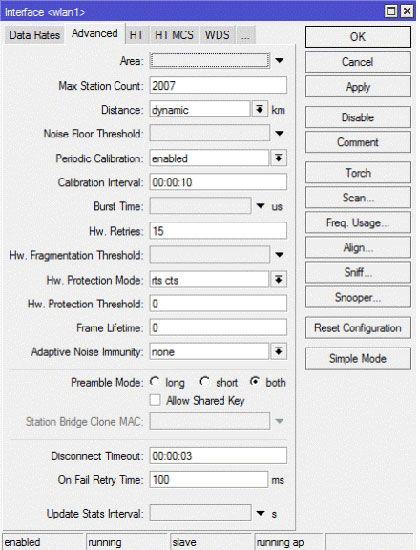
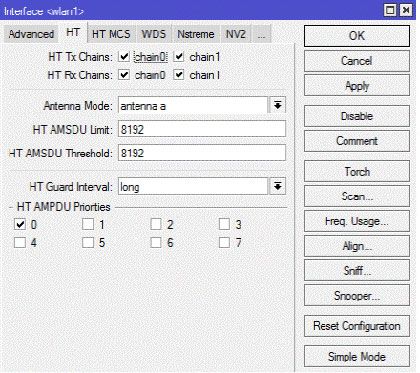
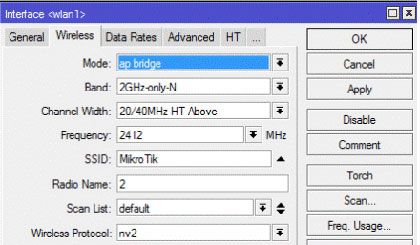
Ниже приведены наиболее важные настройки wi-fi интерфейса для максимальной пропускной способности (до 100 мбс и выше) остальные настройки подразумеваются по умолчанию.
Для более полных настроек, которые отображены на скрин-шотах, в окне настроек интерфейса справа внизу необходимо нажать кнопку Advanced Mode.
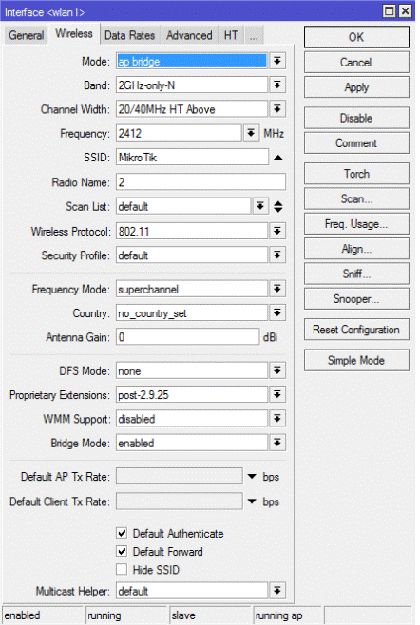
Переходим на вкладку Advanced
Выставляем также режим работы двух каналов для поддержки режима MIMO 2×2.
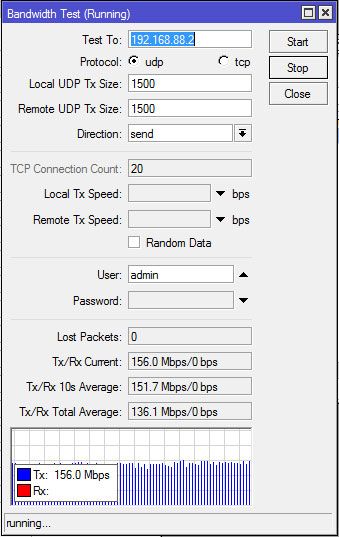
Также можно проверить скорость передачи данных в канале точка-точка.
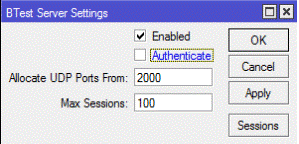
Для этого на обоих устройствах включаем в настройках Tools/BTestServer : server enabled и аутентификацию по желанию.
Ниже приведены результаты тестирования при организации канала между двумя моделями RB751U-2HnD и использовании фирменного протокола от Mikrotik NV2 (nstreme v.2). Как видите при такой связке удалось добиться передачи данных на скорости до 156 мбс в одну сторону. Заметим, что скорость копирования файлов может быть ниже этой цифры.
Настройки практически идентичны вышеуказанным за исключением режима Station на клиентской стороне. А также некоторых других настроек на Точке доступа, приведенных ниже:
Включаем nstreme и выставляем Framer policy
Источник
Manual:Tools/Bandwidth Test

Applies to RouterOS: v2.9, v3, v4+
Contents
Summary
Sub-menu: /tool
Packages required: system
The Bandwidth Tester can be used to measure the throughput to another MikroTik router (either wired or wireless) and thereby help to discover network «bottlenecks».
The TCP test uses the standard TCP protocol with acknowledgments and follows the TCP algorithm on how many packets to send according to latency, dropped packets, and other features in the TCP algorithm. Please review the TCP protocol for details on its internal speed settings and how to analyze its behavior. Statistics for throughput are calculated using the entire size of the TCP data stream. As acknowledgments are an internal working of TCP, their size and usage of the link are not included in the throughput statistics. Therefore this statistic is not as reliable as the UDP statistic when estimating throughput.
The UDP tester sends 110% or more packets than currently reported as received on the other side of the link. To see the maximum throughput of a link, the packet size should be set for the maximum MTU allowed by the links which is usually 1500 bytes. There is no acknowledgment required by UDP; this implementation means that the closest approximation of the throughput can be seen.
- Up to RouterOS version 6.44beta39 Bandwidth Test used only single CPU core and reached its limits when core was 100% loaded.
- Bandwidth Test uses all available bandwidth (by default) and may impact network usability.
- Bandwidth Test uses a lot of resources. If you want to test real throughput of a router, you should run bandwidth test through the tested router not from or to it. To do this you need at least 3 routers connected in chain: the Bandwidth Server, the router being tested and the Bandwidth Client.
- If you use UDP protocol then Bandwidth Test counts IP header+UDP header+UDP data. In case if you use TCP then Bandwidth Test counts only TCP data (TCP header and IP header are not included).
Bandwidth Test Server
Sub-menu: /tool bandwidth-server
| Property | Description |
|---|---|
| allocate-udp-ports-from (integer 1000..64000; Default: 2000) | Beginning of UDP port range |
| authenticate (yes | no; Default: yes) | Communicate only with authenticated clients |
| enabled (yes | no; Default: yes) | Defines whether bandwidth server is enabled or not |
| max-sessions (integer 1..1000; Default: 100) | Maximal simultaneous test count |
Example
To enable bandwidth-test server without client authentication:
Bandwidth Test Client
Command name: /tool bandwidth-test
| Property | Description |
|---|---|
| address (IP address | IPv6 prefix[%interface]; Default: ) | IP address of host |
| direction (both | receive | transmit; Default: receive) | Direction of data flow |
| duration (time; Default: ) | Duration of the test |
| interval (time: 20ms..5s; Default: 1s) | Delay between reports (in seconds) |
| local-tx-speed (integer 0..4294967295; Default: ) | Transfer test maximum speed (bits per second) |
| local-udp-tx-size (integer: 28..64000 ) | Local transmit packet size in bytes |
| password (string; Default: «») | Password for the remote user |
| protocol (udp | tcp; Default: udp) | Protocol to use |
| random-data (yes | no; Default: no) | If random-data is set to yes, the payload of the bandwidth test packets will have incompressible random data stream so that links that use data compression will not distort the results (this is CPU intensive and random-data should be set to no for low speed CPUs) |
| remote-tx-speed (integer 0..4294967295; Default: ) | Receive test maximum speed (bits per second) |
| remote-udp-tx-size (integer: 28..64000 ) | Remote transmit packet size in bytes |
| tcp-connection-count (integer 1..100; Default: 20) | Number of TCP connections to use |
| user (string; Default: «») | Remote user |
Example
To run 15-second long bandwidth-test to the 10.0.0.32 host sending and receiving 1000-byte UDP packets and using username admin to connect:
Источник
Manual:Troubleshooting tools
Contents
Troubleshooting tools
Before, we look at the most significant commands for connectivity checking and troubleshooting, here is little reminder on how to check host computer’s network interface parameters on .
The Microsoft windows have a whole set of helpful command line tools that helps testing and configuring LAN/WAN interfaces. We will look only at commonly used Windows networking tools and commands.
All of the tools are being ran from windows terminal. Go to Start/Run and enter «cmd» to open a Command window.
Some of commands on windows are:
ipconfig – used to display the TCP/IP network configuration values. To open it, enter » ipconfig » in the command prompt.
There are also a variety of additional functions for ipconfig. To obtain a list of additional options, enter » ipconfig /? » or “ ipconfig -? ”.
netstat – displays the active TCP connections and ports on which the computer is listening, Ethernet statistics, the IP routing table, statistics for the IP, ICMP, TCP, and UDP protocols. It comes with a number of options for displaying a variety of properties of the network and TCP connections “netstat –?”.
nslookup – is a command-line administrative tool for testing and troubleshooting DNS servers. For example, if you want to know what IP address is «www.google.com», enter «nslookup www.google.com» and you will find that there are more addresses 74.125.77.99, 74.125.77.104, 74.125.77.147.
netsh – is a tool an administrator can use to configure and monitor Windows-based computers at a command prompt. It allows configure interfaces, routing protocols, routes, routing filters and display currently running configuration.
Very similar commands are available also on unix-like machines. Today in most of Linux distributions network settings can be managed via GUI, but it is always good to be familiar with the command-line tools. Here is the list of basic networking commands and tools on Linux:
ifconfig – it is similar like ipconfig commands on windows. It lets enable/disable network adapters, assigned IP address and netmask details as well as show currently network interface configuration.
iwconfig — iwconfig tool is like ifconfig and ethtool for wireless cards. That also view and set the basic Wi-Fi network details.
nslookup – give a host name and the command will return IP address.
netstat – print network connections, including port connections, routing tables, interface statistics, masquerade connections, and more. (netstat – r, netstat — a)
ip – show/manipulate routing, devices, policy routing and tunnels on linux-machine.
For example, check IP address on interface using ip command:
You can add static route using ip following command:
mentioned tools are only small part of networking tools that is available on Linux. Remember if you want full details on the tools and commands options use man command. For example, if you want to know all options on ifconfig write command man ifconfig in terminal.
Check network connectivity
Using the ping command
Ping is one of the most commonly used and known commands. Administration utility used to test whether a particular host is reachable across an Internet Protocol (IP) network and to measure the round-trip time for packets sent from the local host to a destination host, including the local host’s own interfaces.
Ping uses Internet Control Message Protocol (ICMP) protocol for echo response and echo request. Ping sends ICMP echo request packets to the target host and waits for an ICMP response. Ping output displays the minimum, average and maximum times used for a ping packet to find a specified system and return.
Press Ctrl-C to stop ping process.
Press Ctrl-C to stop ping process.
Using the traceroute command
Traceroute displays the list of the routers that packet travels through to get to a remote host. The traceroute or tracepath tool is available on practically all Unix-like operating systems and tracert on Microsoft Windows operating systems.
Traceroute operation is based on TTL value and ICMP “Time Exceeded” message. Remember that TTL value in IP header is used to avoid routing loops. Each hop decrements TTL value by 1. If the TTL reaches zero, the packet is discarded and ICMP Time Exceeded message is sent back to the sender when this occurs.
Initially by traceroute, the TTL value is set to 1 when next router finds a packet with TTL = 1 it sets TTL value to zero, and responds with an ICMP «time exceeded» message to the source. This message lets the source know that the packet traverses that particular router as a hop. Next time TTL value is incremented by 1 and so on. Typically, each router in the path towards the destination decrements the TTL field by one unit TTL reaches zero.
Using this command you can see how packets travel through the network and where it may fail or slow down. Using this information you can determine the computer, router, switch or other network device that possibly causing network issues or failures.
From Personal computer:
Traceroute and tracepath is similar, only tracepath does not not require superuser privileges.
Log Files
System event monitoring facility allows to debug different problems using Logs. Log file is a text file created in the server/router/host capturing different kind of activity on the device. This file is the primary data analysis source. RouterOS is capable of logging various system events and status information. Logs can be saved in routers memory (RAM), disk, file, sent by email or even sent to remote syslog server.
All messages stored in routers local memory can be printed from /log menu. Each entry contains time and date when event occurred, topics that this message belongs to and message itself.
Read more about logging on RouterOS here>>
Torch (/tool torch)
Torch is real-time traffic monitoring tool that can be used to monitor the traffic flow through an interface.
You can monitor traffic classified by protocol name, source address, destination address, port. Torch shows the protocols you have chosen and tx/rx data rate for each of them.
Note: Unicast traffic between Wireless clients with client-to-client forwarding enabled will not be visible to torch tool. Packets that are processed with hardware offloading enabled bridge will also not be visible (unknown unicast, broadcast and some multicast traffic will be visible to torch tool).
The following example monitor the traffic generated by the telnet protocol, which passes through the interface ether1.
To see what IP protocols are sent via ether1:
In order to see what protocols are linked to a host connected to interface 10.0.0.144/32 ether1:
Warning: Traffic that appears in torch is before it has been filtered by Firewall. This means you will be able to see packets that might get dropped by your Firewall rules.
Starting from v5RC6 torch is capable of showing IPv6 traffic. Two new parameters are introduced src-address6 and dst-address6. Example:
To make /ping tool to work with domain name that resolves IPv6 address use the following:
By default ping tool will take IPv4 address.
Winbox
More attractive Torch interface is available from Winbox (Tool>Torch). In Winbox you can also trigger a Filter bar by hitting the F key on the keyboard.
Packet Sniffer (/tool sniffer)
Packet sniffer is a tool that can capture and analyze packets sent and received by specific interface. packet sniffer uses libpcap format.
Packet Sniffer Configuration
In the following example streaming-server will be added, streaming will be enabled, file-name will be set to test and packet sniffer will be started and stopped after some time:
Here you can specify different packet sniffer parameters, like maximum amount of used memory, file size limit in KBs.
Running Packet Sniffer Tool
There are three commands that are used to control runtime operation of the packet sniffer:
/tool sniffer start, /tool sniffer stop, /tool sniffer save.
The start command is used to start/reset sniffing, stop — stops sniffing. To save currently sniffed packets in a specific file save command is used.
Below the sniffed packets will be saved in the file named test:
View sniffed packets
There are also available different submenus for viewing sniffed packets.
- /tool sniffer packet – showthe list of sniffed packets
- /tool sniffer protocol – showall kind of protocols that have been sniffed
- /tool sniffer host –shows the list of hosts that were participating in data exchange you’ve sniffed
Figure below shows sniffer GUI in Winbox, which is more user-friendly.
Detailed commands description can be found in the manual >>
Bandwidth test
The Bandwidth Tester can be used to measure the throughput (Mbps) to another MikroTik router (either wired or wireless network) and thereby help to discover network «bottlenecks»- network point with lowest throughput.
BW test uses two protocols to test bandwidth:
- TCP – uses the standard TCP protocol operation principles with all main components like connection initialization, packets acknowledgments, congestion window mechanism and all other features of TCP algorithm. Please review the TCP protocol for details on its internal speed settings and how to analyze its behavior. Statistics for throughput are calculated using the entire size of the TCP data stream. As acknowledgments are an internal working of TCP, their size and usage of the link are not included in the throughput statistics. Therefore statistics are not as reliable as the UDP statistics when estimating throughput.
- UDP traffic – sends 110% or more packets than currently reported as received on the other side of the link. To see the maximum throughput of a link, the packet size should be set for the maximum MTU allowed by the links which is usually 1500 bytes. There is no acknowledgment required by UDP; this implementation means that the closest approximation of the throughput can be seen.
Remember that Bandwidth Test uses all available bandwidth (by default) and may impact network usability.
If you want to test real throughput of a router, you should run bandwidth test through the router not from or to it. To do this you need at least 3 routers connected in chain:
Bandwidth Server – router under test – Bandwidth Client.
Note: If you use UDP protocol then Bandwidth Test counts IP header+UDP header+UDP data. In case if you use TCP then Bandwidth Test counts only TCP data (TCP header and IP header are not included).
To enable bandwidth-test server with client authentication:
Run UDP bandwidth test in both directions, user name and password depends on remote Bandwidth Server. In this case user name is ‘admin’ without any password.
More information and all commands description can be found in the manual>>
Profiler
Profiler is a tool that shows CPU usage for each process running on RouterOS. It helps to identify which process is using most of the CPU resources.
Источник


