Mikrotik vpn для android

Краткое описание:
Утилиты для управления маршрутизаторами MikroTik RouterOS
RouterOS provides all the core features for your network — routing, firewall, bandwidth management, wireless access point, backhaul link, hotspot gateway, VPN server and more.
Use the MikroTik smartphone app to configure your router when a computer is not available.
Default username on new routers: admin. There is usually no default password (leave empty), or it is specified in the accompanied document.
Requirements: a MikroTik router running RouterOS v6 or newer.
Используйте приложение MikroTik Home, чтобы применить самые основные начальные настройки для вашей домашней точки доступа MikroTik и управлять своими домашними устройствами.
Требования: роутер MikroTik под управлением RouterOS v6 или новее.
Возможности:
• Настройки Wi-Fi
• Интернет-настройки
• Сохранение и контроль за домашними устройствами, их использованием и т.д.
• Управление доступом детей в интернет
• Настройки переадресации портов.
Use the MikroTik Home app to apply the most basic initial settings for your MikroTik home access point and manage your home devices.
Default username on new routers: admin. There is usually no default password (leave empty).
Requirements: a MikroTik router running RouterOS v6 or newer.
• WiFi settings
• Internet settings
• Save and monitor home devices, their usage etc.
• Manage your kids internet access
• Set up Port forwarding
Требуется Android: 4.2 и выше
Русский интерфейс: Да
1.3.18
• Added 5G support
1.3.17
• Fixed LTE signals in RouterOS v7.1 beta
• Added update status bar
1.3.16
• Auto-detect Gateway IP for first time users
• Auto-detect country in Quick Setup
• Fixed IP > Certificates > Subject Alt. Name input
• Fixed new config window texts
1.3.15
• Added SIM status info in main menu LTE cell
• Fixed login page tab text overflow
1.3.14
• Fixed value copy for some fields
• Managed device edit dialog improvements
• External CDB database improvements
• Fixed crash on login for some devices
1.0.1
• Fixed some crashes
Сообщение отредактировал Sergei77HX — 25.05.21, 19:34
Источник
Mikrotik vpn для android
Бесплатный чек-лист
по настройке RouterOS
на 28 пунктов
L2TP/IPsec между mikrotik и Android/IOS
У меня работает. Вы видимо не правильный алгоритм шифрования указали. Телефон и рутер не могут пройти к согласию. У меня шифрование aes-265, а хэш считается через sha1. Там в логе поглядите, рутер пишет, что ему предлагает телефон и что у него есть.
Привет.
Вот моя конфига. Работает нормально android, windows.
Есть wan интерфейс на нём белый IP.
Есть local интерфейс 192.168.1.1
VPN L2TP IPSEC
/interface l2tp-server server set default-profile=default enabled=yes
/ip pool add name=l2tp_pool ranges=192.168.1.150-192.168.1.200
/ppp profile add name=l2tp change-tcp-mss=yes local-address=192.168.1.1 only-one=default remote-address=l2tp_pool use-compression=default use-encryption=yes use-mpls=default use-vj-compression=default
/ppp secret add name=user1 password=P@ssw0rd service=l2tp profile=l2tp
/ip ipsec peer add address=0.0.0.0/0 port=500 auth-method=pre-shared-key secret=»SecretKey» exchange-mode=main-l2tp send-initial-contact=yes nat-traversal=yes proposal-check=obey hash-algorithm=sha1 enc-algorithm=3des dh-group=modp1024 generate-policy=port-override lifetime=»1d 00:00:00″ dpd-interval=120 dpd-maximum-failures=5
ip ipsec proposal set default auth-algorithms=sha1 enc-algorithms=3des,aes-256 lifetime=30m pfs-group=modp1024
/interface ethernet set local arp=proxy-arp
Источник
oriolrius.cat
Oriol Rius :: Technology : Crecimiento Personal : Mussol
Mikrotik as a PPTP server for Android
Reading time: 4 – 6 minutes
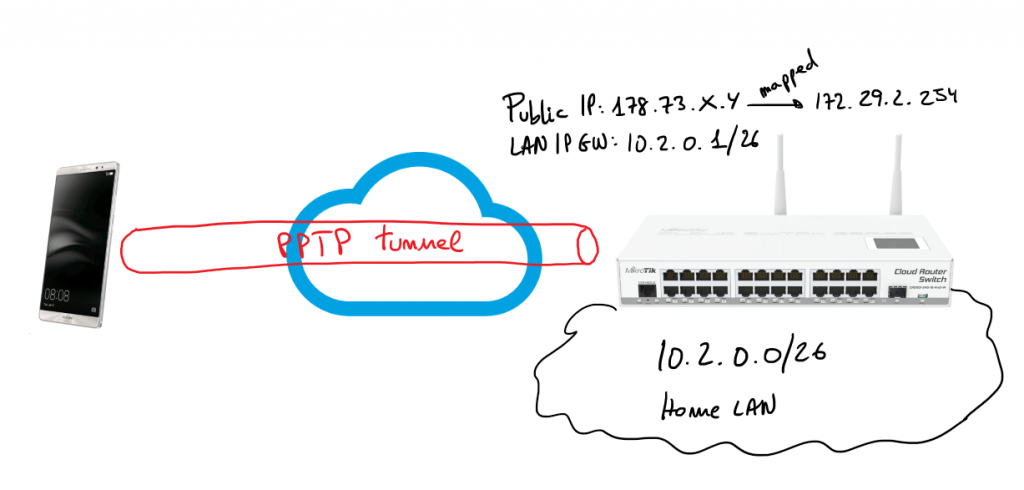
Two years ago I installed a Mikrotik Cloud Switch and lately I stoped my pfSense and I started using that switch as my network router, firewall and also as a switch. RouterOS is really powerful and allows to do a lot of things with that hardware. One of those things is set-up a VPN server based on PPTP. This is not the most secure way to create VPNs but usually the only requirement is a little bit of security on top of an IP over IP service that allows us to use local service when we’re in remote. In my case I have a lot of services in my LAN and I need some of them when I’m out of home specially I need to use them from my mobile phone.
Next steps describe how I set-up a PPTP server on my Mikrotik server allowing my Android 6 device (Huawei Mate 8) to connect to my home services through the VPN. Bellow you have a simple schema representing the schenario of the solution:
I’m only going to describe steps from the web console, of course, all those steps can be done using Winbox or the command line. To be honest I’m not used to RouterOS CLI but I think it’s not difficult to figure out the CLI commands to get the same result.
First step is set-up a pool of IP addresses to be assigned to the tunnel endpoints.
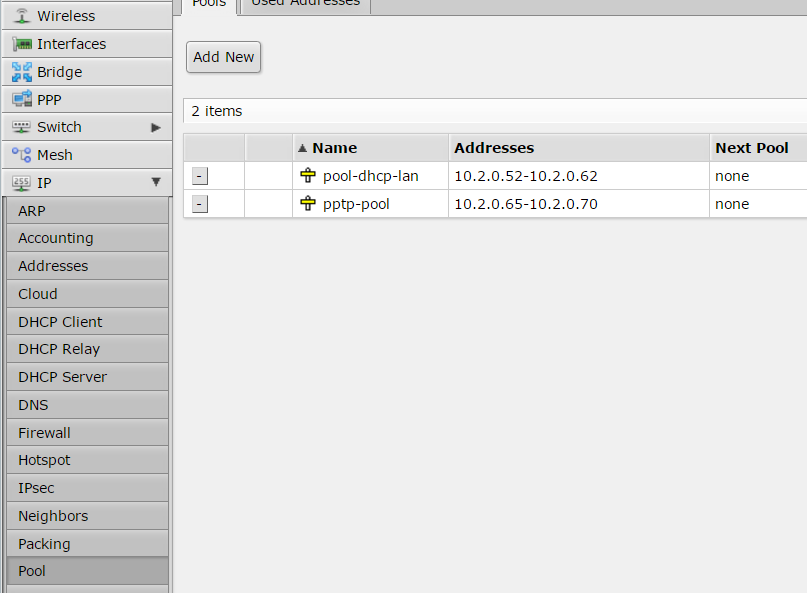
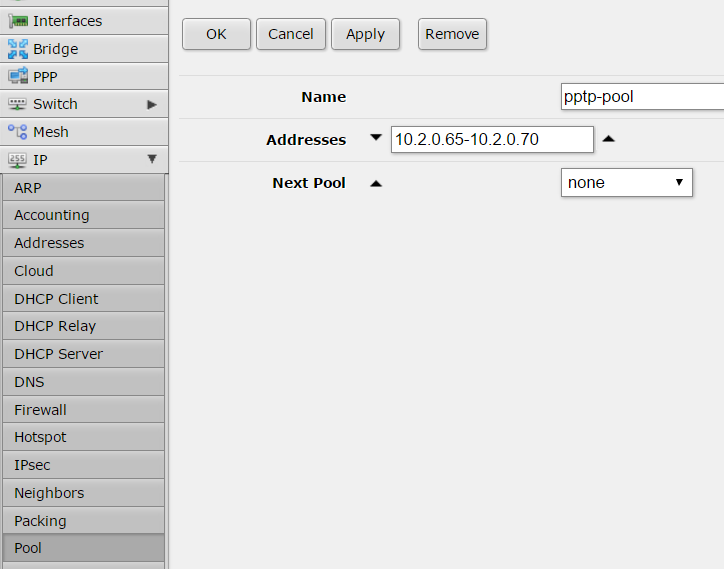
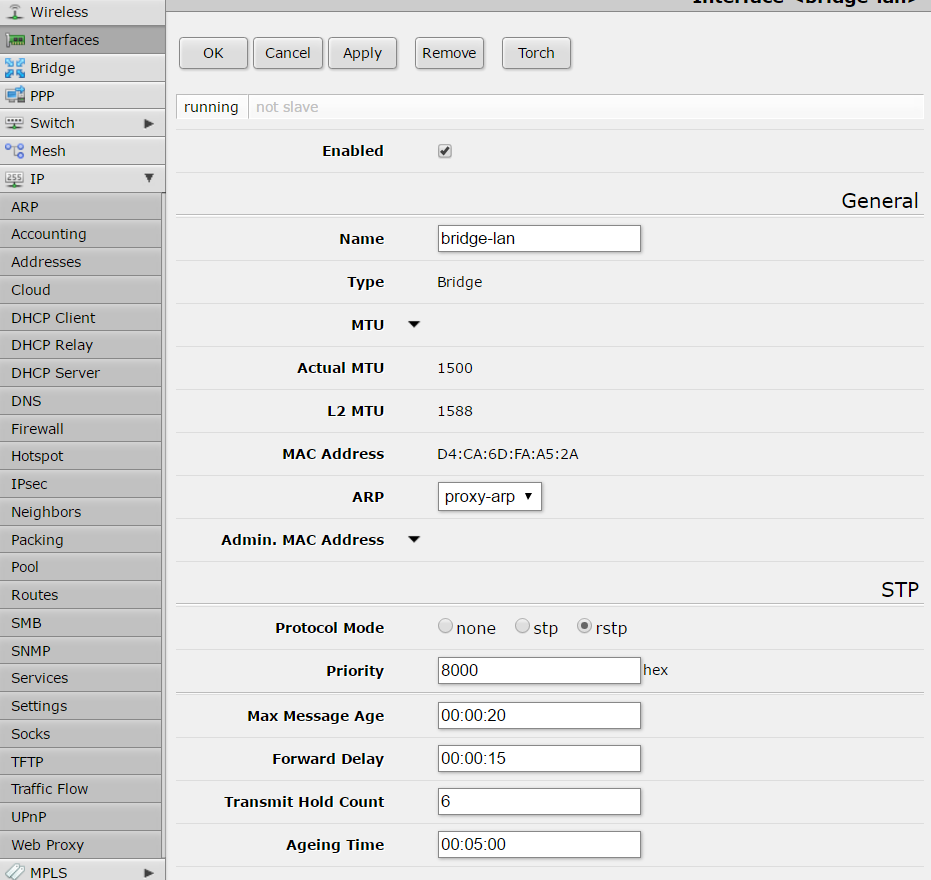
Thanks to an ARP proxy those IP addresses will be available like local IPs, this is transparent for the VPN configuration.
configuration of connection profile is done inside “Profiles” tab:
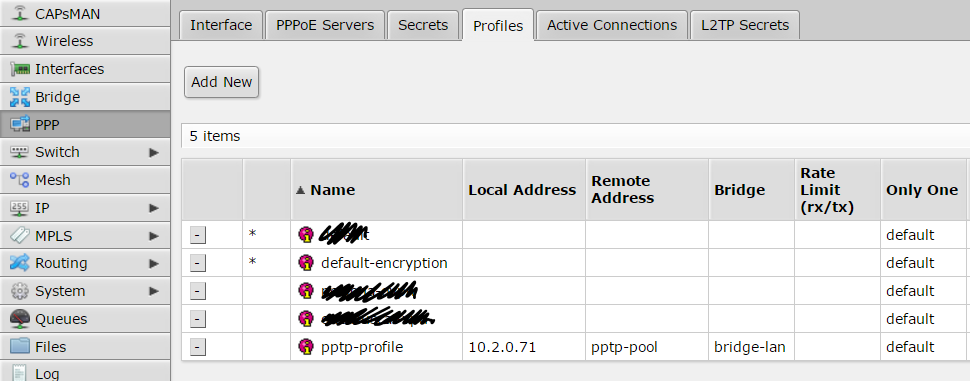
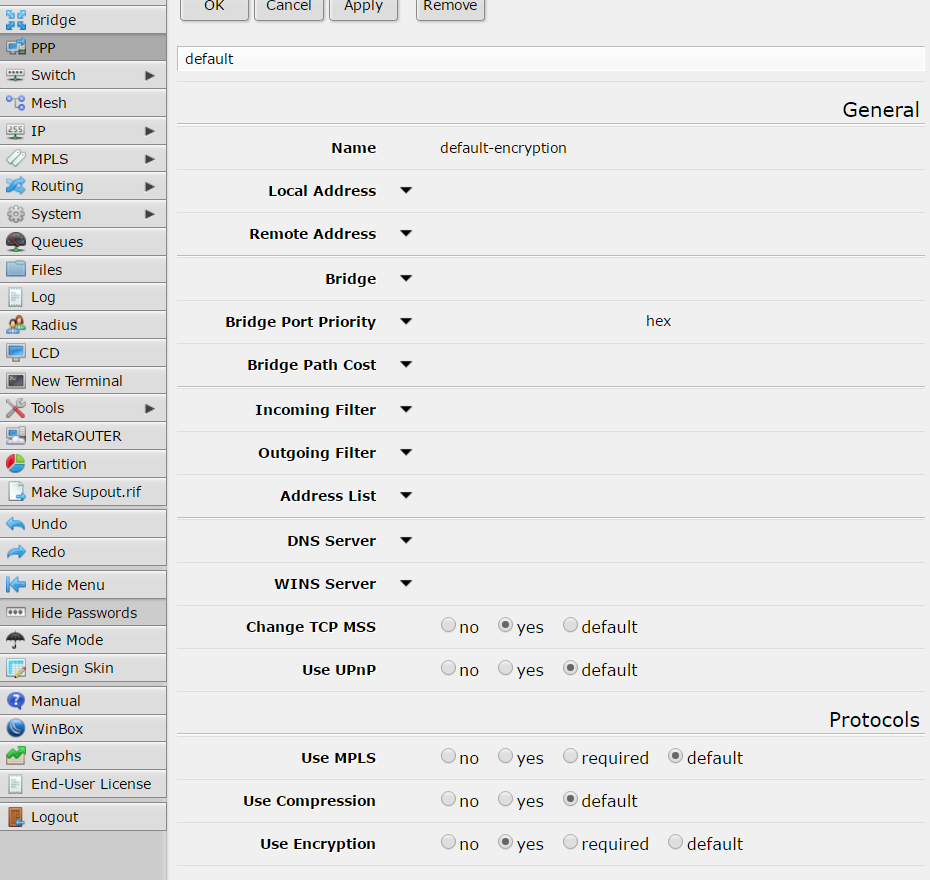
first of all create a new profile called “default-encription”:
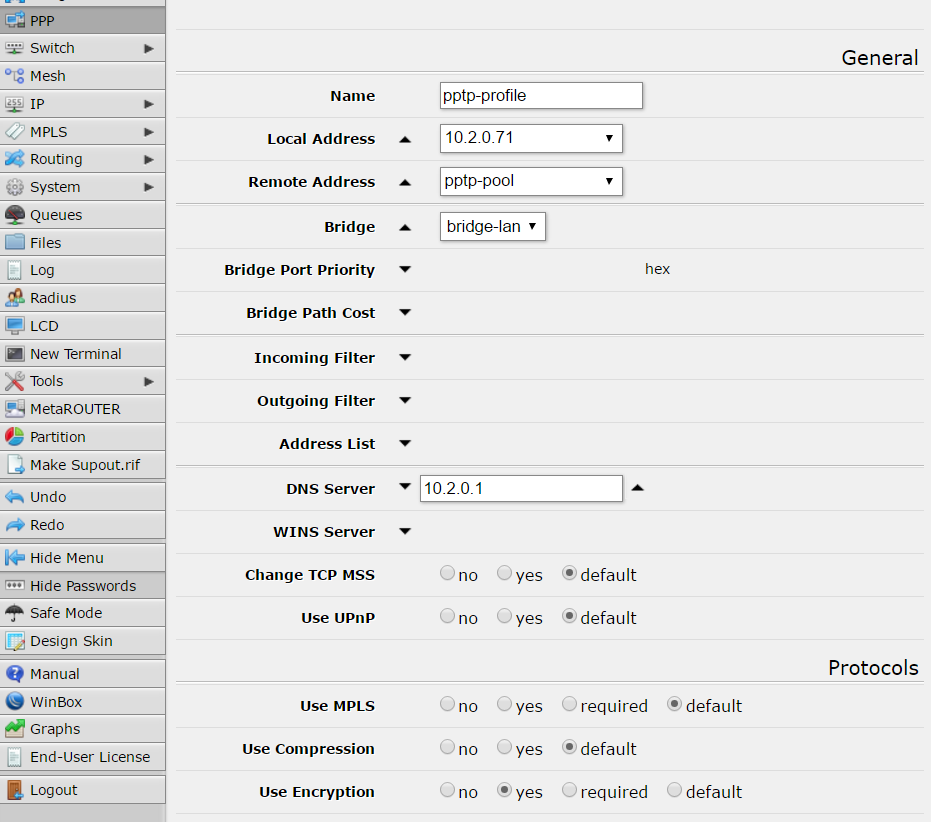
and another profile called “pptp-profile”:
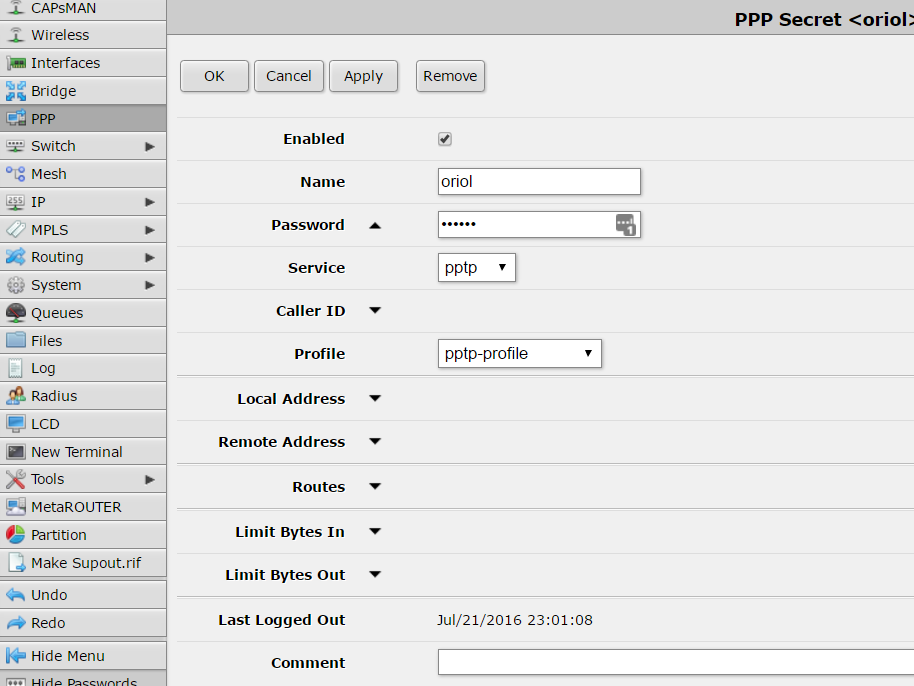
“Secrets” tab is where you have to manage users, in my case only two users are created:
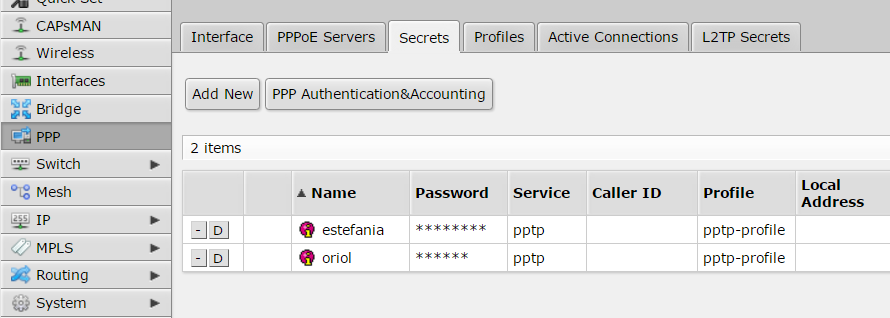
configuration details about my user are:
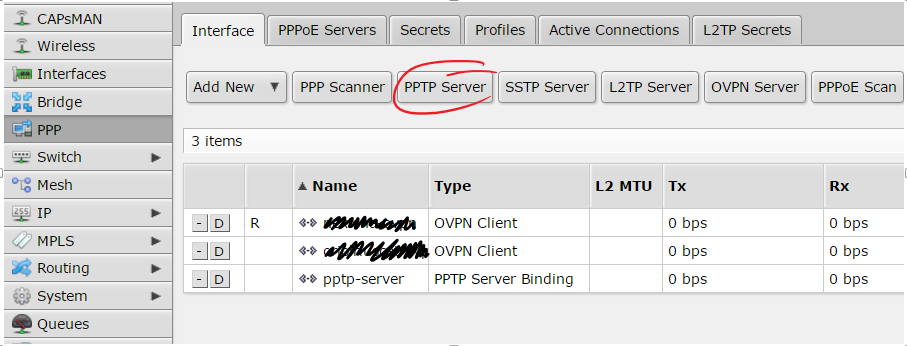
Inside PPP menu there is a button with a label “PPTP server” click there…
… and copy next settings:
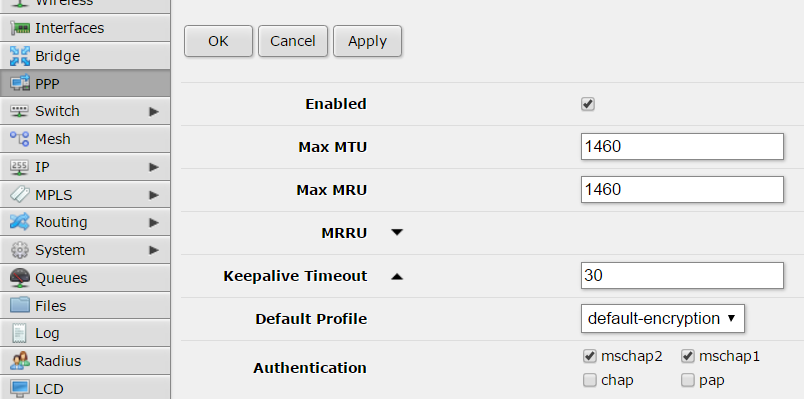
Don’t forget to check that your PPTP port is accessible from your public IP address . Remember it’s 1723/TCP.
Android configuration is simple, first of all go to “settings” icon. Look for a “More” section bellow network options, and you’ll find VPN managment. Add a new connection, define a name, the type and the IP address and leave the rest by default. After that when you come back to VPN list you’ll find your new VPN in the list, click there and just set-up your PPTP credentials.

If you have some trouble the only thing that you can do is go to Mikrotik logs or start sniffing to figure out where is the problem. I had to do some tests before it was working but in the end everything was so simple like I explained here.
Источник
Android и MikroTik
В ожидании новенького, миниатюрного MikroTik mAP 2n решил разобраться с возможностью связки Android и MikroTik. Как оказалось все не слишком и сложно.
У меня исходное:
- MikroTik RouterBoard 951g-2hnd RouterOS 6.17
- HighScreen Boost Android 4.1.2
Проще связать их используя WiFi-Tethering, но тут все просто на Android включаем режим точки доступа и подключаем MikroTik к ней. Интересней рассмотреть возможность связи посредством USB-Tethering.
Вообще для работы требуется RouterOS 6.7 и выше и наличие USB в MikroTik.
What’s new in 6.7 (2013-Nov-29 13:37):
*) support Android usb tethering interface;
.
Android смартфон версии 2.2 и выше.
- Подключаем Android смартфон USB кабелем к MikroTik оборудованию.
MikroTik должен определить устройство:
/system resource usb print
У меня выглядит так:
# DEVICE VENDOR NAME SPEED
0 1:1 Linux 3.3.5 ehci_hcd RB400 EHCI 480 Mbps
1 1:5 Android Android 480 Mbps
- Настройки — Беспроводные сети — Еще… — Мобильная сеть — Передача данных = enable
- Настройки — Беспроводные сети — Еще… — Режим модема — USB-модем = enable

- В появившимся интерфейсе lte1: Add Default Route = enable
- В IP — DHCP Client добавляем клиента для интерфейса lte1
- В IP — Firewall — NAT добавляем правила для NAT
Через консоль:
/interface lte set lte1 add-default-route=yes
/ip dhcp-client add interface=lte1 disabled=no
/ip firewall nat add chain=srcnat action=masquerade out-interface=lte1 disabled=no
В интерфейсе lte1 включаем Add Default Route:
Добавляем клиента в IP — DHCP Client для интерфейса lte1:
Правим NAT правила:
Источник
shaposhnikoff / gist:70bd00800546ed43cb2df1d7ceb20805
This file contains bidirectional Unicode text that may be interpreted or compiled differently than what appears below. To review, open the file in an editor that reveals hidden Unicode characters. Learn more about bidirectional Unicode characters
| Title: Настройка сервера VPN L2TP/IPSec на Mikrotik RoutersOS |
| Date: 2013-05-31 17:25 |
| Category: Mikrotik |
| Tags: mikrotik, vpn |
| Slug: mikrotik-lt2p-vpn |
| Summary: Краткое описание настройки сервера VPN L2TP/IPSec на Mikrotik RoutersOS c возможностью подключения с помощью встроенных VPN клиентов Windows 7, Mac OS X и IOS. |
|  |
| **Замечение:** Если несколько клиентов находятся за NAT, то только одно L2TP/IPSec соединение может быть установлено. |
| ## Базовая настройка |
| «` |
| /ip address |
| add address=91.219.55.10/24 interface=ether1 |
| add address=10.20.0.1/24 interface=ether2 |
| /ip route |
| add gateway=91.219.55.1 |
| /ip firewall nat |
| add chain=srcnat action=masquerade out-interface=ether1 |
| /ip dns |
| set allow-remote-requests=yes servers=91.219.55.1,8.8.8.8 |
| /ip pool |
| add name=lan_dhcp ranges=10.20.0.100-10.20.0.199 |
| /ip dhcp-server |
| add name=lan_dhcp address-pool=lan_dhcp interface=ether2 disabled=no |
| /ip dhcp-server network |
| add address=10.20.0.0/24 dns-server=10.20.0.1 gateway=10.20.0.1 |
| «` |
| ## Настройка L2TP |
| Создадим еще один пул IP адресов из той-же подсети, который будет использоваться для VPN клиентов: |
| «` |
| /ip pool add name=lan_vpn ranges=10.20.0.200-10.20.0.254 |
| «` |
| Создайте новый PPP профиль: |
| «` |
| /ppp profile add name=l2tp-vpn-lan local-address=10.20.0.1 \ |
| remote-address=lan-vpn dns-server=10.20.0.1 |
| «` |
| Включите L2TP сервер. Для наших целей достаточно только метода аутентификации *mschap2*. |
| «` |
| /interface l2tp-server server set enabled=yes authentication=mschap2 \ |
| default-profile=l2tp-vpn-lan |
| «` |
| Создайте пользователя: |
| «` |
| /ppp secret add name=userlogin password=userpassword service=l2tp \ |
| profile=l2tp-vpn-lan |
| «` |
| ## Настройка IPSec |
| Созадем ipsec peer: |
| «` |
| /ip ipsec peer add address=0.0.0.0/0 port=500 auth-method=pre-shared-key \ |
| secret=»shared_password_key» exchange-mode=main-l2tp send-initial-contact=yes \ |
| nat-traversal=yes proposal-check=obey hash-algorithm=sha1 \ |
| enc-algorithm=3des dh-group=modp1024 generate-policy=yes \ |
| lifetime=»1d 00:00:00″ dpd-interval=120 dpd-maximum-failures=5 |
| «` |
| Некоторые разъяснения: |
| * «address=0.0.0.0/0« — разрешаем подключение с любого IP адреса; |
| * «auth-method=pre-shared-key« — аутентификация компьютера с помощью общего ключа; |
| * «secret=»shared_password_key»« — пароль общего ключа; |
| Созадем ipsec proposal |
| «` |
| /ip ipsec proposal set default auth-algorithms=sha1 \ |
| enc-algorithms=3des,aes-256 lifetime=30m pfs-group= |
| «` |
| ## Включение Proxy-ARP |
| Поскольку компьютеры в локальной сети и удаленные клиенты используют IP адреса из одной и той же подсети, необходимо включить proxy-arp на интерфейсе подключенном к локальной сети. В нашем примере это «ether2«: |
| «` |
| /interface ethernet |
| set ether2 arp=proxy-arp |
| «` |
You can’t perform that action at this time.
You signed in with another tab or window. Reload to refresh your session. You signed out in another tab or window. Reload to refresh your session.
Источник


